
The previous chapters introduced WidgetKit and demonstrated how it can be used to display widgets that provide information to the user on the home screen, lock screen, and Today view. Widgets of this type present information based on a timeline you create and pass to WidgetKit. In this chapter, we will introduce ActivityKit and Live Activities and explore how these can be used to present dynamic information to the user via widgets on the lock screen and Dynamic Island.
Introducing Live Activities
Live Activities are created using the ActivityKit and WidgetKit frameworks and present dynamic information in glanceable form without restricting updates to a predefined timeline.
A single app can have multiple Live Activities, and the information presented can be sourced locally within the app or delivered from a remote server via push notifications. One important caveat is that updates to the Live Activity will not necessarily occur in real-time. Both the local and remote push notification options use background modes of execution, the timing and frequency of which are dictated by the operating system based on various factors, including battery status, the resource-intensive nature of the update task, and user behavior patterns. We will cover this in more detail in the next chapter.
In addition to displaying information, Live Activities may contain Button and Toggle views to add interactive behavior.
Creating a Live Activity
Once a Widget Extension has been added to an Xcode app project, the process of creating a Live Activity can be separated into the following steps, each of which will be covered in this chapter and put to practical use in the next chapter:
 |
You are reading a sample chapter from an old edition of iOS App Development Essentials. Purchase the fully updated iOS 18 App Development Essentials book. The full book contains 71 chapters, over 612 pages of in-depth information, downloadable source code, and access to over 50 SwiftUI knowledge test quizzes. |
- Declare static and dynamic Activity Attributes.
- Design the Live Activity presentations for the lock screen and Dynamic Island.
- Configure and start the Live Activity.
- Update the Live Activity with the latest information. • End the Live Activity when updates are no longer required.
Live Activity Attributes
The purpose of Live Activities is to present information to the user when the corresponding app has been placed in the background. The Live Activity attributes declare the data structure to be presented and are created using ActivityKit’s ActivityAttributes class. Two types of attributes can be included. The first type declares the data that will change over the lifecycle of the Live Activity, such as the latest scores of a live sporting event or an estimated flight arrival time. The second attribute type declares values that will remain static while the Live Activity executes, such as the name of the sports teams or the airline and flight number of a tracked flight.
Within the ActivityAttributes declaration, the dynamic attributes are embedded in a ContentState structure using the following syntax:
struct DemoWidgetAttributes: ActivityAttributes {
    public struct ContentState: Codable, Hashable {
        // dynamic attributes here
        var arrivalTime: Date
    }

    // static attributes here
    var airlineName: String = "Pending"
    var flightNumber: String = "Pending"
}Code language: Swift (swift)
Designing the Live Activity Presentations
Live Activities present data to the user via lock screen, Dynamic Island, and banner widgets, each of which must be designed to complete the Live Activity. These presentations are created using SwiftUI views. While the lock screen presentation (also used for the banner widget) consists of a single layout, the Dynamic Island presentations are separated into regions.
The layouts for the Live Activity widgets are defined in a configuration structure subclassed from the WidgetKit framework’s Widget class and must conform to the following syntax:
struct DemoWidgetLiveActivity: Widget {
    var body: some WidgetConfiguration {
        ActivityConfiguration(for: DemoWidgetAttributes.self) { context in

        } dynamicIsland: { context in

            DynamicIsland {

                DynamicIslandExpandedRegion(.leading) {

                }
                DynamicIslandExpandedRegion(.trailing) {

                }
                DynamicIslandExpandedRegion(.bottom) {

                }
                DynamicIslandExpandedRegion(.center) {

                }
            } compactLeading: {

            } compactTrailing: {

            } minimal: {

            }
        }
    }
}Code language: Swift (swift)
Each element is passed a context object from which static and current dynamic data values can be accessed for inclusion in the presentation views. For example, the arrival time and flight number from the previous activity attributes declaration could be displayed by the widget as follows:
|
You are reading a sample chapter from an old edition of iOS App Development Essentials. Purchase the fully updated iOS 18 App Development Essentials book. The full book contains 71 chapters, over 612 pages of in-depth information, downloadable source code, and access to over 50 SwiftUI knowledge test quizzes. |
Text("Arrival: \(context.state.arrivalTime)")
Text("Flight: \(context.attributes.flightNumber)")Code language: Swift (swift)
Lock Screen/Banner
Starting at the top of the Widget declaration, the layout for the lock screen and banner presentation consists of an area the size of a typical lock screen notification. The following example will display two Text views in a VStack layout:
struct DemoWidgetLiveActivity: Widget {
    var body: some WidgetConfiguration {
        ActivityConfiguration(for: DemoWidgetAttributes.self) { context in
            VStack {
                Text("Arrival: \(context.state.arrivalTime)")
                Text("Flight: \(context.attributes.flightNumber)")

            }
        } dynamicIsland: { context in
.
.Code language: Swift (swift)
Dynamic Island Expanded Regions
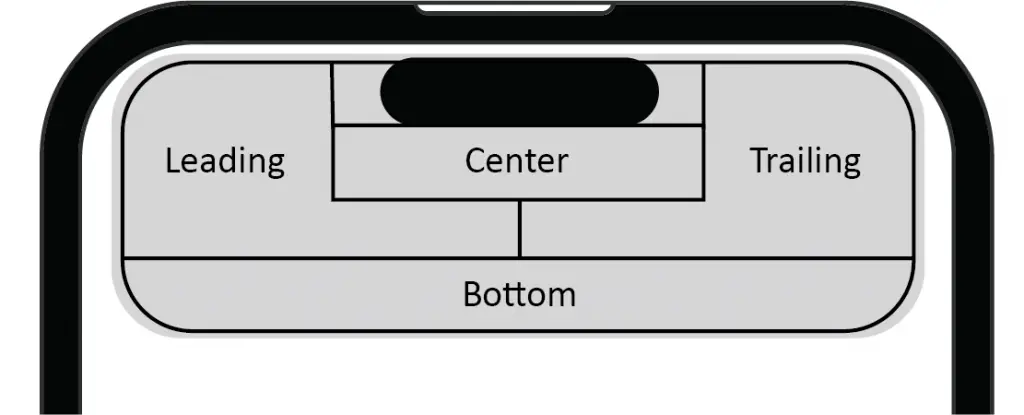
The Live Activity will display data using compact layouts on devices with a Dynamic Island. However, a long press performed on the island will display the expanded widget. Unlike the lock screen widget, the expanded Dynamic Island presentation is divided into four regions, as illustrated in Figure 1-1:
The following example highlights the code locations for each Dynamic Island region:
.
.
} dynamicIsland: { context in

    DynamicIsland {

        DynamicIslandExpandedRegion(.leading) {
            Text("Leading")
        }
        DynamicIslandExpandedRegion(.trailing) {
            Text("Trailing")
        }
        DynamicIslandExpandedRegion(.bottom) {
            Text("Bottom")
        }
        DynamicIslandExpandedRegion(.center) {
            Text("Center")
        }
    } compactLeading: {
.
.Code language: Swift (swift)
The default sizing behavior of each region can be changed using priorities. In the following code, for example, the leading and trailing region sizes are set to 25% and 75% of the available presentation width, respectively:
DynamicIslandExpandedRegion(.leading, priority: 0.25) {
    Text("Leading")
}
DynamicIslandExpandedRegion(.trailing, priority: 0.75) {
    Text("Trailing")
}Code language: Swift (swift)
Dynamic Island Compact Regions
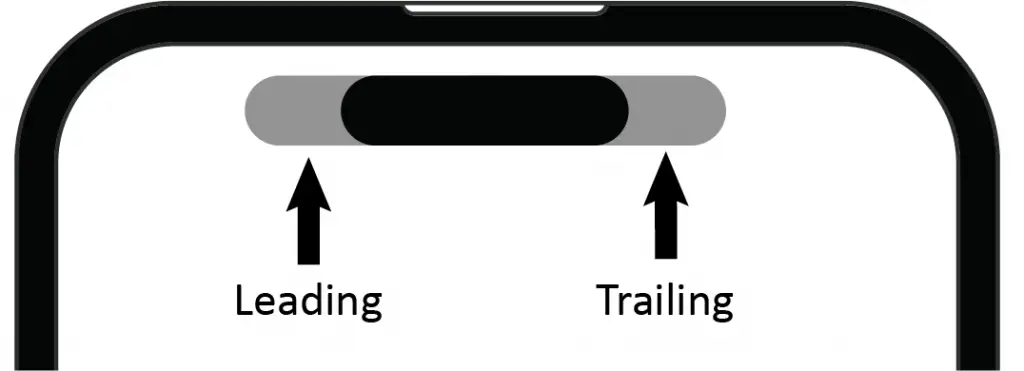
The compact presentation is divided into regions located on either side of the camera, as illustrated in Figure 1-2:
|
You are reading a sample chapter from an old edition of iOS App Development Essentials. Purchase the fully updated iOS 18 App Development Essentials book. The full book contains 71 chapters, over 612 pages of in-depth information, downloadable source code, and access to over 50 SwiftUI knowledge test quizzes. |
An example compact declaration might read as follows:
.
.
} compactLeading: {
    Text("L")
} compactTrailing: {
    Text("T")
} minimal: {
.
.Code language: Swift (swift)
Dynamic Island Minimal
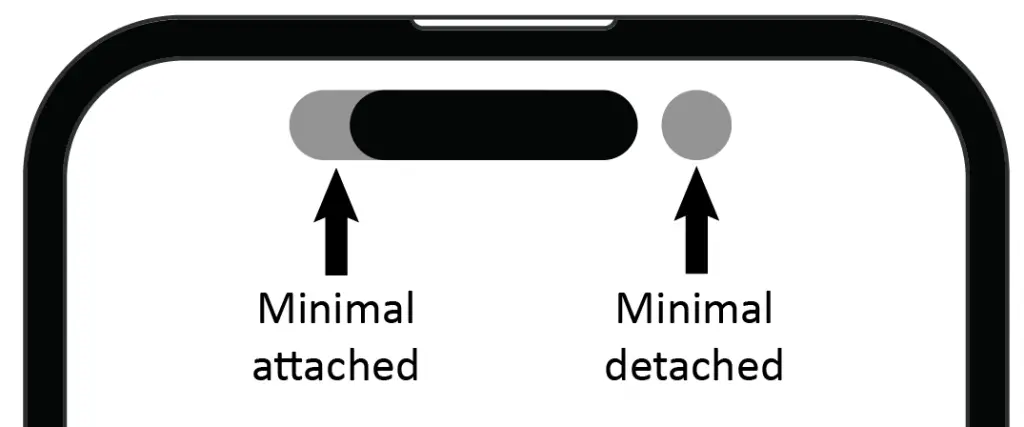
The Live Activity uses minimal presentations when multiple Live Activities are running concurrently. In this situation, the minimal presentation for one Live Activity will appear in the compact leading region (referred to as the attached minimal), while another appears as a detached minimal positioned to the right of the camera:
For example:
.
.
} minimal: {
    Text("M")
}
.
.Code language: Swift (swift)
Starting a Live Activity
Once the data model has been defined and the presentations designed, the next step is to request and start the Live Activity. This is achieved by a call to the Activity.request() method. When the request method is called, an activity attributes instance, an initialized ContentState, and a push type must be provided. The push type should be set to token if the data updates will be received via push notifications or nil if updates are coming from the app.
An optional stale date may also be included. When the stale date is reached, the state of the Live Activity context will update to reflect that the information is out of date, allowing you to notify the user within the widget presentation. To check if the Live Activity is out of date, access the context’s isStale property. The following code, for example, displays a message in the Dynamic Island expanded presentation when the data needs to be refreshed:
|
You are reading a sample chapter from an old edition of iOS App Development Essentials. Purchase the fully updated iOS 18 App Development Essentials book. The full book contains 71 chapters, over 612 pages of in-depth information, downloadable source code, and access to over 50 SwiftUI knowledge test quizzes. |
DynamicIslandExpandedRegion(.leading) {
    VStack {
        Text("Arrival: \(context.state.arrivalTime)")
        Text("Flight: \(context.attributes.flightNumber)")

        if (context.isStale) {
            Text("Out of date")
        }
    }
}Code language: Swift (swift)
Set the staleDate parameter to nil if you do not plan to check the Live Activity status for this property.
Based on the above requirements, the first step is to create an activity attributes object and initialize any static properties, for example:
var attributes = DemoWidgetAttributes()
attributes.flightNumber = "Loading..."Code language: Swift (swift)
The second requirement is a ContentState instance configured with initial dynamic values:
let contentState = DemoWidgetAttributes.ContentState(arrivalTime: Date.now + 60)Code language: Swift (swift)With the requirements met, the Activity.request() method can be called as follows:
private var activity: Activity<DemoWidgetAttributes>?
.
.
   do {
       activity = try Activity.request(
           attributes: attributes,
           content: .init(state: contentState, staleDate: nil),
           pushType: nil
       )
   } catch (let error) {
        print("Error requesting live activity: \(error.localizedDescription).")
   }
}Code language: Swift (swift)
If the request is successful, the Live Activity will launch and be ready to receive updates. In the above example, the push type has been set to nil to indicate the data is generated within the app. This would need to be changed to token to support updates using push notifications.
|
You are reading a sample chapter from an old edition of iOS App Development Essentials. Purchase the fully updated iOS 18 App Development Essentials book. The full book contains 71 chapters, over 612 pages of in-depth information, downloadable source code, and access to over 50 SwiftUI knowledge test quizzes. |
Updating a Live Activity
To refresh a Live Activity with updated data, a call is made to the update() method of the activity instance returned by the earlier call to the Activity.request() method. The update call must be passed an ActivityContent instance containing a ContentState initialized with the updated dynamic data values and an optional stale date value. For example:
let flightState = DemoWidgetAttributes.ContentState(arrivalTime: newTime)

Task {

    await activity?.update(
        ActivityContent<DemoWidgetAttributes.ContentState>(
            state: flightState,
            staleDate: Date.now + 120,
            relevanceScore: 0
        ),
        alertConfiguration: nil
    )
}Code language: Swift (swift)
If your app starts multiple concurrent Live Activities, the system will display the one with the highest relevanceScore. When working with push notifications, the content state is updated automatically, and the update call is unnecessary.
Activity Alert Configurations
Alert configurations are passed to the update() method to notify the user of significant events in the Live Activity data. When an alert is triggered, a banner (based on the lock screen presentation layout) appears on the device screen, accompanied by an optional alert sound. The following code example creates an alert configuration when a tracked flight has been significantly delayed:
var alertConfig: AlertConfiguration? = nil

if (arrvialTime > Date.now + 84000) {
    alertConfig = AlertConfiguration(
        title: "Flight Delay",
        body: "Flight now arriving tomorrow",
        sound: .default
    )
}Code language: Swift (swift)
Note that the title and body text will only appear on Apple Watch devices.
Once an alert configuration has been created, it can be passed to the update() method:
|
You are reading a sample chapter from an old edition of iOS App Development Essentials. Purchase the fully updated iOS 18 App Development Essentials book. The full book contains 71 chapters, over 612 pages of in-depth information, downloadable source code, and access to over 50 SwiftUI knowledge test quizzes. |
await activity?.update(
    ActivityContent<DemoWidgetAttributes.ContentState>(
        state: flightState,
        staleDate: Date.now + 120,
        relevanceScore: 0
    ),
    alertConfiguration: alertConfig
)Code language: Swift (swift)
Stopping a Live Activity
Live Activities are stopped by calling the end() method of the activity instance. The call is passed a ContentState instance initialized with the final data values and a dismissal policy setting. For example:
let finalState = DemoWidgetAttributes.ContentState(arrivalTime: Date.now)

await activity?.end(
     .init(state: finalState, staleDate: nil),
     dismissalPolicy: .default
)Code language: Swift (swift)
When the dismissalPolicy is set to default, the Live Activity widget will remain on the lock screen for four hours unless the user removes it. Use immediate to instantly remove the Live Activity from the lock screen or after() to dismiss the Live Activity at a specific time within the four-hour window.
Summary
Live Activities provide users with timely updates via widgets on the device lock screen and Dynamic Island. Updated information can be generated locally within the app or sent from a remote server using push notifications. A Live Activity consists of a set of attributes that define the data to be presented and SwiftUI-based layouts for each of the widget presentations. Live Activity instances are started, stopped, and updated using calls to the corresponding Activity object. When working with push notifications, the activity will update automatically on receipt of a notification. Updates may also include an optional alert to attract the user’s attention.