
Widgets allow small amounts of app content to be displayed alongside the app icons that appear on the device home screen pages, the Today view, and the macOS Notification Center. Widgets are built using SwiftUI in conjunction with the WidgetKit Framework.
The focus of this chapter is to provide a high-level outline of the various components that make up a widget before exploring widget creation in practical terms in the chapters that follow.
An Overview of Widgets
Widgets are intended to provide users with “at a glance” views of important, time-sensitive information relating to your app. When the user taps a widget, the corresponding app is launched, taking the user to a specific screen where more detailed information may be presented. Widgets are intended to display information that updates based on a timeline, ensuring that only the latest information is displayed to the user. A single app can have multiple widgets displaying different information.
Widgets are available in three size families (small, medium, and large), of which the widget must support at least one size. They can be implemented such that the information displayed is customizable by the user.
Widgets are selected from the widget gallery and positioned by the user on the device’s home screen. To conserve screen space, iOS allows widgets to be stacked, allowing users to flip through each widget in the stack with a swiping gesture. A widget can increase the probability of moving automatically to the top of the stack by assigning a relevancy score to specific timeline entries. For example, the widget for a weather app might assign high relevancy to a severe weather warning in the hope that WidgetKit will move it to the top of the stack, thereby increasing the likelihood that the user will see the information.
 |
You are reading a sample chapter from an old edition of iOS App Development Essentials. Purchase the fully updated iOS 18 App Development Essentials book. The full book contains 71 chapters, over 612 pages of in-depth information, downloadable source code, and access to over 50 SwiftUI knowledge test quizzes. |
The Widget Extension
A widget is created by adding a widget extension to an existing app. A widget extension consists of a Swift file, an app configuration intent class (required if the widget is to be user configurable), an asset catalog, and an Info. plist file.
The widget itself is declared as a structure conforming to the Widget protocol, and it is within this declaration that the basic configuration of the widget is declared. The body of a typical widget declaration will include the following items:
- Widget kind – Identifies the widget within the project. This can be any String value that uniquely identifies the widget within the project.
- Widget Configuration – A declaration that conforms to the appropriate intent protocol. This includes a reference to the timeline provider containing the information to be displayed, the widget display name and description, and the size families supported by the widget. WidgetKit supports two types of widget configuration: static configuration and app intent configuration.
- Entry View – A reference to the SwiftUI View containing the layout that is to be presented to the user when the widget is displayed. This layout is populated with content from individual timeline entries at specific points in the widget timeline.
In addition to the widget declaration, the extension must also include a placeholder View defining the layout to be displayed to the user while the widget is loading and gathering data. This may be declared manually or configured to be automatically generated by WidgetKit based on the entry view included in the Widget view declaration outlined above.
Widget Configuration Types
When creating a widget, the choice must be made regarding whether it should be created using the static or intent configuration model. These two options can be summarized as follows:
- App Intent Configuration – Used when the widget needs to provide a configuration option to the user, for example, allowing the user to select the news publications from which headlines are to be displayed within the widget.
- Static Configuration – Used when the widget has no user-configurable properties.
When the configuration app intent option is used, the configuration options presented to the user are declared within a WidgetConfigurationIntent instance.
|
You are reading a sample chapter from an old edition of iOS App Development Essentials. Purchase the fully updated iOS 18 App Development Essentials book. The full book contains 71 chapters, over 612 pages of in-depth information, downloadable source code, and access to over 50 SwiftUI knowledge test quizzes. |
The following is an example widget entry containing a static configuration designed to support both small and medium size families:
struct DemoWidget: Widget {
    let kind: String = "DemoWidget2"

    var body: some WidgetConfiguration {
        StaticConfiguration(kind: kind, provider: Provider()) { entry in
            DemoWidgetEntryView(entry: entry)
                    .containerBackground(.fill.tertiary, for: .widget)
        }
        .configurationDisplayName("My Widget")
        .description("This is an example widget.")
        .supportedFamilies([.systemSmall, .systemMedium])
    }
}Code language: Swift (swift)
The following listing, on the other hand, declares a widget using an app intent configuration:
struct DemoWidget: Widget {
    let kind: String = "DemoWidget"

    var body: some WidgetConfiguration {
        AppIntentConfiguration(kind: kind, intent: ConfigurationAppIntent.self,
                             provider: Provider()) { entry in
            DemoWidgetEntryView(entry: entry)
                .containerBackground(.fill.tertiary, for: .widget)
        }
        .configurationDisplayName("A Simple Widget")
        .description("This is an example widget.")
        .supportedFamilies([.systemSmall, .systemMedium])
    }
}Code language: Swift (swift)
Widget Entry View
The widget entry view is simply a SwiftUI View declaration containing the layout to be displayed by the widget. Conditional logic (for example, if or switch statements based on the widgetFamily environment property) can present different layouts subject to the prevailing size family.
Except for tapping to open the corresponding app, widgets are non-interactive. As such, the entry view will typically consist of display-only views (in other words, no buttons, sliders, or toggles).
When WidgetKit creates an instance of the entry view, it passes it a widget timeline entry containing the data to be displayed on the views that make up the layout. The following view declaration is designed to display city name and temperature values:
|
You are reading a sample chapter from an old edition of iOS App Development Essentials. Purchase the fully updated iOS 18 App Development Essentials book. The full book contains 71 chapters, over 612 pages of in-depth information, downloadable source code, and access to over 50 SwiftUI knowledge test quizzes. |
struct DemoWidgetEntryView : View {
    var entry: Provider.Entry

    var body: some View {
        ZStack {
            Color("demoBackgroundColor")
            DemoSubView(entry: entry)
        }
    }
}Code language: Swift (swift)
Widget Timeline Entries
The purpose of a widget is to display different information at specific points in time. For example, the widget for a calendar app might change throughout the day to display the user’s next appointment. The content displayed at each point in the timeline is contained within widget entry objects conforming to the TimelineEntry protocol. Each entry must, at a minimum, include a Date object defining the point in the timeline at which the data in the entry is to be displayed, together with any data needed to populate the widget entry view at the specified time. The following is an example of a timeline entry declaration designed for use with the above entry view:
struct WeatherEntry: TimelineEntry {
    var date: Date
    let city: String
    let temperature: Int
}Code language: Swift (swift)
If necessary, the Date object can be a placeholder to be updated with the actual time and date when the entry is added to a timeline.
Widget Timeline
The widget timeline is simply an array of widget entries that defines the points in time that the widget is to be updated, together with the content to be displayed at each time point. Timelines are constructed and returned to WidgetKit by a widget provider.
Widget Provider
The widget provider is responsible for providing the content displayed on the widget. The provider must conform to either the TimelineProvider or AppIntentTimelineProvider protocols, depending on whether the widget supports static or app intent configuration. At a minimum, it must implement the following methods:
- snapshot() – The snapshot() method (getSnapshot() for static configuration) of the provider will be called by WidgetKit when a single, populated widget timeline entry is required. This snapshot is used within the widget gallery to show how the widget would appear if the user added it to the device. Since real data may not be available at the point that the user is browsing the widget gallery, the entry returned should typically be populated with sample data.
- timeline() – This method is responsible for assembling and returning a Timeline instance containing the array of widget timeline entries that define how and when the widget content is to be updated, together with an optional reload policy value. For static configuration, the method is called getTimeline().
- placeholder() – The placeholder() method returns a widget view to be displayed while the app initializes. For static configuration, the method is called getPlaceholder()
The following code excerpt declares an example app intent configuration timeline provider:
|
You are reading a sample chapter from an old edition of iOS App Development Essentials. Purchase the fully updated iOS 18 App Development Essentials book. The full book contains 71 chapters, over 612 pages of in-depth information, downloadable source code, and access to over 50 SwiftUI knowledge test quizzes. |
struct Provider: AppIntentTimelineProvider {

   func placeholder(in context: Context) -> SimpleEntry {
        SimpleEntry(date: Date(), configuration: ConfigurationAppIntent())
    }

    func snapshot(for configuration: ConfigurationAppIntent,
                  in context: Context) async -> SimpleEntry {
        SimpleEntry(date: Date(), configuration: configuration)
    }

    func timeline(for configuration: ConfigurationAppIntent,
                     in context: Context) async -> Timeline<SimpleEntry> {
        var entries: [SimpleEntry] = []

        // Construct timeline array here

        return Timeline(entries: entries, policy: .atEnd)
    }
}Code language: Swift (swift)
Reload Policy
When a widget is displaying entries from a timeline, WidgetKit needs to know what action to take when it reaches the end of the timeline. The following predefined reload policy options are available for use when the provider returns a timeline:
- atEnd – At the end of the current timeline, WidgetKit will request a new timeline from the provider. This is the default behavior if no reload policy is specified.
- after(Date) – WidgetKit will request a new timeline after the specified date and time.
- never – The timeline is not reloaded at the end of the timeline.
Relevance
As previously mentioned, iOS allows widgets to be placed in a stack in which only the uppermost widget is visible. While the user can scroll through the stacked widgets to decide which is to occupy the topmost position, this presents the risk that the user may not see an essential update in time to act on the information.
To address this issue, WidgetKit is allowed to move a widget to the top of the stack if the information it contains is relevant to the user. This decision is based on various factors, such as the user’s previous behavior (for example, checking a bus schedule widget at the same time every day), together with a relevance score assigned by the widget to a particular timeline entry.
Relevance is declared using a TimelineEntryRelevance structure. This contains a relevancy score and a time duration for which the entry is relevant. The score can be any floating point value and is measured relative to all other timeline entries generated by the widget. For example, if most relevancy scores in the timeline entries range between 0.0 and 10.0, a relevancy score of 20.0 assigned to an entry may cause the widget to move to the top of the stack. The following code declares two relevancy entries:
let lowScore = TimelineEntryRelevance(score: 0.0, duration: 0)
let highScore = TimelineEntryRelevance(score: 10.0, duration: 0)Code language: Swift (swift)
If relevancy is to be included in an entry, it must appear after the date entry, for example:
|
You are reading a sample chapter from an old edition of iOS App Development Essentials. Purchase the fully updated iOS 18 App Development Essentials book. The full book contains 71 chapters, over 612 pages of in-depth information, downloadable source code, and access to over 50 SwiftUI knowledge test quizzes. |
struct WeatherEntry: TimelineEntry {
    var date: Date
    var relevance: TimelineEntryRelevance?
    let city: String
    let temperature: Int
}
.
.
let entry1 = WeatherEntry(date: Date(), relevance: lowScore, city: "London", temperature: 87)

let entry2 = WeatherEntry(date: Date(), relevance: highScore, city: "London", temperature: 87)Code language: Swift (swift)
Forcing a Timeline Reload
WidgetKit requests a timeline containing the time points and content to display to the user when a widget is launched. Under normal conditions, WidgetKit will not request another timeline update until the end of the timeline is reached, and then only if required by the reload policy.
Situations commonly arise, however, where the information in a timeline needs to be updated. A user might, for example, add a new appointment to a calendar app that requires a timeline update. Fortunately, the widget can be forced to request an updated timeline by making a call to the reloadTimelines() method of the WidgetKit WidgetCenter instance, passing through the widget’s kind string value (defined in the widget configuration as outlined earlier in the chapter). For example:
WidgetCenter.shared.reloadTimelines(ofKind: "My Kind")Code language: Swift (swift)Alternatively, it is also possible to trigger a timeline reload for all the active widgets associated with an app as follows:
WidgetCenter.shared.reloadAllTimelines()Code language: Swift (swift)Widget Sizes
As previously discussed, widgets can be displayed in small, medium, and large sizes. The widget declares which sizes it supports by applying the supportedFamilies() modifier to the widget configuration as follows:
struct SimpleWidget: Widget {
private let kind: String = "SimpleWidget"
var body: some WidgetConfiguration {
AppIntentConfiguration(kind: kind, intent: ConfigurationAppIntent.self,
provider: Provider()) { entry in
SimpleWidgetEntryView(entry: entry)
}
.configurationDisplayName("Weather Fun")
.description("Learning about weather in real-time.")
.supportedFamilies([.systemSmall, .systemMedium])
}
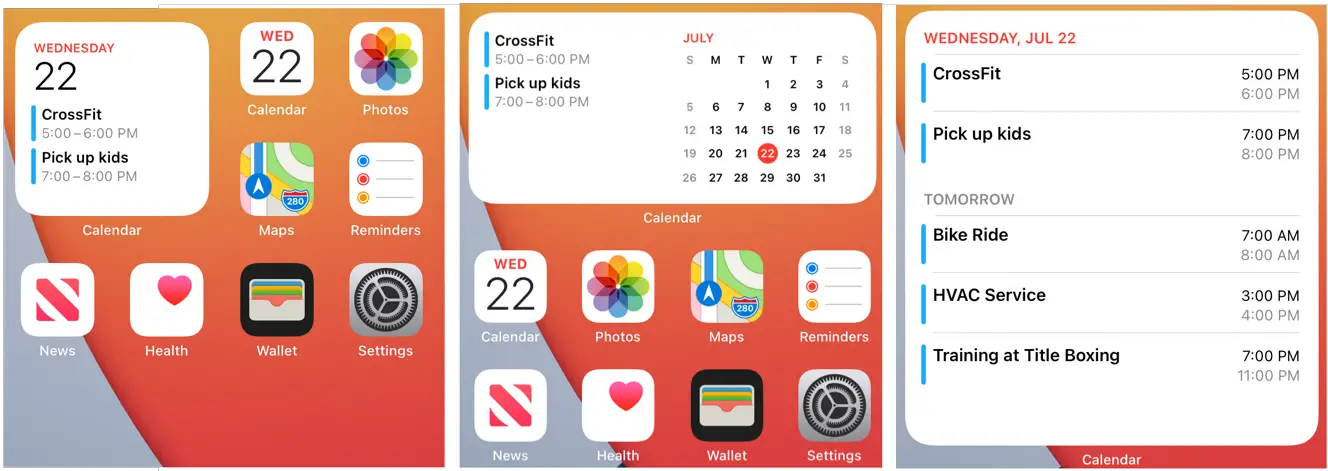
}Code language: Swift (swift)The following figure shows the built-in iOS Calendar widget in small, medium, and large formats:
|
You are reading a sample chapter from an old edition of iOS App Development Essentials. Purchase the fully updated iOS 18 App Development Essentials book. The full book contains 71 chapters, over 612 pages of in-depth information, downloadable source code, and access to over 50 SwiftUI knowledge test quizzes. |
Widget Placeholder
As previously mentioned, the widget extension must provide a placeholder. This view is displayed to the user while the widget is initializing and takes the form of the widget entry view without any data or information. Consider the following example widget:
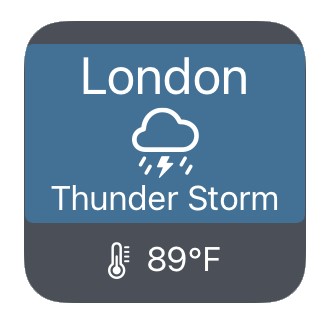
The above example, of course, shows the widget running after it has received the timeline data to be displayed.
During initialization, however, the placeholder view resembling Figure 54-3 would be expected to be displayed:
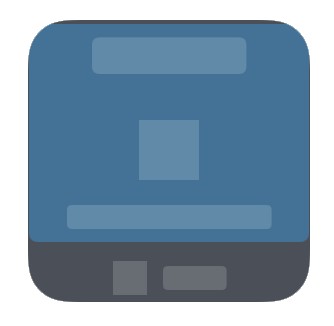
Fortunately, SwiftUI includes the redacted(reason:) modifier, which may be applied to an instance of the widget entry view to act as a placeholder. The following is an example of a placeholder view declaration for a widget extension using the redacted() modifier (note that the reason is set to placeholder):
struct PlaceholderView : View {
    var body: some View {
        SimpleWidgetEntryView()
            .redacted(reason: .placeholder)
    }
}Code language: Swift (swift)
Summary
Widgets allow apps to present important information to the user directly on the device’s home screen without launching the app. Widgets are implemented using the WidgetKit Framework and take the form of extensions added to the main app. Widgets are driven by timelines, which control the information displayed to the user and when it appears. Widgets can support small, medium, and large formats and may be designed to be configurable by the user. Users can place widgets into a stack when adding them to the home screen. By adjusting the relevance of a timeline entry, a widget can increase the chances of being moved to the top of the stack.
|
You are reading a sample chapter from an old edition of iOS App Development Essentials. Purchase the fully updated iOS 18 App Development Essentials book. The full book contains 71 chapters, over 612 pages of in-depth information, downloadable source code, and access to over 50 SwiftUI knowledge test quizzes. |