
This chapter will demonstrate how to use SwiftData by creating an example app project. The project will demonstrate how to declare models, create a model container, access the model context, add and delete data entries, establish relationships, and perform database searches.
About the SwiftData Project
The project will consist of a rudimentary visitor logging app containing a list of customers and the dates and times of their visits. Once the basics of the app are working, we will extend the project to allow the visitor list to be searched.
Creating the SwiftDataDemo Project
Launch Xcode and create a new Multiplatform App project named SwiftDataDemo.
Adding the Data Models
The first requirement for our app is the model that will store visitors’ first and last names. Select the File -> New -> File… menu option and use the Swift file template to create a file named Visitor.swift. Open the file and add the model declaration:
import Foundation
import SwiftData

@Model
class Visitor {
    var firstname: String
    var lastname: String

    init(firstname: String, lastname: String) {
        self.firstname = firstname
        self.lastname = lastname
    }
}Code language: Swift (swift)
Note the use of the @Model macro to declare the class as a SwiftData model. Repeat the above steps to add a second Swift file named LogEntry.swift that reads as follows:
 |
You are reading a sample chapter from an old edition of iOS App Development Essentials. Purchase the fully updated iOS 18 App Development Essentials book. The full book contains 71 chapters, over 612 pages of in-depth information, downloadable source code, and access to over 50 SwiftUI knowledge test quizzes. |
import Foundation
import SwiftData

@Model
class LogEntry {

    var date: Date

    init(date: Date) {
        self.date = date
    }
}Code language: Swift (swift)
Setting up the Model Container
With the models declared, the next step is to add the model container to the app’s main scene. To do so, edit the SwiftDataDemoApp.swift file, import the SwiftData framework, and apply the modelContainer(for:) modifier to the WindowGroup, passing it a reference to the Visitor model:
import SwiftUI
import SwiftData

@main
struct SwiftDataDemoApp: App {
    var body: some Scene {
        WindowGroup {
            ContentView()
        }
        .modelContainer(for: Visitor.self)
    }
}Code language: Swift (swift)
Accessing the Model Context
The model container will create an environment object containing the model context. We will need access to this context to insert, fetch, and delete data entries, starting with the ContentView.swift file:
import SwiftUI
import SwiftData

struct ContentView: View {

    @Environment(\.modelContext) var modelContext
.
.Code language: Swift (swift)
Designing the Visitor List View
The app’s home screen will display a list of visitor names. To simplify the code, we will declare this list in a separate view and call it from the content view. Add a new SwiftUI View file to the project named VisitorListView.swift and make the following changes:
import SwiftUI
import SwiftData

struct VisitorListView: View {

    @Environment(\.modelContext) var modelContext
    @Query var visitors: [Visitor]

    var body: some View {
        List {
            ForEach (visitors) { visitor in
                NavigationLink(value: visitor) {
                    if (visitor.lastname.isEmpty) {
                        Text("Edit new visitor")
                                .foregroundColor(Color.gray)
                    } else {
                        Text("\(visitor.lastname), \(visitor.firstname)")
                    }
                }
            }
            .onDelete(perform: deleteVisitors)
        }
    }

    func deleteVisitors(_ indexSet: IndexSet) {
        for index in indexSet {
            let visitor = visitors[index]
            modelContext.delete(visitor)
        }
    }
}

/*
#Preview {
    VisitorListView()
}
*/Code language: Swift (swift)
The above changes begin by obtaining access to the model context. The SwiftData @Query macro is then used to extract all the stored Visitor entries and place them in an array named visitors. A ForEach loop iterates through the visitors array, displaying each visitor as a list item. Finally, the .onDelete() modifier is applied to the ForEach loop and configured to call the deleteVisitors() function, which calls the model context’s delete() method to remove the selected visitor.
Establishing the Relationship
The next view to be added is the visitor detail view, which will be displayed when a new visitor is added and to add log entries for existing visitors. Since each visitor will have their own log entries, we need to establish a relationship between the Visitor and LogEntry models. This will allow us to list and add log entries belonging to individual visitors. To establish the relationship, add the following @Relationship declaration to the Visitor. swift model:
|
You are reading a sample chapter from an old edition of iOS App Development Essentials. Purchase the fully updated iOS 18 App Development Essentials book. The full book contains 71 chapters, over 612 pages of in-depth information, downloadable source code, and access to over 50 SwiftUI knowledge test quizzes. |
import Foundation
import SwiftData

@Model
class Visitor {
    var firstname: String
    var lastname: String

    @Relationship(deleteRule: .cascade) var visits = [LogEntry]()

    init(firstname: String, lastname: String) {
        self.firstname = firstname
        self.lastname = lastname
    }
}Code language: Swift (swift)
Note that we have set the deleteRule parameter to cascade. This ensures that all related log entries are removed when a visitor is deleted.
Creating the Visitor Detail View
The visitor detail view will be used when adding new visitors and entries to a visitor’s log. This will require an additional SwiftUI View file named VisitorDetailView.swift. Create this file and edit it as follows:
import SwiftUI

struct VisitorDetailView: View {

    @Bindable var visitor: Visitor

    var body: some View {
        Form {

            Section("Visitor") {
                TextField("First name", text: $visitor.firstname)
                TextField("Last name", text: $visitor.lastname)
            }

            Section("Visit History") {

                Button("Add Visit", action: addVisit)

                ForEach(visitor.visits) { visit in
                    Text(visit.date.formatted(date: .abbreviated,
                                        time: .shortened))
                }

            }
        }
        .navigationTitle("Visitor Detail")
        .navigationBarTitleDisplayMode(.inline)
    }

    func addVisit() {
        visitor.visits.append(LogEntry(date: Date.now))
    }
}

/*
#Preview {
    AddVisitorView()
}
*/Code language: Swift (swift)
When called, the visitor detail view will be passed a Visitor object. This is declared as @Bindable because the TextFields need to bind to the firstname and lastname properties of the Visitor object. A ForEach loop then iterates through the log entries for the current visitor using the visits relationship declared in the Visitor model:
ForEach(visitor.visits) { visit in
    Text(visit.date.formatted(date: .abbreviated, time: .shortened))
}Code language: Swift (swift)
Similarly, the relationship is used to append new entries to the visitor’s log when the Add Visit button is clicked:
func addVisit() {
    visitor.visits.append(LogEntry(date: Date.now))
}Code language: Swift (swift)
Modifying the Content View
The final task before testing the app is to design the main screen. Load the ContentView.swift file and make the following modifications:
|
You are reading a sample chapter from an old edition of iOS App Development Essentials. Purchase the fully updated iOS 18 App Development Essentials book. The full book contains 71 chapters, over 612 pages of in-depth information, downloadable source code, and access to over 50 SwiftUI knowledge test quizzes. |
import SwiftUI

struct ContentView: View {

    @Environment(\.modelContext) var modelContext

    var body: some View {
        NavigationStack {
            VisitorListView()
                .navigationTitle("Visitors")
                .navigationDestination(for: Visitor.self,
                               destination: VisitorDetailView.init)
                .toolbar {
                    Button("New Visitor", systemImage: "plus",
                                               action: addVisitor)
                }
        }
    }

    func addVisitor() {
        let visitor = Visitor(firstname: "", lastname: "")
        modelContext.insert(visitor)
    }
}
.
.Code language: Swift (swift)
The layout consists of the VisitorListView embedded in a NavigationStack. The Navigation destination for the visitor list items is set to the VisitorDetailView, which is passed the selected Visitor object. A button is also placed in the toolbar, which uses the model context to insert a new visitor into the database.
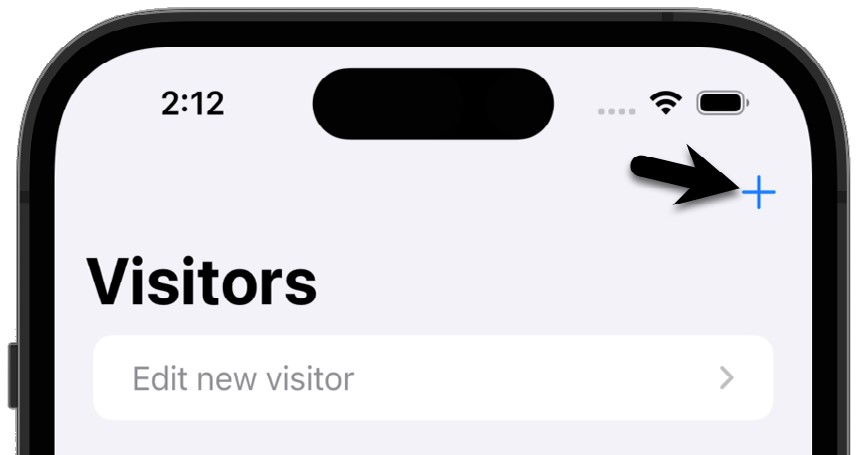
Testing the SwiftData Demo App
Run the app on a device or simulator and tap the + button in the toolbar to add a new visitor, as shown below:
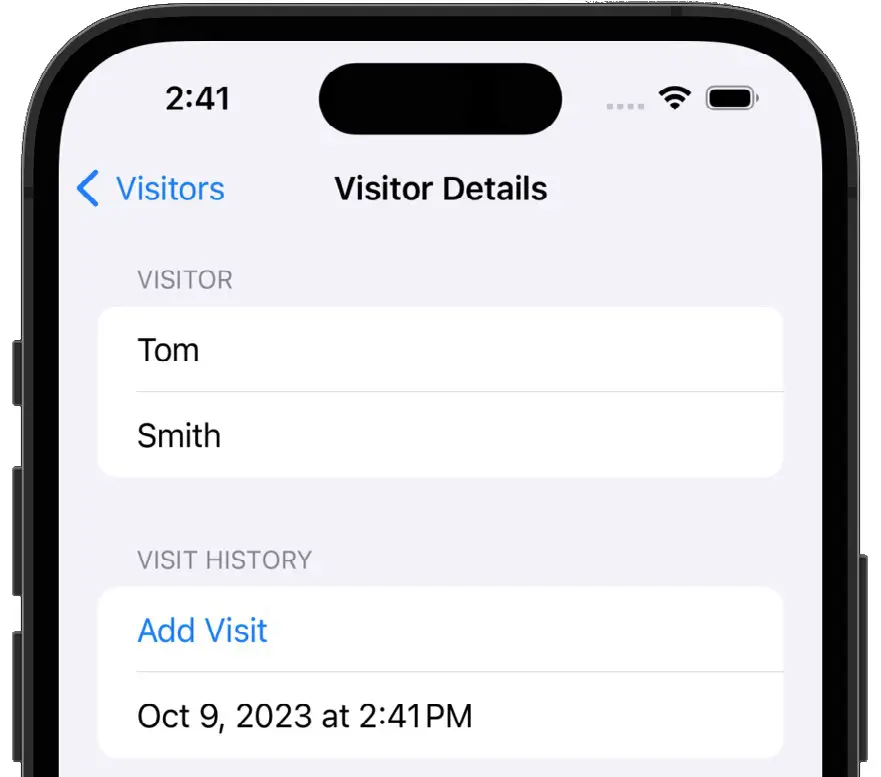
Select the new visitor list entry to display the detail view and enter a first and last name, then click the Add Visit button to add an entry to the log:
Return to the main screen and repeat the above steps to add more visitors, adding multiple log entries for each visitor. Stop and restart the app and verify that the visitors and log entries are restored.
Adding the Search Predicate
The last task in this tutorial is to make the visitor list searchable. Begin by editing the ContentView.swift file to add a search text state and to apply the searchable() modifier to the VisitorListView, passing it a binding to the search text state:
|
You are reading a sample chapter from an old edition of iOS App Development Essentials. Purchase the fully updated iOS 18 App Development Essentials book. The full book contains 71 chapters, over 612 pages of in-depth information, downloadable source code, and access to over 50 SwiftUI knowledge test quizzes. |
struct ContentView: View {

    @Environment(\.modelContext) var modelContext
    @State private var searchText = ""

    var body: some View {
        NavigationStack {
            VisitorListView(searchText: searchText)
                .navigationTitle("Visitors")
                .searchable(text: $searchText)
                .navigationDestination(for: Visitor.self,
                               destination: VisitorDetailView.init)
                .toolbar {
                    Button("New Visitor", systemImage: "plus",
                                               action: addVisitor)
                }
        }
    }
.
.Code language: Swift (swift)
Next, we need to alter VisitorListView so that it can be passed the search text. To do this, we will need to add an initializer to the class as follows:
struct VisitorListView: View {

    @Query var visitors: [Visitor]
    @Environment(\.modelContext) var modelContext

    var body: some View {
.
.
            .onDelete(perform: deleteVisitor)
        }
    }

    init(searchText: String) {

    }
.
.Code language: Swift (swift)
As currently implemented, the @Query macro is configured to find all the stored Visitor entries as follows:
@Query var visitors: [Visitor]Code language: Swift (swift)Within the new initializer, we now need to assign a different query to the visitors variable when a search string has been entered. Queries are created by calling the SwiftData Query() method and passing it a filter predicate. From inside the initializer this new query must be assigned to the visitors variable. When accessing a variable from an initializer, the variable name must be prefixed with an underscore (_). We can, therefore, modify our code as follows:
init(searchText: String) {
    _visitors = Query(filter: #Predicate {

    } )
}Code language: Swift (swift)
The next step is to define the predicate, which needs to return a true or false value. If no search text has been entered, the predicate needs to return a true value so that all of the visitors are listed:
init(searchText: String) {
    _visitors = Query(filter: #Predicate {
        if searchText.isEmpty {
            return true
        }
    } )
}Code language: Swift (swift)
If the user has entered a search string, the predicate needs to compare it to the last name of the current Visitor object and return the Boolean result. Within the predicate, the current Visitor object is referenced by $0, giving us access to the lastname property for comparison against the search text. To ensure the comparison is case-insensitive, we will use the localizedStandardContains() method for the comparison, as follows:
|
You are reading a sample chapter from an old edition of iOS App Development Essentials. Purchase the fully updated iOS 18 App Development Essentials book. The full book contains 71 chapters, over 612 pages of in-depth information, downloadable source code, and access to over 50 SwiftUI knowledge test quizzes. |
init(searchText: String) {
_visitors = Query(filter: #Predicate {
if searchText.isEmpty {
return true
} else {
return $0.lastname.localizedStandardContains(searchText)
}
} )
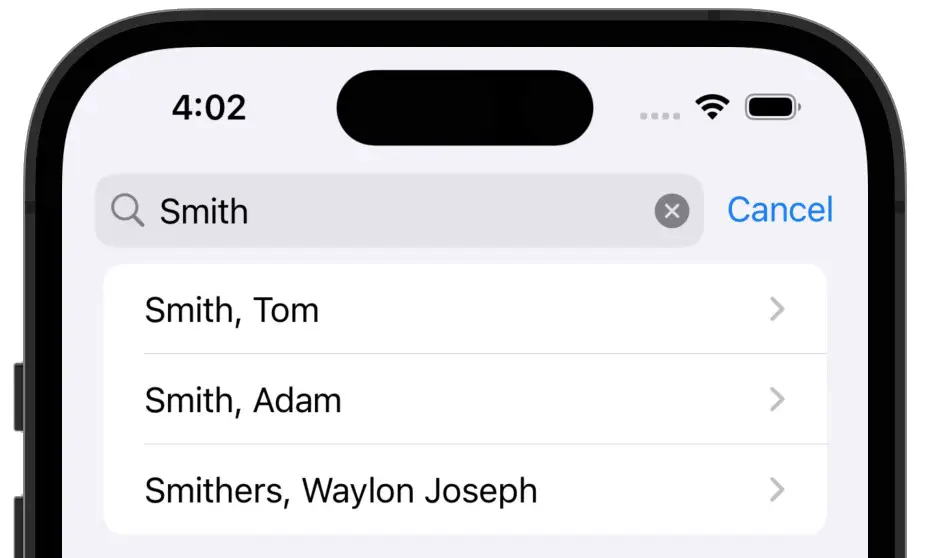
}Code language: Swift (swift)Rerun the app and enter some visitors with the same last name. Perform a downward swipe on the screen to display the search bar, start typing a last name, and check that the list updates with matching visitors, as illustrated in Figure 1-3:
Summary
This chapter provided a tutorial demonstrating using SwiftData to provide persistent storage for an iOS app. Topics covered included declaring models and a model container and then accessing and using the model context to store and retrieve data. The app was then extended to add a search feature.