
From the previous chapter, we now understand the elements that make up a widget and the steps involved in creating one. In this, the first of a series of tutorial chapters dedicated to WidgetKit, we will begin creating an app that includes a widget extension. After completing these tutorials, a functioning widget will have been created, including widget design and timelines, support for different size families, deep links, and configuration using intents.
About the WidgetDemo Project
The project created in this tutorial is the early prototype of a weather app designed to teach children about weather storms. The objective is to provide the user with a list of severe weather systems (tropical storms, thunderstorms, etc.) and display a second screen describing the weather system when a storm type is selected.
A second part of the app is intended to provide real-time updates on severe weather occurring in different locations around the world. When a storm is reported, a widget will be updated with information about the type and location of the storm, together with the prevailing temperature. When the user taps the widget, the app will open the screen containing information about that storm category.
Since this app is an early prototype, however, it will only provide weather updates from two cities, and that data will be simulated rather than obtained from a genuine weather service. However, the app will be functional enough to demonstrate how to implement the key features of WidgetKit.
Creating the WidgetDemo Project
Launch Xcode and select the option to create a new Multiplatform App project named WidgetDemo.
 |
You are reading a sample chapter from an old edition of iOS App Development Essentials. Purchase the fully updated iOS 18 App Development Essentials book. The full book contains 71 chapters, over 612 pages of in-depth information, downloadable source code, and access to over 50 SwiftUI knowledge test quizzes. |
Building the App
Before adding the widget extension to the project, the first step is to build the basic structure of the app, consisting of a List view populated with some storm categories, which, when selected, will appear in a detail screen.
The first requirement is a structure to store the current weather type. Within the project navigator panel, right-click on the WidgetDemo folder and select the New File… menu option, followed by the Swift File template. Click the Next button, name the file WeatherType.swift, and click the Create button. Load the new file into the editor and modify it so that it reads as follows:
struct WeatherType: Hashable {
    var name: String
    var icon: String
}Code language: JavaScript (javascript)
The detail screen will be declared in a new SwiftUI View file named WeatherDetailView.swift. Within the project navigator panel, right-click on the WidgetDemo folder and select the New File… menu option. Select the SwiftUI View template option in the resulting dialog and click the Next button. Name the file WeatherDetailView.swift before creating the file.
With the WeatherDetailView.swift file selected, modify the view declaration so that it reads as follows:
import SwiftUI
struct WeatherDetailView: View {
var weather: WeatherType
var body: some View {
VStack {
Image(systemName: weather.icon)
.resizable()
.scaledToFit()
.frame(width: 150.0, height: 150.0)
Text(weather.name)
.padding()
.font(.title)
Text("If this were a real weather app, a description of \(weather.name) would appear here.")
.padding()
Spacer()
}
}
}
#Preview {
WeatherDetailView(weather: WeatherType(
name: "Thunder Storms", icon: "cloud.bolt"))
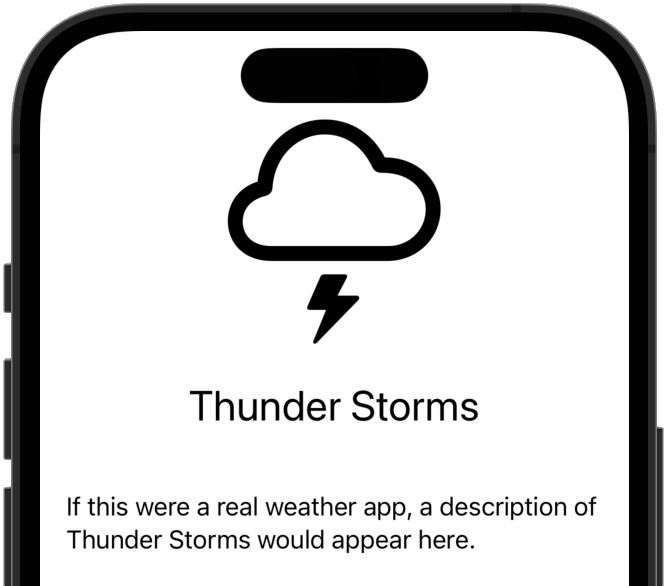
}Code language: Swift (swift)When rendered, the above view should appear in the preview canvas, as shown in Figure 55-1 below:
|
You are reading a sample chapter from an old edition of iOS App Development Essentials. Purchase the fully updated iOS 18 App Development Essentials book. The full book contains 71 chapters, over 612 pages of in-depth information, downloadable source code, and access to over 50 SwiftUI knowledge test quizzes. |
Next, select the ContentView.swift file and modify it to add a List view embedded in a NavigationStack as follows:
import SwiftUI
struct ContentView: View {
var body: some View {
NavigationStack {
List {
NavigationLink(value: WeatherType(name: "Hail Storm",
icon: "cloud.hail")) {
Label("Hail Storm", systemImage: "cloud.hail")
}
NavigationLink(value: WeatherType(name: "Thunder Storm",
icon: "cloud.bolt.rain")) {
Label("Thunder Storm", systemImage: "cloud.bolt.rain")
}
NavigationLink(value: WeatherType(name: "Tropical Storm",
icon: "tropicalstorm")) {
Label("Tropical Storm", systemImage: "tropicalstorm")
}
}
.navigationDestination(for: WeatherType.self) { weather in
WeatherDetailView(weather: weather)
}
.navigationTitle("Severe Weather")
}
}
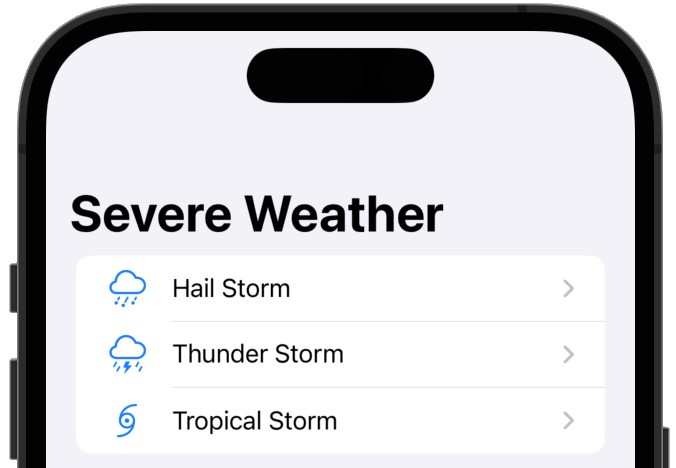
}Code language: Swift (swift)Once the changes are complete, make sure that the layout matches that shown in Figure 55-2:
Using Live Preview, make sure that selecting a weather type displays the detail screen populated with the correct storm name and image.
Adding the Widget Extension
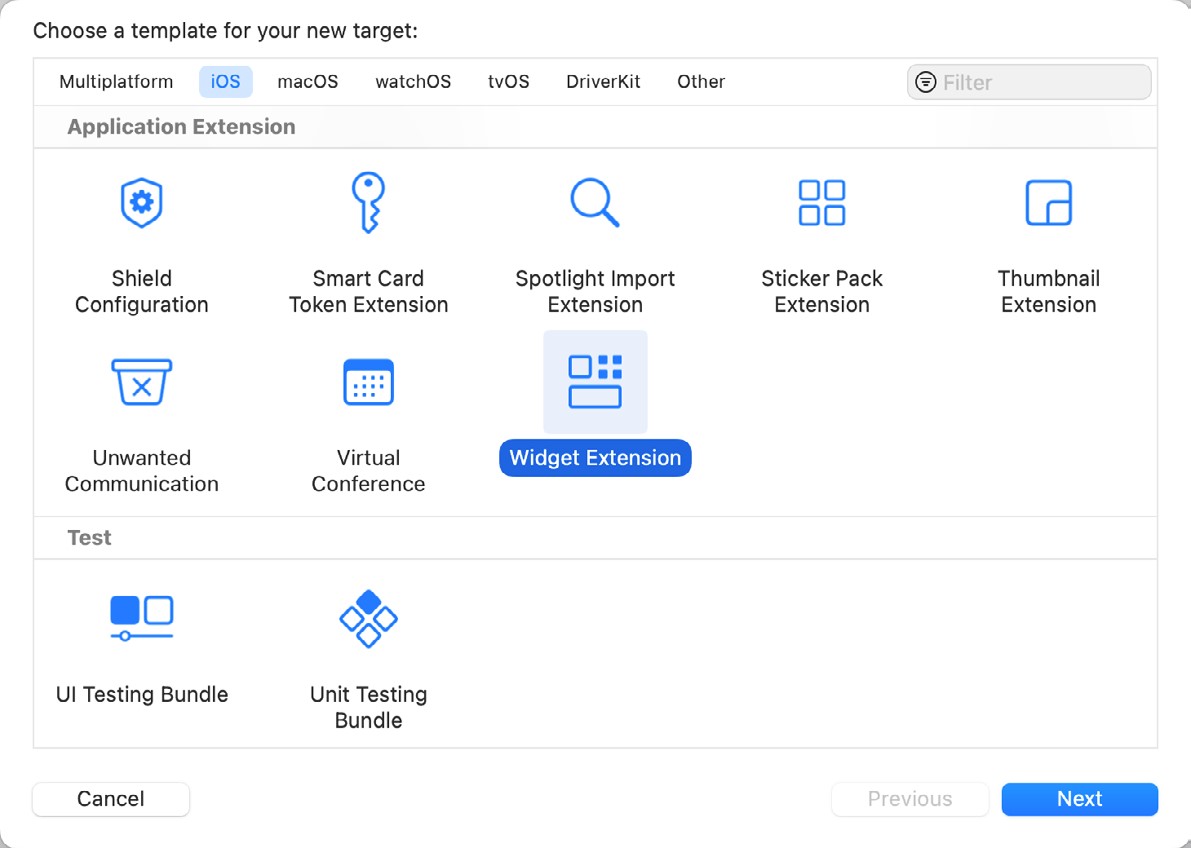
The next step in the project is to add the widget extension by selecting the File -> New -> Target… menu option. From within the target template panel, select the Widget Extension option, as shown in Figure 55-3, before clicking on the Next button:
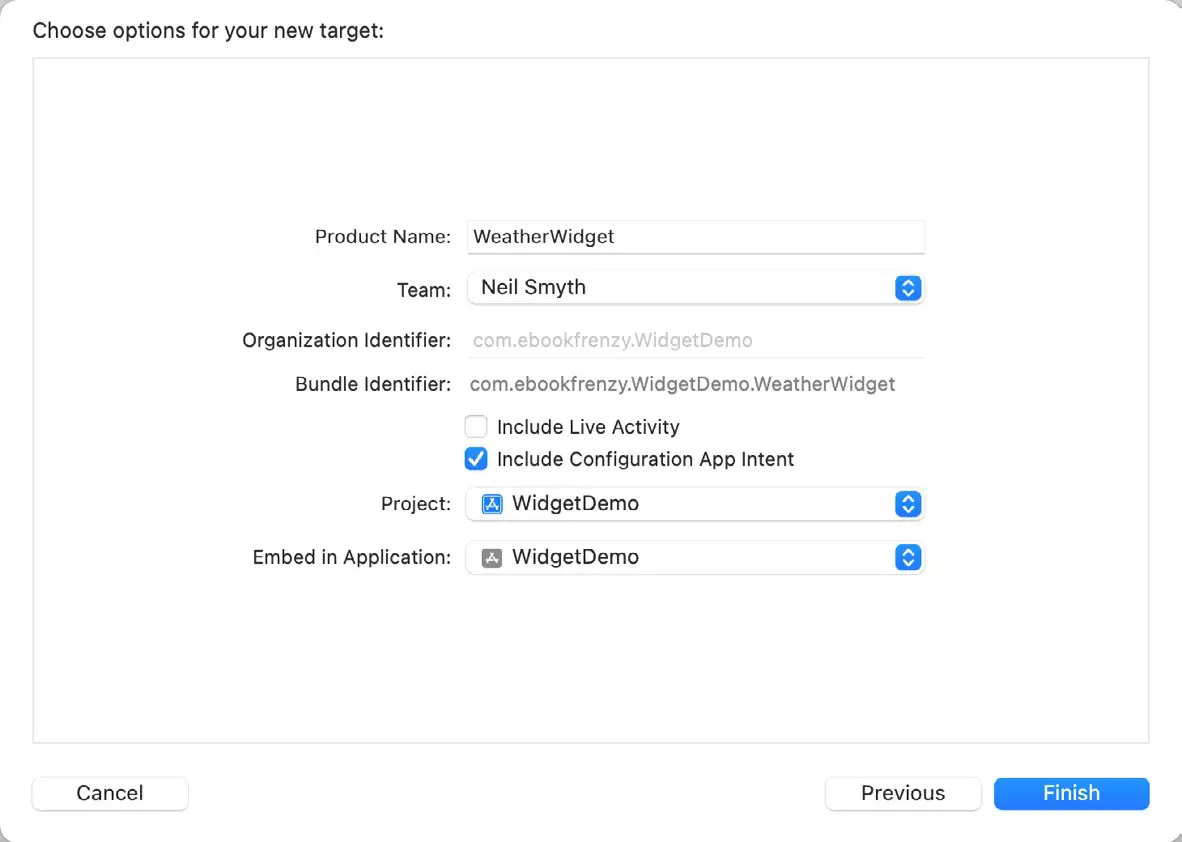
On the subsequent screen, enter WeatherWidget into the product name field. When the widget is completed, the user will be able to select the geographical location for which weather updates are to be displayed. To make this possible, the widget must use the intent configuration type. Before clicking on the Finish button, therefore, make sure that the Include Configuration App Intent option is enabled and the Include Live Activity option is turned off, as shown in Figure 55-4:
|
You are reading a sample chapter from an old edition of iOS App Development Essentials. Purchase the fully updated iOS 18 App Development Essentials book. The full book contains 71 chapters, over 612 pages of in-depth information, downloadable source code, and access to over 50 SwiftUI knowledge test quizzes. |
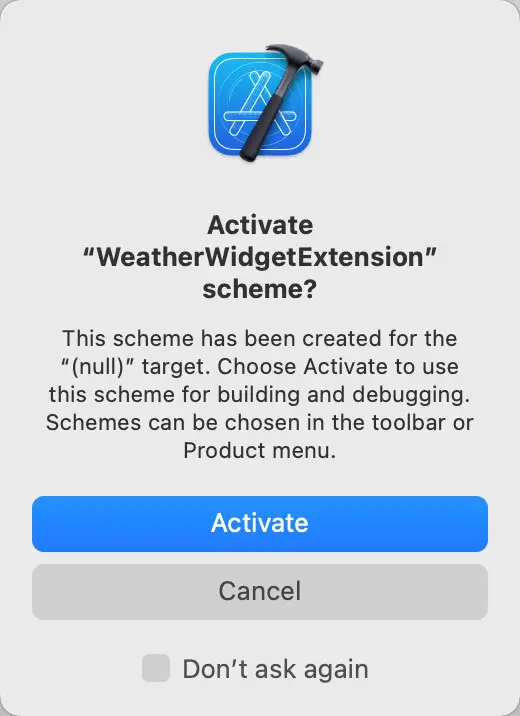
When prompted, click on the Activate button to activate the extension within the project scheme. This will ensure that the widget is included in the project build process:
Once the extension has been added, refer to the project navigator panel, where a new folder containing the widget extension will have been added, as shown in Figure 55-6:

Adding the Widget Data
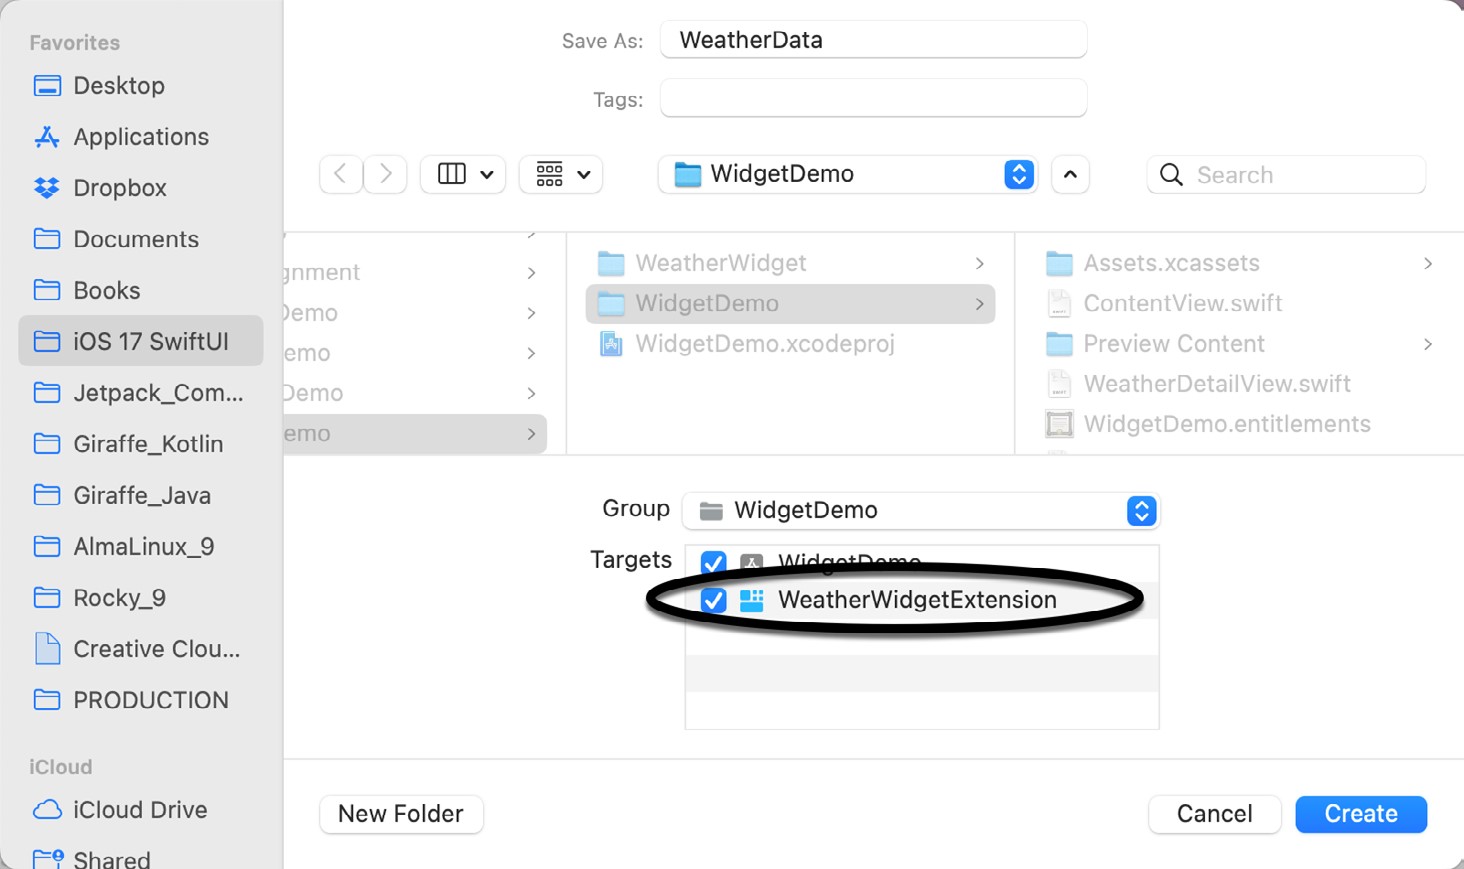
Now that the widget extension has been added to the project, the next step is adding some data and data structures to provide the basis for the widget timeline. Begin by right-clicking on the WidgetDemo folder in the project navigator and selecting the New File… menu option.
From the template selection panel, select the Swift File entry, click on the Next button, and name the file WeatherData.swift. Before clicking on the Create button, make sure that the WeatherWidgetExtension entry is enabled in the Targets section of the panel, as shown in Figure 55-7, so that the file will be accessible to the extension:
As outlined in the previous chapter, each point in the widget timeline is represented by a widget timeline entry instance. Instances of this structure contain the date and time that the entry is to be presented by the widget, together with the data to be displayed. Within the WeatherData.swift file, add a TimelineEntry structure as follows (noting that the WidgetKit framework also needs to be imported):
|
You are reading a sample chapter from an old edition of iOS App Development Essentials. Purchase the fully updated iOS 18 App Development Essentials book. The full book contains 71 chapters, over 612 pages of in-depth information, downloadable source code, and access to over 50 SwiftUI knowledge test quizzes. |
import Foundation
import WidgetKit

struct WeatherEntry: TimelineEntry {
    var date: Date
    let city: String
    let temperature: Int
    let description: String
    let icon: String
    let image: String
}Code language: Swift (swift)
Creating Sample Timelines
Since this prototype app does not have access to live weather data, the timelines used to drive the widget content will contain sample weather entries for two cities. Remaining within the WeatherData.swift file, add these timeline declarations as follows:
.
.
let londonTimeline = [
    WeatherEntry(date: Date(), city: "London", temperature: 87,
          description: "Hail Storm", icon: "cloud.hail",
                image: "hail"),
    WeatherEntry(date: Date(), city: "London", temperature: 92,
          description: "Thunder Storm", icon: "cloud.bolt.rain",
                image: "thunder"),
    WeatherEntry(date: Date(), city: "London", temperature: 95,
          description: "Hail Storm", icon: "cloud.hail",
                image: "hail")
]

let miamiTimeline = [
    WeatherEntry(date: Date(), city: "Miami", temperature: 81,
          description: "Thunder Storm", icon: "cloud.bolt.rain",
                image: "thunder"),
    WeatherEntry(date: Date(), city: "Miami", temperature: 74,
          description: "Tropical Storm", icon: "tropicalstorm",
                image: "tropical"),
    WeatherEntry(date: Date(), city: "Miami", temperature: 72,
          description: "Thunder Storm", icon: "cloud.bolt.rain",
                image: "thunder")
]Code language: Swift (swift)
Note that the timeline entries are populated with the current date and time via a call to the Swift Date() method. The provider will replace these values with more appropriate ones when WidgetKit requests the timeline.
Adding Image and Color Assets
Before moving to the next step of the tutorial, some image and color assets need to be added to the asset catalog of the widget extension.
Begin by selecting the Assets item located in the WeatherWidget folder in the project navigator panel, as highlighted in Figure 55-8:
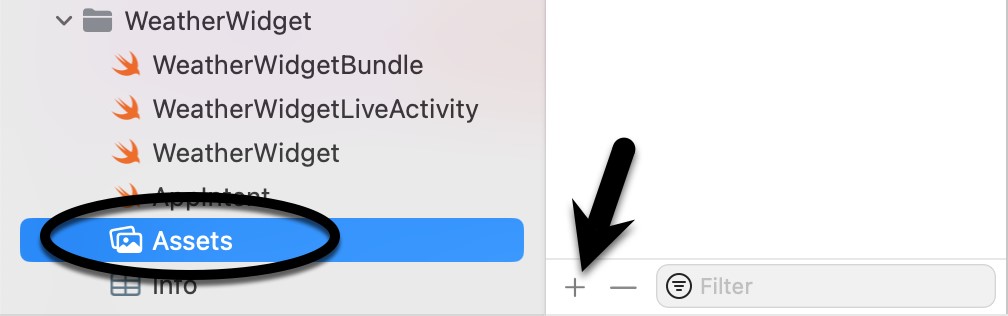
Add a new entry to the catalog by clicking on the button indicated by the arrow in Figure 55-8 above. In the resulting menu, select the Color Set option. Click on the new Color entry and change the name to weatherBackgroundColor. With this new entry selected, click on the Any Appearance block in the main panel, as shown in Figure 55-9:
|
You are reading a sample chapter from an old edition of iOS App Development Essentials. Purchase the fully updated iOS 18 App Development Essentials book. The full book contains 71 chapters, over 612 pages of in-depth information, downloadable source code, and access to over 50 SwiftUI knowledge test quizzes. |
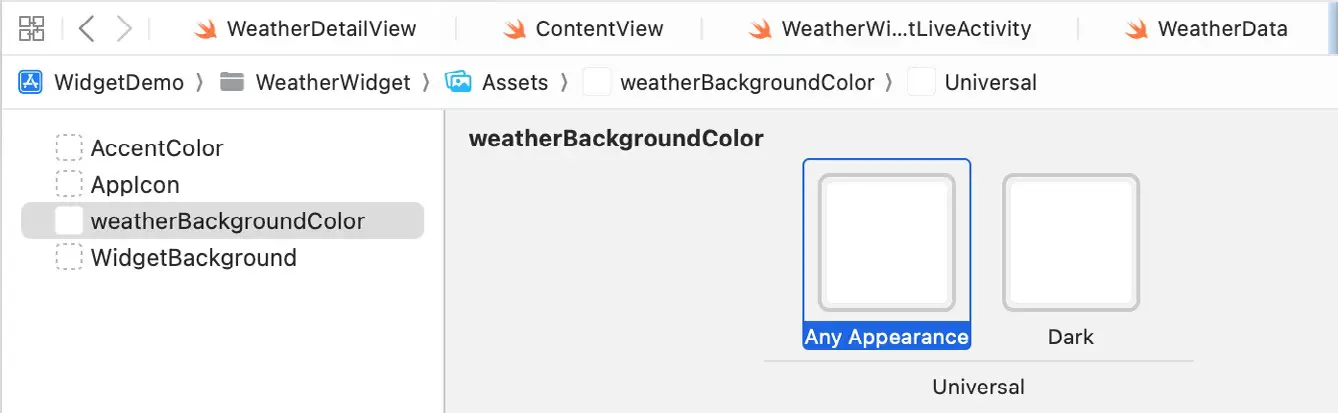
Referring to the Color section of the attributes inspector panel, set Content to Display P3, Input Method to 8-bit Hexadecimal and the Hex field to #4C5057:
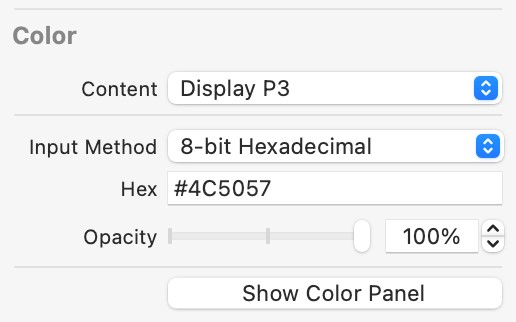
Select the Dark Appearance and make the same attribute changes, this time setting the Hex value to #3A4150.
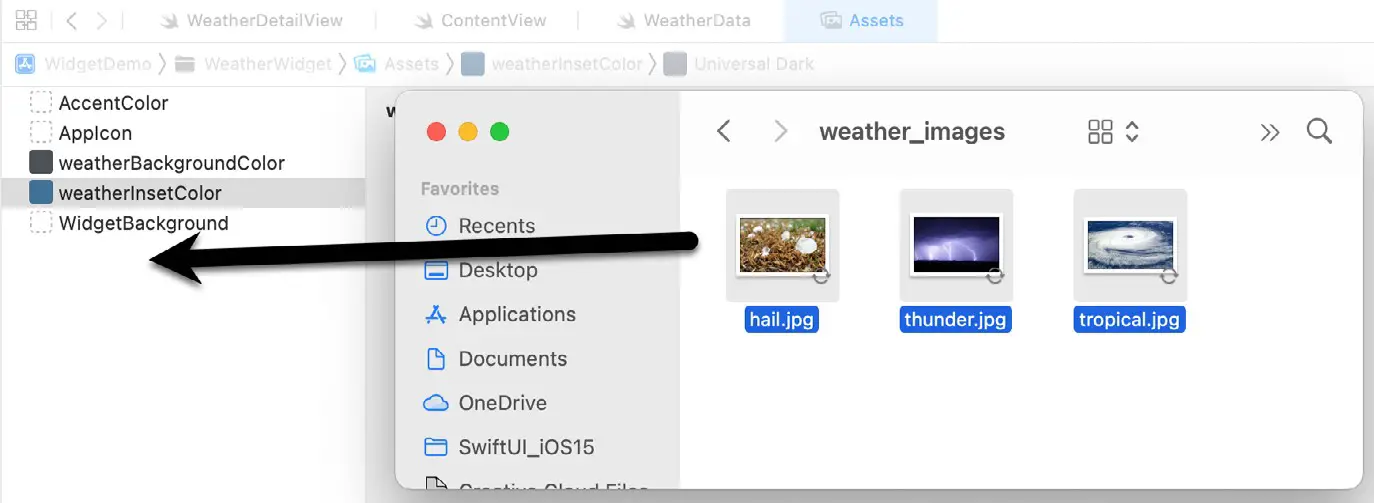
Next, add a second Color Set asset, name it weatherInsetColor, and use #4E7194 for the Any Appearance color value and #7E848F for the Dark Appearance.
The images used by this project can be found in the weather_images folder of the sample code download available from the following URL:
https://www.ebookfrenzy.com/retail/ios17_web/
|
You are reading a sample chapter from an old edition of iOS App Development Essentials. Purchase the fully updated iOS 18 App Development Essentials book. The full book contains 71 chapters, over 612 pages of in-depth information, downloadable source code, and access to over 50 SwiftUI knowledge test quizzes. |
Once the source archive has been downloaded and unpacked, open a Finder window, navigate to the weather_ images folder, and select, drag and drop the images onto the left-hand panel of the Xcode asset catalog screen, as shown in Figure 55-11:
Designing the Widget View
Now that the widget entry has been created and used as the basis for some sample timeline data, the widget view needs to be designed. When the widget extension was added to the project, a template widget entry view was included in the WeatherWidget.swift file, which reads as follows:
struct WeatherWidgetEntryView : View {
    var entry: Provider.Entry

    var body: some View {
        VStack {
            Text("Time:")
            Text(entry.date, style: .time)

            Text("Favorite Emoji:")
            Text(entry.configuration.favoriteEmoji)
        }
    }
}Code language: Swift (swift)
As currently implemented, the view is passed a widget entry from which a date value and emoji are extracted and displayed on Text views.
Modify the view structure so that it reads as follows, keeping in mind that it will result in syntax errors appearing in the editor. These will be resolved later in the tutorial:
struct WeatherWidgetEntryView: View {
    var entry: Provider.Entry

    var body: some View {
        ZStack {
            Color("weatherBackgroundColor")
            WeatherSubView(entry: entry)
        }
    }
}

struct WeatherSubView: View {

    var entry: WeatherEntry

    var body: some View {

        VStack {
            VStack {
                Text("\(entry.city)")
                    .font(.title)
                Image(systemName: entry.icon)
                    .font(.largeTitle)
                Text("\(entry.description)")
                    .frame(minWidth: 125, minHeight: nil)
            }
            .padding(.bottom, 2)
            .background(ContainerRelativeShape()
                       .fill(Color("weatherInsetColor")))
            Label("\(entry.temperature)°F", systemImage: "thermometer")
        }
        .foregroundColor(.white)
        .padding()
    }
}Code language: Swift (swift)
We also need to set the container background color of the WeatherWidgetEntryView when it is called in the body of the WeatherWidget declaration:
|
You are reading a sample chapter from an old edition of iOS App Development Essentials. Purchase the fully updated iOS 18 App Development Essentials book. The full book contains 71 chapters, over 612 pages of in-depth information, downloadable source code, and access to over 50 SwiftUI knowledge test quizzes. |
struct WeatherWidget: Widget {
    let kind: String = "WeatherWidget"

    var body: some WidgetConfiguration {
        AppIntentConfiguration(kind: kind,
          intent: ConfigurationAppIntent.self, provider: Provider()) { entry in
            WeatherWidgetEntryView(entry: entry)
                .containerBackground(Color("weatherBackgroundColor"),
                                for: .widget)
        }
    }
}Code language: Swift (swift)
Since we have changed the view, the preview provider declaration will also need to be changed as follows:
#Preview(as: .systemSmall) {
    WeatherWidget()
} timeline: {
    WeatherEntry(date: Date(),
                        city: "London", temperature: 89,
                 description: "Thunder Storm",
                        icon: "cloud.bolt.rain", image: "thunder")
    WeatherEntry(date: Date(),
                        city: "London", temperature: 89,
                 description: "Hail",
                        icon: "cloud.hail", image: "hail")
Code language: Swift (swift)
Once all necessary changes have eventually been made to the WeatherWidget.swift file, the above preview provider will display a preview canvas configured for the widget’s small family size with two sample timeline entries.
Modifying the Widget Provider
When the widget extension was added to the project, Xcode added a widget provider to the WeatherWidget. swift file. This declaration now needs to be modified to make use of the WeatherEntry structure declared in the WeatherData.swift file. The first step is to modify the snapshot() method to use WeatherEntry and to return an instance populated with sample data:
.
.
struct Provider: AppIntentTimelineProvider {
.
.
    func snapshot(for configuration: ConfigurationAppIntent, in context: Context)
                                              async -> WeatherEntry {
        WeatherEntry(date: Date(), city: "London",
                            temperature: 89, description: "Thunder Storm",
                                 icon: "cloud.bolt.rain", image: "thunder")
    }
.
.Code language: Swift (swift)
Next, the timeline() method needs to be modified to return an array of timeline entry objects together with a reload policy value. Since user configuration has not yet been added to the widget, the timeline() method will be configured initially to return the timeline for London:
func timeline(for configuration: ConfigurationAppIntent, in context: Context)
                                           async -> Timeline<WeatherEntry> {
    var entries: [WeatherEntry] = []
    var eventDate = Date()
    let halfMinute: TimeInterval = 30

    for var entry in londonTimeline {
        entry.date = eventDate
        eventDate += halfMinute
        entries.append(entry)
    }

    return Timeline(entries: entries, policy: .atEnd)
}Code language: Swift (swift)
The above code begins by declaring an array to contain the WeatherEntry instances before creating variables designed to represent the current event time and a 30-second time interval, respectively.
|
You are reading a sample chapter from an old edition of iOS App Development Essentials. Purchase the fully updated iOS 18 App Development Essentials book. The full book contains 71 chapters, over 612 pages of in-depth information, downloadable source code, and access to over 50 SwiftUI knowledge test quizzes. |
A loop then iterates through the London timeline declared in the WeatherData.swift file, setting the eventDate value as the date and time at which the event is to be displayed by the widget. A 30-second interval is then added to the eventDate ready for the next event. Finally, the modified event is appended to the entries array. Once all of the events have been added to the array, it is used to create a Timeline instance with a reload policy of never (in other words, WidgetKit will not ask for a new timeline when the first timeline ends). The timeline is then returned to WidgetKit via the completion handler.
This implementation of the timeline() method will result in the widget changing content every 30 seconds until the final entry in the London timeline array is reached.
Configuring the Placeholder View
The Final task before previewing the widget is to make sure that the placeholder view has been implemented. Xcode will have already created a placeholder() method for this purpose within the WeatherWidget.swift file, which reads as follows:
func placeholder(in context: Context) -> SimpleEntry {
    SimpleEntry(date: Date(), configuration: ConfigurationAppIntent())
}Code language: Swift (swift)
This method now needs to be modified so that it returns a WeatherWidget instance populated with some sample data as follows:
func placeholder(in context: Context) -> WeatherEntry {
    WeatherEntry(date: Date(), city: "London",
                       temperature: 89, description: "Thunder Storm",
                            icon: "cloud.bolt.rain", image: "thunder")
}Code language: Swift (swift)
Previewing the Widget
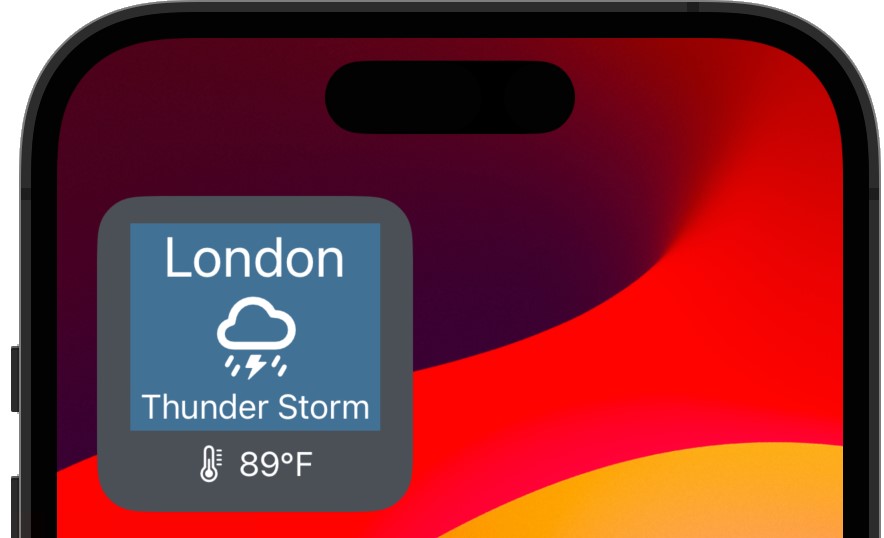
Using the preview canvas, verify that the widget appears, as shown in Figure 55-12 below:
|
You are reading a sample chapter from an old edition of iOS App Development Essentials. Purchase the fully updated iOS 18 App Development Essentials book. The full book contains 71 chapters, over 612 pages of in-depth information, downloadable source code, and access to over 50 SwiftUI knowledge test quizzes. |
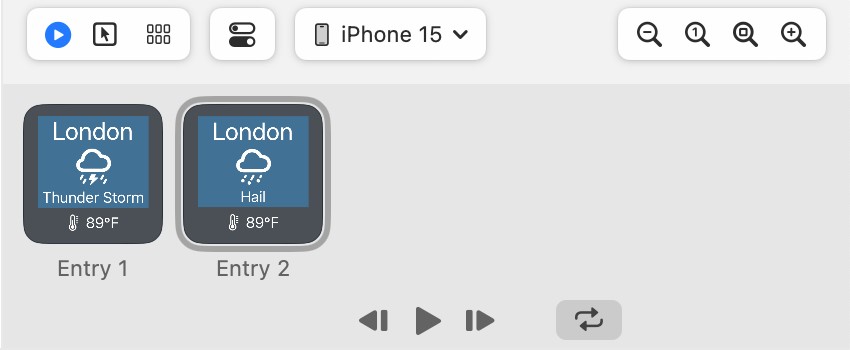
The preview also includes a panel for stepping through the timeline entries, as shown in Figure 55-13 below:
Before we can test the widget on a device or simulator, we must install the WidgetDemo app. In the Xcode toolbar, select WidgetDemo from the scheme menu:
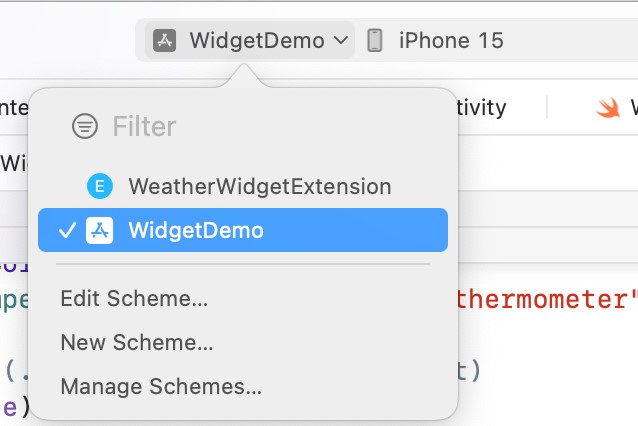
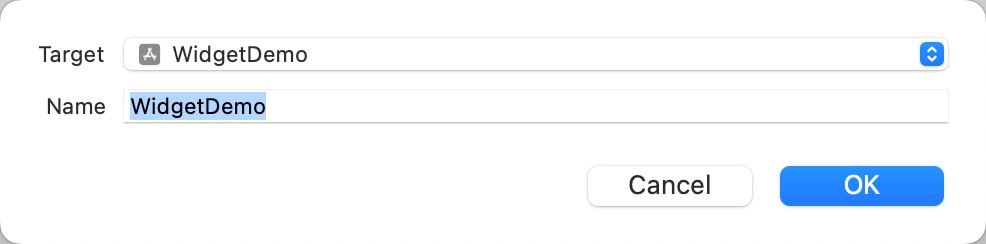
If the WidgetDemo target is not listed in the menu, select the Manage Schemes… option to display the dialog shown in Figure 55-15:
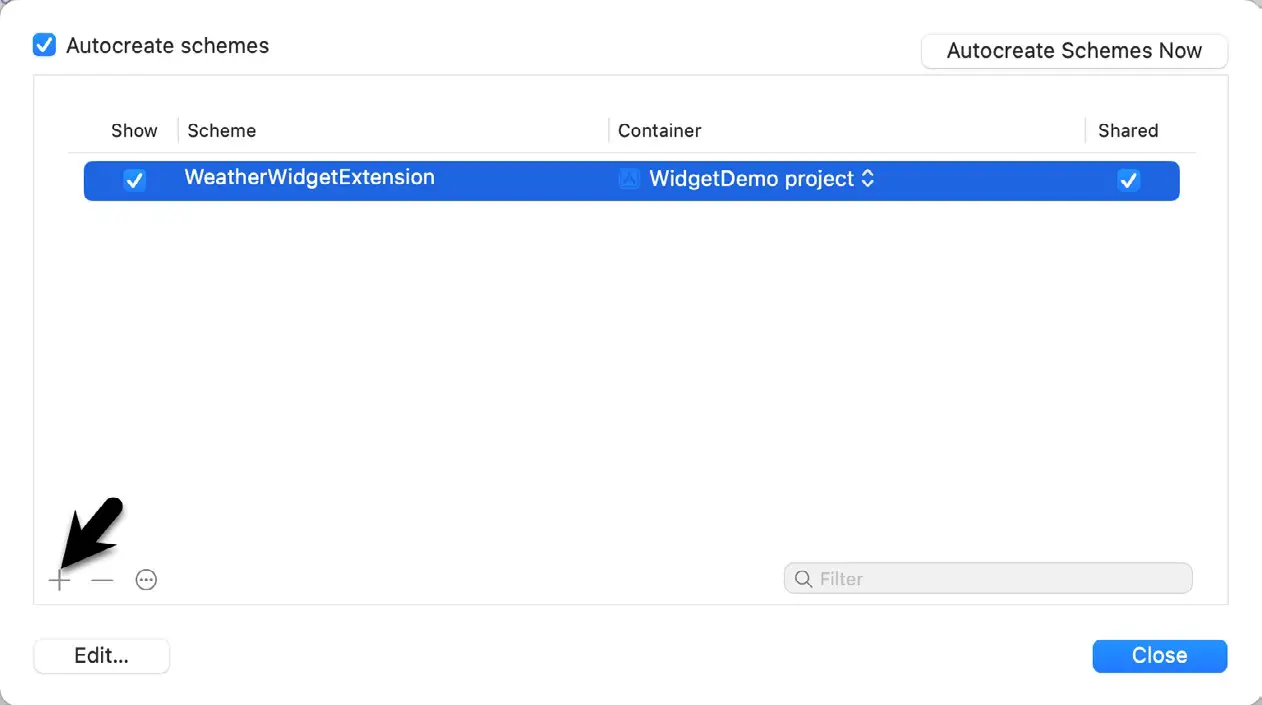
Click on the + button highlighted above and select WidgetDemo from the resulting dialog before clicking OK and closing the Manage Schemes dialog:
Next, test the widget on a device or simulator by changing the active scheme in the Xcode toolbar to the WeatherWidgetExtension scheme before clicking on the run button:
|
You are reading a sample chapter from an old edition of iOS App Development Essentials. Purchase the fully updated iOS 18 App Development Essentials book. The full book contains 71 chapters, over 612 pages of in-depth information, downloadable source code, and access to over 50 SwiftUI knowledge test quizzes. |

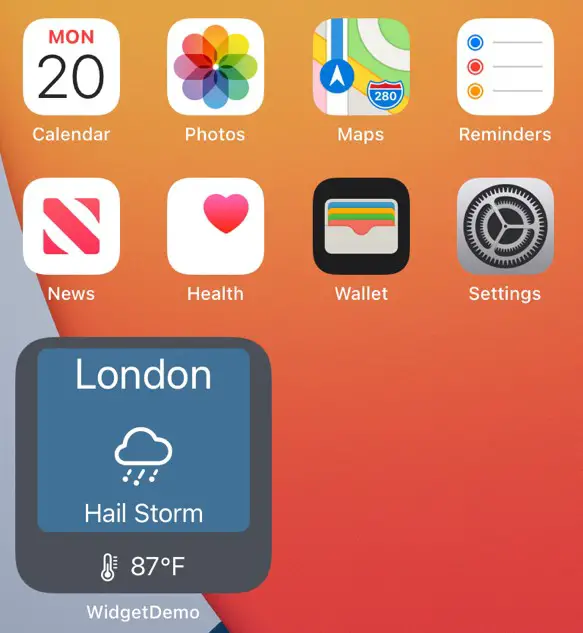
After a short delay, the widget will appear on the home screen and cycle through the different weather events at 30-second intervals:
Summary
The example project created in this chapter has demonstrated how to use WidgetKit to create a widget extension for an iOS app. This included the addition of the extension to the project, the design of the widget view and entry together with the implementation of a sample timeline. The widget created in this chapter, however, has yet to make use of the different widget size families supported by WidgetKit, a topic that will be covered in the next chapter.