
The WidgetDemo app created in the preceding chapters can only display weather information for a single geographical location. It is possible to make aspects of the widget user configurable using an app intent. In this chapter, we will enhance the widget extension so that the user can choose to view the weather for different cities. This will involve implementing a widget configuration intent and modifications to the widget provider declaration.
Reviewing the Project Code
When the widget extension was added to the WidgetDemo project in An iOS 17 SwiftUI WidgetKit Tutorial, we enabled the Include Configuration App Intent option. This selection caused Xcode to structure the template widget so that we can add configuration options without making significant changes to the existing code. For example, Xcode generated the AppIntent.swift file containing the following WidgetConfigurationIntent example class:
import WidgetKit
import AppIntents

struct ConfigurationAppIntent: WidgetConfigurationIntent {
    static var title: LocalizedStringResource = "Configuration"
    static var description = IntentDescription("This is an example widget.")

    // An example configurable parameter.
    @Parameter(title: "Favorite Emoji", default: "")
    var favoriteEmoji: String
}Code language: Swift (swift)
We will modify This rudimentary example later to allow users to select weather information for different cities.
Xcode also based our widget provider (declared in the WeatherWidget.swift file) on the AppIntentTimelineProvider protocol, a prerequisite for supporting widget configuration. Conforming to the protocol requires that the timeline() and snapshot() functions are passed a reference to the app intent configuration as follows:
struct Provider: AppIntentTimelineProvider {
.
.
    func snapshot(for configuration: ConfigurationAppIntent, in context: Context) async -> WeatherEntry {
.
.
    func timeline(for configuration: ConfigurationAppIntent, in context: Context) async -> Timeline<WeatherEntry> {
.
.Code language: Swift (swift)
With access to the configuration intent, we can change the widget to reflect the user’s preferences.
 |
You are reading a sample chapter from an old edition of iOS App Development Essentials. Purchase the fully updated iOS 18 App Development Essentials book. The full book contains 71 chapters, over 612 pages of in-depth information, downloadable source code, and access to over 50 SwiftUI knowledge test quizzes. |
Finally, Xcode added code to the WeatherWidget structure to create an AppIntentConfiguration instance, initialized with the ConfigurationAppIntent class declared in the AppIntent.swift file:
struct WeatherWidget: Widget {
    let kind: String = "WeatherWidget"

    var body: some WidgetConfiguration {
        AppIntentConfiguration(kind: kind, intent: ConfigurationAppIntent.self,
                         provider: Provider()) { entry in
            WeatherWidgetEntryView(entry: entry)
                .containerBackground(Color("weatherBackgroundColor"),
                         for: .widget)
        }
        .configurationDisplayName("My Weather Widget")
        .description("A demo weather widget.")
        .supportedFamilies([.systemSmall, .systemMedium])
    }
}Code language: Swift (swift)
Adding an App Entity
The first requirement for our project is a structure that conforms to the AppEntity protocol that will be used to provide a list of the cities. Edit the AppIntent.swift file and add the following WidgetCity declaration:
struct WidgetCity: AppEntity {

    var id: String

    static var typeDisplayRepresentation:
            TypeDisplayRepresentation = "Change location"
    static var defaultQuery = WidgetCityQuery()

    var displayRepresentation: DisplayRepresentation {
        DisplayRepresentation(title: "\(id)")
   }
Code language: Swift (swift)
The above struct contains all mandatory properties for conforming to the AppEntity protocol. With these requirements met, we can now add properties to a list of city names and corresponding timelines:
struct WidgetCity: AppEntity {

    var id: String
    var timeline: [WeatherEntry]

    static var typeDisplayRepresentation:
                TypeDisplayRepresentation = "Change location"
    static var defaultQuery = WidgetCityQuery()

    var displayRepresentation: DisplayRepresentation {
        DisplayRepresentation(title: "\(id)")
   }

    static let cities: [WidgetCity] = [
        WidgetCity(id: "London", timeline: londonTimeline),
        WidgetCity(id: "Miami", timeline: miamiTimeline)
    ]
}Code language: Swift (swift)
Adding Entity Query
The next step is adding the WidgetCityQuery structure referenced in the WidgetCity declaration above. The declaration must conform to the EntityQuery protocol by implementing the following functions:
- entities(for: ) – Returns an array of app entities that match a specified id.
- suggestedEntities() – Returns an array containing the app entities available for selection in the widget configuration.
- defaultResults() – Returns the entity to be used as the widget’s default configuration setting. Remaining in the AppIntent.swift file, add the WidgetCityQuery struct as follows:
struct WidgetCityQuery: EntityQuery {
    func entities(for identifiers: [WidgetCity.ID]) async throws -> [WidgetCity] {
        WidgetCity.cities.filter {
            identifiers.contains($0.id)
        }
    }

    func suggestedEntities() async throws -> [WidgetCity] {
        WidgetCity.cities
    }

    func defaultResult() async -> WidgetCity? {
        WidgetCity.cities.first
    }
}Code language: Swift (swift)
Modifying the App Intent
The configuration app intent needs to be updated to allow the user to select an option from the list of cities. Configuration options are declared using the @Parameter macro, including the option title and a variable to contain the current selection. To meet the requirements for the weather widget, modify ConfigurationAppIntent so that it reads as follows:
|
You are reading a sample chapter from an old edition of iOS App Development Essentials. Purchase the fully updated iOS 18 App Development Essentials book. The full book contains 71 chapters, over 612 pages of in-depth information, downloadable source code, and access to over 50 SwiftUI knowledge test quizzes. |
struct ConfigurationAppIntent: WidgetConfigurationIntent {
    static var title: LocalizedStringResource = "City Selection"
    static var description = IntentDescription("Select a city.")

    @Parameter(title: "Select a city")
    var currentCity: WidgetCity
}Code language: Swift (swift)
Modifying the Timeline Code
Before testing the configuration intent, the final step is to modify the provider timeline() method in the WeatherWidget.swift the file. Currently, the method is designed to display only the London timeline and reads as follows:
func timeline(for configuration: ConfigurationAppIntent,
             in context: Context) async -> Timeline<WeatherEntry> {
    var entries: [WeatherEntry] = []
    var eventDate = Date()
    let halfMinute: TimeInterval = 30

    for var entry in londonTimeline {
        entry.date = eventDate
        eventDate += halfMinute
        entries.append(entry)
    }

    return Timeline(entries: entries, policy: .atEnd)
}Code language: Swift (swift)
The only change needed is to use the configuration intent parameter to access the timeline for the currently selected city:
func timeline(for configuration: ConfigurationAppIntent, in context: Context) async -> Timeline<WeatherEntry> {
    var entries: [WeatherEntry] = []
    var eventDate = Date()
    let halfMinute: TimeInterval = 30

    for var entry in configuration.currentCity.timeline {
        entry.date = eventDate
        eventDate += halfMinute
        entries.append(entry)
    }

    return Timeline(entries: entries, policy: .atEnd)
}Code language: Swift (swift)
Finally, the example ConfigurationAppIntent extension is no longer needed and must be deleted:
/*
extension ConfigurationAppIntent {
    fileprivate static var smiley: ConfigurationAppIntent {
        let intent = ConfigurationAppIntent()
        intent.favoriteEmoji = "😀"
        return intent
    }

    fileprivate static var starEyes: ConfigurationAppIntent {
        let intent = ConfigurationAppIntent()
        intent.favoriteEmoji = "🤩"
        return intent
    }
}
*/Code language: Swift (swift)
Testing Widget Configuration
Run the widget extension on a device or simulator and wait for it to load. Once it is running, perform a long press on the widget to display the menu shown in Figure 58-1 below:
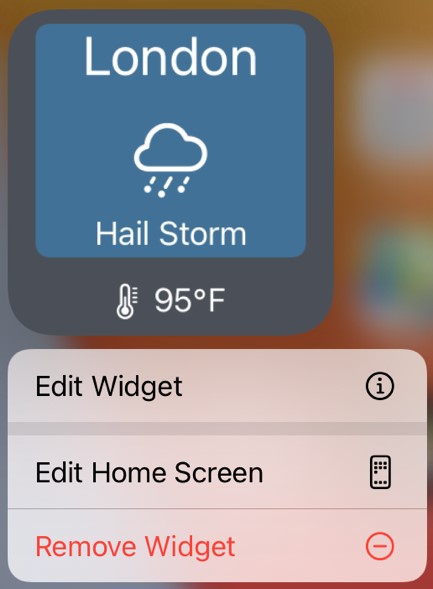
Select the Edit Widget menu option to display the configuration intent dialog, as shown in Figure 58-2:
|
You are reading a sample chapter from an old edition of iOS App Development Essentials. Purchase the fully updated iOS 18 App Development Essentials book. The full book contains 71 chapters, over 612 pages of in-depth information, downloadable source code, and access to over 50 SwiftUI knowledge test quizzes. |
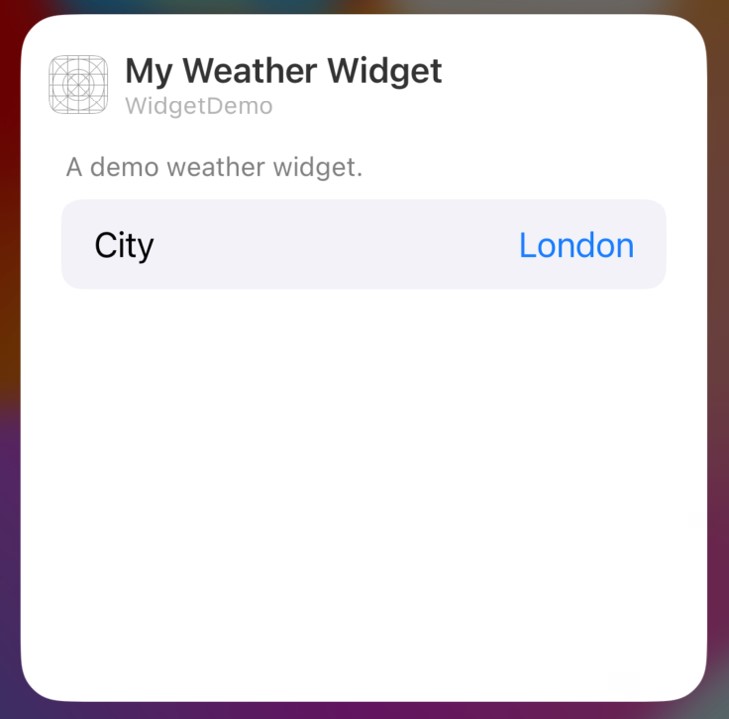
Select the current location (or the Choose button if no city is displayed) to display the list of locations, then select Miami before tapping any screen area outside the dialog. On returning to the home screen, the widget should display entries from the Miami timeline.
Customizing the Configuration Intent UI
The final task in this tutorial is to change the accent colors of the intent UI to match those used by the widget. Since we already have the widget background color declared in the widget extension’s Assets file from the steps in an earlier chapter, this can be used for the background of the intent UI.
The color settings for the intent UI are located in the build settings screen for the widget extension. To find these settings, select the WidgetDemo entry located at the top of the project navigator panel (marked A in Figure 58-3 below), followed by the WeatherWidgetExtension entry (B) in the Targets list:
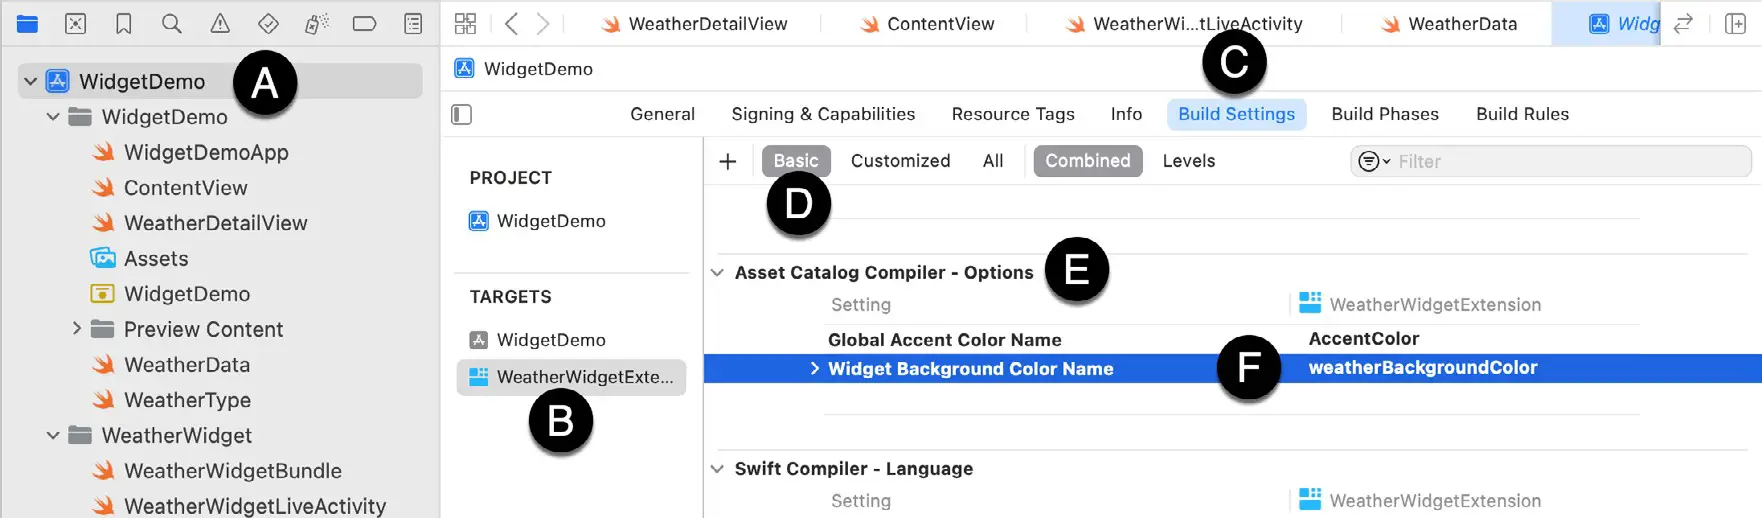
In the toolbar, select Build Settings (C), then the Basic filter option (D) before scrolling down to the Asset Catalog Compiler – Options section (E).
Click on the WidgetBackground value (F) and change it to weatherBackgroundColor. If required, the foreground color used within the intent UI is defined by the Global Accent Color Name value. Note that these values must be named colors declared within the Assets file.
|
You are reading a sample chapter from an old edition of iOS App Development Essentials. Purchase the fully updated iOS 18 App Development Essentials book. The full book contains 71 chapters, over 612 pages of in-depth information, downloadable source code, and access to over 50 SwiftUI knowledge test quizzes. |
Test the widget to verify that the intent UI now uses the widget background color:

Summary
Widget extensions use configuration app intents to provide users with configuration options that change the widget’s behavior or appearance. Once the configuration intent is implemented, each time the provider timeline() method is called, WidgetKit passes it a copy of the configuration object, the properties of which can be accessed to tailor the resulting timeline to match the user’s preferences.