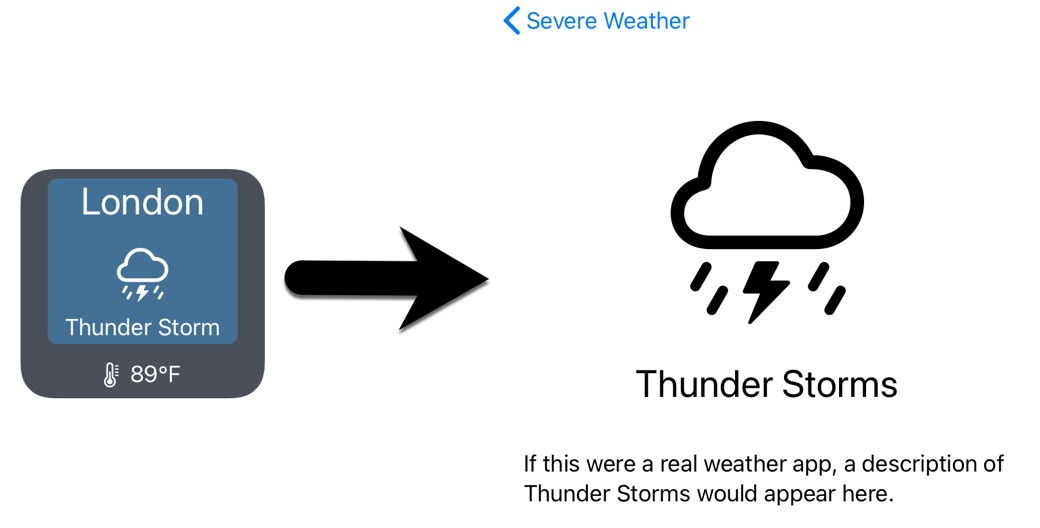
WidgetKit deep links allow the individual views that make up the widget entry view to open different screens within the companion app when tapped. In addition to the main home screen, the WidgetDemo app created in the preceding chapters contains a detail screen to provide the user with information about different weather systems. As currently implemented, however, tapping the widget always launches the home screen of the companion app, regardless of the current weather conditions.
The purpose of this chapter is to implement deep linking on the widget so that tapping the widget opens the appropriate weather detail screen within the app. This will involve some changes to both the app and widget extension.
Adding Deep Link Support to the Widget
Deep links allow specific areas of an app to be presented to the user based on the opening of a URL. The WidgetDemo app used in the previous chapters consists of a list of severe storm types. When a list item is selected, the app navigates to a details screen where additional information about the selected storm is displayed. In this tutorial, changes will be made to both the app and widget to add deep link support. This means, for example, that when the widget indicates that a thunderstorm is in effect, tapping the widget will launch the app and navigate to the thunderstorm detail screen.
The first step in adding deep link support is to modify the WeatherEntry structure to include a URL for each timeline entry. Edit the WeatherData.swift file and modify the structure so that it reads as follows:
.
.
struct WeatherEntry: TimelineEntry {
    var date: Date
    let city: String
    let temperature: Int
    let description: String
    let icon: String
    let image: String
    let url: URL?
}
.
.Code language: Swift (swift)
Next, add some constants containing the URLs that will be used to identify the storm types that the app knows about:
 |
You are reading a sample chapter from an old edition of iOS App Development Essentials. Purchase the fully updated iOS 18 App Development Essentials book. The full book contains 71 chapters, over 612 pages of in-depth information, downloadable source code, and access to over 50 SwiftUI knowledge test quizzes. |
.
.
let hailUrl = URL(string: "weatherwidget://hail")
let thunderUrl = URL(string: "weatherwidget://thunder")
let tropicalUrl = URL(string: "weatherwidget://tropical")
.
.Code language: Swift (swift)
The last remaining change to the weather data is to include the URL within the sample timeline entries:
.
.
let londonTimeline = [
    WeatherEntry(date: Date(), city: "London", temperature: 87,
          description: "Hail Storm", icon: "cloud.hail",
                image: "hail", url: hailUrl),
    WeatherEntry(date: Date(), city: "London", temperature: 92,
          description: "Thunder Storm", icon: "cloud.bolt.rain",
                image: "thunder", url: thunderUrl),
    WeatherEntry(date: Date(), city: "London", temperature: 95,
          description: "Hail Storm", icon: "cloud.hail",
                image: "hail", url: hailUrl)
]

let miamiTimeline = [
    WeatherEntry(date: Date(), city: "Miami", temperature: 81,
          description: "Thunder Storm", icon: "cloud.bolt.rain",
                image: "thunder", url: thunderUrl),
    WeatherEntry(date: Date(), city: "Miami", temperature: 74,
          description: "Tropical Storm", icon: "tropicalstorm",
                image: "tropical", url: tropicalUrl),
    WeatherEntry(date: Date(), city: "Miami", temperature: 72,
          description: "Thunder Storm", icon: "cloud.bolt.rain",
                image: "thunder", url: thunderUrl)
]
.
.Code language: Swift (swift)
With the data modified to include deep link URLs, the widget declaration now needs to be modified to match the widget entry structure. First, the placeholder() and snapshot() methods of the provider will need to return an entry that includes the URL. Edit the WeatherWidget.swift file, locate these methods within the IntentTimelineProvider structure, and modify them as follows:
struct Provider: AppIntentTimelineProvider {
    func placeholder(in context: Context) -> WeatherEntry {
        WeatherEntry(date: Date(), city: "London",
                               temperature: 89, description: "Thunder Storm",
                                    icon: "cloud.bolt.rain", image: "thunder",
                                                url: thunderUrl)
    }

    func snapshot(for configuration: ConfigurationAppIntent, in context: Context) async -> WeatherEntry {
        WeatherEntry(date: Date(), city: "London",
                            temperature: 89, description: "Thunder Storm",
                                 icon: "cloud.bolt.rain", image: "thunder",
                                                url: thunderUrl)
    }
.
.Code language: Swift (swift)
Repeat this step for both declarations in the preview provider:
#Preview(as: .systemMedium) {
    WeatherWidget()
} timeline: {
    WeatherEntry(date: Date(),
                        city: "London", temperature: 89,
                 description: "Thunder Storm",
                        icon: "cloud.bolt.rain", image: "thunder",
                         url: thunderUrl )
    WeatherEntry(date: Date(),
                        city: "London", temperature: 89,
                 description: "Hail",
                        icon: "cloud.hail", image: "hail", url: thunderUrl)
}Code language: Swift (swift)
The final task within the widget code is to assign a URL action to the widget entry view. This is achieved using the widgetUrl() modifier, passing through the URL from the widget entry. Remaining in the WeatherWidget.swift file, locate the WeatherWidgetEntryView declaration and add the modifier to the top-level ZStack as follows:
struct WeatherWidgetEntryView : View {
    var entry: Provider.Entry

    @Environment(\.widgetFamily) var widgetFamily

    var body: some View {
        ZStack {
            Color("weatherBackgroundColor")
            HStack {
                WeatherSubView(entry: entry)
                if widgetFamily == .systemMedium {
                    Image(entry.image)
                        .resizable()
                }
            }
        }
        .widgetURL(entry.url)
    }
}Code language: Swift (swift)
With deep link support added to the widget, the next step is to add support to the app.
 |
You are reading a sample chapter from an old edition of iOS App Development Essentials. Purchase the fully updated iOS 18 App Development Essentials book. The full book contains 71 chapters, over 612 pages of in-depth information, downloadable source code, and access to over 50 SwiftUI knowledge test quizzes. |
Adding Deep Link Support to the App
When an app is launched via a deep link, it is passed a URL object, which may be accessed via the top-level view in the main content view. This URL can then be used to present different content to the user than would usually be displayed.
The first step in adding deep link support to the WidgetDemo app is to modify the ContentView.swift file to a navigation path to the NavigationStack, as outlined below. This will allow us to navigate to the detail view when a selection is made within the widget:
import SwiftUI
.
.
struct ContentView: View {

    @State var path = NavigationPath()

    var body: some View {
        NavigationStack(path: $path) {
            List {
.
.Code language: Swift (swift)
When a view is displayed as the result of a deep link, the URL used to launch the app can be identified using the onOpenUrl() modifier on the parent view. Modify the ContentView declaration to add the onOpenUrl() modifier as follows:
.
.
var body: some View {
    NavigationStack(path: $path) {
        List {
.
.
        }
        .navigationDestination(for: WeatherType.self) { weather in
            WeatherDetailView(weather: weather)
        }
        .navigationTitle("Severe Weather")
        .onOpenURL(perform: { (url) in

            if (!path.isEmpty) {
                path.removeLast(path.count)
            }

            if (url == hailUrl) {
                path.append(WeatherType(name: "Hail Storm",
                                        icon: "cloud.hail"))
            } else if (url == thunderUrl) {
                path.append(WeatherType(name: "Thunder Storm",
                                        icon: "cloud.bolt.rain"))
            } else if (url == tropicalUrl) {
                path.append(WeatherType(name: "Tropical Storm",
                                        icon: "tropicalstorm"))
            }
        })
    }
}Code language: Swift (swift)
The code performs a comparison of the URL used to launch the app with each of the custom URLs supported by the widget. If a matching URL is found, a WeatherType instance is configured and appended to the navigation path. This, in turn, triggers the navigationDestination() modifier causing the WeatherDetailView to be displayed.
We have also added code that checks whether the navigation path is empty and, if necessary, removes any existing destinations. We are doing this because the app may already be displaying a detail view from a previous session when it is launched from the widget. If we append destinations to the non-empty path, the user will have to navigate back through any previous views if they decide to return to the home screen.
 |
You are reading a sample chapter from an old edition of iOS App Development Essentials. Purchase the fully updated iOS 18 App Development Essentials book. The full book contains 71 chapters, over 612 pages of in-depth information, downloadable source code, and access to over 50 SwiftUI knowledge test quizzes. |
Testing the Widget
After making the changes, run the app and then the widget extension on a device or simulator and make sure that tapping the widget opens the app and displays the detail screen correctly configured for the current weather:

Summary
By default, a widget will launch the main view of the companion app when tapped by the user. This behavior can be enhanced by establishing deep links that take the user to specific areas of the app. This involves using the widgetUrl() modifier to assign destination URLs to the views in a widget entry layout. Within the app, the onOpenUrl() modifier is then used to identify the URL used to launch the app and initiate navigation to the corresponding view.
