
In this chapter, we will create a project demonstrating how to add a Live Activity to a SwiftUI-based iOS app using WidgetKit and ActivityKit. The project will include support for lock screen, Dynamic Island, and alert activity views, providing a practical example of activity widget attributes and creating, updating, and managing Live Activity instances.
About the LiveActivityDemo Project
The project created in this chapter will consist of a simple stock tracking app designed to track the fictitious price of Apple, Inc. shares (Ticker: APPL). In the initial steps, we will create a content view displaying updating price data values and buttons to start and stop the tracking. Once these steps are complete, the app will be extended to include a Live Activity widget.
Creating the Project
Launch Xcode and select the option to create a new Multiplatform App project named LiveActivityDemo.
Building the View Model
The pricing data for the project will be provided by a view model class that uses a timer to generate random pricing information. Select the File -> New -> File… menu option and use the Swift File template to create a class file named PricingViewModel.swift. Once you have created the file, make the following changes to create the view model: import Foundation
import Foundation

@Observable
class PricingViewModel {

    private var timer: Timer?
    private var oldPrice: Float = 100
    var currentPrice: Float = 100
    var changePercent: Float = 0

    func startTracking(ticker: String) {
        startUpdates()
    }

    func startUpdates() {
            timer = Timer.scheduledTimer(
				withTimeInterval: 10.0, repeats: true) {_ in
            self.update()
        }
    }

    func stopTracking() {
        timer?.invalidate()
    }

    private func update() {
        refreshPricing()
    }

    func refreshPricing() {
        oldPrice = currentPrice
        currentPrice = Float.random(in: 100...200)
        changePercent = (currentPrice - oldPrice) / oldPrice * 100
    }
}Code language: Swift (swift)
The above changes declare the class as observable and add properties to contain the pricing data. Functions are also added to start and stop a timer, which, in turn, updates the pricing data at regular intervals, essentially simulating a live data feed. Now that we have a view model, the next step is to design the main content view.
 |
You are reading a sample chapter from an old edition of iOS App Development Essentials. Purchase the fully updated iOS 18 App Development Essentials book. The full book contains 71 chapters, over 612 pages of in-depth information, downloadable source code, and access to over 50 SwiftUI knowledge test quizzes. |
Designing the Content View
The main content view will include the ticker, current price, and change percentage information. In addition, buttons labeled “Track” and “Stop” will be configured to call the view model startTracking() and stopTracking() functions, respectively.
Since the view model was declared as observable, the UI will update automatically as the pricing values change. Within Xcode, select the ContentView.swift file and modify it as follows:
import SwiftUI

struct ContentView: View {

    private var viewModel = PricingViewModel()
    let ticker = "APPL"

    var body: some View {

        let color = viewModel.changePercent < 0 ? Color.red : Color.green
        let arrow = viewModel.changePercent < 0 ?
                               "arrowshape.down.fill" : "arrowshape.up.fill"

        VStack(spacing: 20) {
            Text(ticker)
                .font(.system(size: 56))

            HStack {
                VStack {
                    Text("Price: \(viewModel.currentPrice, specifier: "%.2f")")
                        .foregroundColor(color)

                    HStack {
                        Image(systemName: arrow)
                        Text("Change: \(viewModel.changePercent, specifier: "%.0f")%")
                    }
                }
                .foregroundColor(color)
                .font(.largeTitle)
            }

            HStack(spacing:20) {

                Spacer()

                Button(action: {
                    viewModel.startTracking(ticker: ticker)
                }, label: {
                    Text("Track")
                })

                Spacer()

                Button(action: {
                    viewModel.stopTracking()
                }, label: {
                    Text("Stop")
                })

                Spacer()
            }
            .font(.largeTitle)
        }
        .padding()

        Spacer()
    }
}

#Preview {
    ContentView()
}Code language: Swift (swift)
Note that the above code checks the view model’s changePercent property to select the arrow direction and the color of the pricing text to reflect whether the price is increasing or decreasing.
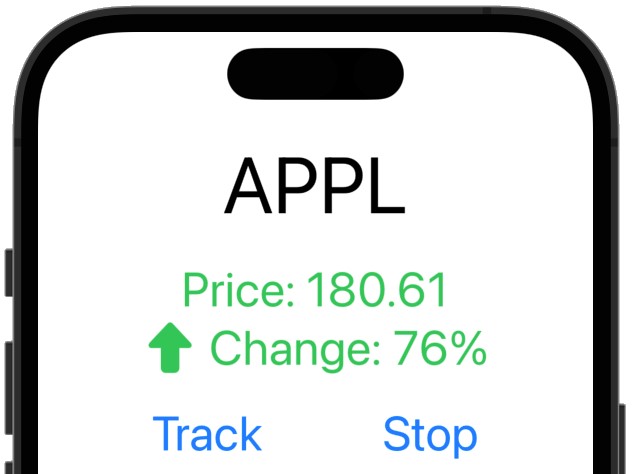
Verify that the view appears in the Preview panel as shown in Figure 1-1 and that the data updates after the Track button is clicked:
Adding the Live Activity Extension
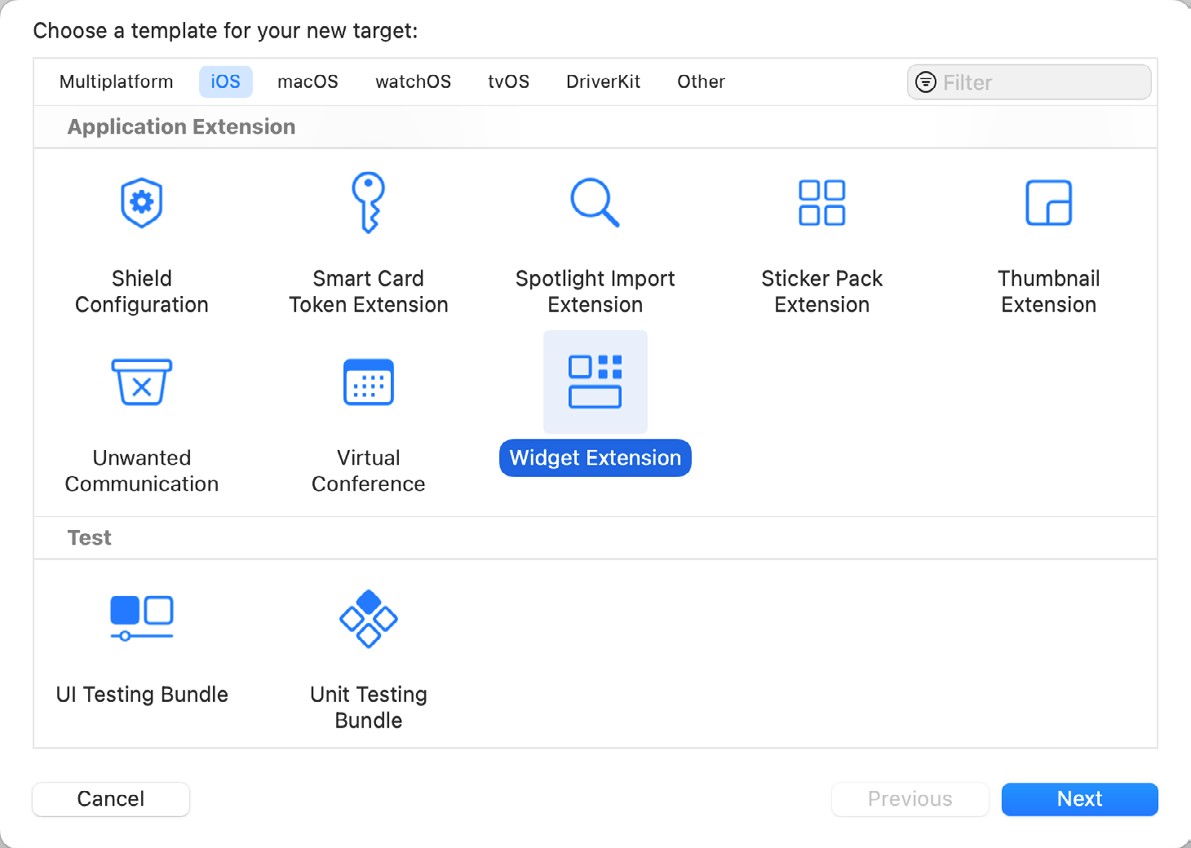
The next step is to add the Live Activity widget extension by selecting the File -> New -> Target… menu option. From within the target template panel, select the Widget Extension option as shown in Figure 1-2 before clicking the Next button:
|
You are reading a sample chapter from an old edition of iOS App Development Essentials. Purchase the fully updated iOS 18 App Development Essentials book. The full book contains 71 chapters, over 612 pages of in-depth information, downloadable source code, and access to over 50 SwiftUI knowledge test quizzes. |
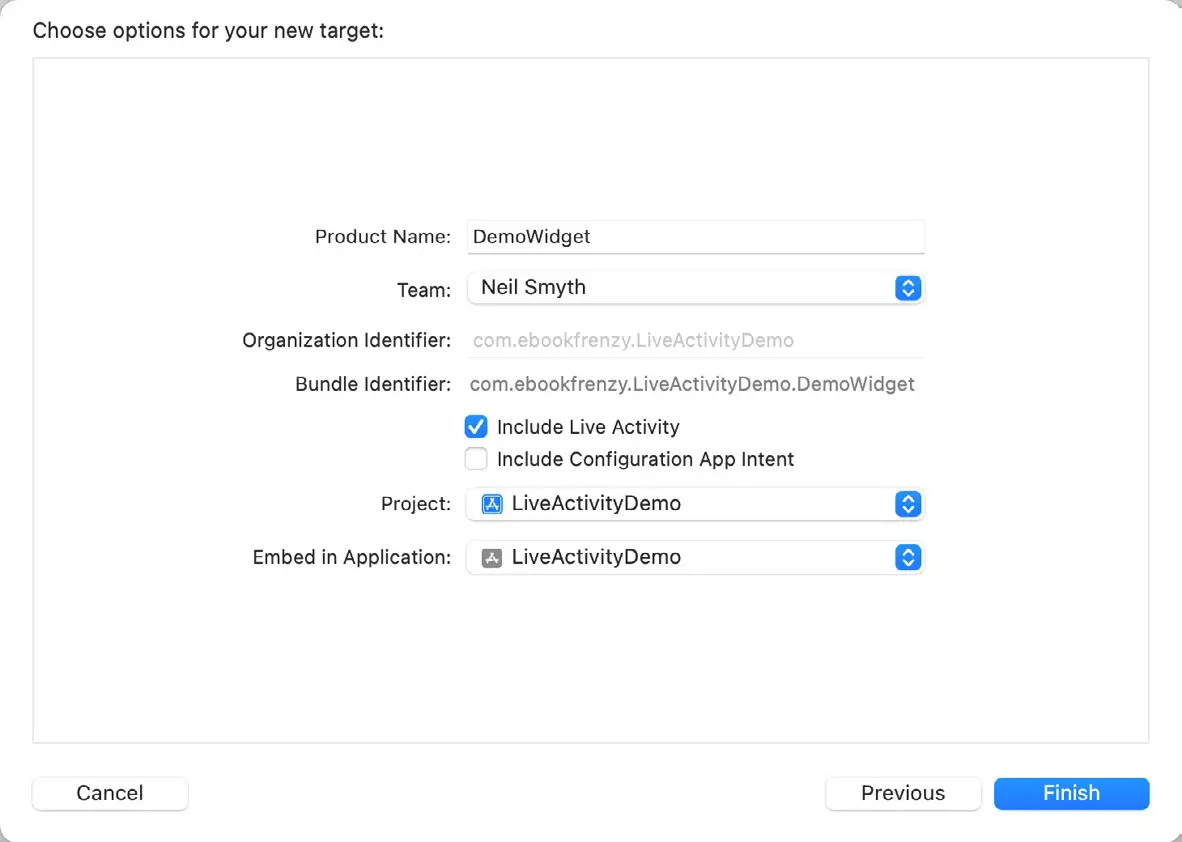
On the subsequent screen, enter DemoWidget into the product name field. Before clicking the Finish button, ensure the Include Live Activity option is enabled. Since we do not plan to make the widget configurable, the Include Configuration App Intent can be turned off, as shown in Figure 1-3:
When prompted, click the Activate button to ensure the widget extension is included in the project build configuration.
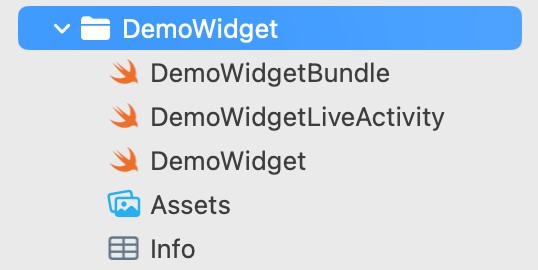
Once the extension has been added, refer to the project navigator panel, where a new folder containing the widget extension will have been added, as shown in Figure 1-4:
As we only need the Live Activity in our app, edit the DemoWidgetBundle.swift file and remove the DemoWidget() call:
import WidgetKit
import SwiftUI

@main
struct DemoWidgetBundle: WidgetBundle {
    var body: some Widget {
        // DemoWidget()
        DemoWidgetLiveActivity()
    }
}Code language: Swift (swift)
Enabling Live Activities Support
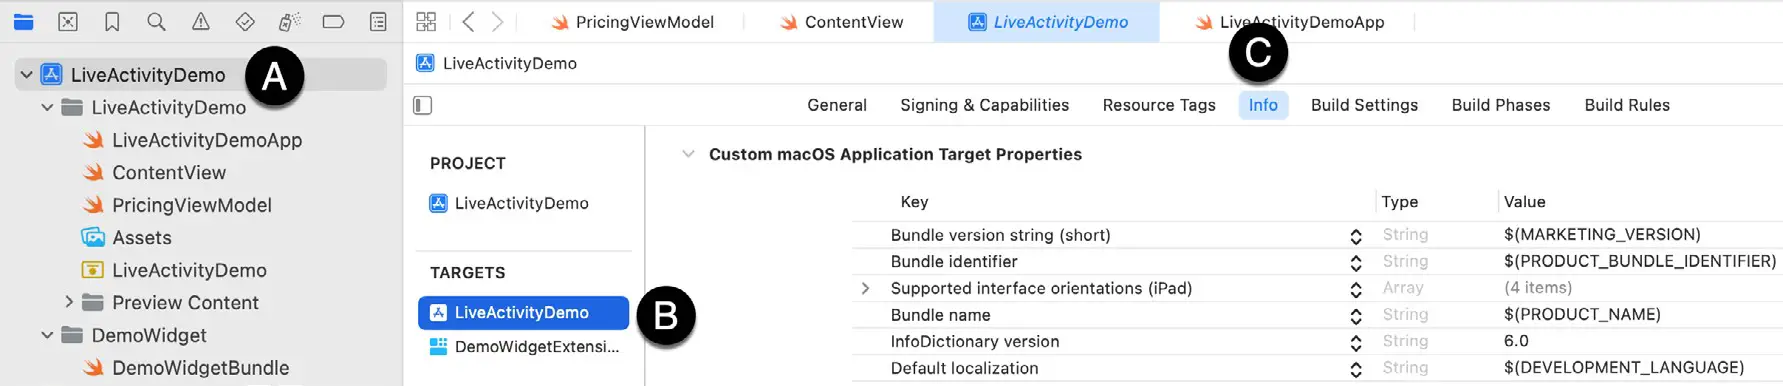
Live Activity support must be enabled once the main project has been created. Select the LiveActivityDemo target at the top of the Project Navigator panel (marked A in Figure 1-5) so that the main panel displays the project settings. From within this panel, select the LiveActivityDemo target entry (B), followed by the Info tab (C):
|
You are reading a sample chapter from an old edition of iOS App Development Essentials. Purchase the fully updated iOS 18 App Development Essentials book. The full book contains 71 chapters, over 612 pages of in-depth information, downloadable source code, and access to over 50 SwiftUI knowledge test quizzes. |
On the Info screen, locate the bottom entry in the list of properties and hover the mouse pointer over the item. When the plus button appears, click it to add a new entry to the list. From within the drop-down list of available keys, locate and select the Supports Live Activities option, as shown in Figure 1-6:
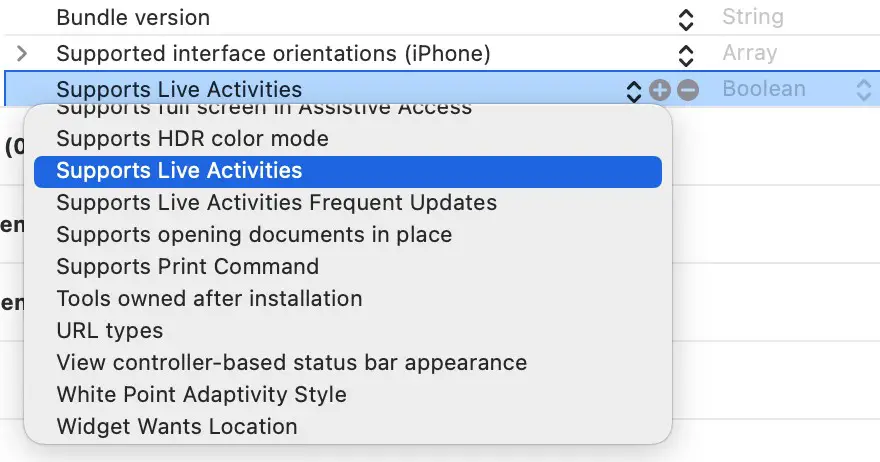
Within the value field for the property, change the setting to YES.
Enabling the Background Fetch Capability
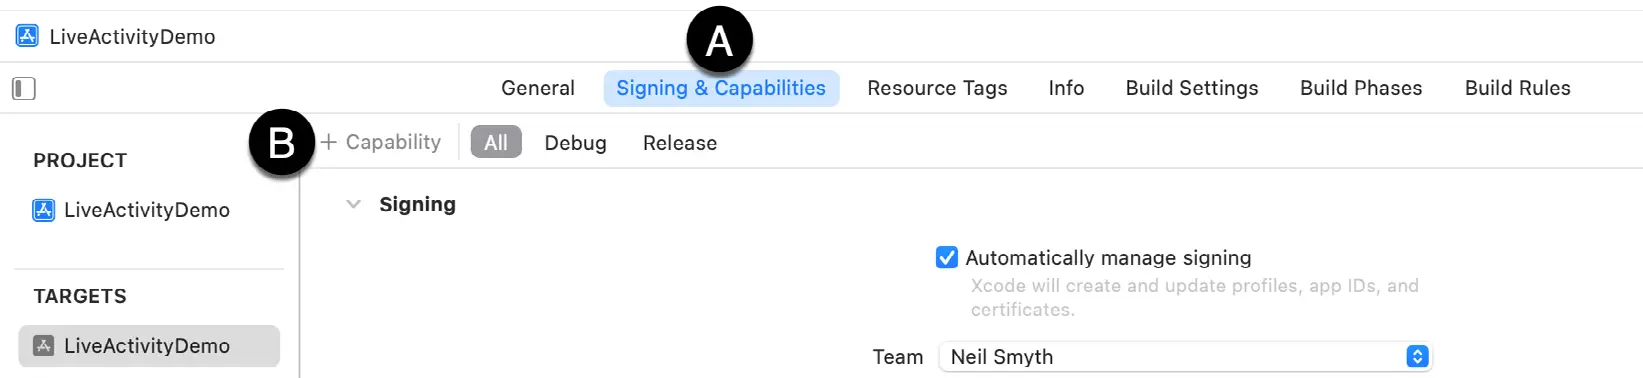
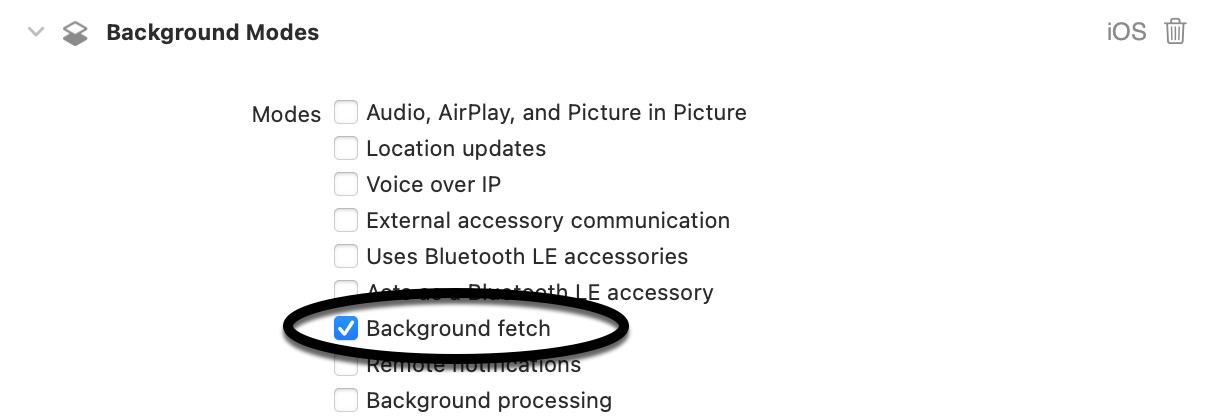
The Live Activity widget will need to receive updates while the LiveActivityDemo app is in the background. To enable background support, select the Signing & Capabilities tab (marked A in Figure 1-7), followed by the + Capability button (B):
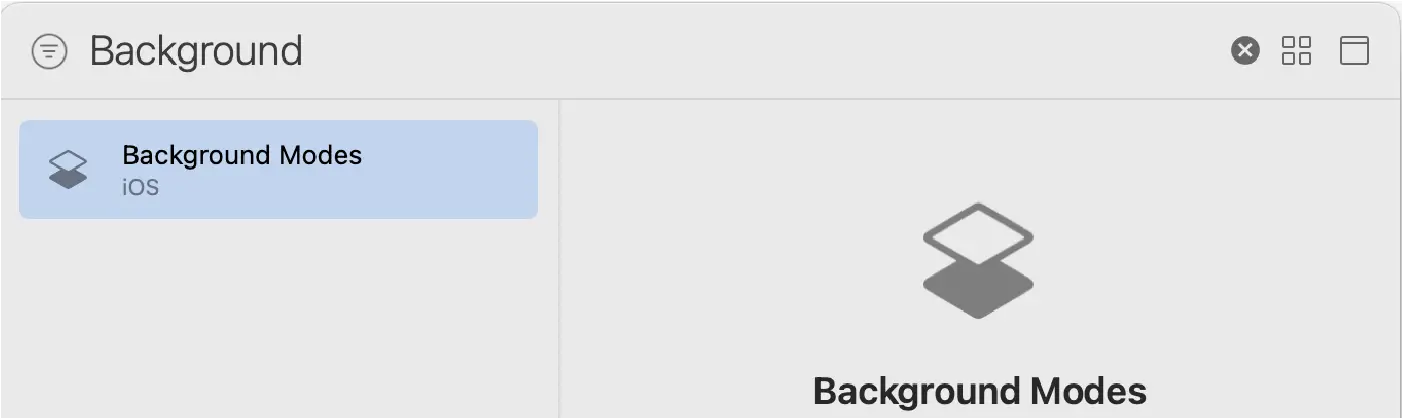
In the resulting dialog, enter Background into the filter bar, select the result, and press the keyboard enter key to add the capability to the project:
Once you have added the Background Modes capability, locate it in the Signing & Capabilities screen and enable Background Fetch mode:
|
You are reading a sample chapter from an old edition of iOS App Development Essentials. Purchase the fully updated iOS 18 App Development Essentials book. The full book contains 71 chapters, over 612 pages of in-depth information, downloadable source code, and access to over 50 SwiftUI knowledge test quizzes. |
Defining the Activity Widget Attributes
When the widget intent was added to the project, Xcode added a file named DemoWidgetLiveActivity, which declares both the activity attributes and the various widget layout configurations. Before designing the layouts, we must specify the widget attributes for our project. Begin by editing the DemoWidgetLiveActivity.swift file and locating and deleting the template DemoWidgetAttributes structure:
/*
struct DemoWidgetAttributes: ActivityAttributes {
public struct ContentState: Codable, Hashable {
// Dynamic stateful properties about your activity go here!
var emoji: String
}
// Fixed non-changing properties about your activity go here!
var name: String
}
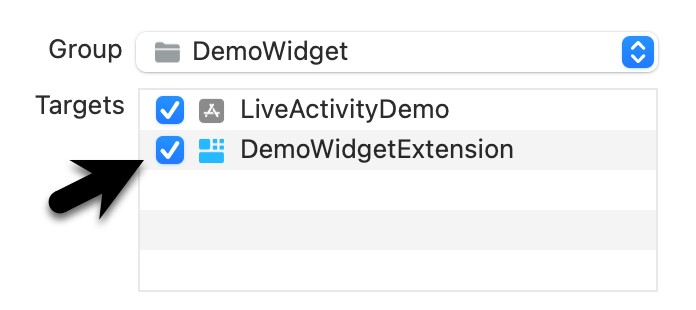
*/Code language: Swift (swift)Next, right-click on the DemoWidget folder in the Project Navigator panel, select the New File… menu option, and create a new Swift file named DemoWidgetAttributes.swift. Before clicking the Create button, make sure that the widget extension is enabled in the Targets section, as highlighted in Figure 1-10:
Once you have created the file, modify it as follows:
import Foundation
import ActivityKit

struct DemoWidgetAttributes: ActivityAttributes {
    public struct ContentState: Codable, Hashable {
        var currentPrice: Float
        var changePercent: Float
    }

    var ticker = ""
}Code language: Swift (swift)
For this project, we have declared two dynamic properties for the price and change percentage and one static variable for the ticker.
Adding the Percentage and Lock Screen Views
Before designing the widget layouts, we will add some views that we can call in the widget configuration code. The first of these views will display the widget on the lock screen and alert banner. Right-click on the DemoWidget folder in the Project Navigator panel, select the New File… menu option, and create a new SwiftUI View file named PercentView.swift. Enable the widget extension target option, as shown in Figure 1-10 above, before clicking Create. Edit the new file and modify it as follows:
|
You are reading a sample chapter from an old edition of iOS App Development Essentials. Purchase the fully updated iOS 18 App Development Essentials book. The full book contains 71 chapters, over 612 pages of in-depth information, downloadable source code, and access to over 50 SwiftUI knowledge test quizzes. |
import SwiftUI
import WidgetKit

struct PercentView: View {

    var context: ActivityViewContext<DemoWidgetAttributes>

    var body: some View {

        let color = context.state.changePercent < 0 ? Color.red : Color.green

        ProgressView(value: abs(context.state.changePercent), total: 100) {
            context.state.changePercent < 0 ?
                      Image(systemName: "arrowshape.down.fill") :
                                  Image(systemName: "arrowshape.up.fill")
        }
        .progressViewStyle(.circular)
        .tint(color)
        .foregroundColor(color)
    }
}

#Preview {
    PercentView()
}Code language: Swift (swift)
Repeat the above steps to create a SwiftUI View file named LockScreenView.swift and make the following changes:
import SwiftUI
import WidgetKit

struct LockScreenView: View {

    var context: ActivityViewContext<DemoWidgetAttributes>

    var body: some View {

        let color = context.state.changePercent < 0 ? Color.red : Color.green

        HStack {

            VStack(alignment: .leading, spacing: 8) {
              Text(context.attributes.ticker).bold()
                .font(.title2)


                Text("\(context.state.currentPrice, specifier: "%.2f")")
                    .font(.title3)
                    .foregroundColor(color)
            }

            Spacer()

            Text("\(context.state.changePercent, specifier: "%.0f")%")
                .font(.largeTitle)
                .foregroundColor(color)

            Spacer()

            PercentView(context: context)
                .padding()
        }
        .padding()
        .activityBackgroundTint(Color.black)
        .activitySystemActionForegroundColor(Color.white)
    }
}

#Preview {
    LockScreenView()
}Code language: Swift (swift)
Designing the Widget Layouts
The next task is to design the various widget layout components, beginning with the lock screen layout. Edit the DemoWidgetLiveActivity.swift file and add a call to LockScreenView, passing it the activity context:
.
.
struct DemoWidgetLiveActivity: Widget {
    var body: some WidgetConfiguration {

        ActivityConfiguration(for: DemoWidgetAttributes.self) { context in
            LockScreenView(context: context)
        } dynamicIsland: { context in
.
.Code language: Swift (swift)
Next, implement the leading, trailing, and bottom regions of the Dynamic Island expanded layout, including a ternary statement to select the appropriate color:
.
.
} dynamicIsland: { context in

    DynamicIsland {

        let color = context.state.changePercent < 0 ? Color.red : Color.green

        DynamicIslandExpandedRegion(.leading) {
            Text(context.attributes.ticker)
                .font(.title3)
                .bold()
        }
        DynamicIslandExpandedRegion(.trailing) {
            Text("\(context.state.currentPrice, specifier: "%.2f")")
                .foregroundColor(color)
                .font(.title3)
                .bold()
        }
        DynamicIslandExpandedRegion(.bottom) {
            HStack {
                Text("Price change: ")
                Text("\(context.state.changePercent, specifier: "%.2f")%")
                    .foregroundColor(color)
                Spacer()
                PercentView(context: context)
            }
            .font(.title3)
            .bold()
        }
    } compactLeading: {
.
.Code language: Swift (swift)
The compact and minimal regions will be used when the Live Activity is displayed in the Dynamic Island and can be implemented as follows:
.
.
} compactLeading: {
    Text(context.attributes.ticker)
        .font(.title2)
        .bold()
        .foregroundColor(
           context.state.changePercent < 0 ? Color.red : Color.green)
} compactTrailing: {
    Text("\(context.state.currentPrice, specifier: "%.2f")")
        .font(.title2)
        .bold()
        .foregroundColor(
             context.state.changePercent < 0 ? Color.red : Color.green)
} minimal: {
    PercentView(context: context)
}
// .widgetURL(URL(string: "http://www.apple.com"))
// .keylineTint(Color.red)
.
.Code language: Swift (swift)
Finally, remove the following template preview code from the DemoWidgetLiveActivity.swift file:
|
You are reading a sample chapter from an old edition of iOS App Development Essentials. Purchase the fully updated iOS 18 App Development Essentials book. The full book contains 71 chapters, over 612 pages of in-depth information, downloadable source code, and access to over 50 SwiftUI knowledge test quizzes. |
/*
extension DemoWidgetAttributes {
    fileprivate static var preview: DemoWidgetAttributes {
        DemoWidgetAttributes(name: "World")
    }
}

extension DemoWidgetAttributes.ContentState {
    fileprivate static var smiley: DemoWidgetAttributes.ContentState {
        DemoWidgetAttributes.ContentState(emoji: "😀")
     }

     fileprivate static var starEyes: DemoWidgetAttributes.ContentState {
         DemoWidgetAttributes.ContentState(emoji: "🤩")
     }
}

#Preview("Notification", as: .content, using: DemoWidgetAttributes.preview) {
   DemoWidgetLiveActivity()
} contentStates: {
    DemoWidgetAttributes.ContentState.smiley
    DemoWidgetAttributes.ContentState.starEyes
}
*/Code language: JSON / JSON with Comments (json)
Launching the Live Activity
The final step before testing the app is to add code to the view model to start, update, and stop the Live Activity. Open the PriceViewModel.swift file in the editor and make the following changes to the startTracking() function:
import Foundation
import ActivityKit
import WidgetKit

@Observable
class PricingViewModel {

    private var activity: Activity<DemoWidgetAttributes>?
    private var timer: Timer?
    private var oldPrice: Float = 100
    var currentPrice: Float = 100
    var changePercent: Float = 0

    func startTracking(ticker: String) {
        let contentState = DemoWidgetAttributes.ContentState(
             currentPrice: currentPrice, changePercent: changePercent)
        var attributes = DemoWidgetAttributes()
        attributes.ticker = ticker

        do {
            activity = try Activity.request(
                attributes: attributes,
                content: .init(state: contentState, staleDate: nil),
                pushType: nil
            )
            startUpdates()
        } catch (let error) {
            print("Error starting Live Activity: \(error.localizedDescription).")
        }
    }
.
.Code language: Swift (swift)
The above changes configure the content state using the DemoWidgetAttributes class populated with the pricing data and ticker symbol. Next, the Live Activity request() function is called to start the Live Activity. Since we use local data instead of push notifications, the pushType parameter is set to nil.
Updating the Live Activity
Next, edit the update() function to update the Live Activity with the latest pricing data:
private func update() {
    refreshPricing()

    let priceStatus = DemoWidgetAttributes.ContentState(
         currentPrice: currentPrice, changePercent: changePercent)

    Task {
        await activity?.update(
            ActivityContent<DemoWidgetAttributes.ContentState>(
                state: priceStatus,
                staleDate: nil,
                relevanceScore: 0
            ),
            alertConfiguration: nil
        )
    }
}Code language: Swift (swift)
Once again, a content state is created using the refreshed pricing data and passed to the Live Activity update() function. We will add an alert configuration later in the chapter, so we have set this parameter to nil for now.
Stopping the Live Activity
In addition to stopping the timer, the stopTracking() function must end the Live Activity. This requires the following changes:
|
You are reading a sample chapter from an old edition of iOS App Development Essentials. Purchase the fully updated iOS 18 App Development Essentials book. The full book contains 71 chapters, over 612 pages of in-depth information, downloadable source code, and access to over 50 SwiftUI knowledge test quizzes. |
func stopTracking() async {
    let finalState = DemoWidgetAttributes.ContentState(
            currentPrice: currentPrice, changePercent: changePercent)
    timer?.invalidate()
    await activity?.end(.init(state: finalState, staleDate: nil),
            dismissalPolicy: .default)
}Code language: Swift (swift)
Now that stopTracking() has been declared as an async function, we also need to change the way it is called within the ContentView.swift file:
.
.
Spacer()
Button(action: {
    Task {
        await viewModel.stopTracking()
    }
}, label: {
    Text("Stop")
})
Spacer()
.
.Code language: Swift (swift)
Testing the App
Because the iOS simulator does not support the execution of background tasks, the best way to test the Live Activity is to run it on a physical device. With a device connected, launch the LiveActivityDemo app, start price tracking, and place the app in the background. Lock the device and then display the lock screen where the Live Activity widget should appear, as shown below:
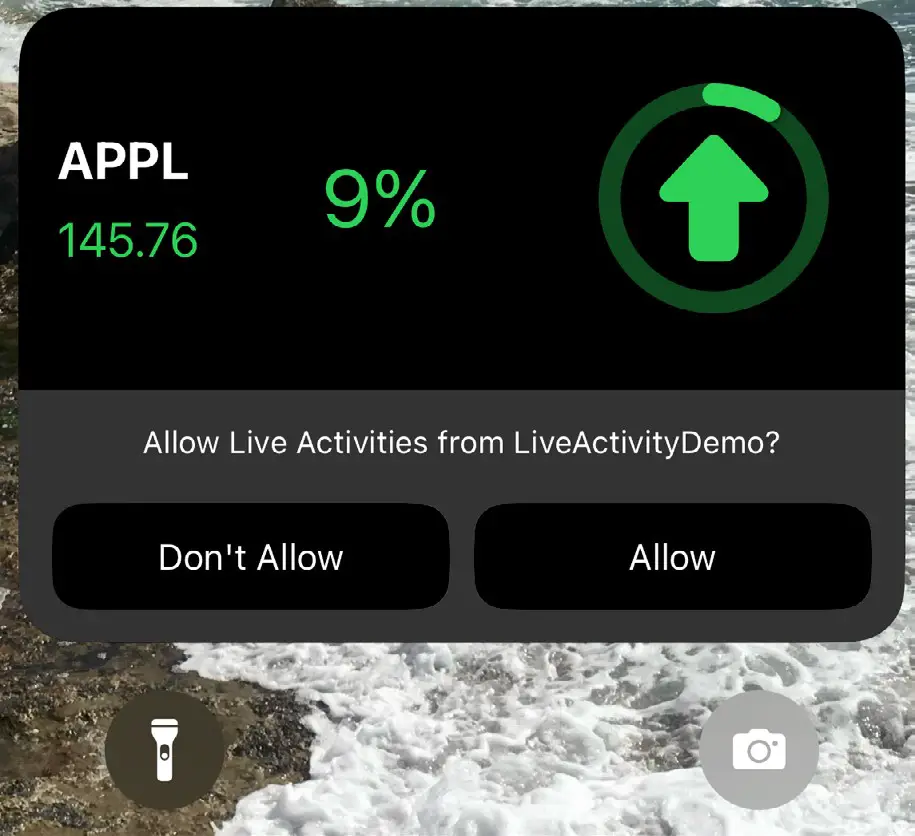
Tap the Allow button to enable the Live Activity and watch as the pricing data updates regularly. If your device has a Dynamic Island, unlock it and check that the pricing data appears as Figure 1-12. If your device does not have a Dynamic Island, run the app on a suitable simulator, start the price tracking, and place the app in the background. The Live Activity will still appear in the Dynamic Island, but the data will not update:
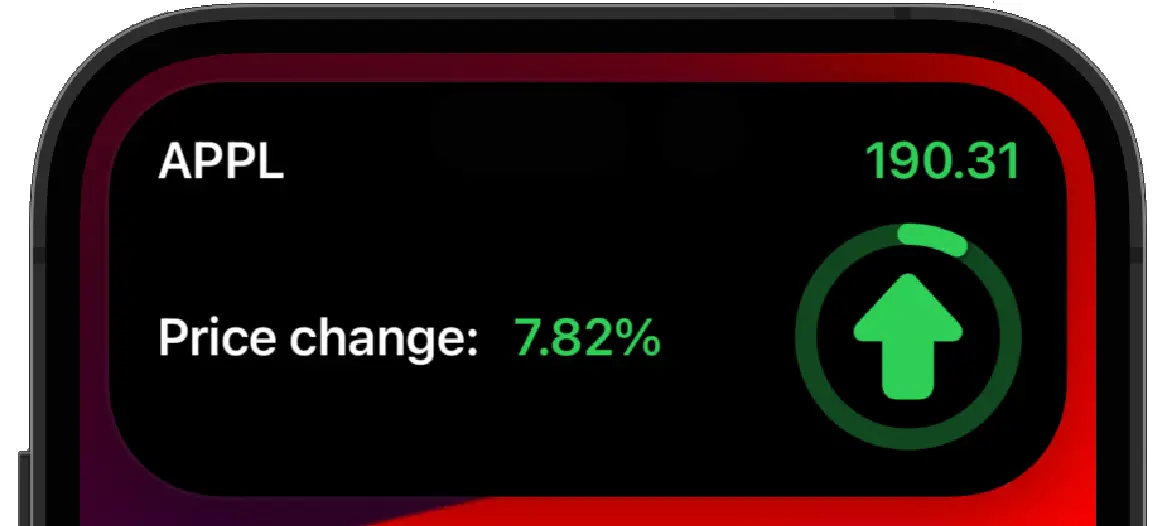
Next, perform a long press on the island to display the expanded view:
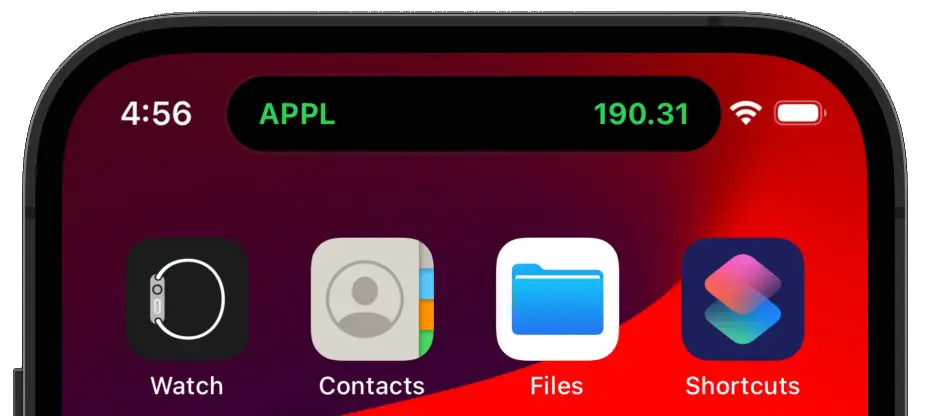
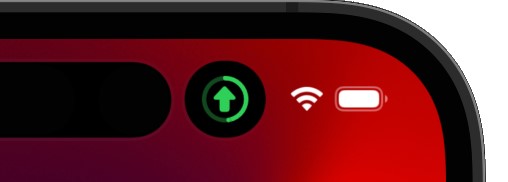
If you have access to another app containing a Live Activity, run it and start its Live Activity. Next, reinstall the LiveActivityDemo app, start the price tracking, and place the app in the background. The minimal widget layout should appear as shown in Figure 1-14:
|
You are reading a sample chapter from an old edition of iOS App Development Essentials. Purchase the fully updated iOS 18 App Development Essentials book. The full book contains 71 chapters, over 612 pages of in-depth information, downloadable source code, and access to over 50 SwiftUI knowledge test quizzes. |
Adding an Alert Notification
The final step in this example is to add an alert to notify the user when the stock price drops significantly. To do this, we will create an AlertConfiguration instance and pass it to the activity’s update() function in the PricingViewModel.swift file:
private func update() { refreshPricing() let priceStatus = DemoWidgetAttributes.ContentState( currentPrice: currentPrice, changePercent: changePercent)
private func update() {
refreshPricing()
let priceStatus = DemoWidgetAttributes.ContentState(
currentPrice: currentPrice,
changePercent: changePercent)
Task {
var alertConfig: AlertConfiguration? = nil
if (changePercent < -25) {
alertConfig = AlertConfiguration(
title: "Price Drop Alert",
body: "Stock price has decreased by more than 25%",
sound: .default
)
}
await activity?.update(
ActivityContent<DemoWidgetAttributes.ContentState>(
state: priceStatus,
staleDate: nil,
relevanceScore: 0
),
alertConfiguration: alertConfig
)
}
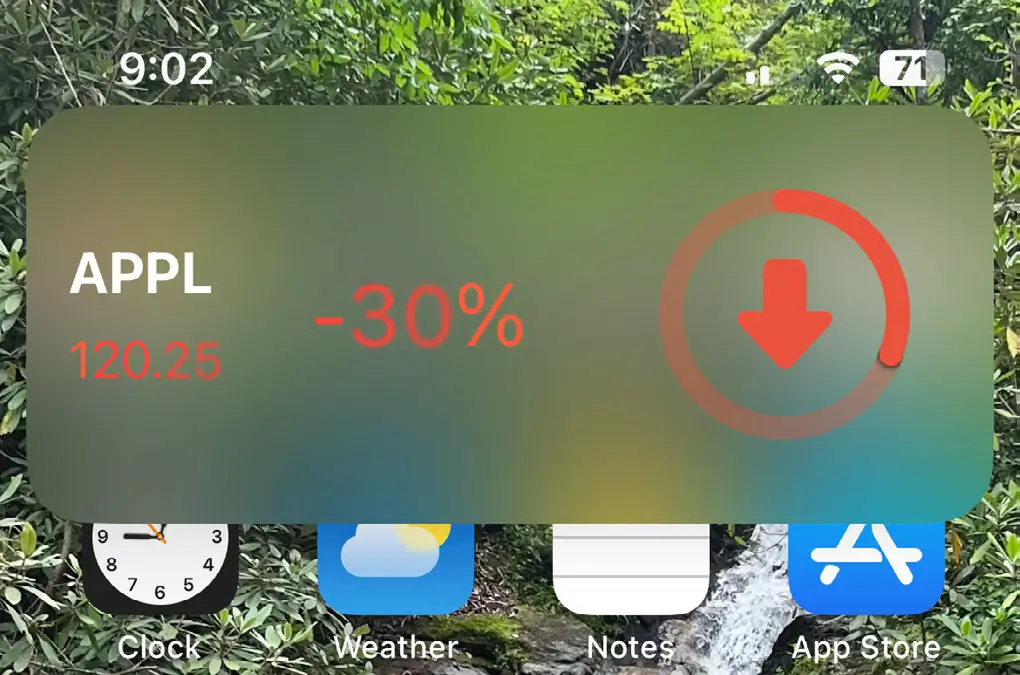
}Code language: Swift (swift)Rerun the app on a physical device, start the price tracking, and place the app in the background. When the price change drops below 25%, the alert will sound, and the widget will appear on the screen as shown in Figure 1-15:
Understanding Background Updates
The LiveActivityDemo app is designed to update the pricing data once every 10 seconds, and while you have been testing, this is the behavior you should be seeing. Since we are launching the app from within Xcode, it is essential to note that it is running while connected to the debugger. When the app is launched without the debugger (in other words, launched from the device screen), you will notice that the updates no longer occur as expected. In fact, it may take minutes or even hours for the widgets to update. This is because iOS does not guarantee that a background task will run when scheduled. Instead, iOS uses a predictive engine to decide which background tasks to run and when to run them based on various factors. These factors include the battery level, the time of day and frequency with which the user interacts with the app, and the time and resources required to complete each background refresh.
These limitations, intended to prevent background tasks from draining the battery or degrading the device’s performance, do not apply when the app runs while connected to the debugger.
|
You are reading a sample chapter from an old edition of iOS App Development Essentials. Purchase the fully updated iOS 18 App Development Essentials book. The full book contains 71 chapters, over 612 pages of in-depth information, downloadable source code, and access to over 50 SwiftUI knowledge test quizzes. |
There are several options for mitigating the unpredictable nature of background tasks.
To increase the likelihood that your background tasks will run, ensure that the update tasks are brief and do not make excessive resource demands. Also, it may take a while for the predictive algorithms to begin scheduling updates for your app after the Live Activity starts, so wait a few hours before making any assumptions.
Another way to improve the user experience is to include an “out of date” notification on the widget presentations and a button to wake up the app and refresh the data. This approach will be covered in the Adding a Refresh Button to an iOS Live Activity chapter.
Alternatively, switching from local updates to push notifications may improve performance, particularly when using a high priority. In the An iOS 17 Live Activity Push Notifications Tutorial chapter, we will convert the LiveActivityDemo project to use remote notifications.
Summary
This chapter created an example app project containing a Live Activity to present data on the device lock screen and Dynamic Island of iOS devices. The initial steps involved adding a widget extension to an Xcode project and enabling support for Live Activity updates. We then declared the Activity’s widget attributes before designing the various UI layout regions. Next, we added code to start, update, and stop the Live Activity. Finally, an alert notification was added to the Activity.
|
You are reading a sample chapter from an old edition of iOS App Development Essentials. Purchase the fully updated iOS 18 App Development Essentials book. The full book contains 71 chapters, over 612 pages of in-depth information, downloadable source code, and access to over 50 SwiftUI knowledge test quizzes. |
Background updates are executed at the discretion of the operating system based on predictive algorithms. While it is possible to increase the chances that an update may be performed more frequently, there is no guaranteed way to predict when a Live Activity will be updated.