
Although we have demonstrated that Live Activities can be updated from within an app, a more likely scenario is that the updates will be generated by a remote server and sent to the device. This can be achieved using push notifications. This chapter will introduce push notifications and convert the LiveActivityDemo project from local updates to push notifications. The next chapter will demonstrate how to send test push notifications.
An Overview of Push Notifications
Push notifications have been available to iOS app developers for a while. They are how News apps notify you of breaking news stories, or a banking app might alert you to a suspicious credit card transaction. The push notification system has been upgraded to include a notification type specifically for Live Activity updates.
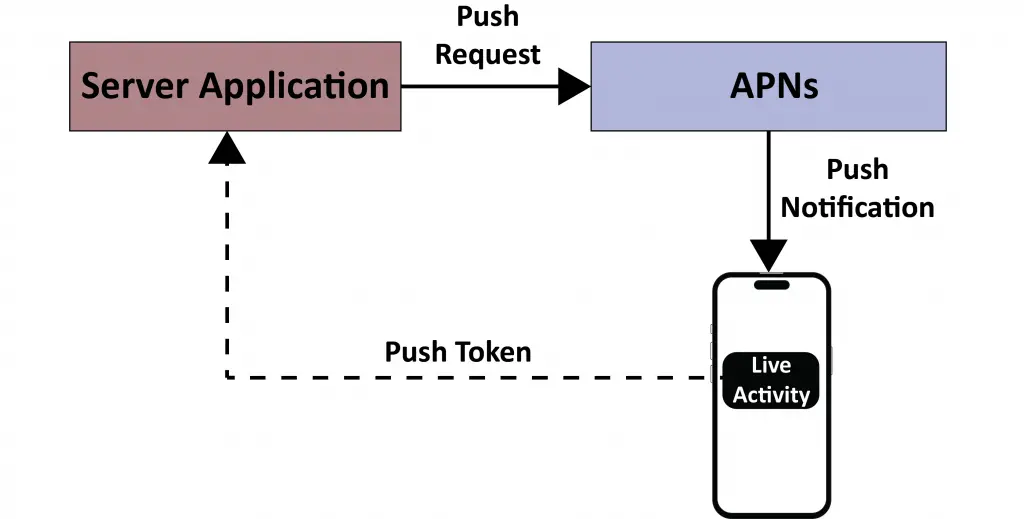
A typical push notification configuration will consist of your server-side application, the Apple Push Notification service (APNs), and the Live Activity on a device.
Simply put, the Live Activity on the device creates a push token uniquely identifying the device and activity. The server application creates a push notification containing the push token, several configuration values, and a JSON structure containing the latest data (called the payload) and sends it to the APNs. The APNs then delivers the payload to the device matching the push token. Upon receiving the push notification, the Live Activity content state updates automatically with the payload data, causing the widgets to refresh. The diagram in Figure 1-1 illustrates the push notification process:
Registering an APNs Key
The first step in setting up push notification support is registering and downloading a key within the Apple Developer portal. This will require an Apple Developer Program membership. If you are not a member, follow the steps in the “Joining the Apple Developer Program” chapter to enroll.
 |
You are reading a sample chapter from an old edition of iOS App Development Essentials. Purchase the fully updated iOS 18 App Development Essentials book. The full book contains 71 chapters, over 612 pages of in-depth information, downloadable source code, and access to over 50 SwiftUI knowledge test quizzes. |
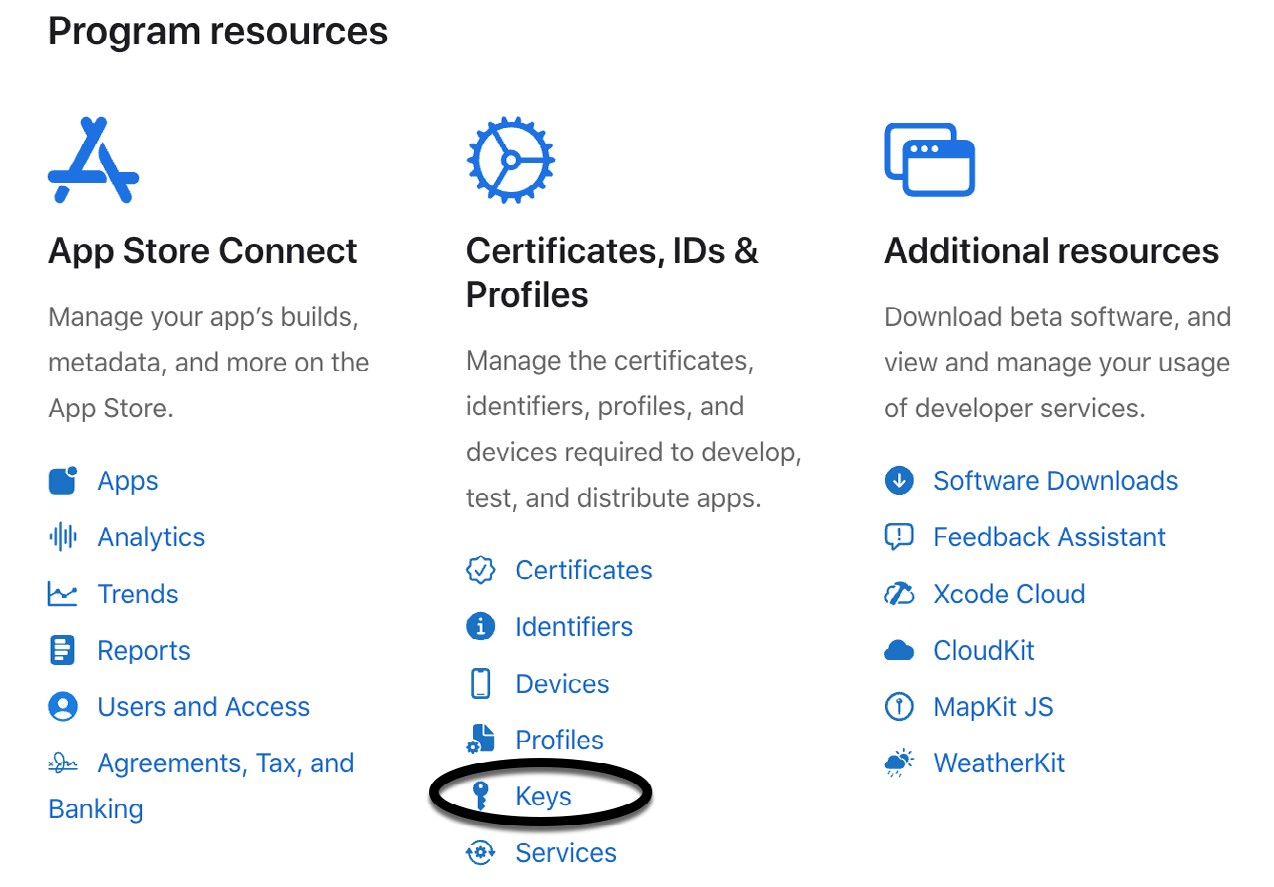
Once you have membership, open a browser window, navigate to https://developer.apple.com, and log in to your account. From the portal home screen, locate and select the Keys link in the Certificates, IDs & Profiles section, as highlighted in Figure 1-2:
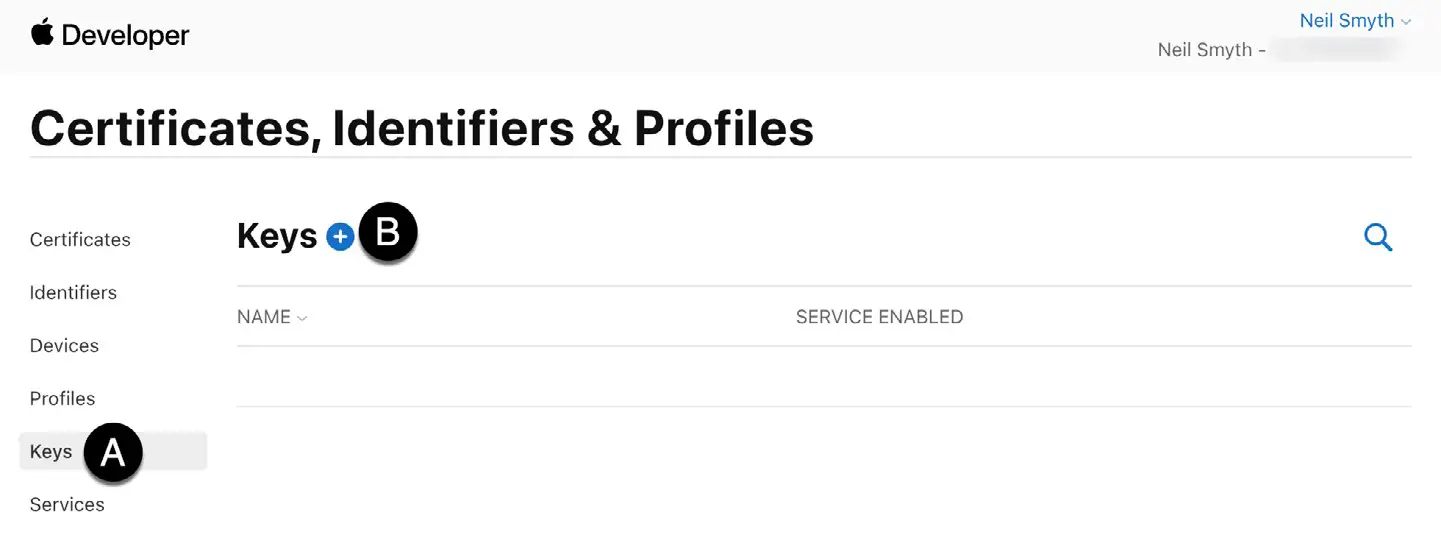
On the next screen, select Keys in the side panel (marked A in Figure 1-3), then click the + button (B) to register a new key:
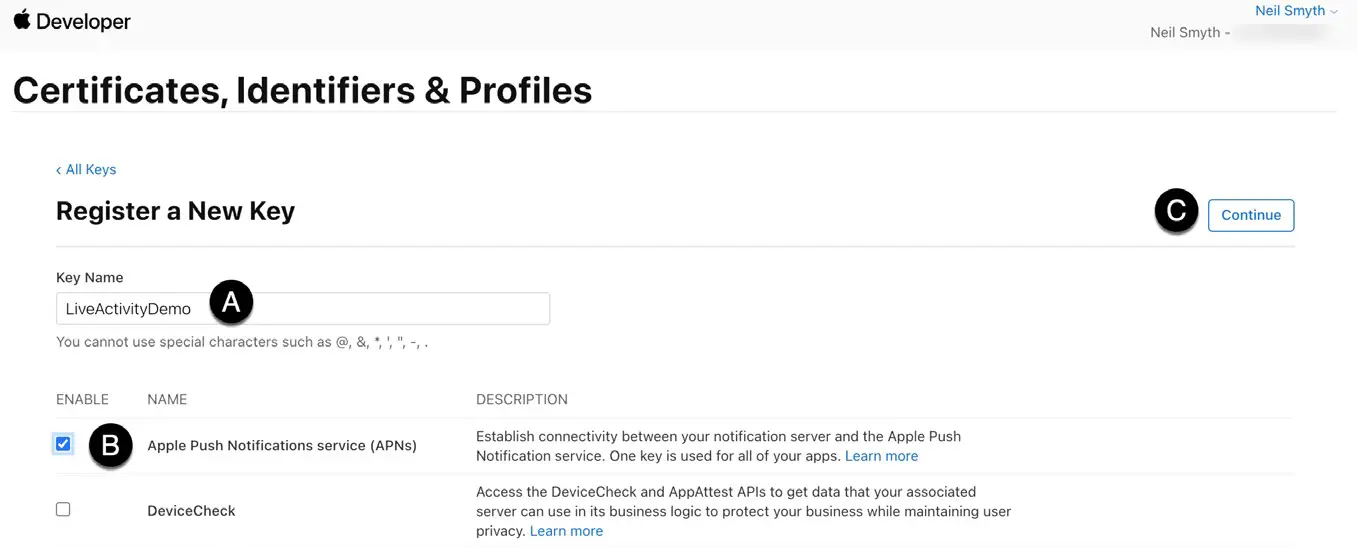
When the following screen appears, enter a Key name (for example, LiveActivityDemo) in the field marked A in Figure 1-4, and enable the Apple Push Notifications service option (B) before clicking the Continue button (C):
On the next screen, review the information before clicking on the Register button:
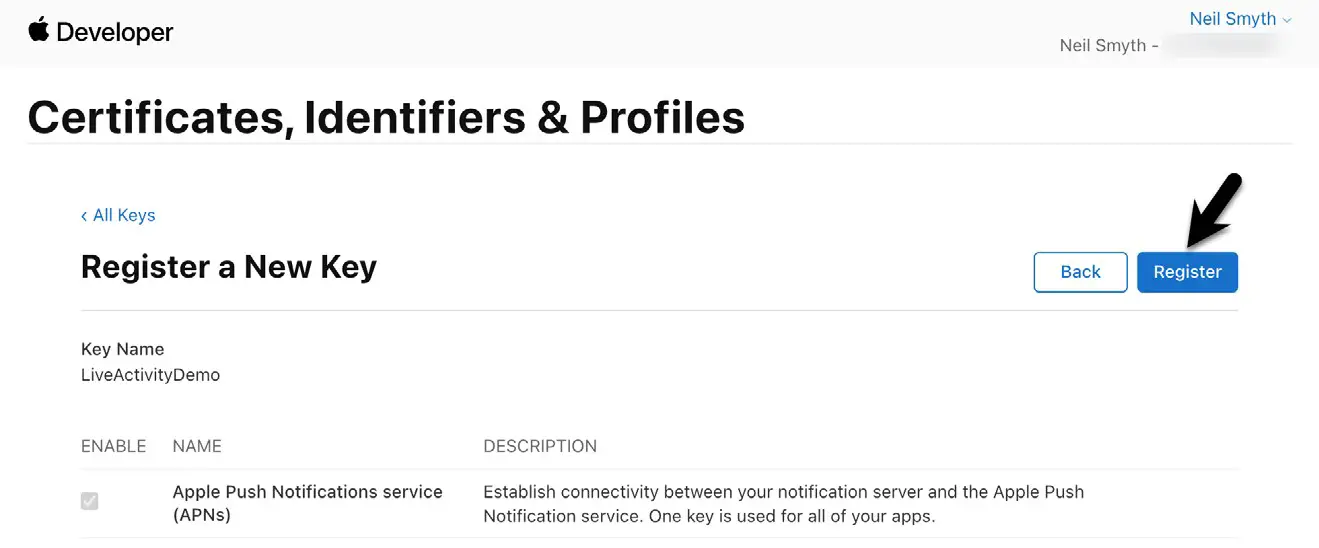
Once the key is registered, download the key file to a safe location (once it has been downloaded, it will not be possible to do so again) and note the Key ID. Both will be required in the next chapter when we start sending notifications.
|
You are reading a sample chapter from an old edition of iOS App Development Essentials. Purchase the fully updated iOS 18 App Development Essentials book. The full book contains 71 chapters, over 612 pages of in-depth information, downloadable source code, and access to over 50 SwiftUI knowledge test quizzes. |
Enabling Push Notifications for the App
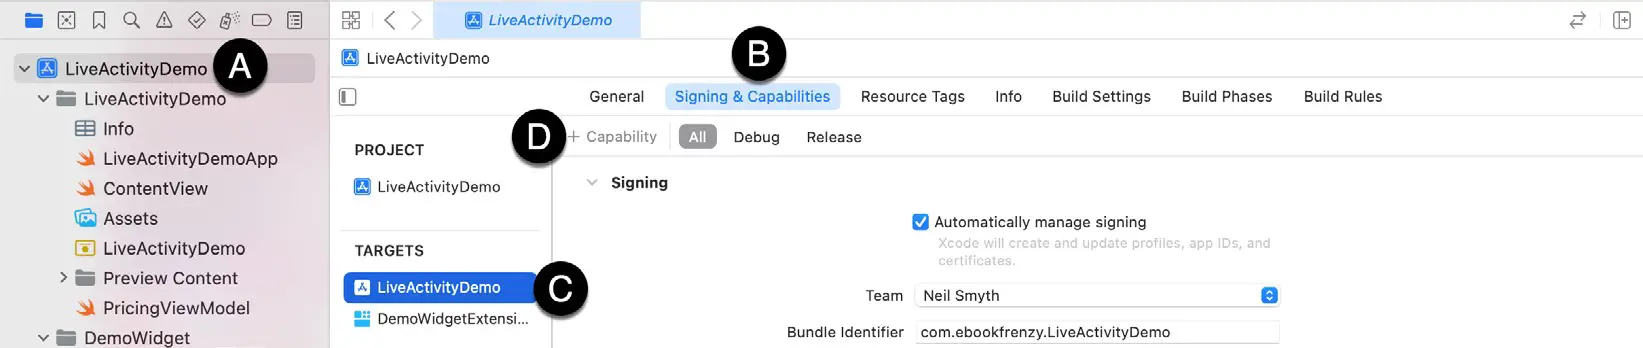
The next step is to add Push Notification support to the LiveActivityDemo project. Load the project into Xcode and select the LiveActivityDemo target at the top of the Project Navigator panel (marked A in Figure 1-6) so that the main panel displays the project settings. From within this panel, select the Signing & Capabilities tab (B) followed by the LiveActivityDemo target entry (C):
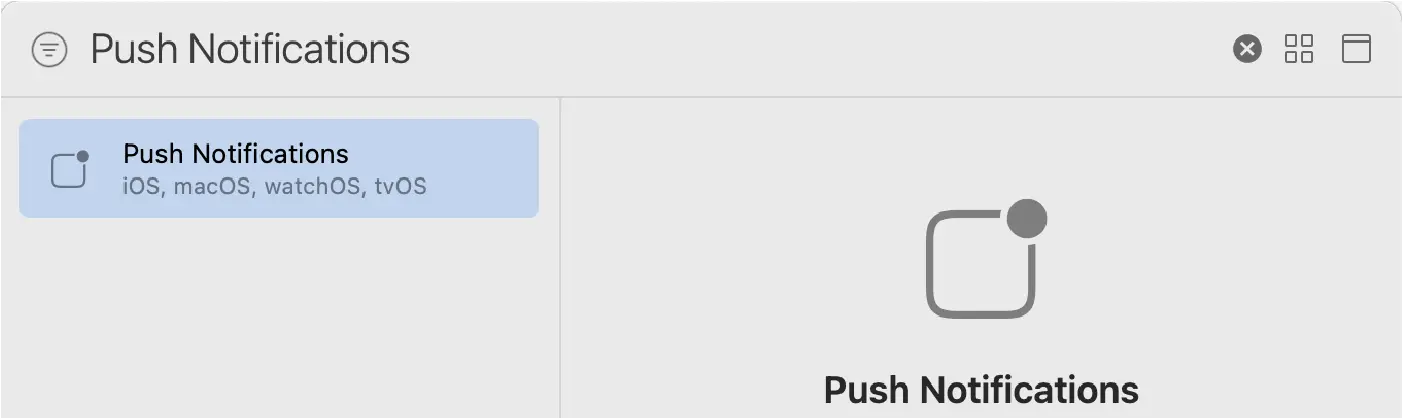
Click on the “+ Capability” button (D) to display the dialog shown in Figure 1-7. Enter Push Notifications into the filter bar, select the result, and press the keyboard enter key to add the capability to the project:
Enabling Frequent Updates
Like the background fetch operations outlined in the previous chapter, the system imposes a budget that limits the frequency of push notifications. If your Live Activity requires frequent updates, you can request an increased notification budget by enabling the Supports Live Activity Frequent Updates entitlement.
With the LiveActivityDemo target still selected in the project navigator panel, select the Info tab within the main panel as shown in Figure 1-8:

Once selected, locate the bottom entry in the list of properties and hover the mouse pointer over the item. When the + button appears, click it to add a new entry to the list. From within the drop-down list of available keys, locate and select the Supports Live Activity Frequent Updates key as shown in Figure 1-9:
|
You are reading a sample chapter from an old edition of iOS App Development Essentials. Purchase the fully updated iOS 18 App Development Essentials book. The full book contains 71 chapters, over 612 pages of in-depth information, downloadable source code, and access to over 50 SwiftUI knowledge test quizzes. |
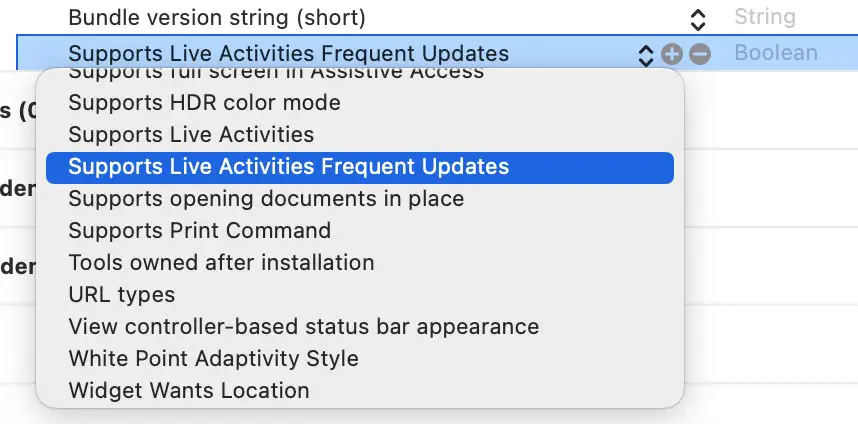
After you have added the key, change its value to YES.
Requesting User Permission
Apps that use push notifications must seek the users’ permission when first launched. This ensures that the user is aware that push notifications are being used and allows them to decline. This requires the addition of an app delegate to our project. App delegates are used to perform tasks during the early stages of the app launch process.
SwiftUI apps are based on the App protocol, which does not provide app delegate support directly. Instead, we will have to add the delegate manually in the LiveActivityDemoApp.swift file, as follows:
import SwiftUI

@main
struct LiveActivityDemoApp: App {

    @UIApplicationDelegateAdaptor private var appDelegate: AppDelegate

    var body: some Scene {
        WindowGroup {
            ContentView()
        }
    }
}

class AppDelegate: NSObject, UIApplicationDelegate {
    func application(_ application: UIApplication, didFinishLaunchingWithOptions
                     launchOptions: [UIApplication.LaunchOptionsKey : Any]? =
                                                                  nil) -> Bool {
        return true
    }
}Code language: Swift (swift)
The didFinishLaunchingWithOptions method will be called once the app has started and provides us access to low-level classes and objects that SwiftUI usually shields us from. One such object is the UINotificationCenter instance, which we will use to request remote notifications permission from the user as follows:
func application(_ application: UIApplication, didFinishLaunchingWithOptions launchOptions: [UIApplication.LaunchOptionsKey : Any]? = nil) -> Bool {

    UNUserNotificationCenter.current().requestAuthorization(options:
                           [.alert, .sound]) { allowed, error in
        if allowed {
            DispatchQueue.main.async {
                UIApplication.shared.registerForRemoteNotifications()
            }
            print("User granted push notification permission.")
        } else {
            print("Error requesting push notification permission.")
        }
    }
    return true
}Code language: Swift (swift)
Run the app on a physical device and tap the Allow button when the dialog shown in Figure 1-10 appears:
|
You are reading a sample chapter from an old edition of iOS App Development Essentials. Purchase the fully updated iOS 18 App Development Essentials book. The full book contains 71 chapters, over 612 pages of in-depth information, downloadable source code, and access to over 50 SwiftUI knowledge test quizzes. |

Changing the Push Type
Now that we have enabled push notification support for our project and received permission from the user, the Live Activity request() method call must be updated to use push notifications. Edit the PricingViewModel.swift file, locate the startTracking() method, and modify the request() call as follows:
func startTracking(ticker: String) {
.
.
    do {
        activity = try Activity.request(
            attributes: attributes,
            content: .init(state: contentState, staleDate: nil),
            pushType: .token
        )
        // startUpdates()
    } catch (let error) {
.
.Code language: Swift (swift)
When a push notification arrives, the pricing data will be updated automatically. Since we no longer need to update the widgets, the call to startUpdates() has been removed. Take this opportunity to delete the following redundant method declarations from the PricingViewModel class:
- startUpdates()
- update()
- refreshPricing()
The timer and oldPrice variables and references can also be removed as follows:
@Observable
class PricingViewModel {

    private var activity: Activity<DemoWidgetAttributes>?
    // private var timer: Timer?
    // private var oldPrice: Float = 100
    var currentPrice: Float = 100
    var changePercent: Float = 0
.
.
   func stopTracking() async {
        let finalState = DemoWidgetAttributes.ContentState(
                 currentPrice: currentPrice, changePercent: changePercent)
        // timer?.invalidate()

        await activity?.end(.init(state: finalState, staleDate: nil),
                dismissalPolicy: .default)
    }
.
.Code language: Swift (swift)
Obtaining a Push Token
The push server will need a copy of the app’s push token to deliver updates to the Live Activity on a specific device. When using push notifications in your own projects, you need to obtain this token and pass it to your server so that it can communicate with the user’s device. For this example, however, we will output the push token to the console and then copy and paste it into our server-side testing environment.
When the activity push request is made, the system will issue a push token that uniquely identifies the activity and device. This action occurs asynchronously, so we must wait for the token to become available before using it. It is also possible for the token to change during the lifespan of the activity, and each new token will need to be forwarded to the server. For this purpose, we can use the activity’s pushTokenUpdates() method both to wait for the token and receive notification of token changes. Remaining in the startTracking() method, add the following code to obtain and display the push tokens as they are issued:
|
You are reading a sample chapter from an old edition of iOS App Development Essentials. Purchase the fully updated iOS 18 App Development Essentials book. The full book contains 71 chapters, over 612 pages of in-depth information, downloadable source code, and access to over 50 SwiftUI knowledge test quizzes. |
func startTracking(ticker: String) {
.
.
    do {
        activity = try Activity.request(
            attributes: attributes,
            content: .init(state: contentState, staleDate: nil),
            pushType: .token
        )
    } catch (let error) {
        print("Error starting Live Activity: \(error.localizedDescription).")
    }

    Task {
        for await pushToken in activity!.pushTokenUpdates {
            let pushTokenString = pushToken.reduce("") {
                $0 + String(format: "%02x", $1)
            }

            print("New Push Token: \(pushTokenString)")
        }
    }
}Code language: Swift (swift)
Once you have made the above changes, run the app on a physical device, tap the Track button, and refer to the console where the push token should be visible. In the next chapter, we will learn how to use this token to send push notifications to the Live Activity.
Removing the Refresh Button
Since the modified Live Activity no longer controls how and when pricing updates will be available, the refresh button added in the previous chapter is unnecessary. To remove the button, delete the following code from the LockScreenView.swift file:
/*
           if (context.isStale) {
                HStack {

                    Text("Update required ")

                    Button(intent: RefreshIntent(), label: {
                        Image(systemName: "arrow.clockwise.circle.fill")
                    })
                    Spacer()
                }
            }
*/
        }
        .padding()Code language: Swift (swift)
Finally, locate RefreshIntent.swift file in the Project navigator panel and delete it from the project. The modifications are complete, and the Live Activity is ready to receive push notifications.
Summary
Push notifications use the Apple Push Notification service to deliver content to apps remotely and have been extended to support remote Live Activity updates. Preparing a Live Activity to work with push notifications is a multi-step process involving registering an APNs key, creating a push token, requesting user permission, and making minor changes to the Live Activity code. With these steps completed in the LiveActivityDemo project, the next chapter will explain how to send push notifications to the Live Activity.