
The previous chapter explained how to add support for push notifications to a Live Activity. Once enabled for push notifications, the Live Activity is ready for testing.
Test push notifications can be sent from the CloudKit console or the command line using the curl tool. This chapter will demonstrate both options, including generating the authentication key required for sending notifications from the command line and declaring a notification payload.
In the next chapter, Troubleshooting Live Activity Push Notifications, we will outline techniques for identifying and resolving push notification problems.
Using the Push Notifications Console
The best way to begin push notification testing is using the CloudKit console. The console provides an easy way to send push notifications and, more importantly, identify why the Live Activity may not have received a notification on the user’s device.
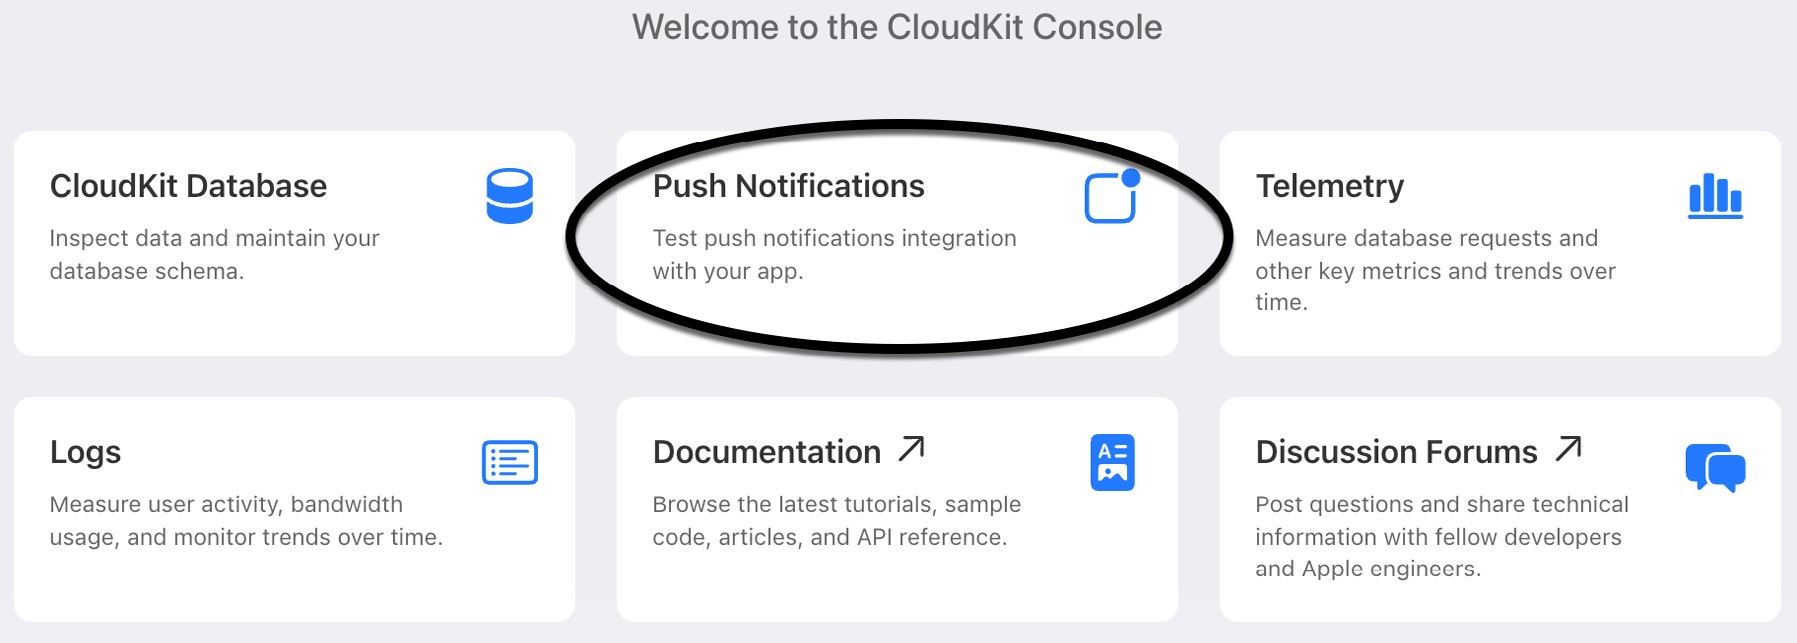
To access the CloudKit console, open a browser window, navigate to https://icloud.developer.apple.com/, and sign in using your Apple Developer credentials. Once you have signed in, select the Push Notifications option in the dashboard, as highlighted in Figure 1-1:
 |
You are reading a sample chapter from an old edition of iOS App Development Essentials. Purchase the fully updated iOS 18 App Development Essentials book. The full book contains 71 chapters, over 612 pages of in-depth information, downloadable source code, and access to over 50 SwiftUI knowledge test quizzes. |
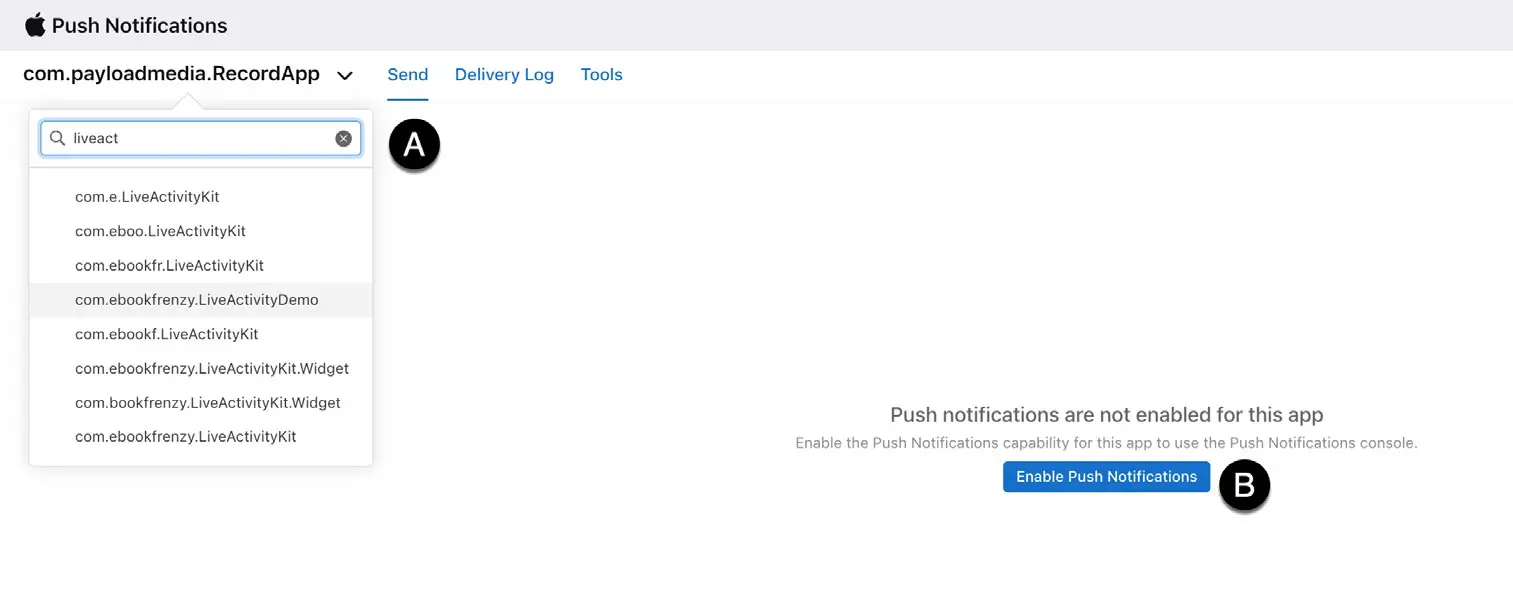
Use the drop-down menu (marked A in Figure 1-2) to select the LiveActivityDemo project, then click the Enable Push Notifications button (B):
Once notifications have been enabled, click on the Create New Notification button:
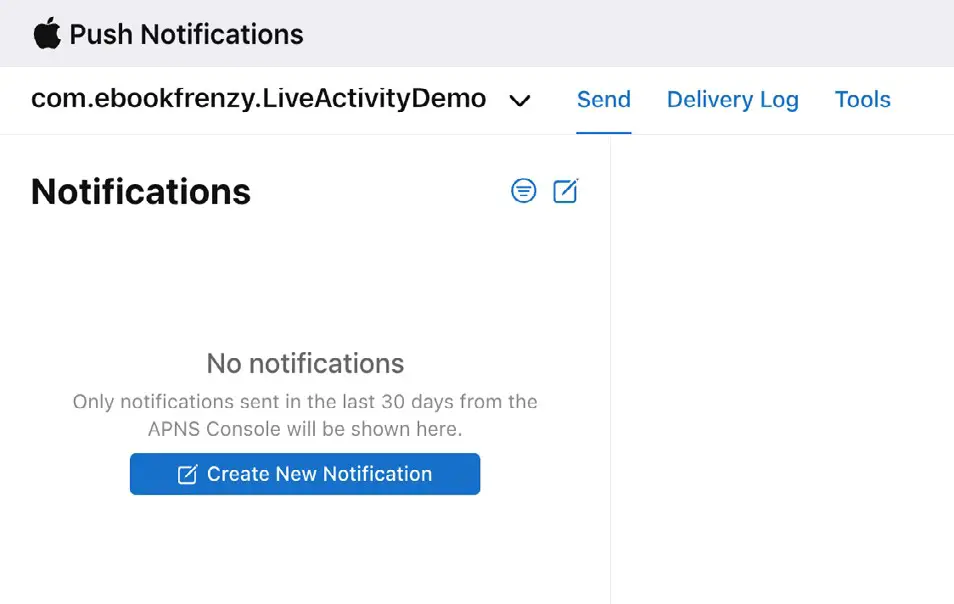
The New Notification screen will appear ready for the notification details to be entered.
Configuring the Notification
In the General section of the New Notification screen, enter a name for the test and set the Environment menu to Development (the Production setting is for when the app has been published on the App Store). Next, return to Xcode, run the app on a device and start tracking, copy the push token from the Xcode console and paste it into the Device Token field in the CloudKit console:
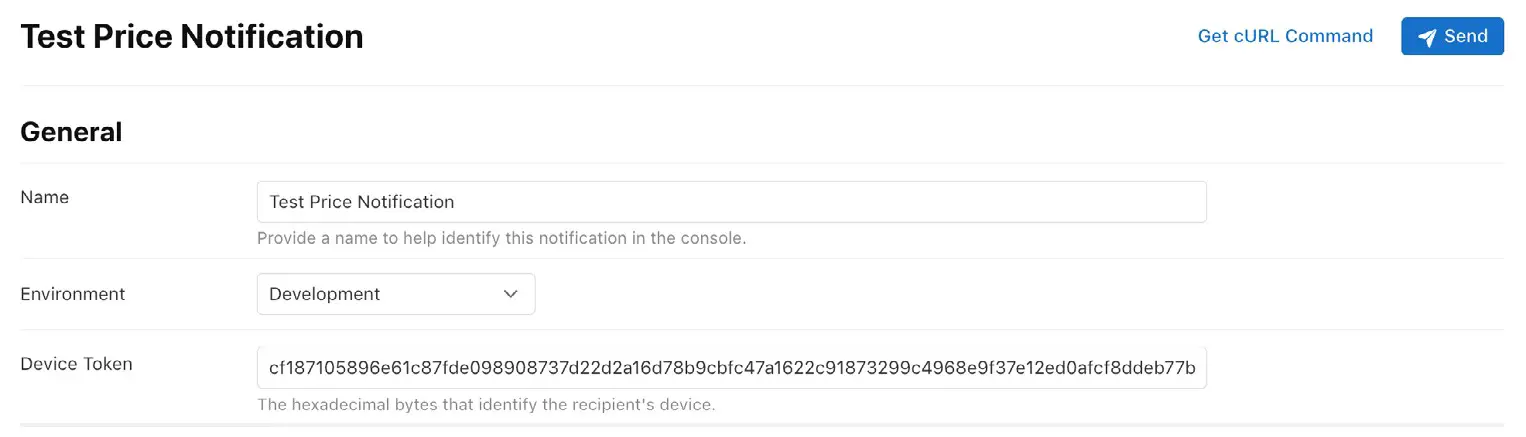
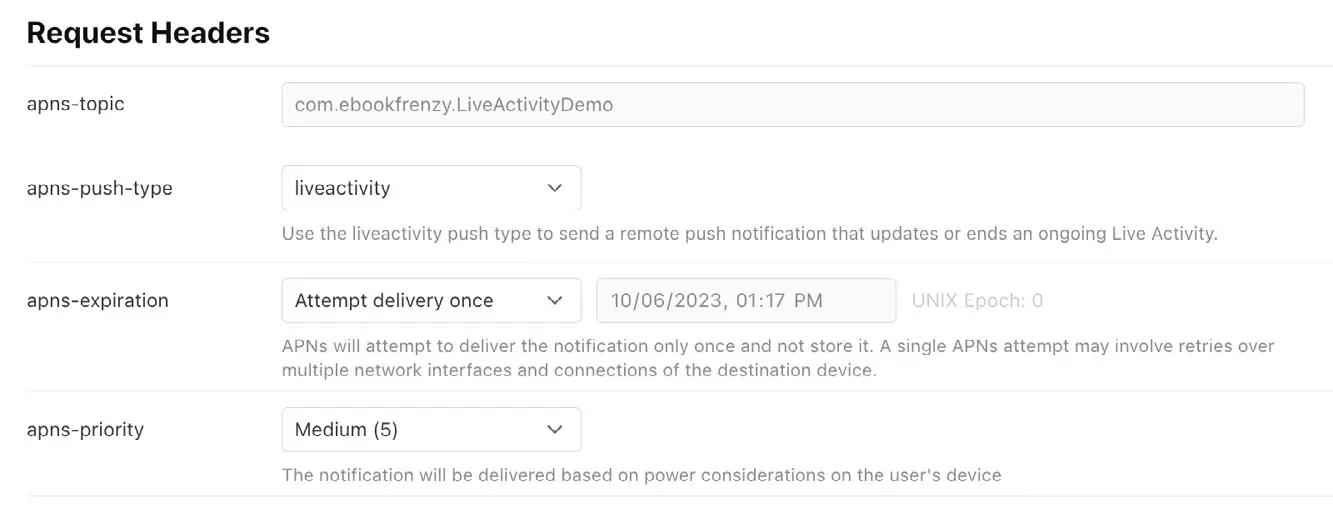
In the Request Headers section, the apns-topic field is read-only and will already contain your app Bundle Identifier. Select the apns-push-type menu and change the selection to liveactivity. The apns-expiration setting can specify a date and time when the APNs service should stop trying to send the notification. The default setting will only make one push attempt. The single delivery attempt option is actually more robust than the name suggests, and this setting is adequate for most requirements.
|
You are reading a sample chapter from an old edition of iOS App Development Essentials. Purchase the fully updated iOS 18 App Development Essentials book. The full book contains 71 chapters, over 612 pages of in-depth information, downloadable source code, and access to over 50 SwiftUI knowledge test quizzes. |
The apns-priority value can be set to 1 (low), 5 (medium), or 10 (high). Use low priority for non-time-sensitive updates and high priority for critical alerts. For most uses, however, medium is the recommended priority:
The final section will contain the notification payload, which requires additional explanation.
Defining the Payload
The notification payload is declared using JSON and must contain the following information:
- timestamp – The timestamp ensures that the Live Activity is updated only with the most up-to-date push notification. Notifications containing a timestamp identical to or earlier than the previous notification are discarded. For this reason, you must provide a new timestamp each time you send a push notification. The timestamp is calculated as the number of elapsed seconds since January 1, 1970, and can be obtained using the following online Epoch calculator:
https://www.epochconverter.com/
Alternatively, open a Terminal window on your Mac and run the following command:
|
You are reading a sample chapter from an old edition of iOS App Development Essentials. Purchase the fully updated iOS 18 App Development Essentials book. The full book contains 71 chapters, over 612 pages of in-depth information, downloadable source code, and access to over 50 SwiftUI knowledge test quizzes. |
date +%s
- event – This value specifies the action associated with the push notification and should be set to “update”.
- content-state – The content state defines the updated data to be displayed by the Live Activity. It must match exactly the dynamic variable names and data types declared in the Live Activity widget attributes structure.
Return to the CloudKit console and enter the following JSON declaration into the Payload section of the New Notification form, where <recent timestamp> is replaced with the current value:
{
    "aps":{
        "timestamp":<recent time stamp>
        "event":"update"
        "content-state":{
            "currentPrice": 310,
            "changePercent": 37
        }
    }
}Code language: JSON / JSON with Comments (json)
Sending the Notification
Before sending the notification, ensure the app is still running on your device and check the Xcode console to confirm that the push token is unchanged from when it was pasted into the notification form. Place the app into the background, return to the CloudKit console, and click the Send button. After a short delay, the console will report a problem with the entered information or attempt to send the notification. Check the Live Activity widget on your device to see if the price information has updated to the values contained in the payload. If nothing happens, it is time to troubleshoot the notification using the steps outlined in the next chapter.
Sending Push Notifications from the Command Line
Another way to test push notifications is from the command line of a Terminal window on your Mac using the curl command. This technique has the advantage that it can be used to automate sending multiple notifications without having to create each one in the CloudKit console manually. It also allows us to generate the timestamp dynamically.
Behind the scenes, the CloudKit console automatically generated an authentication token for us that is required to send push notifications. To generate this for the command line, you will need the Key ID and the key file saved in the An iOS 17 Live Activity Push Notifications Tutorial chapter. You will also need your Apple Developer Team ID, which can be found by selecting the Membership details option in the Apple Developer console. You will also need to specify the Bundle ID of your app (known as the topic in this context).
|
You are reading a sample chapter from an old edition of iOS App Development Essentials. Purchase the fully updated iOS 18 App Development Essentials book. The full book contains 71 chapters, over 612 pages of in-depth information, downloadable source code, and access to over 50 SwiftUI knowledge test quizzes. |
Once this information has been gathered, open a Terminal window, change directory to a suitable location, create a new file named push.sh, and edit it as follows:
#!/bin/bash
TEAM_ID="<Your Team ID here>"
TOKEN_KEY_FILE_NAME="<Path to your P8 key file here>"
AUTH_KEY_ID="<Your Key ID here>"
TOPIC="<Your app Bundle ID here>"
APNS_HOST_NAME=api.sandbox.push.apple.com

JWT_ISSUE_TIME=$(date +%s)
JWT_HEADER=$(printf '{ "alg": "ES256", "kid": "%s" }' "${AUTH_KEY_ID}" | openssl base64 -e -A | tr -- '+/' '-_' | tr -d =)
JWT_CLAIMS=$(printf '{ "iss": "%s", "iat": %d }' "${TEAM_ID}" "${JWT_ISSUE_TIME}" | openssl base64 -e -A | tr -- '+/' '-_' | tr -d =)
JWT_HEADER_CLAIMS="${JWT_HEADER}.${JWT_CLAIMS}"
JWT_SIGNED_HEADER_CLAIMS=$(printf "${JWT_HEADER_CLAIMS}" | openssl dgst -binary -sha256 -sign "${TOKEN_KEY_FILE_NAME}" | openssl base64 -e -A | tr -- '+/' '-_' | tr -d =)
AUTHENTICATION_TOKEN="${JWT_HEADER}.${JWT_CLAIMS}.${JWT_SIGNED_HEADER_CLAIMS}"
echo $AUTHENTICATION_TOKEN
Code language: Bash (bash)
Save the file and run it using the following command:
sh ./push.shCode language: plaintext (plaintext)On successful execution, the script should print the authentication token.
Use Xcode to launch the LiveActivityDemo app on a device and copy the latest push token from the console. Edit the push.sh script file and add the token as follows:
#!/bin/bash
ACTIVITY_PUSH_TOKEN="<Your push token here>"
.
.Code language: Bash (bash)
Finally, the curl command can be added to the script. This consists of the authentication and push tokens and the push type, topic, priority, and expiration settings. The command must also include the notification payload with a current timestamp using the same JSON syntax used in the CloudKit console. With these requirements in mind, add the following lines to the end of the push.sh file:
|
You are reading a sample chapter from an old edition of iOS App Development Essentials. Purchase the fully updated iOS 18 App Development Essentials book. The full book contains 71 chapters, over 612 pages of in-depth information, downloadable source code, and access to over 50 SwiftUI knowledge test quizzes. |
curl -v \
  --header "authorization: bearer ${AUTHENTICATION_TOKEN}" \
  --header "apns-topic: <your bundle id here>.push-type.liveactivity" \
  --header "apns-push-type: liveactivity" \
  --header "apns-priority: 10" \
  --header "apns-expiration: 0" \
  --data '{"aps":{"timestamp":'$(date +%s)',"event":"update","content-state":{"currentPrice":500,"changePercent":50}}}' \
  --http2  https://api.development.push.apple.com:443/3/device/$ACTIVITY_PUSH_TOKENCode language: Bash (bash)
Note that the topic header consists of your bundle ID followed by .push-type.liveactivity and that we are using the date +%s command to create the timestamp.
Check the push token is still valid, execute the push script, and check the output for errors. If the APNs accepted the notification, the output will end as follows:
> apns-expiration: 0
> Content-Length: 105
> Content-Type: application/x-www-form-urlencoded
>
* We are completely uploaded and fine
< HTTP/2 200
< apns-id: 92F32B4C-9527-0CAD-32FA-AC0B4A9200B1
< apns-unique-id: 4090d3d1-b615-250a-79e5-d39e3801b542
<
* Connection #0 to host api.development.push.apple.com left intactCode language: plaintext (plaintext)
If the notification does not update the Live Activity widgets, record the apns-unique-id in the curl output and use it to diagnose the problem using the steps in the Troubleshooting Live Activity Push Notifications chapter.
Summary
Test push notifications can be sent to a Live Activity using either the CloudKit console or from the command line using the curl command. For both options, the notification must include the push token from the device and a JSON payload containing the updated Live Activity content state. An additional authentication token is required when testing is performed using the command line. The token is generated using the Key ID and file created in the previous chapter.