
The previous chapter explored how we use modifiers to change the appearance and behavior of composables. Many examples used to demonstrate modifiers involved the Text composable, performing tasks such as changing the font type, size, and weight. This chapter will introduce another powerful text-related feature of Jetpack Compose, known as annotated strings. We will also look at brush styles and how they can be used to add more effects to the text in a user interface.
What are annotated strings?
The previous chapter’s modifier examples changed the appearance of the entire string displayed by a Text composable. For instance, we could not display part one part of the text in bold while another section was in italics. It is for this reason that Jetpack Compose includes the annotated strings. Annotated strings allow a text to be divided into multiple sections, each with its own style.
Using annotated strings
An AnnotatedString instance is created by calling the buildAnnotatedString function and passing it the text and styles to be displayed. These string sections are combined via calls to the append function to create the complete text to be displayed.
Two style types are supported, the first of which, SpanStyle, is used to apply styles to a span of individual characters within a string. The syntax for building an annotated string using SpanStyle is as follows:
buildAnnotatedString {
    withStyle(style = SpanStyle( /* style settings */)) {
        append(/* text string */)
    }

    withStyle(style = SpanStyle(/* style settings */)) {
	append(/* more text */)
    }
.
.
}Code language: Kotlin (kotlin)
A SpanStyle instance can be initialized with any combination of the following style options:
- color
- fontSize
- fontWeight
- fontStyle
- fontSynthesis
- fontFamily
- fontFeatureSettings
- letterSpacing
- baselineShift,
- textGeometricTransform
- localeList
- background
- textDecoration
- shadow
ParagraphStyle, on the other hand, applies a style to paragraphs and can be used to modify the following properties:
- textAlign
- textDirection
- lineHeight
- textIndent
The following is the basic syntax for using paragraph styles in annotated strings:
buildAnnotatedString {
    withStyle(style = ParagraphStyle( /* style settings */)) {
        append(/* text string */)
    }

    withStyle(style = ParagraphStyle(/* style settings */))
        append(/* more text */)
    }
.
.
}Code language: Kotlin (kotlin)
Brush Text Styling
Additional effects may be added to any text by using the Compose Brush styling. Brush effects can be applied directly to standard text strings or selectively to segments of an annotated string. For example, the following syntax applies a radial color gradient to a Text composable (color gradients will be covered in the chapter entitled Jetpack Compose Canvas Graphics Drawing Tutorial):
val myColors = listOf( /* color list */)

Text(
    text = "text here",
    style = TextStyle(
        brush = Brush.radialGradient(
            colors = myColors
        )
    )
)Code language: Kotlin (kotlin)
Creating the example project
Launch Android Studio and select the New Project option from the welcome screen. Choose the Empty Activity template within the New Project dialog before clicking the Next button.
Enter StringsDemo into the Name field and specify com.example.stringsdemo as the package name. Before clicking the Finish button, change the Minimum API level setting to API 26: Android 8.0 (Oreo). Once the project has been created, the SlotApiDemo project should be listed in the Project tool window along the lefthand edge of the Android Studio main window.
Within the MainActivity.kt file, delete the Greeting function and add a new empty composable named MainScreen:
@Composable
fun MainScreen() {

}Code language: Kotlin (kotlin)
Next, edit the onCreateActivity() method and GreetingPreview function to call MainScreen instead of Greeting.
An example SpanStyle annotated string
The first example we will create uses SpanStyle to build an annotated string consisting of multiple color and font styles.
Begin by editing the MainActivity.kt file and modifying the MainScreen function to read as follows:
.
.
import androidx.compose.ui.graphics.Color
import androidx.compose.ui.text.buildAnnotatedString
import androidx.compose.ui.text.withStyle
import androidx.compose.ui.text.SpanStyle
import androidx.compose.ui.text.font.FontWeight
import androidx.compose.ui.text.font.FontStyle
import androidx.compose.foundation.layout.Column
import androidx.compose.ui.unit.sp
.
.
@Composable
fun MainScreen() {
    Column {
        SpanString()
    }
}Code language: Kotlin (kotlin)
Next, add the SpanStyle declaration to the MainActivity.kt file as follows:
@Composable
fun SpanString() {
    Text(
        buildAnnotatedString {
            withStyle(
                style = SpanStyle(fontWeight = FontWeight.Bold,
                    fontSize = 30.sp)) {
                append("T")
            }

            withStyle(style = SpanStyle(color = Color.Gray)) {
                append("his")
            }
            append(" is ")
            withStyle(
                style = SpanStyle(
                    fontWeight = FontWeight.Bold,
                    fontStyle = FontStyle.Italic,
                    color = Color.Blue
                )
            ) {
                append("great!")
            }
        }
    )
}Code language: Kotlin (kotlin)
The example code creates an annotated string in three parts using several span styles for each section. After making these changes, refer to the Preview panel, where the text should appear as shown in Figure 39-1:

An example ParagraphStyle annotated string
Now that we have seen how to create a span-style annotated string, the next step is to build a paragraph style string. Remaining in the MainActivity.kt file, make the following changes to add a new function named ParaString and to call it from the MainScreen function:
.
.
import androidx.compose.ui.text.ParagraphStyle
import androidx.compose.ui.text.style.TextAlign
import androidx.compose.ui.text.style.TextIndent
.
.
@Composable
fun MainScreen() {
    Column {
        SpanString()
        ParaString()
    }
}

@Composable
fun ParaString() {

    Text(
        buildAnnotatedString {
            append(
                "\nThis is some text that doesn't have any style applied to it.\n")
        })
}Code language: Kotlin (kotlin)
The above code gives us an unmodified paragraph against which we can compare the additional paragraphs we will add. Next, modify the function to add an indented paragraph with an increased line height:
@Composable
fun ParaString() {
Text(
buildAnnotatedString {
append("\nThis is some text that doesn't have any style applied to it.\n")
withStyle(style = ParagraphStyle(
lineHeight = 30.sp,
textIndent = TextIndent(
firstLine = 60.sp,
restLine = 25.sp))
) {
append("This is some text that is indented more on the first lines than the rest of the lines. It also has an increased line height.\n")
}
})
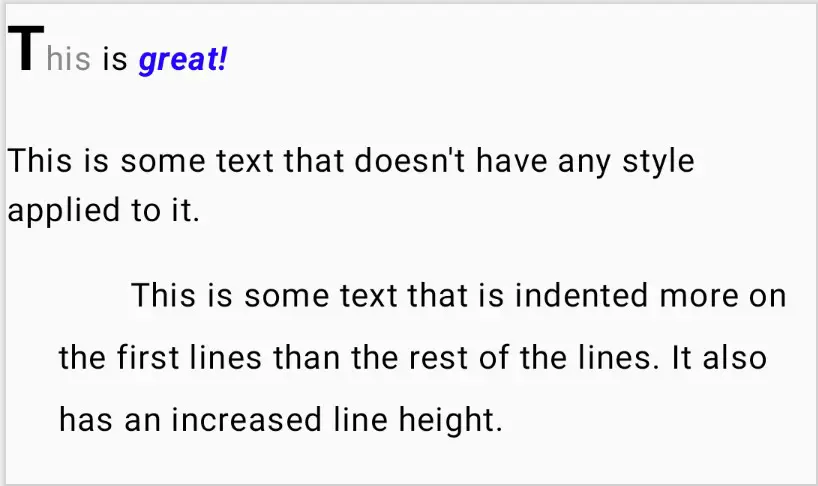
}Code language: Kotlin (kotlin)When the preview is rendered, it should resemble Figure 39-2 (note that we specified different indents for the first and remaining lines):
Next, add a third paragraph that uses right alignment as follows:
@Composable
fun ParaString() {
.
.
                append("This is some text that is indented more on the first lines than the rest of the lines. It also has an increased line height.\n")
            }

            withStyle(style = ParagraphStyle(textAlign = TextAlign.End)) {
                append("This is some text that is right aligned.")
            }
    })
}Code language: Kotlin (kotlin)
This change should result in the following preview:

A Brush style example
The final example in this tutorial involves using the Brush style to change the text’s appearance. First, add another function to the MainActivity.kt file and call it from within the MainScreen function:
.
.
import androidx.compose.ui.graphics.Brush
import androidx.compose.ui.text.ExperimentalTextApi
.
.
@Composable
fun MainScreen() {
    Column {
        SpanString()
        ParaString()
        BrushStyle()
    }
}

@OptIn(ExperimentalTextApi::class)
@Composable
fun BrushStyle() {

}Code language: Kotlin (kotlin)
We will begin by declaring a list of colors and use a span style to display large, bold text as follows:
@OptIn(ExperimentalTextApi::class)
@Composable
fun BrushStyle() {
    val colorList: List<Color> = listOf(Color.Red, Color.Blue,
        Color.Magenta, Color.Yellow, Color.Green, Color.Red)
    Text(
        text = buildAnnotatedString {
            withStyle(
                    style = SpanStyle(
                        fontWeight = FontWeight.Bold,
                        fontSize = 70.sp
                )
            ) {
                append("COMPOSE!")
            }
        }
    )
}Code language: Kotlin (kotlin)
All that remains is to apply a linearGradient brush to the style, using the previously declared color list:
@OptIn(ExperimentalTextApi::class)
@Composable
fun BrushStyle() {

    Text(
        text = buildAnnotatedString {

            withStyle(
                    style = SpanStyle(
                        fontWeight = FontWeight.Bold,
                        fontSize = 70.sp,
                        brush = Brush.linearGradient(colors = colorList)
                )
            ) {
                append("COMPOSE!")
.
.Code language: Kotlin (kotlin)
After completing the above changes, check that the new text appears in the preview panel as illustrated in Figure 39-3:

Summary
While modifiers provide a quick and convenient way to make changes to the appearance of text in a user interface, they do not support multiple styles within a single string. On the other hand, annotated strings provide greater flexibility in changing the appearance of text. Annotated strings are built using the buildAnnotatedString function and can be configured using either span or paragraph styles. Another option for altering how text appears is using the Brush style to change the text foreground creatively, such as using color gradients.