
The two preceding chapters of this book were intended to convey the knowledge necessary to begin implementing iCloud-based document storage in iOS apps. Having outlined the steps necessary to enable iCloud access in the chapter entitled Preparing an iOS 17 App to use iCloud Storage and provided an overview of the UIDocument class in Managing Files using the iOS 17 UIDocument Class, the next step is to begin to store documents using the iCloud service.
Within this chapter, the iCloudStore app created in the previous chapter will be re-purposed to store a document using iCloud storage instead of the local device-based file system. The assumption is also made that the project has been enabled for iCloud document storage following the steps outlined in Preparing an iOS 17 App to use iCloud Storage.
Before starting on this project, it is important to note that membership to the Apple Developer Program will be required as outlined in How to Join the Apple Developer Program.
iCloud Usage Guidelines
Before implementing iCloud storage in an app, a few rules must first be understood. Some of these are mandatory rules, and some are simply recommendations made by Apple:
- Apps must be associated with a provisioning profile enabled for iCloud storage.
- The app projects must include a suitably configured entitlements file for iCloud storage.
- Apps should not make unnecessary use of iCloud storage. Once a user’s initial free iCloud storage space is consumed by stored data, the user will either need to delete files or purchase more space.
- Apps should, ideally, provide the user with the option to select which documents are to be stored in the cloud and which are to be stored locally.
- When opening a previously created iCloud-based document, the app should never use an absolute path to the document. The app should instead search for the document by name in the app’s iCloud storage area and then access it using the result of the search.
- Documents stored using iCloud should be placed in the app’s Documents directory. This gives the user the ability to delete individual documents from the storage. Documents saved outside the Documents folder can only be deleted in bulk.
Preparing the iCloudStore App for iCloud Access
Much of the work performed in creating the local storage version of the iCloudStore app in the previous chapter will be reused in this example. The user interface, for example, remains unchanged, and the implementation of the UIDocument subclass will not need to be modified. The only methods that need to be rewritten are the saveDocument and viewDidLoad methods of the view controller.
 |
You are reading a sample chapter from Building iOS 17 Apps using Xcode Storyboards.
Buy the full book now in eBook or Print format. The full book contains 96 chapters and 760 pages of in-depth information. |
Load the iCloudStore project into Xcode and select the ViewController.swift file. Locate the saveDocument method and remove the current code from within the method so that it reads as follows:
@IBAction func saveDocument(_ sender: Any) {
}Code language: Swift (swift)
Next, locate the loadFile method and modify it accordingly to match the following fragment:
func loadFile() {
}Code language: Swift (swift)
Enabling iCloud Capabilities and Services
Before writing any code, we need to add the iCloud capability to our project, enable the iCloud Documents service, and create an iCloud container.
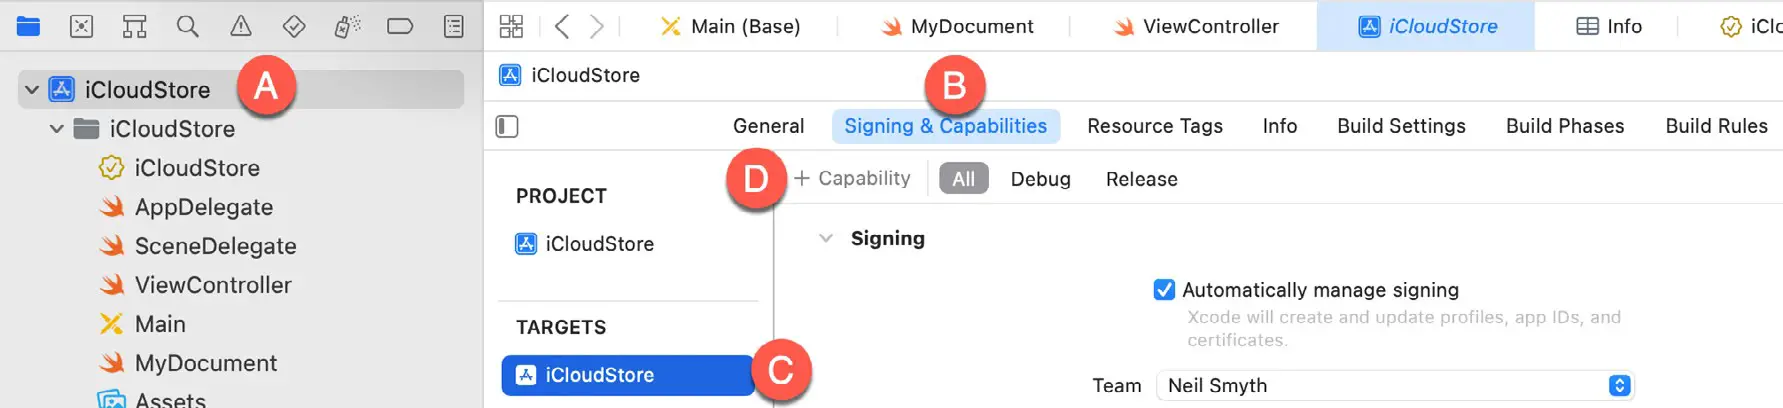
Begin by selecting the iCloudStore target located at the top of the Project Navigator panel (marked A in Figure 41-1) so that the main panel displays the project settings. From within this panel, select the Signing & Capabilities tab (B) followed by the CoreDataDemo target entry (C):
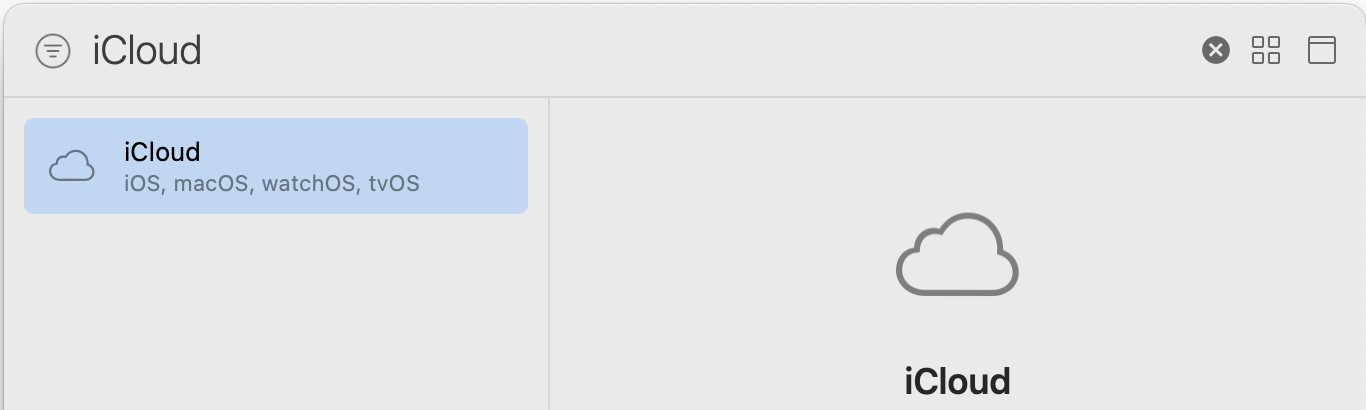
Click on the “+ Capability” button (D) to display the dialog shown in Figure 41-2. Enter iCloud into the filter bar, select the result and press the keyboard enter key to add the capability to the project:
|
You are reading a sample chapter from Building iOS 17 Apps using Xcode Storyboards.
Buy the full book now in eBook or Print format. The full book contains 96 chapters and 760 pages of in-depth information. |
If iCloud is not listed as an option, you will need to pay to join the Apple Developer program as outlined in the chapter entitled How to Join the Apple Developer Program. If you are already a member, use the steps outlined in the chapter entitled Installing Xcode 14 and the iOS 17 SDK to ensure you have created a Developer ID Application certificate.
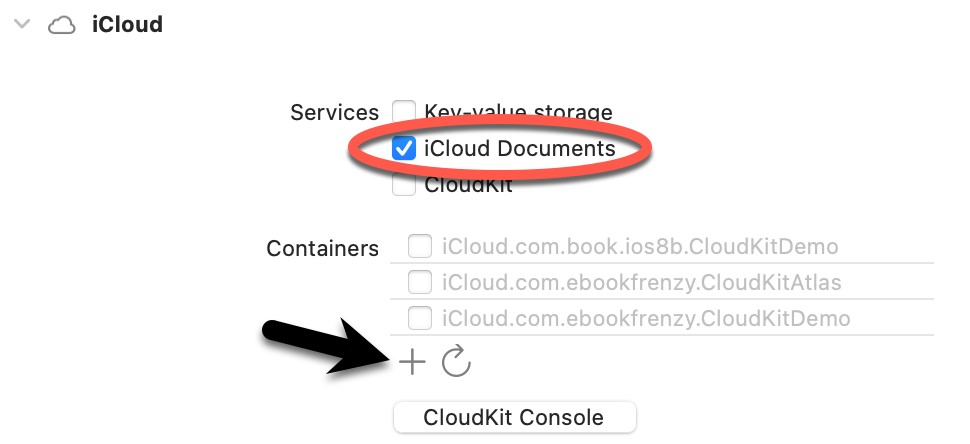
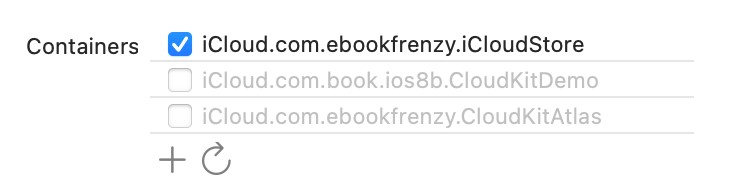
Within the iCloud entitlement settings, make sure that the iCloud Documents service is enabled before clicking on the “+” button indicated by the arrow in Figure 41-3 below to add an iCloud container for the project:
After clicking the “+” button, the dialog shown in Figure 41-4 will appear containing a text field into which you need to enter the container identifier. This entry should uniquely identify the container within the CloudKit ecosystem, generally includes your organization identifier (as defined when the project was created), and should be set to something similar to iCloud.com.yourcompany.iCloudStore.
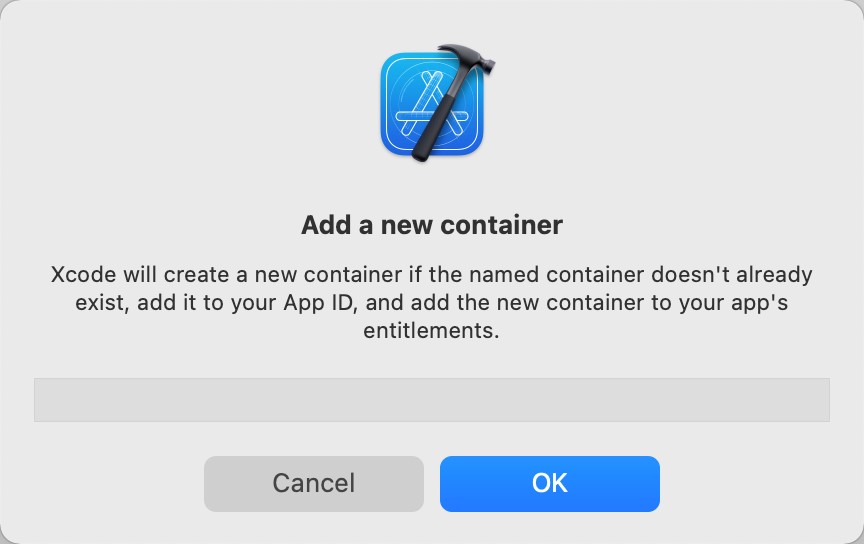
Once you have entered the container name, click the OK button to add it to the app entitlements. Returning to the Signing & Capabilities screen, make sure that the new container is selected:
Configuring the View Controller
Before writing any code, several variables need to be defined within the view controller’s ViewController.swift file in addition to those implemented in the previous chapter.
|
You are reading a sample chapter from Building iOS 17 Apps using Xcode Storyboards.
Buy the full book now in eBook or Print format. The full book contains 96 chapters and 760 pages of in-depth information. |
Creating a URL to the document location in the iCloud storage will also be necessary. When a document is stored on iCloud, it is said to be ubiquitous since the document is accessible to the app regardless of the device on which it is running. Therefore, the object used to store this URL will be named ubiquityURL.
As previously stated, when opening a stored document, an app should search for it rather than directly access it using a stored path. An iCloud document search is performed using an NSMetaDataQuery object which needs to be declared in the view controller class, in this instance, using the name metaDataQuery. Note that declaring the object locally to the method in which it is used will result in the object being released by the automatic reference counting system (ARC) before it has completed the search.
To implement these requirements, select the ViewController.swift file in the Xcode project navigator panel and modify the file as follows:
import UIKit

class ViewController: UIViewController {

    @IBOutlet weak var textView: UITextView!

    var document: MyDocument?
    var documentURL: URL?
    var ubiquityURL: URL?
    var metaDataQuery: NSMetadataQuery?
.
.
}Code language: Swift (swift)
Implementing the loadFile Method
The purpose of the code in the view controller loadFile method is to identify the URL for the ubiquitous file version to be stored using iCloud (assigned to ubiquityURL). The ubiquitous URL is constructed by calling the url(forUbiquityContainerIdentifier:) method of the FileManager passing through nil as an argument to default to the first container listed in the entitlements file.
ubiquityURL = filemgr.url(forUbiquityContainerIdentifier: nil)Code language: Swift (swift)The app will only be able to obtain the ubiquityURL if the user has configured a valid Apple ID within the iCloud page of the iOS Settings app. Therefore, some defensive code must be added to notify the user and return from the method if a valid ubiquityURL cannot be obtained. For testing in this example, we will output a message to the console before returning:
|
You are reading a sample chapter from Building iOS 17 Apps using Xcode Storyboards.
Buy the full book now in eBook or Print format. The full book contains 96 chapters and 760 pages of in-depth information. |
guard ubiquityURL != nil else {
    print("Unable to access iCloud Account")
    print("Open the Settings app and enter your Apple ID into iCloud settings")
    return
}Code language: Swift (swift)
Since it is recommended that documents be stored in the Documents sub-directory, this needs to be appended to the URL path along with the file name:
ubiquityURL =
	ubiquityURL?.appendingPathComponent("Documents/savefile.txt")Code language: Swift (swift)
The final task for the loadFile method is to initiate a search in the app’s iCloud storage area to find out if the savefile.txt file already exists and to act accordingly, subject to the result of the search. The search is performed by calling the methods on an instance of the NSMetaDataQuery object. This involves creating the object, setting a predicate to indicate the files to search for, and defining a ubiquitous search scope (in other words instructing the object to search within the Documents directory of the app’s iCloud storage area). Once initiated, the search is performed on a separate thread and issues a notification when completed. For this reason, it is also necessary to configure an observer to be notified when the search is finished. The code to perform these tasks reads as follows:
metaDataQuery = NSMetadataQuery()

metaDataQuery?.predicate =
    NSPredicate(format: "%K like 'savefile.txt'",
        NSMetadataItemFSNameKey)
metaDataQuery?.searchScopes = [NSMetadataQueryUbiquitousDocumentsScope]

NotificationCenter.default.addObserver(self,
    selector: #selector(
           ViewController.metadataQueryDidFinishGathering),
    name: NSNotification.Name.NSMetadataQueryDidFinishGathering,
    object: metaDataQuery!)

metaDataQuery?.start()Code language: Swift (swift)
Once the start method is called, the search will run and call the metadataQueryDidFinishGathering method when the search is complete. The next step, therefore, is to implement the metadataQueryDidFinishGathering method. Before doing so, however, note that the loadFile method is now complete, and the full implementation should read as follows:
func loadFile() {

    let filemgr = FileManager.default

    ubiquityURL = filemgr.url(forUbiquityContainerIdentifier: nil)

    guard ubiquityURL != nil else {
        print("Unable to access iCloud Account")
        print("Open the Settings app and enter your Apple ID into iCloud settings")
        return
    }

    ubiquityURL = ubiquityURL?.appendingPathComponent(
					"Documents/savefile.txt")

    metaDataQuery = NSMetadataQuery()

    metaDataQuery?.predicate =
        NSPredicate(format: "%K like 'savefile.txt'",
            NSMetadataItemFSNameKey)
    metaDataQuery?.searchScopes =
		[NSMetadataQueryUbiquitousDocumentsScope]

    NotificationCenter.default.addObserver(self,
        selector: #selector(
               ViewController.metadataQueryDidFinishGathering),
        name: NSNotification.Name.NSMetadataQueryDidFinishGathering,
        object: metaDataQuery!)

    metaDataQuery?.start()
}Code language: Swift (swift)
Implementing the metadataQueryDidFinishGathering Method
When the metadata query was triggered in the loadFile method to search for documents in the Documents directory of the app’s iCloud storage area, an observer was configured to call a method named metadataQueryDidFinishGathering when the initial search was completed. The next logical step is to implement this method. The first task of the method is to identify the query object that caused this method to be called. This object must then disable any further query updates (at this stage, the document either exists or doesn’t exist, so there is nothing to be gained by receiving additional updates) and stop the search. Finally, removing the observer that triggered the method call is also necessary. When combined, these requirements result in the following code:
let query: NSMetadataQuery = notification.object as! NSMetadataQuery

query.disableUpdates()

NotificationCenter.default.removeObserver(self,
        name: NSNotification.Name.NSMetadataQueryDidFinishGathering,
        object: query)

query.stop()Code language: Swift (swift)
In all likelihood, a more complex app would need to implement a for loop to iterate through more than one document in the array. Given that the iCloudStore app searched for only one specific file name, we can check the array element count and assume that if the count is one, then the document already exists. In this case, the ubiquitous URL of the document from the query object needs to be assigned to our ubiquityURL member property and used to create an instance of our MyDocument class called document. The document object’s open(completionHandler:) method is then called to open the document in the cloud and read the contents. This will trigger a call to the load(fromContents:) method of the document object, which, in turn, will assign the contents of the document to the userText property. Assuming the document read is successful, the value of userText needs to be assigned to the text property of the text view object to make it visible to the user. Bringing this together results in the following code fragment:
|
You are reading a sample chapter from Building iOS 17 Apps using Xcode Storyboards.
Buy the full book now in eBook or Print format. The full book contains 96 chapters and 760 pages of in-depth information. |
    document = MyDocument(fileURL: resultURL as URL)

    document?.open(completionHandler: {(success: Bool) -> Void in
        if success {
            print("iCloud file open OK")
            self.textView.text = self.document?.userText
            self.ubiquityURL = resultURL as URL
        } else {
            print("iCloud file open failed")
        }
    })
} else {
}Code language: Swift (swift)
Suppose the document does not yet exist in iCloud storage. In that case, the code needs to create the document using the save(to:) method of the document object passing through the value of ubiquityURL as the destination path on iCloud:
.
.
} else {
    if let url = ubiquityURL {
        document = MyDocument(fileURL: url)

        document?.save(to: url,
                       for: .forCreating,
                       completionHandler: {(success: Bool) -> Void in
                        if success {
                            print("iCloud create OK")
                        } else {
                            print("iCloud create failed")
                        }
        })
    }
}Code language: Swift (swift)
The individual code fragments outlined above combine to implement the following metadataQueryDidFinishGathering method, which should be added to the ViewController.swift file:
@objc func metadataQueryDidFinishGathering(notification: NSNotification)
     -> Void
{
    let query: NSMetadataQuery = notification.object as! NSMetadataQuery

    query.disableUpdates()

    NotificationCenter.default.removeObserver(self,
            name: NSNotification.Name.NSMetadataQueryDidFinishGathering,
            object: query)

    query.stop()

    if query.resultCount == 1 {
        let resultURL = query.value(ofAttribute: NSMetadataItemURLKey,
                                    forResultAt: 0) as! URL

        document = MyDocument(fileURL: resultURL as URL)

        document?.open(completionHandler: {(success: Bool) -> Void in
            if success {
                print("iCloud file open OK")
                self.textView.text = self.document?.userText
                self.ubiquityURL = resultURL as URL
            } else {
                print("iCloud file open failed")
            }
        })
    } else {
        if let url = ubiquityURL {
            document = MyDocument(fileURL: url)

            document?.save(to: url,
                           for: .forCreating,
                           completionHandler: {(success: Bool) -> Void in
                            if success {
                                print("iCloud create OK")
                            } else {
                                print("iCloud create failed")
                            }
            })
        }
    }
}Code language: Swift (swift)
Implementing the saveDocument Method
The final task before building and running the app is implementing the saveDocument method. This method needs to update the userText property of the document object with the text entered into the text view and then call the saveToURL method of the document object, passing through the ubiquityURL as the destination URL using the .forOverwriting option:
@IBAction func saveDocument(_ sender: Any) {
    document?.userText = textView.text

    if let url = ubiquityURL {
        document?.save(to: url,
               for: .forOverwriting,
               completionHandler: {(success: Bool) -> Void in
                if success {
                    print("Save overwrite OK")
                } else {
                    print("Save overwrite failed")
                }
        })
    }
}Code language: Swift (swift)
All that remains now is to build and run the iCloudStore app on an iOS device, but first, some settings need to be checked.
Enabling iCloud Document and Data Storage
When testing iCloud on an iOS Simulator session, it is important to ensure that the simulator is configured with a valid Apple ID within the Settings app. Launch the simulator, load the Settings app, and click on the iCloud option to configure this. If no account information is configured on this page, enter a valid Apple ID and corresponding password before proceeding with the testing.
|
You are reading a sample chapter from Building iOS 17 Apps using Xcode Storyboards.
Buy the full book now in eBook or Print format. The full book contains 96 chapters and 760 pages of in-depth information. |
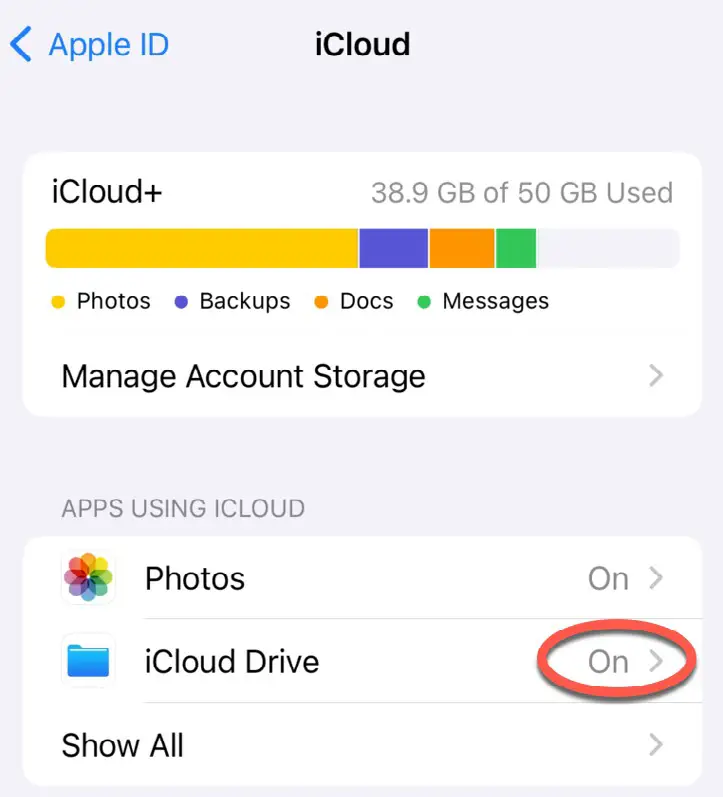
Whether or not apps are permitted to use iCloud storage on an iOS device or Simulator is controlled by the iCloud settings. To review these settings, open the Settings app on the device or simulator, select your account at the top of the settings list and, on the resulting screen, select the iCloud category. Scroll down the list of various iCloud-related options and verify that the iCloud Drive option is set to On:
Running the iCloud App
Once you have logged in to an iCloud account on the device or simulator, test the iCloudStore app by clicking the run button. Once running, edit the text in the text view and touch the Save button. Next, in the Xcode toolbar, click on the stop button to exit the app, followed by the run button to re-launch the app. On the second launch, the previously entered text will be read from the document in the cloud and displayed in the text view object.
Making a Local File Ubiquitous
In addition to writing a file directly to iCloud storage, as illustrated in this example app, it is also possible to transfer a pre-existing local file to iCloud storage, making it ubiquitous. This can be achieved using the setUbiquitous method of the FileManager class. For example, assuming that documentURL references the path to the local copy of the file and ubiquityURL the iCloud destination, a local file can be made ubiquitous using the following code:
do {
    try filemgr.setUbiquitous(true, itemAt: documentUrl,
                destinationURL: ubiquityURL)
} catch let error {
    print("setUbiquitous failed: \(error.localizedDescription)")
}Code language: Swift (swift)
Summary
The objective of this chapter was to work through the process of developing an app that stores a document using the iCloud service. Both techniques of directly creating a file in iCloud storage and making an existing locally created file ubiquitous were covered. In addition, some important guidelines that should be observed when using iCloud were outlined.