
Each SiriKit domain will default to a standard user interface layout to present information to the user during the Siri session. In the previous chapter, for example, the standard user interface was used by SiriKit to display to the user the message recipients and content to the user before sending the message. The default appearance can, however, be customized by making use of an Intent UI app extension. This UI Extension provides a way to control the appearance of information when it is displayed within the Siri interface. It also allows an extension to present additional information that would not normally be displayed by Siri or to present information using a visual style that reflects the design theme of the main app.
Adding the Intents UI Extension
When the Intents Extension was added to the SiriDemo project in the previous chapter, the option to include an Intents UI Extension was disabled. Now that we are ready to create a customized user interface for the intent, select the Xcode File -> New -> Target… menu option and add an Intents UI Extension to the project. Name the product SiriDemoIntentUI and, when prompted to do so, activate the build scheme for the new extension.
Modifying the UI Extension
SiriKit provides two mechanisms for performing this customization each of which involves implementing a method in the intent UI view controller class file. A simpler and less flexible option involves the use of the configure method. For greater control, the previously mentioned configureView method is available.
Using the configure Method
The files for this Intent UI Extension added above can be found within the Project navigator panel under the SiriDemoIntentUI folder.
Included within the SiriDemoIntentUI extension is a storyboard file named MainInterface.storyboard. For those unfamiliar with how user interfaces were built prior to the introduction of SwiftUI, this is an Interface Builder file. When the configure method is used to customize the user interface, this scene is used to display additional content which will appear directly above the standard SiriKit provided UI content. This layout is sometimes referred to as the Siri Snippet.
Although not visible by default, at the top of the message panel presented by Siri is the area represented by the UI Extension. Specifically, this displays the scene defined in the MainInterface.storyboard file of the SiriDemoIntentUI extension folder. The lower section of the panel is the default user interface provided by Siri for this particular SiriKit domain.
To provide a custom user interface using the UI Extension, the user interface needs to be implemented in the MainInterface.storyboard file and the configure method added to the IntentViewController.swift file. The IntentViewController class in this file is a subclass of UIViewController and configured such that it implements the INUIHostedViewControlling protocol.
The UI Extension is only used when information is being presented to the user in relation to an intent type that has been declared as supported in the UI Extension’s Info.plist file. When the extension is used, the configure method of the IntentViewController is called and passed an INInteraction object containing both the NSUserActivity and intent objects associated with the current Siri session. This allows context information about the session to be extracted and displayed to the user via the custom user interface defined in the MainInterface.storyboard file.
To add content above the “To:” line, therefore, we just need to implement the configure method and add some views to the UIView instance in the storyboard file. These views can be added either via Interface Builder or programmatically with the configure method.
For more advanced configuration, however, the configureView() approach provides far greater flexibility, and is the focus of this chapter.
Using the configureView Method
Unlike the configure method, the configureView method allows each section of the default user interface to be replaced with custom content and view layout.
SiriKit considers the default layout to be a vertical stack in which each row is represented by a parameter. For each layer of the stack (starting at the top and finishing at the bottom of the layout) the configureView method is called, passed information about the corresponding parameters and given the opportunity to provide a custom layout to be displayed within the corresponding stack row of the Siri user interface. The method is also passed a completion handler to be called with the appropriate configuration information to be passed back to Siri.
The parameters passed to the method take the form of INParameter instances. It is the responsibility of the configureView method to find out if a parameter is one for which it wants to provide a custom layout. It does this by creating local NSParameter instances of the type it is interested in and comparing these to the parameters passed to the method. Parameter instances are created by combining the intent class type with a specific key path representing the parameter (each type of intent has its own set of path keys which can be found in the documentation for that class). If the method needs to confirm that the passed parameter relates to the content of a send message intent, for example, the code would read as follows:
func configureView(for parameters: Set<INParameter>, of interaction:
   INInteraction, interactiveBehavior: INUIInteractiveBehavior, context:
    INUIHostedViewContext, completion: @escaping (Bool, Set<INParameter>,
      CGSize) -> Void) {

    let content = INParameter(for: INSendMessageIntent.self,
               keyPath: #keyPath(INSendMessageIntent.content))

    if parameters == [content] {
       // Configure ViewController before calling completion handler
   }
.
.
}Code language: Swift (swift)
When creating a custom layout, it is likely that the method will need to access the data contained within the parameter. In the above code, for example, it might be useful to extract the message content from the parameter and incorporate it into the custom layout. This is achieved by calling the parameterValue method of the INInteraction object which is also passed to the configureView method. Each parameter type has associated with it a set of properties. In this case, the property for the message content is named, appropriately enough, content and can be accessed as follows:
.
.
let content = INParameter(for: INSendMessageIntent.self,
               keyPath: #keyPath(INSendMessageIntent.content))

if parameters == [content] {
   let contentString = interaction.parameterValue(for: content)
}
.
.Code language: Swift (swift)
When the configureView method is ready to provide Siri with a custom layout, it calls the provided completion handler, passing through a Boolean true value, the original parameters and a CGSize object defining the size of the layout as it is to appear in the corresponding row of the Siri user interface stack, for example:
completion(true, parameters, size)Code language: Swift (swift)If the default Siri content is to be displayed for the specified parameters instead of a custom user interface, the completion handler is called with a false value and a zero CGSize object:
completion(false, parameters, CGSize.zero)Code language: Swift (swift)In addition to calling the configureView method for each parameter, Siri will first make a call to the method to request a configuration for no parameters. By default, the method should check for this condition and call the completion handler as follows:
if parameters.isEmpty {
    completion(false, [], CGSize.zero)
}Code language: Swift (swift)
The foundation for the custom user interface for each parameter is the View contained within the intent UI MainInterface.storyboard file. Once the configureView method has identified the parameters it can dynamically add views to the layout, or make changes to existing views contained within the scene.
Designing the Siri Snippet
The previous section covered a considerable amount of information, much of which will become clearer by working through an example.
Begin by selecting the MainInterface.storyboard file belonging to the SiriDemoIntentUI extension. While future releases of Xcode will hopefully allow the snippet to be declared using SwiftUI, this currently involves working with Interface Builder to add components, configure layout constraints and set up outlets.
The first step is to add a Label to the layout canvas. Display the Library by clicking on the button marked A in Figure 43-1 below and drag and drop a Label object from the Library (B) onto the layout canvas as indicated by the arrow:
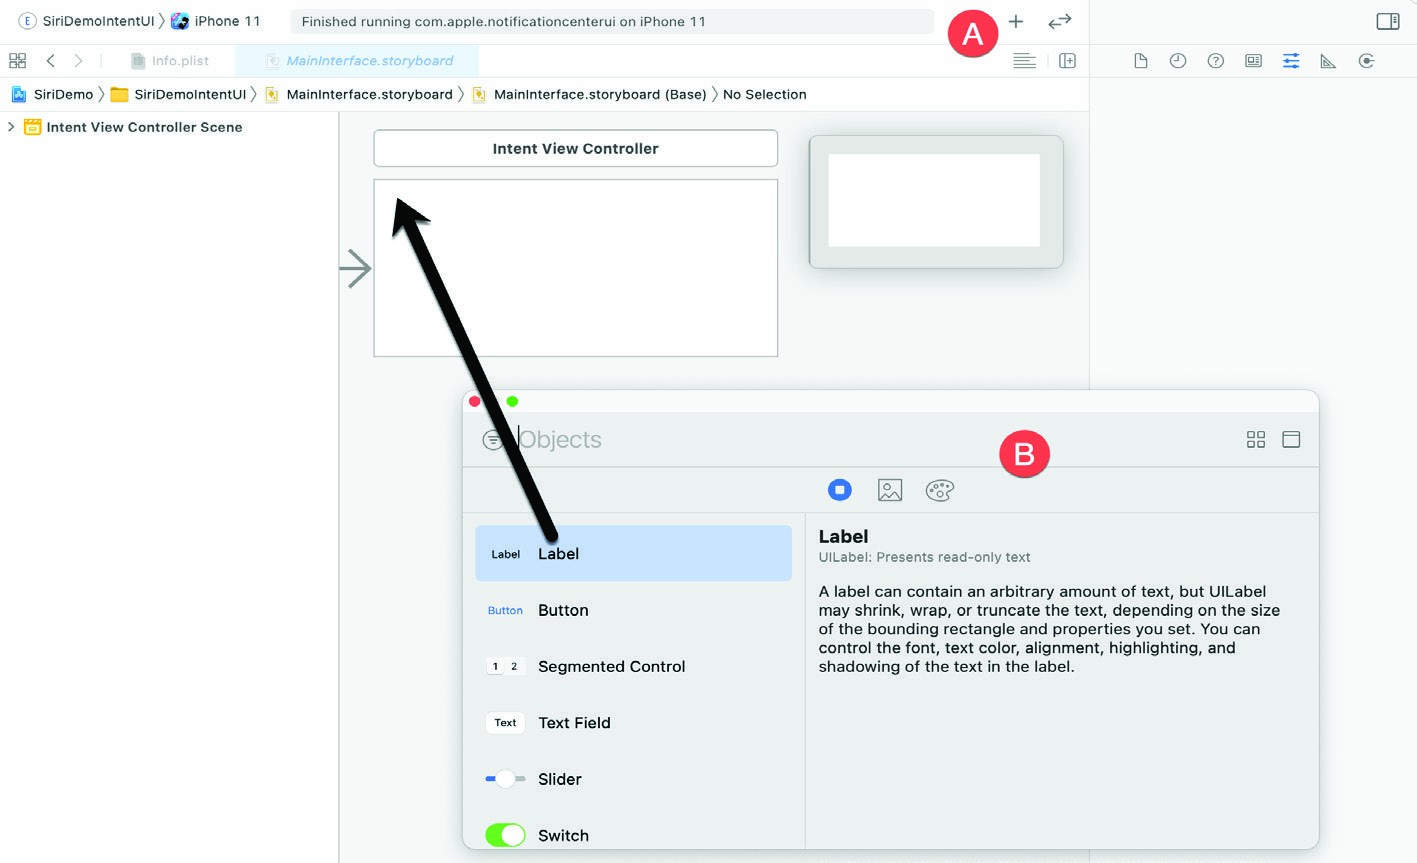
Figure 43-1
Next, the Label needs to be constrained so that it has a 5dp margin between the leading, trailing and top edges of the parent view. With the Label selected in the canvas, click on the Add New Constraints button located in the bottom right-hand corner of the editor to display the menu shown in Figure 43-2 below:
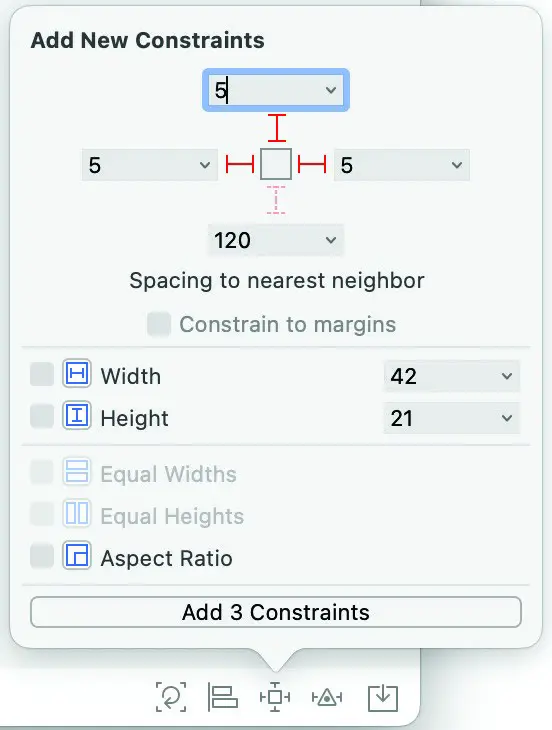
Figure 43-2
Enter 5 into the top, left and right boxes and click on the I-beam icons next to each value so that they are displayed in solid red instead of dashed lines before clicking on the Add 3 Constraints button.
Before proceeding to the next step, establish an outlet connection from the Label component to a variable in the IntentViewController.swift file named contentLabel. This will allow the view controller to change the text displayed on the Label to reflect the intent content parameter. This is achieved using the Assistant Editor which is displayed by selecting the Xcode Editor -> Assistant menu option. Once displayed, Ctrl-click on the Label in the canvas and drag the resulting line to a position in the Assistant Editor immediately above the viewDidLoad() declaration:
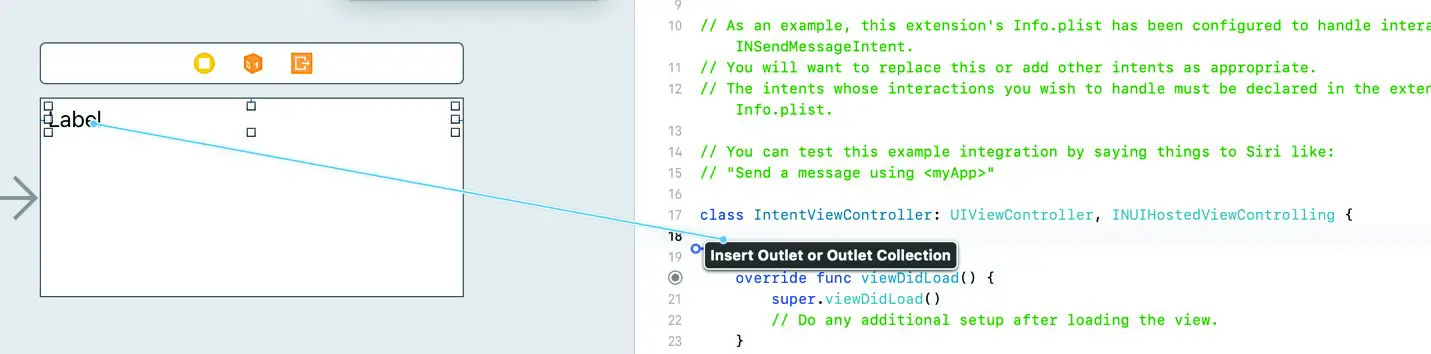
Figure 43-3
On releasing the line, the dialog shown in Figure 43-4 will appear. Enter contentLabel into the Name field and click on Connect to establish the outlet.
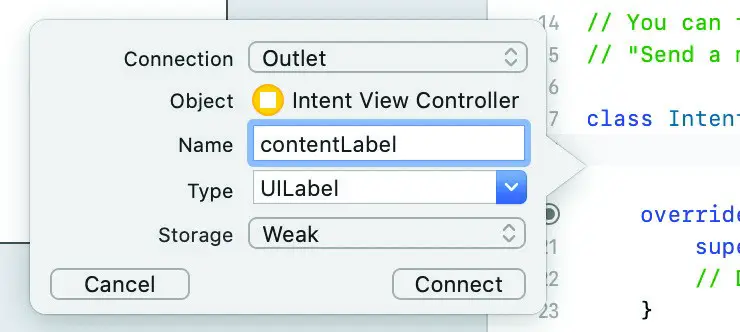
Figure 43-4
Ctrl-click on the snippet background view and drag to immediately beneath the newly declared contentLabel outlet, this time creating an outlet named contentView:
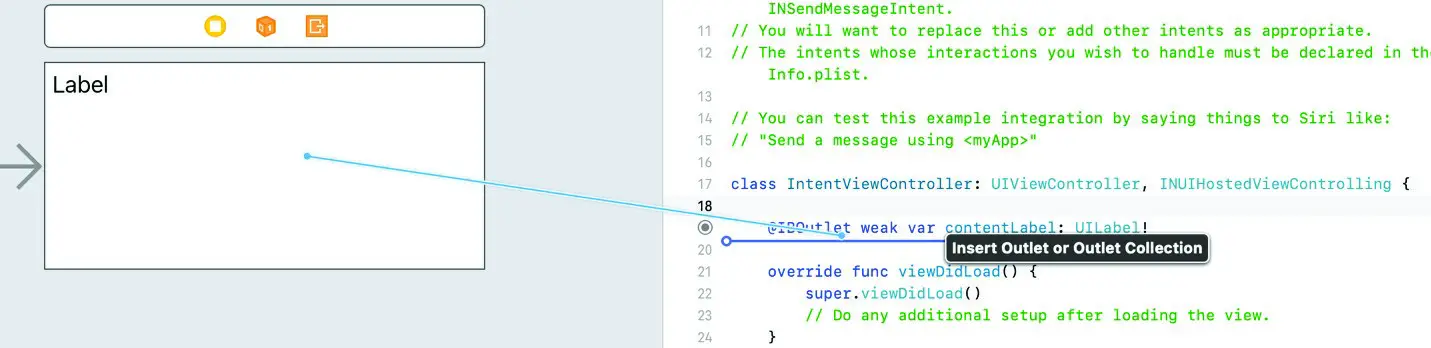
Figure 43-5
On completion of these steps, the outlets should appear in the IntentViewController.swift file as follows:
class IntentViewController: UIViewController, INUIHostedViewControlling {

    @IBOutlet weak var contentLabel: UILabel!
    @IBOutlet weak var contentView: UIView!
.
.Code language: Swift (swift)
Implementing a configureView Method
Next, edit the configureView method located in the IntentViewController.swift file to extract the content and recipients from the intent, and to modify the Siri snippet for the content parameter as follows:
func configureView(for parameters: Set<INParameter>, of interaction:
    INInteraction, interactiveBehavior: INUIInteractiveBehavior, context:
    INUIHostedViewContext, completion: @escaping (Bool, Set<INParameter>,
     CGSize) -> Void) {

    var size = CGSize.zero

    let content = INParameter(for: INSendMessageIntent.self, keyPath:
        #keyPath(INSendMessageIntent.content))

    let recipients = INParameter(for: INSendMessageIntent.self,
                        keyPath: #keyPath(INSendMessageIntent.recipients))

    let recipientsValue = interaction.parameterValue(
           for: recipients) as! Array<INPerson>

    if parameters == [content] {
        let contentValue = interaction.parameterValue(for: content)

        self.contentLabel.text = contentValue as? String
        self.contentLabel.textColor = UIColor.white
        self.contentView.backgroundColor = UIColor.brown
        size = CGSize(width: 100, height: 70)
    }
    completion(true, parameters, size)
}Code language: Swift (swift)
The code begins by declaring a variable in which to contain the required size of the Siri snippet before the content and recipients are extracted from the intent parameter. If the parameters include message content, it is applied to the Label widget in the snippet. The background of the snippet view is set to brown, the text color to white, and the dimensions to 100 x 70dp.
The recipients parameter takes the form of an array of INPerson objects, from which can be extracted the recipients’ display names. Code now needs to be added to iterate through each recipient in the array, adding each name to a string to be displayed on the contentLabel view. Code will also be added to use a different font and text color on the label and to change the background color of the view. Since the recipients list requires less space, the height of the view is set to 30dp:
.
.
    if parameters == [content] {
        let contentValue = interaction.parameterValue(for: content)
        self.contentLabel.text = contentValue as? String
        self.contentView.backgroundColor = UIColor.brown
        size = CGSize(width: 100, height: 70)
    } else if recipientsValue.count > 0 {
        var recipientStr = "To:"
        var first = true

        for name in recipientsValue {
            let separator = first ? " " : ", "
            first = false
            recipientStr += separator + name.displayName
        }

        self.contentLabel.font = UIFont(name: "Arial-BoldItalicMT", size: 20.0)
        self.contentLabel.text = recipientStr
        self.contentLabel.textColor = UIColor.white
        self.contentView.backgroundColor = UIColor.blue
        size = CGSize(width: 100, height: 30)
    } else if parameters.isEmpty {
        completion(false, [], CGSize.zero)
    }
    completion(true, parameters, size)
.
.Code language: Swift (swift)
Note that the above additions to the configureView() method also include a check for empty parameters, in which case a false value is returned together with a zeroed CGSize object indicating that there is nothing to display.
Testing the Extension
To test the extension, begin by changing the run target menu to the SiriDemoIntentUI target as shown in Figure 43-6 below:
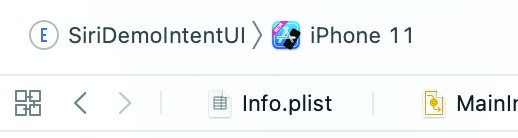
Figure 43-6
Next, display the menu again, this time selecting the Edit Scheme… menu option:
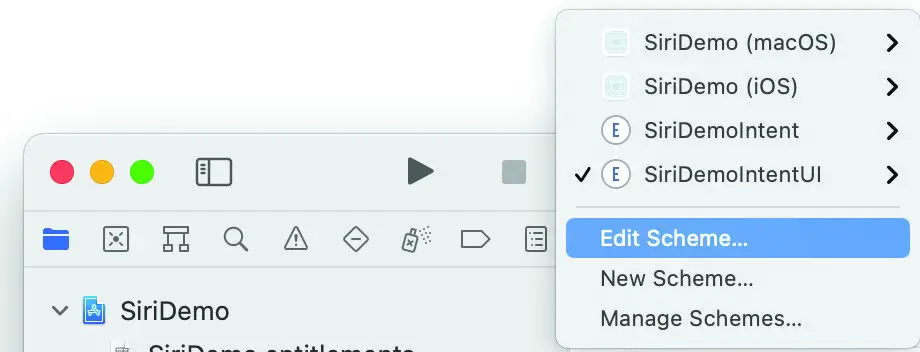
Figure 43-7
In the resulting dialog select the Run option from the left-hand panel and enter the following into the Siri Intent Query box before clicking on the Close button:
Use SiriDemo to tell John and Kate I’ll be 10 minutes late.
Compile and run the Intents UI Extension and verify that the recipient row now appears with a blue background, a 30 point height and uses a larger italic font while the content appears with a brown background and a 70dp height:
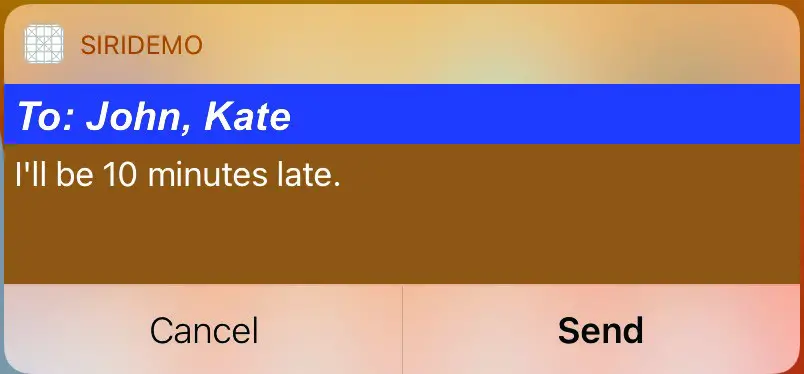
Figure 43-8
Summary
While the default user interface provided by SiriKit for the various domains will be adequate for some apps, most intent extensions will need to be customized to present information in a way that matches the style and theme of the associated app, or to provide additional information not supported by the default layout. The default UI can be replaced by adding an Intent UI extension to the app project. The UI extension provides two options for configuring the user interface presented by Siri. The simpler of the two involves the use of the configure method to present a custom view above the default Siri user interface layout. A more flexible approach involves the implementation of the configureView method. SiriKit associates each line of information displayed in the default layout with a parameter. When implemented, the configureView method will be called for each of these parameters and provided with the option to return a custom View containing the layout and information to be used in place of the default user interface element.