
The previous chapter covered much of the theory associated with integrating Siri into an iOS app. This chapter will review the example Siri messaging extension that is created by Xcode when a new Intents Extension is added to a project. This will not only show a practical implementation of the topics covered in the previous chapter, but will also provide some more detail on how the integration works. The next chapter will cover the steps required to make use of a UI Extension within an app project.
Creating the Example Project
Begin by launching Xcode and creating a new Multiplatform App project named SiriDemo.
Enabling the Siri Entitlement
Once the main project has been created the Siri entitlement must be enabled for the project. Select the SiriDemo target located at the top of the Project Navigator panel (marked A in Figure 42-1) so that the main panel displays the project settings. From within this panel, select the Signing & Capabilities tab (B) followed by the SiriDemo target entry (C):
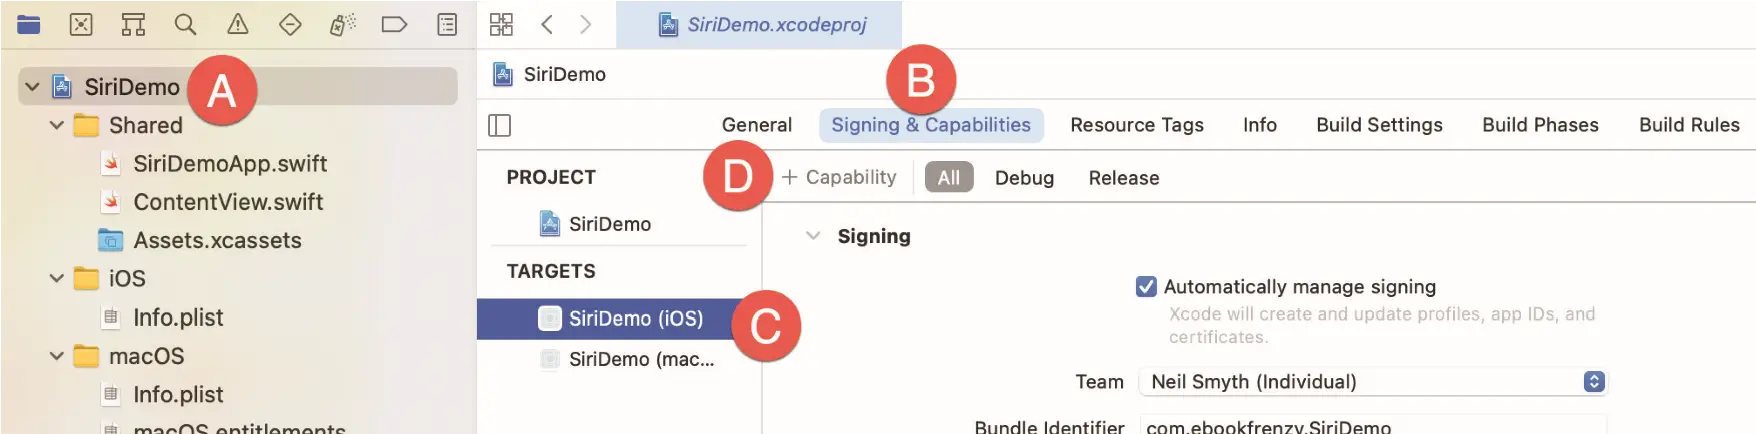
Figure 42-1
Click on the “+ Capability” button (D) to display the dialog shown in Figure 42-2. Enter Siri into the filter bar, select the result and press the keyboard enter key to add the capability to the project:
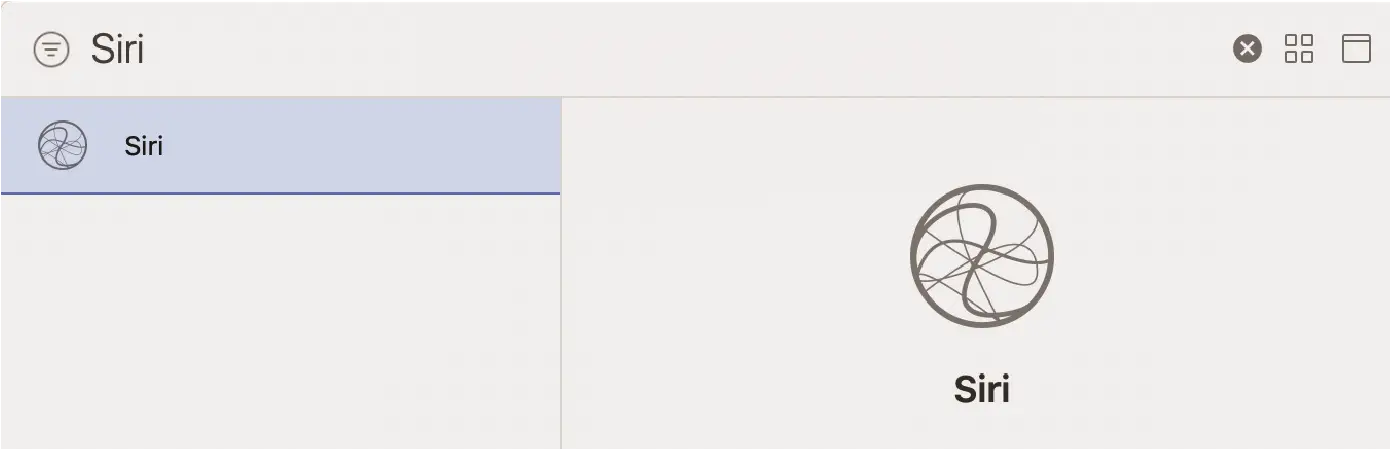
Figure 42-2
If Siri is not listed as an option, you will need to pay to join the Apple Developer program as outlined in the chapter entitled “Joining the Apple Developer Program”.
Seeking Siri Authorization
In addition to enabling the Siri entitlement, the app must also seek authorization from the user to integrate the app with Siri. This is a two-step process which begins with the addition of an entry to the Info.plist file of the iOS app target for the NSSiriUsageDescription key with a corresponding string value explaining how the app makes use of Siri.
Select the Info.plist file located within the iOS folder in the project navigator panel as shown in Figure 42-3:
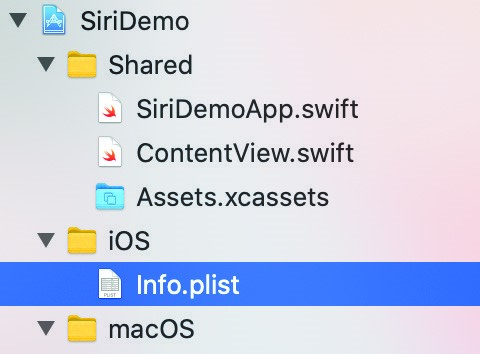
Figure 42-3
Once the file is loaded into the editor, locate the bottom entry in the list of properties and hover the mouse pointer over the item. When the plus button appears, click on it to add a new entry to the list. From within the drop-down list of available keys, locate and select the Privacy – Siri Usage Description option as shown in Figure 42-4:
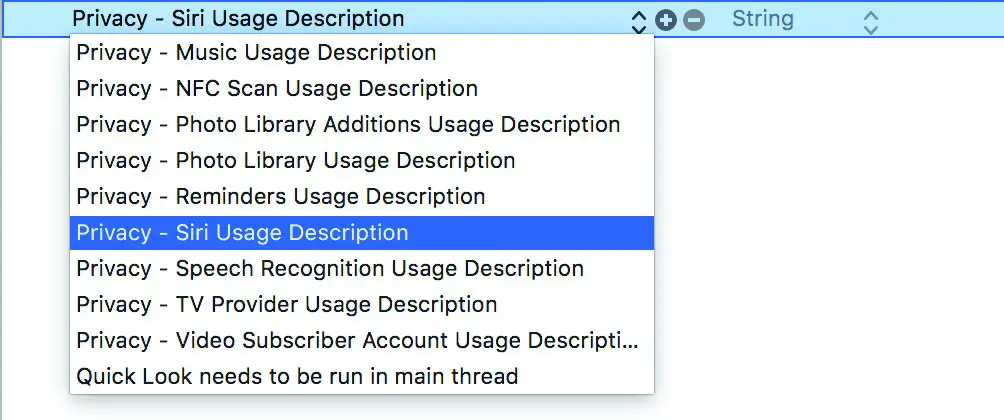
Figure 42-4
Within the value field for the property, enter a message to display to the user when requesting permission to use speech recognition. For example:
Siri support is used to send and review messages.
In addition to adding the Siri usage description key, a call also needs to be made to the requestSiriAuthorization() class method of the INPreferences class. Ideally, this call should be made the first time that the app runs, not only so that authorization can be obtained, but also so that the user learns that the app includes Siri support. For the purposes of this project, the call will be made within the onChange() modifier based on the scenePhase changes within the app declaration located in the SiriDemoApp.swift file as follows:
import SwiftUI
import Intents

@main
struct SiriDemoApp: App {

    @Environment(\.scenePhase) private var scenePhase

    var body: some Scene {
        WindowGroup {
            ContentView()
        }
        .onChange(of: scenePhase) { phase in
            INPreferences.requestSiriAuthorization({status in
                // Handle errors here
            })
        }
    }
}
Before proceeding, compile and run the app on an iOS device or simulator. When the app loads, a dialog will appear requesting authorization to use Siri. Select the OK button in the dialog to provide authorization.
Adding the Intents Extension
The next step is to add the Intents Extension to the project ready to begin the SiriKit integration. Select the Xcode File -> New -> Target… menu option and add an Intents Extension to the project. Name the product SiriDemoIntent, set the Starting Point menu to Messaging and make sure that the Include UI Extension option is turned off (this will be added in the next chapter) before clicking on the Finish button. When prompted to do so, activate the build scheme for the Intents Extension.
Supported Intents
In order to work with Siri, an extension must specify the intent types it is able to support. These declarations are made in the Info.plist files of the extension folders. Within the Project Navigator panel, select the Info.plist file located in the SiriDemoIntent folder and unfold the NSExtension -> NSExtensionAttributes section. This will show that the IntentsSupported key has been assigned an array of intent class names:
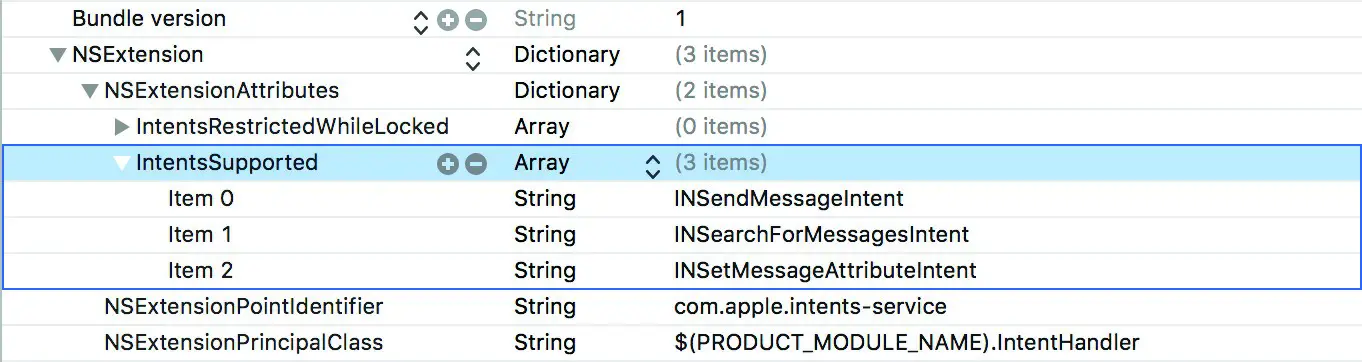
Figure 42-5
Note that entries are available for intents that are supported and intents that are supported but restricted when the lock screen is enabled. It might be wise, for example, for a payment based intent to be restricted when the screen is locked. As currently configured, the extension supports all of the messaging intent types without restrictions. To support a different domain, change these intents or add additional intents accordingly. For example, a photo search extension might only need to specify INSearchForPhotosIntent as a supported intent. When the Intents UI Extension is added in the next chapter, it too will contain an Info.plist file with these supported intent value declarations. Note that the intents supported by the Intents UI Extension can be a subset of those declared in the UI Extension. This allows the UI Extension to be used only for certain intent types.
Trying the Example
Before exploring the structure of the project it is worth running the app and experiencing the Siri integration. The example simulates searching for and sending messages, so can be safely used without any messages actually being sent.
Make sure that the SiriDemoIntent option is selected as the run target in the toolbar as illustrated in Figure 42-6 and click on the run button.

Figure 42-6
When prompted, select Siri as the app within which the extension is to run. When Siri launches experiment with phrases such as the following:
“Send a message with SiriDemo.”
“Send a message to John with SiriDemo.”
“Use SiriDemo to say Hello to John and Kate.”
“Find Messages with SiriDemo.”
If Siri indicates that SiriDemo has not yet been set up, tap the button located on the Siri screen to open the SiriDemo app. Once the app has launched, press and hold the home button to relaunch Siri and try the above phrases again.
In each case, all of the work involved in understanding the phrases and converting them into structured representations of the request is performed by Siri. All the intent handler needs to do is work with the resulting intent object.
Specifying a Default Phrase
A useful option when repeatedly testing SiriKit behavior is to configure a phrase to be passed to Siri each time the app is launched from within Xcode. This avoids having to repeatedly speak to Siri each time the app is relaunched. To specify the test phrase, select the SiriDemoIntent run target in the Xcode toolbar and select Edit scheme… from the resulting menu as illustrated in Figure 42-7:
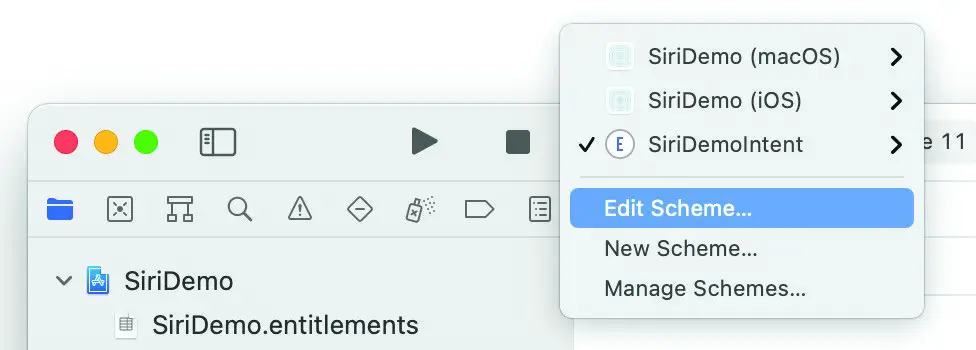
Figure 42-7
In the scheme panel, select the Run entry in the left-hand panel followed by the Info tab in the main panel. Within the Info settings, enter a query phrase into the Siri Intent Query text box before closing the panel:
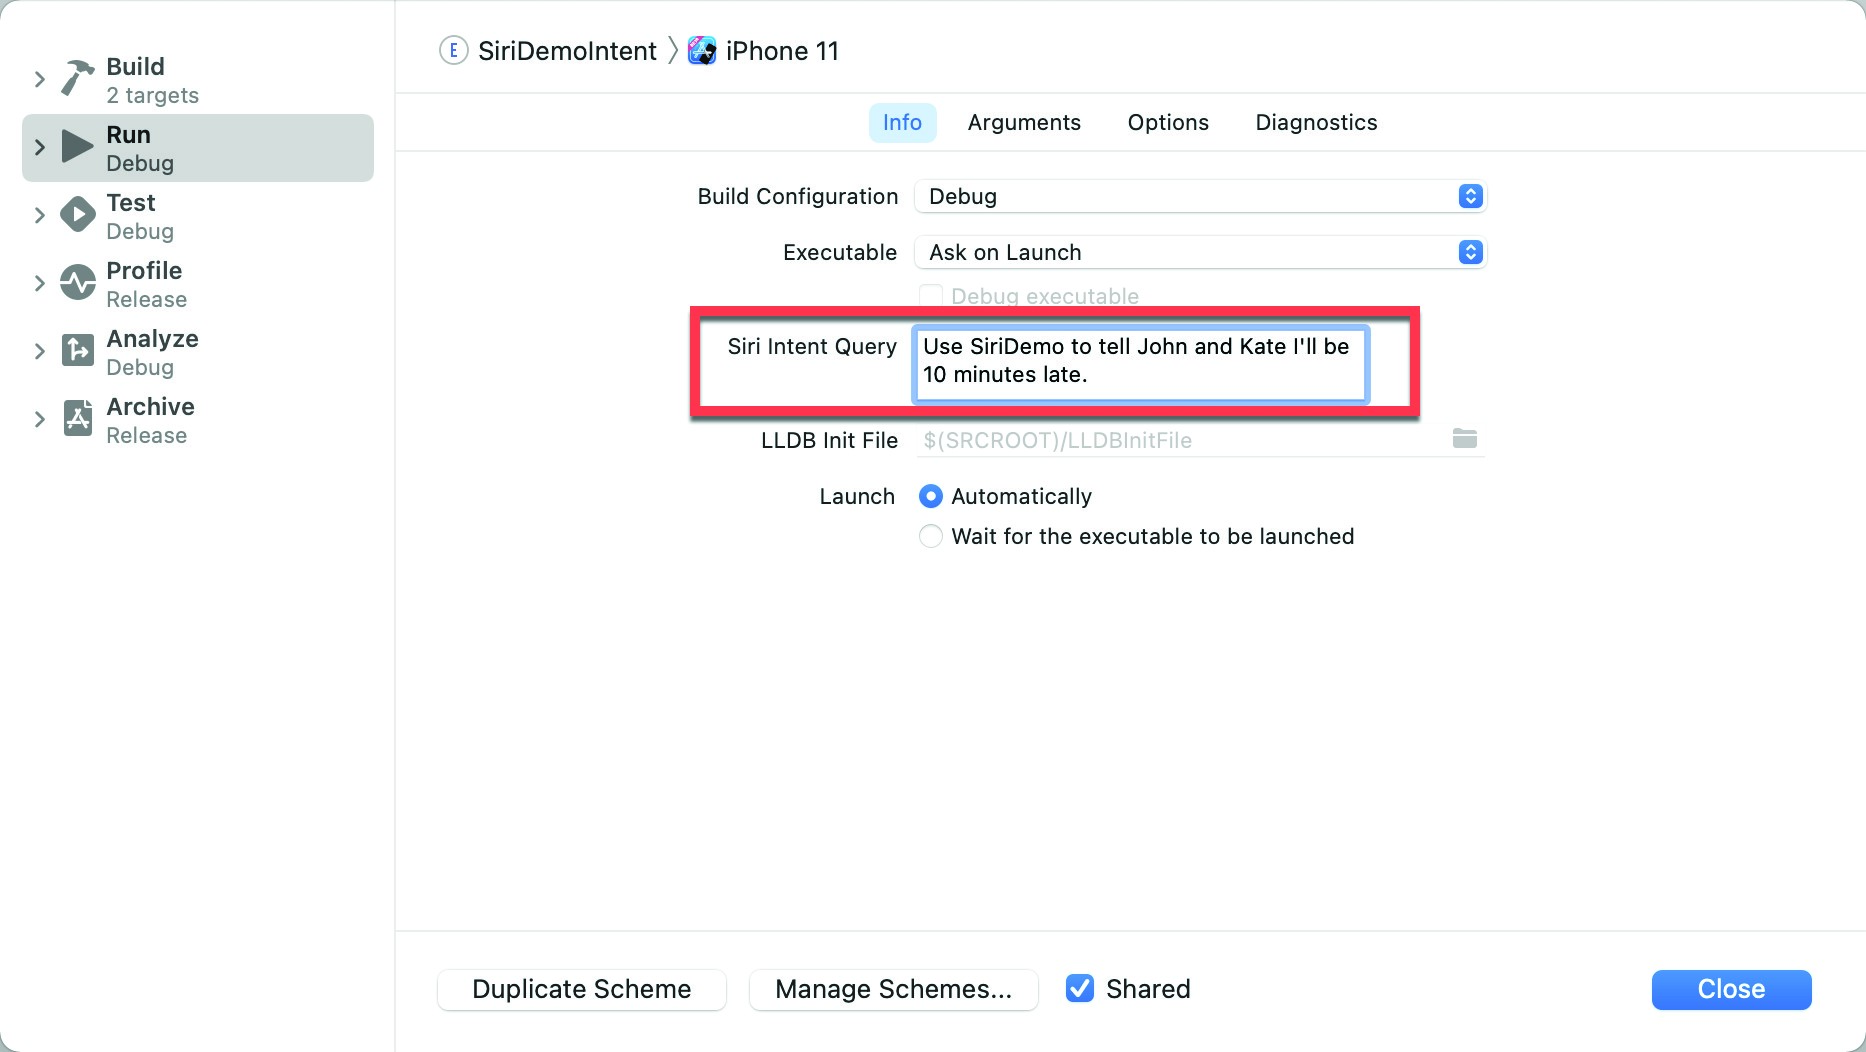
Figure 42-8
Run the extension once again and note that the phrase is automatically passed to Siri to be handled:

Figure 42-9
Reviewing the Intent Handler
The Intent Handler is declared in the IntentHandler.swift file in the SiriDemoIntent folder. Load the file into the editor and note that the class declares that it supports a range of intent handling protocols for the messaging domain:
class IntentHandler: INExtension, INSendMessageIntentHandling,
  INSearchForMessagesIntentHandling, INSetMessageAttributeIntentHandling {
.
.
}
The above declaration declares the class as supporting all three of the intents available in the messaging domain.
As an alternative to listing all of the protocol names individually, the above code could have achieved the same result by referencing the INMessagesDomainHandling protocol which encapsulates all three protocols.
If this template were to be re-purposed for a different domain, these protocol declarations would need to be replaced. For a payment extension, for example, the declaration might read as follows:
class IntentHandler: INExtension, INSendPaymentIntentHandling,
    INRequestPaymentIntent {
.
.
}
The class also contains the handler method, resolution methods for the intent parameters and the confirm method. The resolveRecipients method is of particular interest since it demonstrates the use of the resolution process to provide the user with a range of options from which to choose when a parameter is ambiguous.
The implementation also contains multiple handle methods for performing tasks for message search, message send and message attribute change intents. Take some time to review these methods before proceeding.
Summary
This chapter has provided a walk-through of the sample messaging-based extension provided by Xcode when creating a new Intents Extension. This has highlighted the steps involved in adding both Intents and UI Extensions to an existing project, and enabling and seeking SiriKit integration authorization for the project. The chapter also outlined the steps necessary for the extensions to declare supported intents and provided an opportunity to gain familiarity with the methods that make up a typical intent handler. The next chapter will outline the mechanism for implementing and configuring a UI Extension.