
A context menu in SwiftUI is a menu of options that appears when the user performs a long press over a view on which a menu has been configured. Each menu item will typically contain a Button view configured to perform an action when selected, together with a Text view and an optional Image view.
This chapter will work through the creation of an example app that makes use of a context menu to perform color changes on a view.
Creating the ContextMenuDemo Project
Launch Xcode and select the option to create a new Multiplatform App project named ContextMenuDemo.
Preparing the Content View
A context menu may be added to any view within a layout, but for the purposes of this example, the default “Hello, world!” Text view will be used. Within Xcode, load the ContentView.swift file into the editor, add some state properties to store the foreground and background color values, and use these to control the color settings of the Text view. Also use the font() modifier to increase the text font size:
import SwiftUI

struct ContentView: View {

    @State private var foregroundColor: Color = Color.black
    @State private var backgroundColor: Color = Color.white

    var body: some View {

        Text("Hello, world!")
            .padding()
            .font(.largeTitle)
            .foregroundColor(foregroundColor)
            .background(backgroundColor)
.
.Code language: Swift (swift)
Adding the Context Menu
Context menus are added to views in SwiftUI using the contextMenu() modifier and declaring the views that are to serve as menu items. Add menu items to the context menu by making the following changes to the body view of the ContentView.swift file:
 |
You are reading a sample chapter from an old edition of iOS App Development Essentials. Purchase the fully updated iOS 18 App Development Essentials book. The full book contains 71 chapters, over 612 pages of in-depth information, downloadable source code, and access to over 50 SwiftUI knowledge test quizzes. |
Finally, add code to the two button actions to change the values assigned to the foreground and background state properties:
var body: some View {

    Text("Hello, world!")
        .font(.largeTitle)
        .padding()
        .foregroundColor(foregroundColor)
        .background(backgroundColor)

        .contextMenu {
            Button(action: {
                self.foregroundColor = .black
                self.backgroundColor = .white
            }) {
                Text("Normal Colors")
                Image(systemName: "paintbrush")
            }

            Button(action: {
                self.foregroundColor = .white
                self.backgroundColor = .black
            }) {
                Text("Inverted Colors")
                Image(systemName: "paintbrush.fill")
            }
    }
}Code language: Swift (swift)
Testing the Context Menu
Use Live Preview mode to test the view and perform a long press on the Text view. After a short delay the context menu should appear resembling Figure 34-1 below:
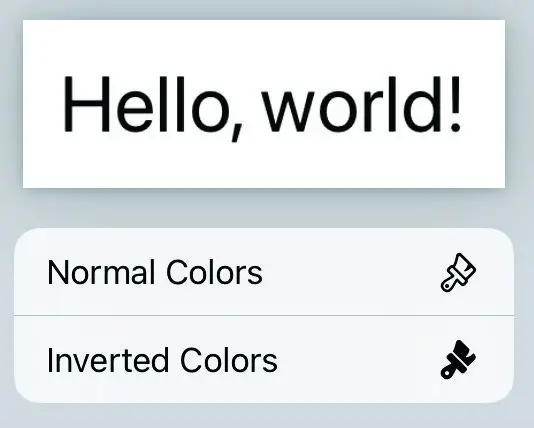
Figure 34-1
Select the Inverted Colors option to dismiss the menu and invert the colors on the Text view:

Figure 34-2
|
You are reading a sample chapter from an old edition of iOS App Development Essentials. Purchase the fully updated iOS 18 App Development Essentials book. The full book contains 71 chapters, over 612 pages of in-depth information, downloadable source code, and access to over 50 SwiftUI knowledge test quizzes. |
Summary
Context menus appear when a long press gesture is performed over a view in a layout. A context menu can be added to any view type and is implemented using the contextMenu() modifier. The menu is comprised of menu items which usually take the form of Button views configured with an action together with a Text view and an optional Image view.