
As previously discussed, the purpose of Siri Shortcuts is to allow key features of an app to be invoked by the user via Siri by speaking custom phrases. This chapter will demonstrate how to integrate shortcut support into an existing iOS app, including the creation of a custom intent and intent UI, the configuration of a SiriKit Intent Definition file and outline the code necessary to handle the intents, provide responses and donate shortcuts to Siri.
About the Example App
The project used as the basis for this tutorial is an app that simulates the purchasing of financial stocks and shares. The app is named ShortcutDemo and can be found in the sample code download available at the following URL:
https://www.ebookfrenzy.com/code/SwiftUI-iOS14-CodeSamples.zip
The app consists of a “Buy” screen into which the stock symbol and quantity are entered and the purchase initiated, and a “History” screen consisting of a List view listing all previous transactions. Selecting an entry in the transaction history displays a third screen containing details about the corresponding stock purchase.
App Groups and UserDefaults
Much about the way in which the app has been constructed will be familiar from techniques outlined in previous chapters of the book. The project also makes use of app storage in the form of UserDefaults and the @AppStorage property wrapper, concepts which were introduced in the chapter entitled “SwiftUI Data Persistence using AppStorage and SceneStorage”. The ShortcutDemo app uses app storage to store an array of objects containing the symbol, quantity and time stamp data for all stock purchase transactions. Since this is a test app that needs to store minimal amounts of data, this storage is more than adequate. In a real-world environment, however, a storage system capable of handling larger volumes of data such as SQLite, CoreData or iCloud storage would need to be used.
In order to share the UserDefaults data between the app and the SiriKit intents extension, the project also makes use of App Groups. App Groups allow apps to share data with other apps and targets within the same app group. App Groups are assigned a name (typically similar to group.com.yourdomain.myappname) and are enabled and configured within the Xcode project Signing & Capabilities screen.
Preparing the Project
Once the ShortcutDemo project has been downloaded and opened within Xcode, some configuration changes need to be made before the app can be compiled and run. Begin by selecting the ShortcutDemo target at the top of the project navigator panel (marked A in Figure 46-1) followed by the ShortcutDemo (iOS) entry in the Targets list (B). Select the Signing & Capabilities tab (C) and choose your developer ID from the Team menu in the Signing section (D):
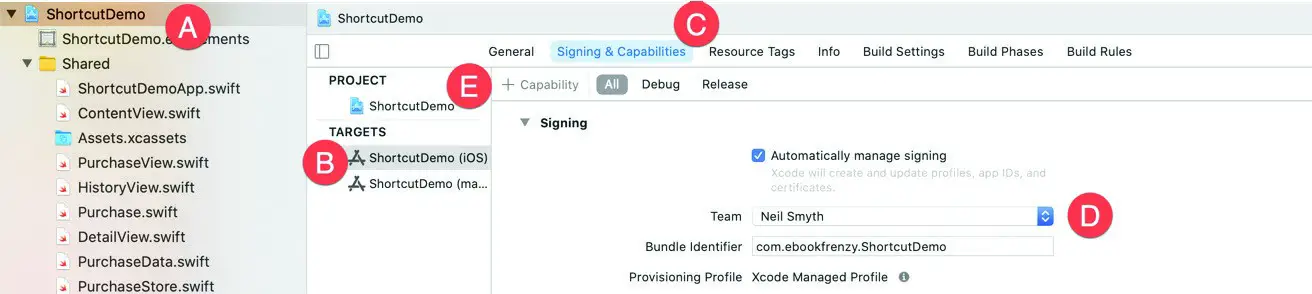
Figure 46-1
Next, click the “+ Capabilities” button (E) and double-click on the App Groups entry in the resulting dialog to add the capability to the project. Once added, click on the ‘+’ button located beneath the list of App Groups (as indicated in Figure 46-2):
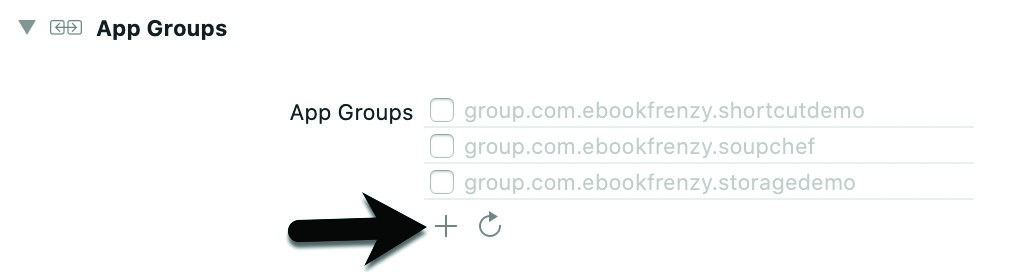
Figure 46-2
In the resulting panel, provide a name for the app group container that will be unique to your project (for example group.com.<your domain name>.shortcutdemo). Once a name has been entered, click on the OK button to add it to the project entitlements file (ShortcutDemo.entitlements) and make sure that its toggle button is enabled.
Now that the App Group container has been created, the name needs to be referenced in the project code. Edit the PurchaseStore.swift file and replace the placeholder text in the following line of code with your own App Group name:
@AppStorage("demostorage", store: UserDefaults(
    suiteName: "YOUR APP GROUP NAME HERE")) var store: Data = Data()Code language: Swift (swift)
Running the App
Run the app on a device or simulator and enter a stock symbol and quantity (for example 100 shares of TSLA and 20 GE shares) and click on the Purchase button. Assuming the transaction is successful, select the History tab at the bottom of the screen and confirm that the transactions appear in the list as shown in Figure 46-3:

Figure 46-3
If the purchased stocks do not appear in the list, switch between the Buy and History screens once more at which point the items should appear (this is a bug in SwiftUI which has been reported to Apple but not yet fixed). Select a transaction from the list to display the Detail screen for that purchase:
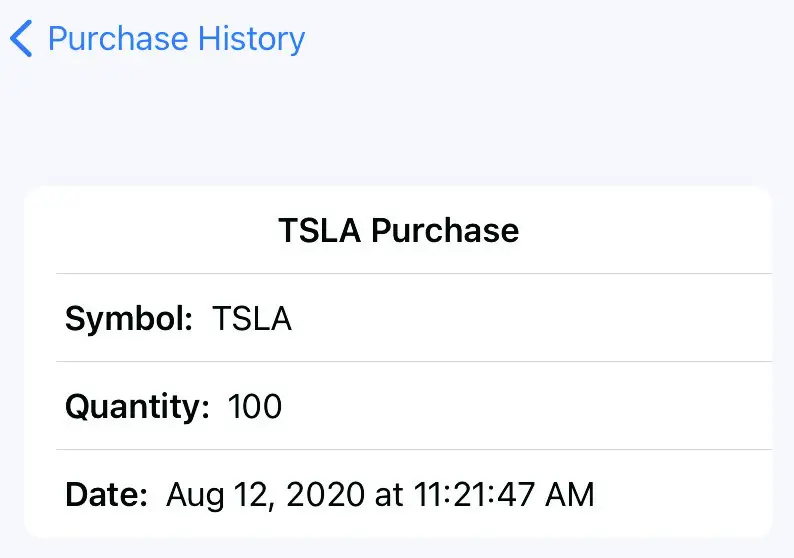
Figure 46-4
With the app installed, configured and running, the next step is to begin integrating shortcut support into the project.
Enabling Siri Support
To add the Siri entitlement, return to the Signing & Capabilities screen, click on the “+ Capability” button to display the capability selection dialog, enter Siri into the filter bar and double-click on the result to add the capability to the project.
Seeking Siri Authorization
In addition to enabling the Siri entitlement, the app must also seek authorization from the user to integrate the app with Siri. This is a two-step process which begins with the addition of an entry to the Info.plist file of the iOS app target for the NSSiriUsageDescription key with a corresponding string value explaining how the app makes use of Siri.
Select the Info.plist file located within the iOS folder in the project navigator panel as shown in Figure 46-5:
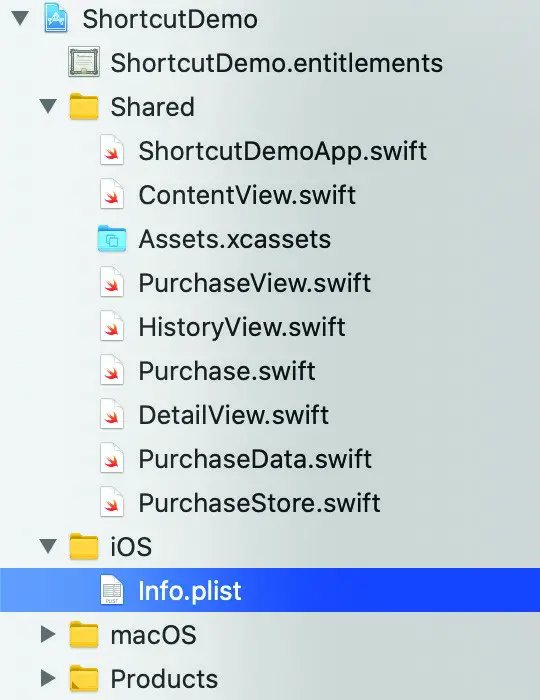
Figure 46-5
Once the file is loaded into the editor, locate the bottom entry in the list of properties and hover the mouse pointer over the item. When the plus button appears, click on it to add a new entry to the list. From within the drop-down list of available keys, locate and select the Privacy – Siri Usage Description option as shown in Figure 46-6:
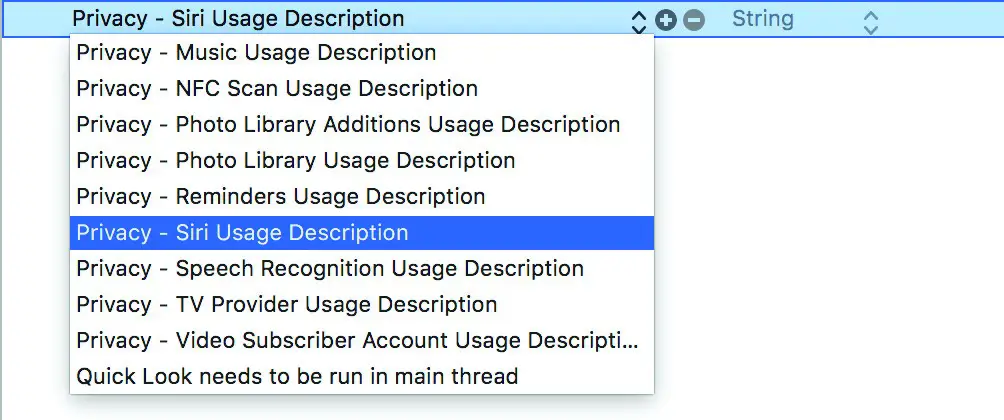
Figure 46-6
Within the value field for the property, enter a message to display to the user when requesting permission to use speech recognition. For example:
Siri support is used to suggest shortcuts
In addition to adding the Siri usage description key, a call also needs to be made to the requestSiriAuthorization class method of the INPreferences class. Ideally, this call should be made the first time that the app runs, not only so that authorization can be obtained, but also so that the user learns that the app includes Siri support. For the purposes of this project, the call will be made within the onChange() modifier based on the scenePhase changes within the app declaration located in the ShortcutDemoApp.swift file as follows:
import SwiftUI
import Intents

@main
struct ShortcutDemoApp: App {

    @Environment(\.scenePhase) private var scenePhase

    var body: some Scene {
        WindowGroup {
            ContentView()
        }
        .onChange(of: scenePhase) { phase in
                 INPreferences.requestSiriAuthorization({status in
                 // Handle errors here
             })
         }
    }
}Code language: Swift (swift)
Before proceeding, compile and run the app on an iOS device or simulator. When the app loads, a dialog will appear requesting authorization to use Siri. Select the OK button in the dialog to provide authorization.
Adding the Intents Extension
To add shortcut support, an intents extension will be needed for the Siri shortcuts associated with this app. Select the File -> New -> Target… menu option, followed by the Intents Extension option and click on the Next button. On the options screen, enter ShortcutDemoIntent into the product name field, change the Starting Point to None and make sure that the Include UI Extension option is enabled before clicking on the Finish button:
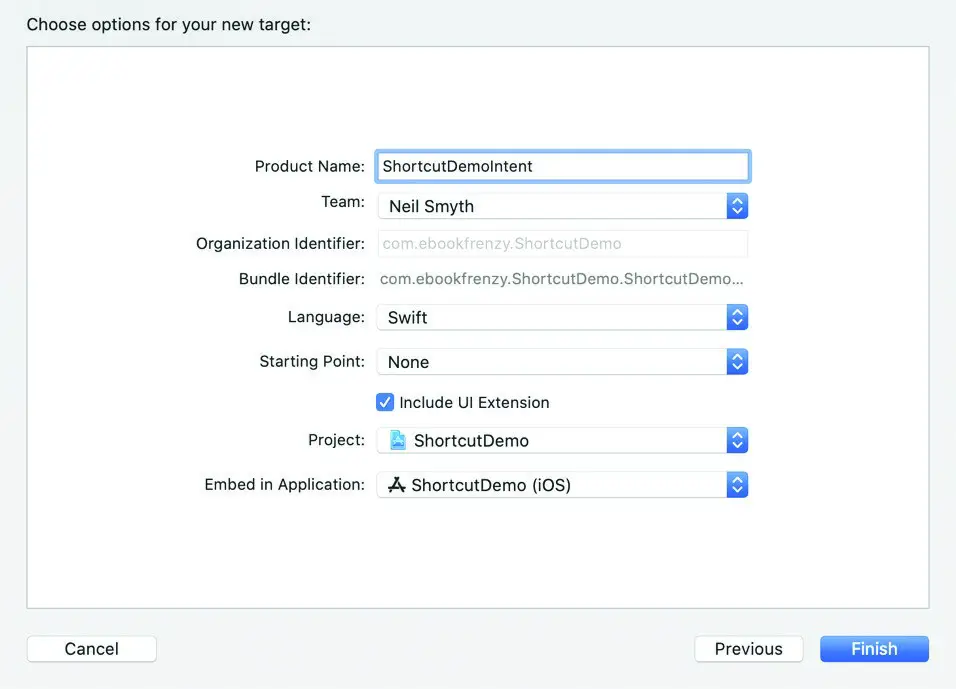
Figure 46-7
If prompted to do so, activate the ShortcutDemoIntent target scheme.
Adding the SiriKit Intent Definition File
Now that the intent extension has been added to the project, the SiriKit Intent Definition file needs to be added so that the intent can be configured. Right-click on the Shared folder in the project navigator panel and select New File… from the menu. In the template selection dialog scroll down to the Resource section and select the SiriKit Intent Definition File template followed by the Next button:
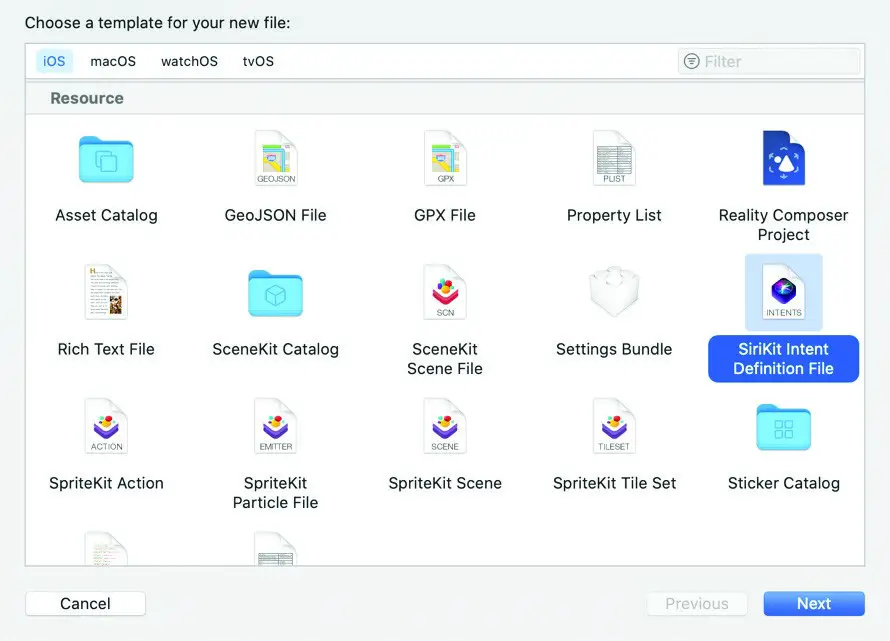
Figure 46-8
Keep the default name of Intents in the Save As: field, but make sure that the file is available to all of the targets in the project by enabling all of the options in the Targets section of the dialog before clicking on the Create button:
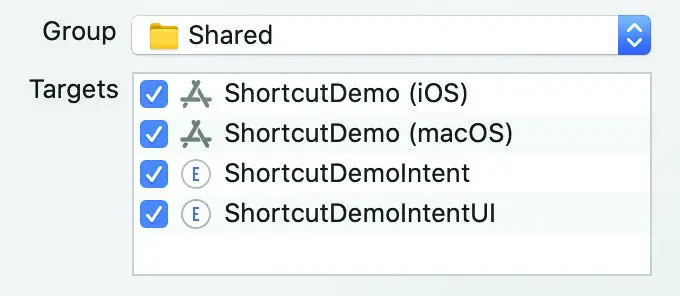
Figure 46-9
Adding the Intent to the App Group
The purchase history data will be shared between the main app and the intent using app storage. This requires that the App Group capability be added to the ShortcutDemoIntent target and enabled for the same container name as that used by the ShortcutDemo target. To achieve this, select the ShortcutDemo item at the top of the project navigator panel, switch to the Signing & Capabilities panel, select the ShortcutDemoIntent entry in the list of targets and add the App Group capability. Once added, make sure that the App Group name used by the ShortcutDemo target is selected:
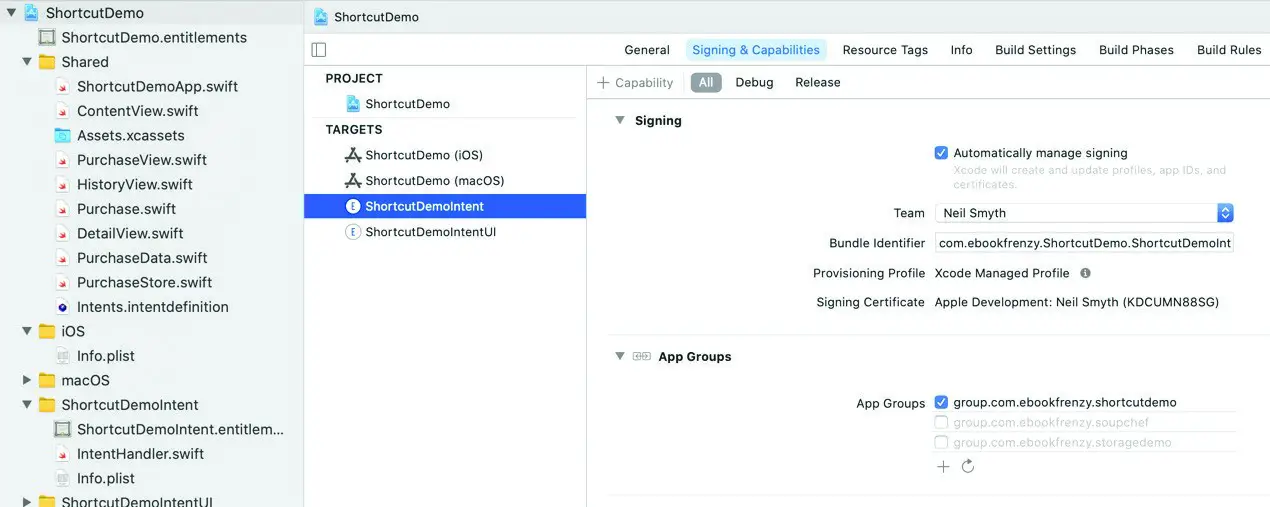
Figure 46-10
Configuring the SiriKit Intent Definition File
Locate the Intents.intentdefinition file and select it to load it into the editor. The file is currently empty, so add a new intent by clicking on the ‘+’ button in the lower left-hand corner of the editor panel and selecting the New Intent menu option:
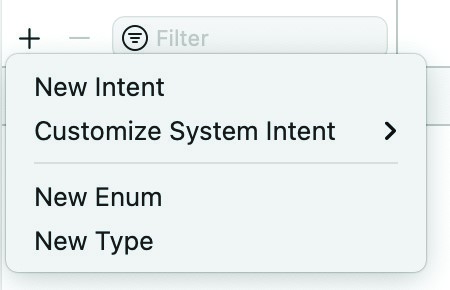
Figure 46-11
In the Custom Intents panel, rename the new intent to BuyStock as shown in Figure 46-12:

Figure 46-12
Next, change the Category setting in the Custom Intent section of the editor from “Do” to “Buy”, enter “ShortcutDemo” and “Buy stocks and shares” into the Title and Description fields respectively, and enable both the Configurable in Shortcuts and Siri Suggestions options. Since this is a buy category intent, the User confirmation required option is enabled by default and cannot be disabled:
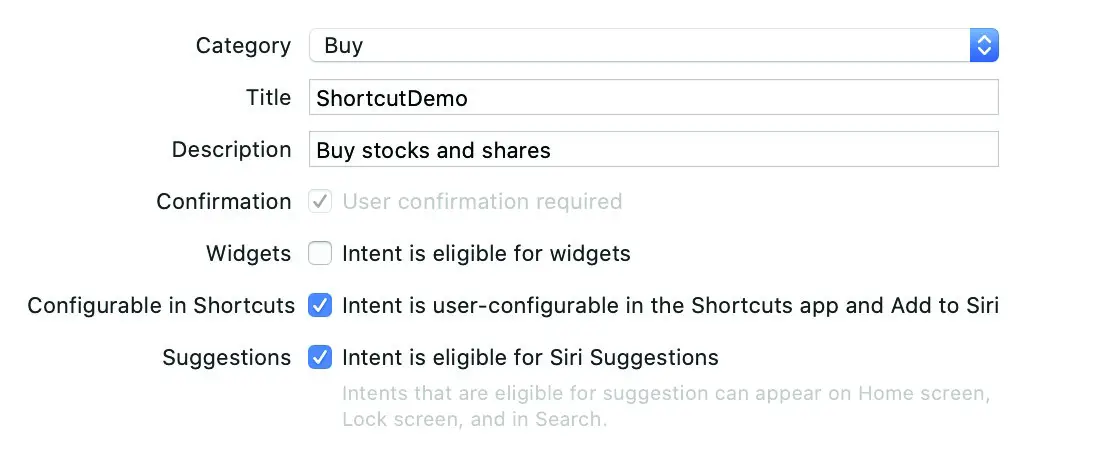
Figure 46-13
Adding Intent Parameters
In order to complete a purchase, the intent is going to need two parameters in the form of the stock symbol and quantity. Remaining within the Intent Definition editor, use the ‘+’ button located beneath the Parameters section to add a parameter named symbol with the type set to String, the display name set to “Symbol”, and both the Configurable and Resolvable options enabled. Within the Siri Dialog section, enter “Specify a stock symbol” into the Prompt field:
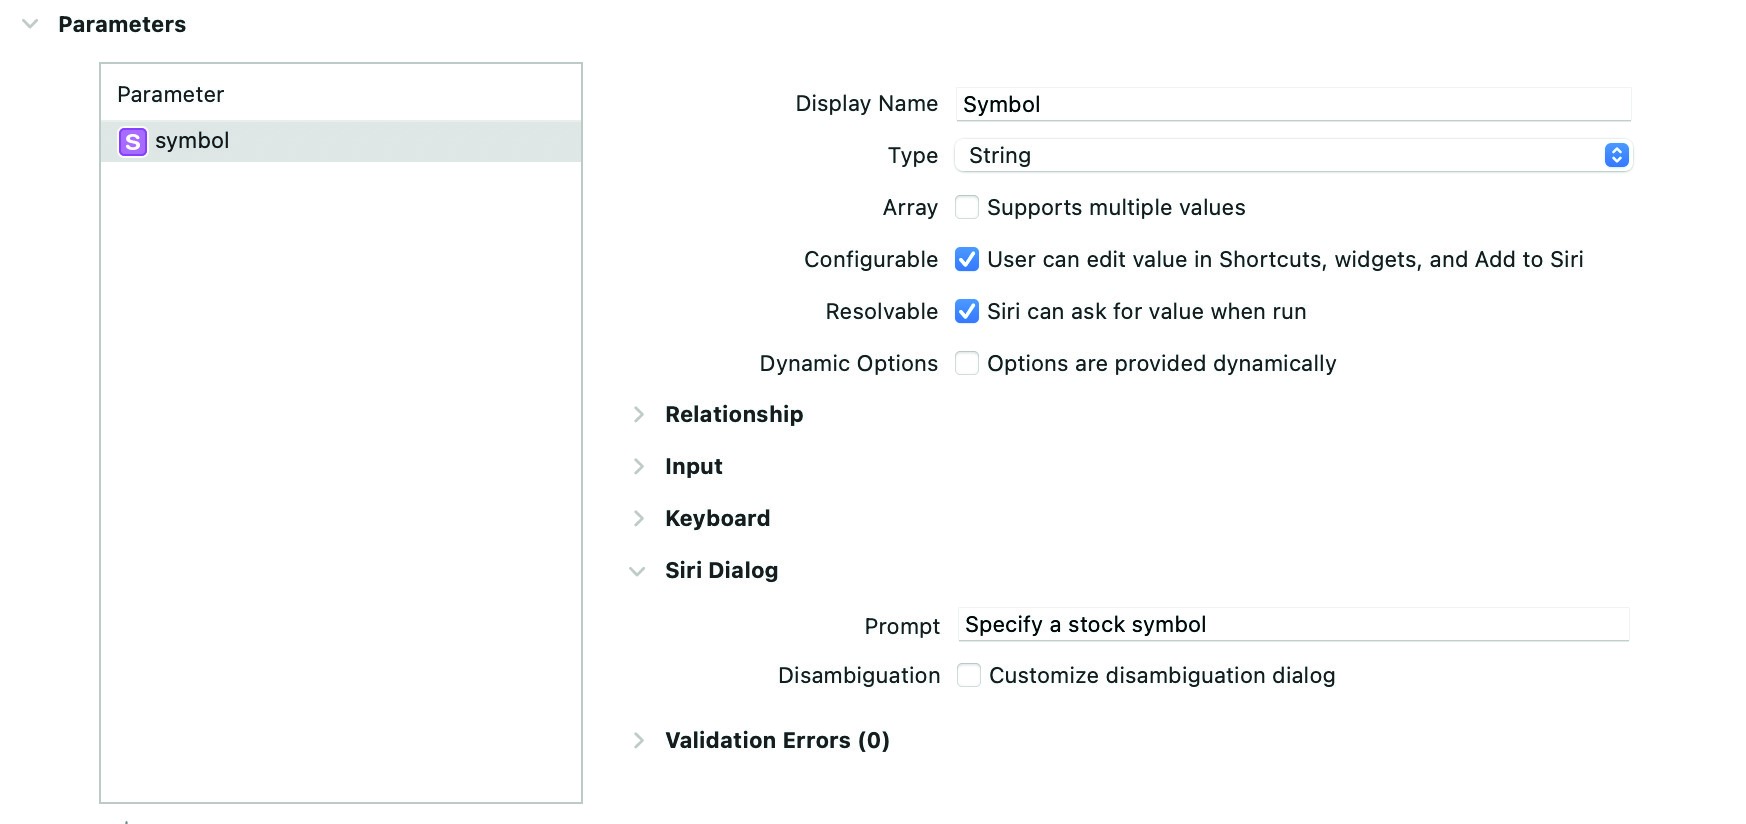
Figure 46-14
Repeat the above steps to add a quantity parameter to the intent, setting the prompt to “Specify a quantity to purchase”.
Declaring Shortcut Combinations
A shortcut intent can be configured to handle different combinations of intent parameters. Each unique combination of parameters defines a shortcut combination. For each combination, the intent needs to know the phrase that Siri will speak when interacting with the user which can contain embedded parameters. These need to be configured both for shortcut suggestions and for use within the Shortcuts apps so that the shortcuts can be selected manually by the user. For this example, the only combination required involves both the symbol and quantity which will have been added automatically within the Supported Combinations panel of the Shortcuts app section of the intents configuration editor screen.
Within the Supported Combinations panel, select the symbol, quantity parameter combination and begin typing into the Summary field. Type the word “Buy” followed by the first few letters of the word “quantity”. Xcode will notice that this could be a reference to the quantity parameter name and suggests it as an option to embed the parameter into the phrase as shown in Figure 46-15:

Figure 46-15
Select the parameter from the suggestion to embed it into the phrase, then continue typing so that the message reads “Buy quantity shares of symbol” where “symbol” is also an embedded parameter:
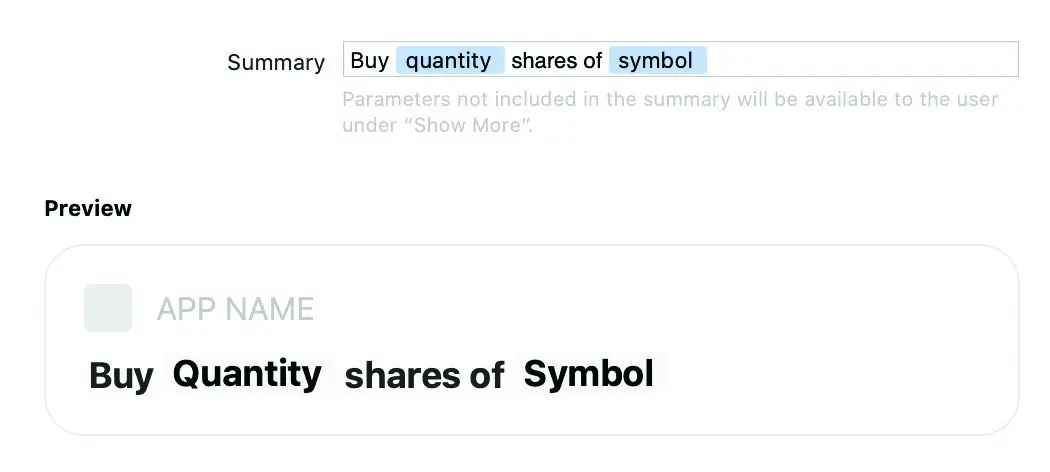
Figure 46-16
These combination settings will have been automatically duplicated under the Suggestions heading. The Supports background execution for suggestions defines whether or not the app can handle the shortcut type in the background without having to be presented to the user for additional input. Make sure this option is enabled for this shortcut combination.
Configuring the Intent Response
The final area to be addressed within the Intent Definition file is the response handling. To view these settings, select the Response entry located beneath the BuyStock intent in the Custom Intents panel:
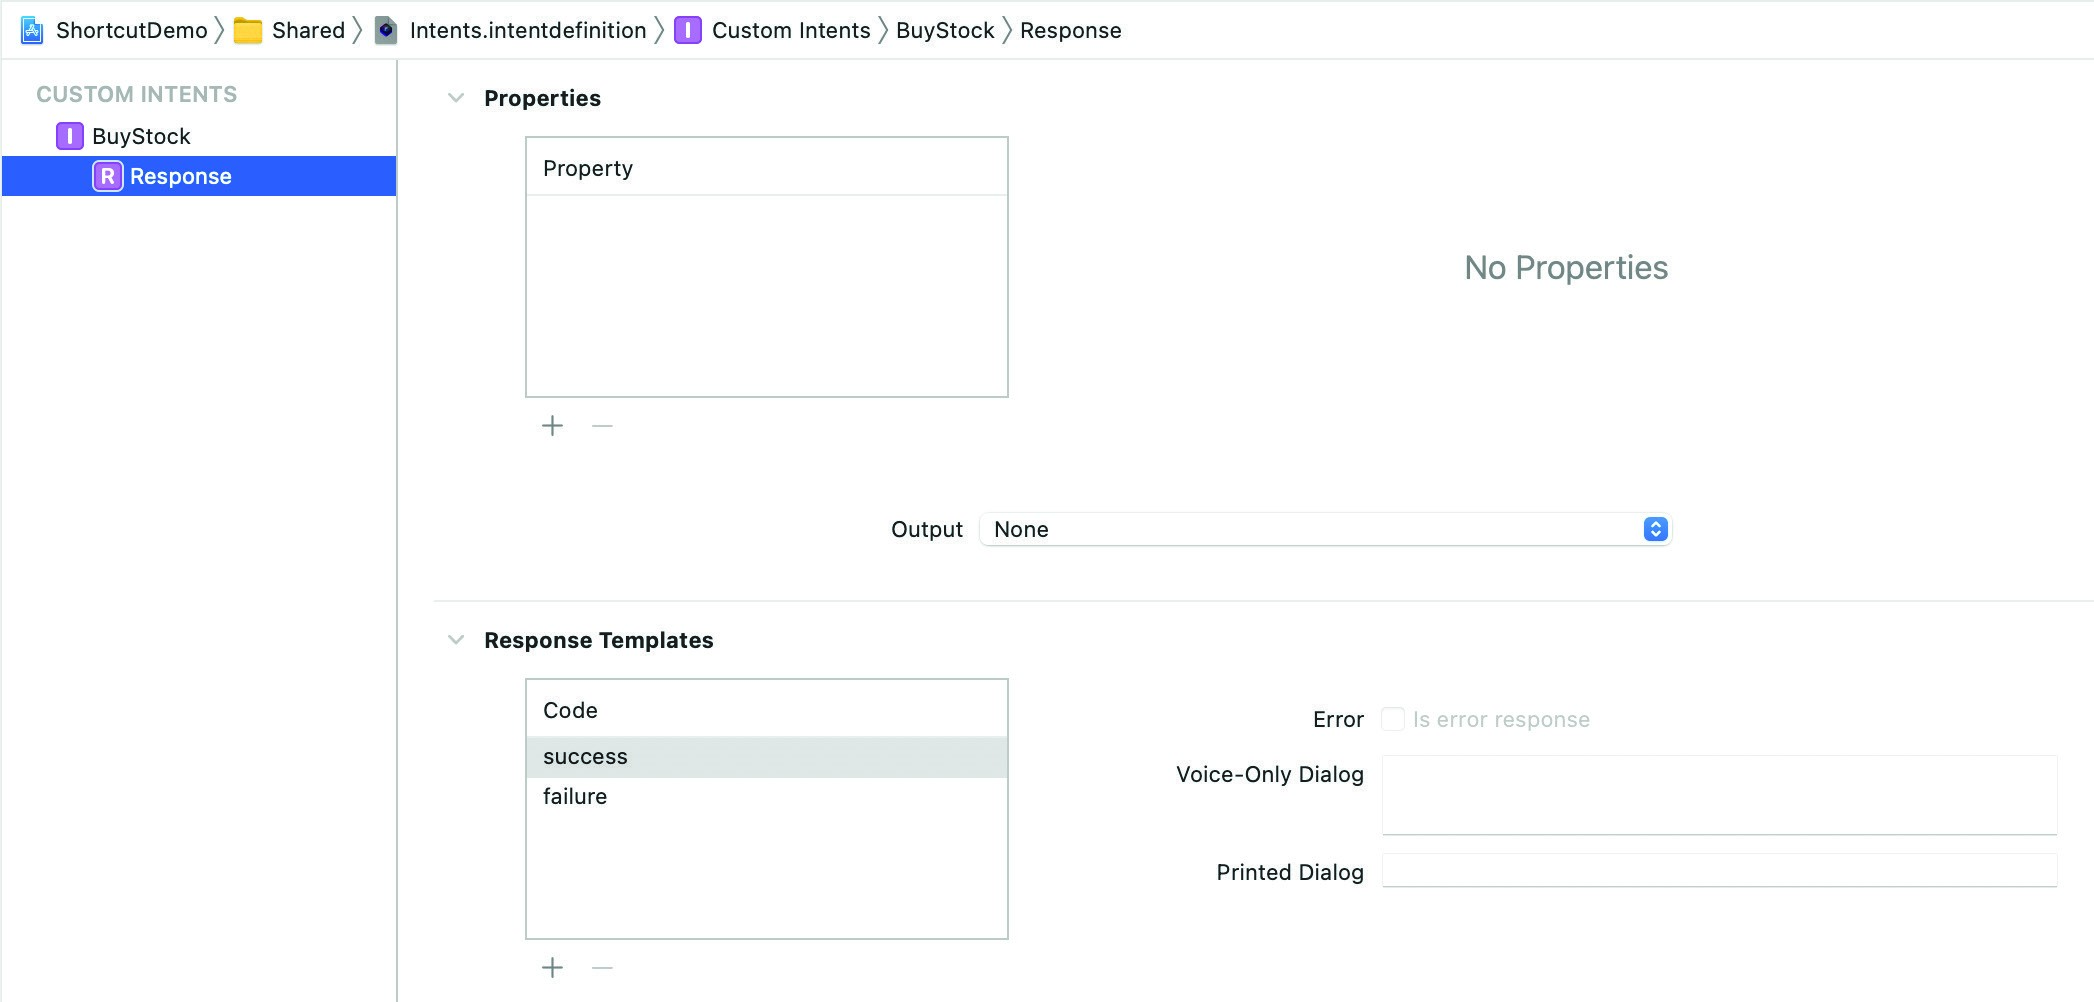
Figure 46-17
The first task is to declare the parameters that will be included in the response phrases. As with the intent configuration, add both the symbol and quantity parameters configured as Strings.
Next, select the success entry in the response templates code list:
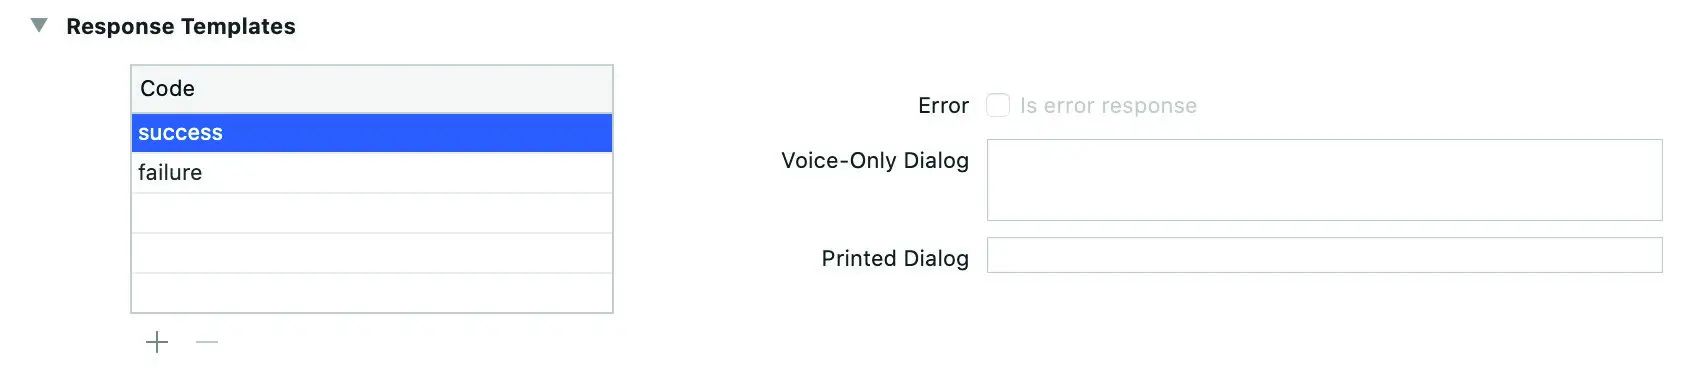
Figure 46-18
Enter the following message into the Voice-Only Dialog field (making sure to insert the parameters for the symbol and quantity using the same technique used above the combination summary settings):
Successfully purchased quantity symbol shares
Repeat this step to add the following template text to the failure code:
Sorry, could not purchase quantity shares of symbol
Behind the scenes, Xcode will take the information provided within the Intent Definition file and automatically generate new classes named BuyStockIntentHandling, BuyStockIntent and BuyStockIntentResponse, all of which will be used in the intent handling code. To make sure these files are generated before editing the code, select the Product -> Clean Builder Folder menu option followed by Product -> Build.
Configuring Target Membership
Many of the classes and targets in the project are interdependent and need to be accessible to each other during both compilation and execution. To allow this access, a number of classes and files within the project need specific target membership settings. While some of these settings will have set up correctly by default, others may need to be set up manually before testing the app. Begin by selecting the IntentHandler.swift file (located in the ShortcutDemoIntent folder) in the project navigator panel and display the File Inspector (View -> Inspectors -> File). In the file inspector panel, locate the Target Membership section and make sure that all targets are enabled as shown in Figure 46-19:
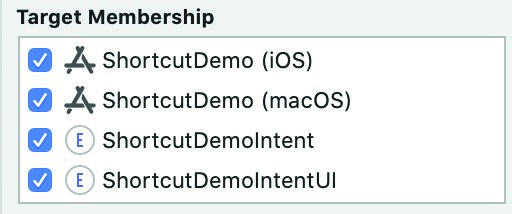
Figure 46-19
Repeat these steps for the Purchase.swift, PurchaseData.swift and PurchaseStore.swift files located in the Shared folder.
Modifying the Intent Handler Code
Now that the intent definition is complete and the classes have been auto-generated by Xcode, the intent handler needs to be modified to implement the BuyStockIntentHandling protocol. Edit the IntentHandler.swift file and make the following changes:
import Intents

class IntentHandler: INExtension, BuyStockIntentHandling {

    override func handler(for intent: INIntent) -> Any {

        guard intent is BuyStockIntent else {
            fatalError("Unknown intent type: \(intent)")
        }

        return self
    }

    func handle(intent: BuyStockIntent,
       completion: @escaping (BuyStockIntentResponse) -> Void) {

    }
}Code language: Swift (swift)
The handler() method simply checks that the intent type is recognized and, if so, returns itself as the intent handler.
Next, add the resolution methods for the two supported parameters:
.
.
    func resolveSymbol(for intent: BuyStockIntent, with completion: @escaping (INStringResolutionResult) -> Void) {

        if let symbol = intent.symbol {
            completion(INStringResolutionResult.success(with: symbol))
        } else {
            completion(INStringResolutionResult.needsValue())
        }
    }

    func resolveQuantity(for intent: BuyStockIntent, with completion: @escaping (INStringResolutionResult) -> Void) {
        if let quantity = intent.quantity {
            completion(INStringResolutionResult.success(with: quantity))
        } else {
            completion(INStringResolutionResult.needsValue())
        }
    }
.
.Code language: Swift (swift)
Code now needs to be added to the handle() method to perform the stock purchase. Since this will need access to the user defaults app storage, begin by making the following changes (replacing the placeholder text with your app group name):
import Intents
import SwiftUI

class IntentHandler: INExtension, BuyStockIntentHandling {

    @AppStorage("demostorage", store: UserDefaults(
      suiteName: "YOUR APP GROUP NAME HERE")) var store: Data = Data()

    var purchaseData = PurchaseData()
.
.Code language: Swift (swift)
Before modifying the handle() method, add the following method to the IntentHandler.swift file which will be called to save the latest purchase to the app storage:
func makePurchase(symbol: String, quantity: String) -> Bool {

    var result: Bool = false
    let decoder = JSONDecoder()

    if let history = try? decoder.decode(PurchaseData.self,
                                                 from: store) {
        purchaseData = history
        result = purchaseData.saveTransaction(symbol: symbol,
                                            quantity: quantity)
    }
    return result
}Code language: Swift (swift)
The above method uses a JSON decoder to decode the data contained within the app storage (for a reminder about encoding and decoding app storage data, refer to the chapter entitled “SwiftUI Data Persistence using AppStorage and SceneStorage”). The result of this decoding is a PurchaseData instance, the saveTransaction() method of which is called to save the current purchase. Next, modify the handle() method as follows:
func handle(intent: BuyStockIntent,
   completion: @escaping (BuyStockIntentResponse) -> Void) {

    guard let symbol = intent.symbol,
            let quantity = intent.quantity
       else {
            completion(BuyStockIntentResponse(code: .failure,
                    userActivity: nil))
            return
    }

    let result = makePurchase(symbol: symbol, quantity: quantity)

    if result {
        completion(BuyStockIntentResponse.success(quantity: quantity,
                                symbol: symbol))
    } else {
        completion(BuyStockIntentResponse.failure(quantity: quantity,
                                symbol: symbol))
    }
}Code language: Swift (swift)
When called, the method is passed a BuyStockIntent intent instance and completion handler to be called when the purchase is completed. The method begins by extracting the symbol and quantity parameter values from the intent object:
guard let symbol = intent.symbol,
       let quantity = intent.quantity
   else {
       completion(BuyStockIntentResponse(code: .failure,
                    userActivity: nil))
       return
}Code language: Swift (swift)
These values are then passed through to the makePurchase() method to perform the purchase transaction. Finally, the result returned by the makePurchase() method is used to select the appropriate response to be passed to the completion handler. In each case, the appropriate parameters are passed to the completion handler for inclusion in the response template:
let result = makePurchase(symbol: symbol, quantity: quantity)

if result {
    completion(BuyStockIntentResponse.success(quantity: quantity,
                            symbol: symbol))
} else {
    completion(BuyStockIntentResponse.failure(quantity: quantity,
                            symbol: symbol))
}Code language: Swift (swift)
Adding the Confirm Method
To fully conform with the BuyStockIntentHandling protocol, the IntentHandler class also needs to contain a confirm() method. As outlined in the SiriKit introductory chapter, this method is called by Siri to check that the handler is ready to handle the intent. All that is needed for this example is for the confirm() method to provide Siri with a ready status as follows:
public func confirm(intent: BuyStockIntent,
    completion: @escaping (BuyStockIntentResponse) -> Void) {

    completion(BuyStockIntentResponse(code: .ready, userActivity: nil))
}Code language: Swift (swift)
Donating Shortcuts to Siri
Each time the user successfully completes a stock purchase within the main app the action needs to be donated to Siri as a potential shortcut. The code to make these donations should now be added to the PurchaseView.swift file in a method named makeDonation(), which also requires that the Intents framework be imported:
import SwiftUI
import Intents

struct PurchaseView: View {
.
.

        .onAppear() {
            purchaseData.refresh()

        }
    }

    func makeDonation(symbol: String, quantity: String) {
        let intent = BuyStockIntent()

        intent.quantity = quantity
        intent.symbol = symbol
        intent.suggestedInvocationPhrase = "Buy \(quantity) \(symbol)"

        let interaction = INInteraction(intent: intent, response: nil)

        interaction.donate { (error) in
            if error != nil {
                if let error = error as NSError? {
                    print(
                     "Donation failed: %@" + error.localizedDescription)
                }
            } else {
                print("Successfully donated interaction")
            }
        }
    }
.
.
}Code language: Swift (swift)
The method is passed string values representing the stock and quantity of the purchase. A new BuyStockIntent instance is then created and populated with both these values and a suggested activation phrase containing both the quantity and symbol. Next, an INInteraction object is created using the BuyStockIntent instance and the donate() method of the object called to make the donation. The success or otherwise of the donation is then output to the console for diagnostic purposes.
The donation will only be made after a successful purchase has been completed, so add the call to makeDonation() after the saveTransaction() call in the buyStock() method:
private func buyStock() {
    if (symbol == "" || quantity == "") {
        status = "Please enter a symbol and quantity"
    } else {
        if purchaseData.saveTransaction(symbol: symbol,
                                           quantity: quantity) {
            status = "Purchase completed"
            makeDonation(symbol: symbol, quantity: quantity)
        }
    }
}Code language: Swift (swift)
Testing the Shortcuts
Before running and testing the app, some settings on the target device or simulator need to be changed in order to be able to fully test the shortcut functionality. To enable these settings, open the Settings app on the device or simulator on which you intend to test the app, select the Developer option and locate and enable the Display Recent Shortcuts and Display Donations on Lock Screen options as shown in Figure 46-20:
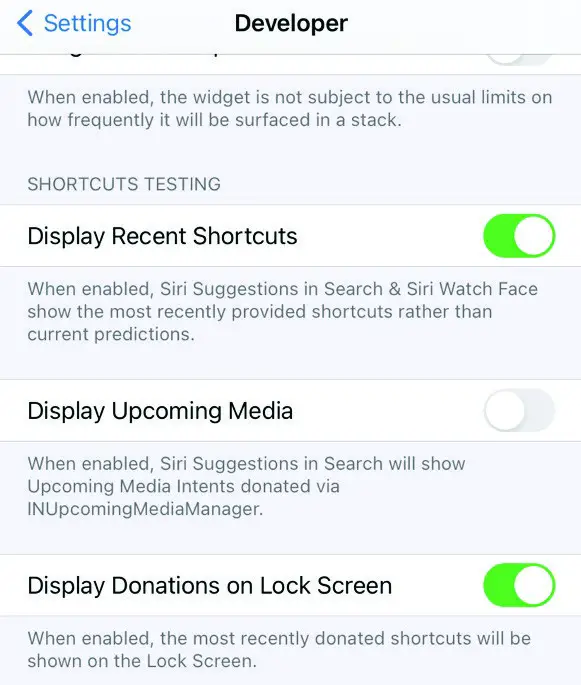
Figure 46-20
These settings will ensure that newly donated shortcuts always appear in Siri search and on the lock screen rather than relying on Siri to predict when the shortcuts should be suggested to the user.
With the settings changed, run the ShortcutDemo app target and make a stock purchase (for example buy 75 IBM shares). After the purchase is complete, check the Xcode console to verify that the “Successfully donated interaction” message appeared.
Next, locate the built-in iOS Shortcuts app on the device home screen as highlighted in Figure 46-21 below and tap to launch it:
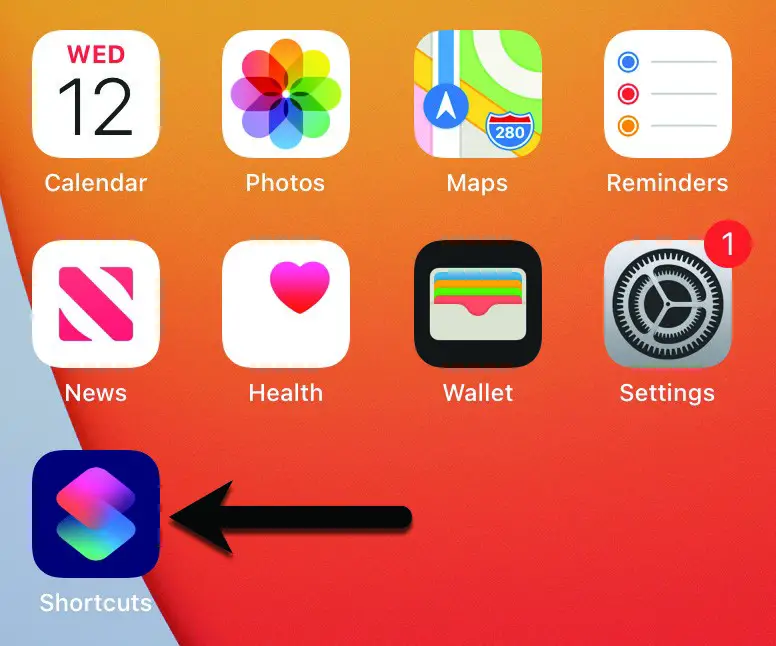
Figure 46-21
Within the Shortcuts app, select the Gallery tab where the donated shortcut should appear as shown in Figure 46-22 below:
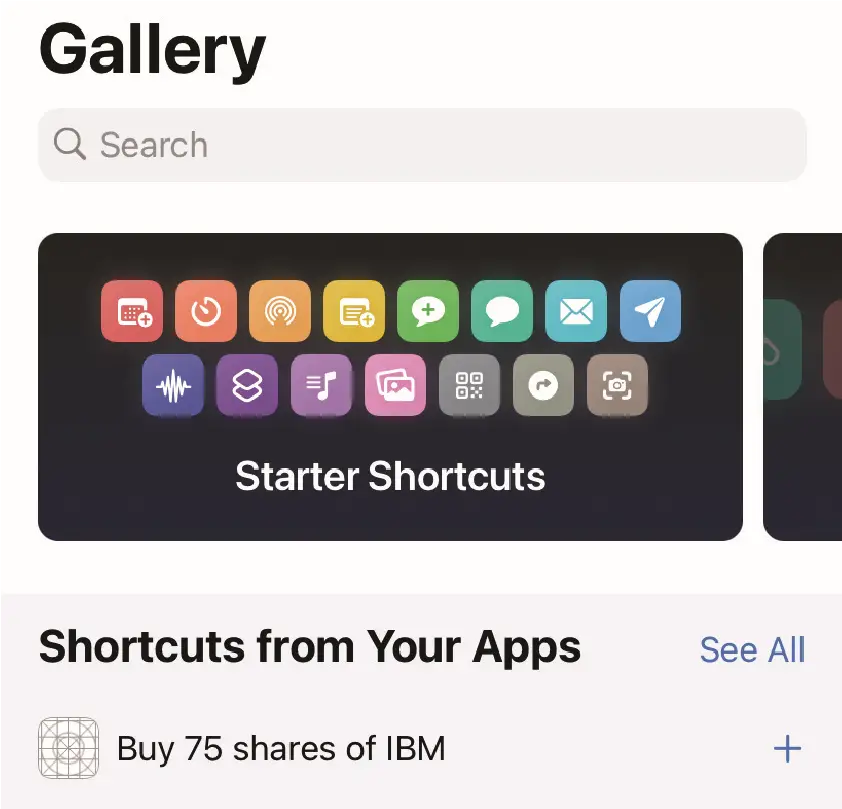
Figure 46-22
Click on the ‘+’ button to the right of the shortcut title to display the Add to Siri screen (Figure 46-23). Note that “Buy 75 IBM” is suggested as configured when the donation was made in the makeDonation() method. To change the phrase, delete the current “When I say” setting and enter a different phrase:
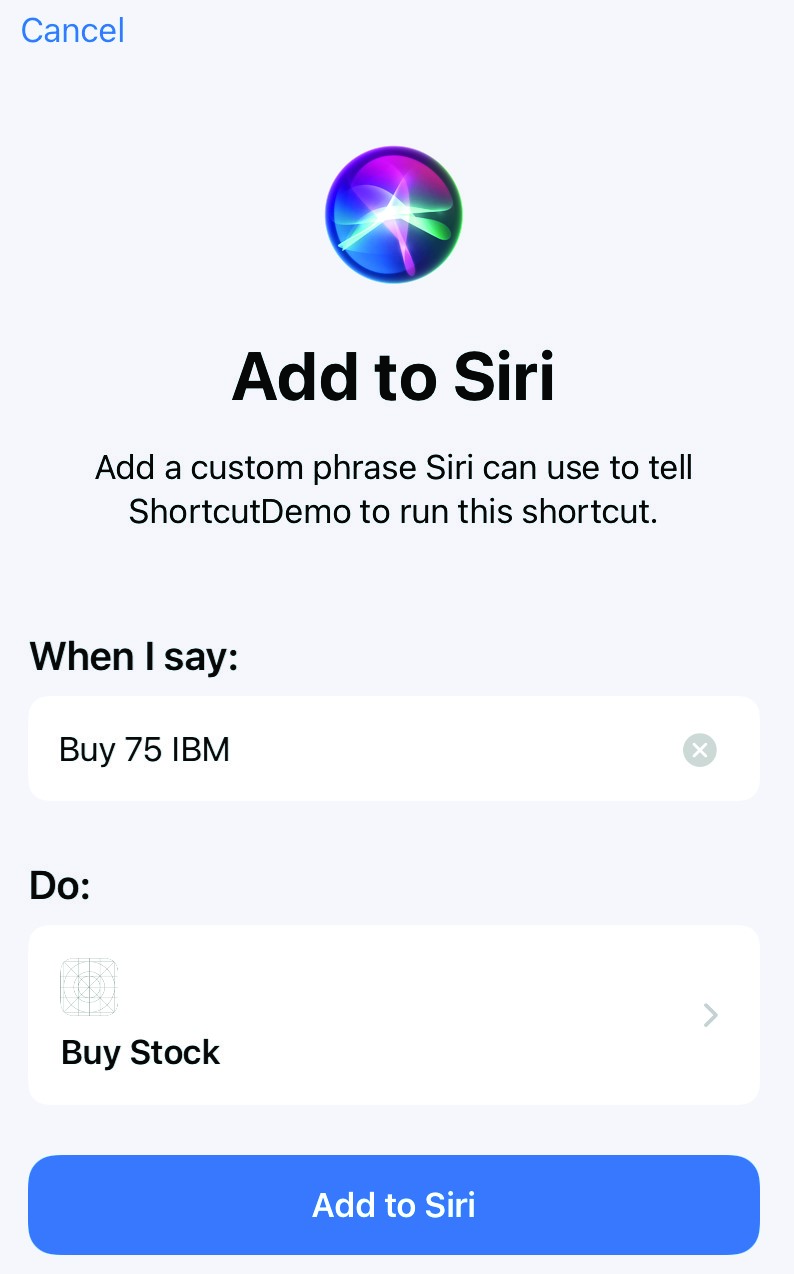
Figure 46-23
Click the Add to Siri button to add the shortcut and return to the Gallery screen. Select the My Shortcuts tab and verify that the new shortcut has been added:
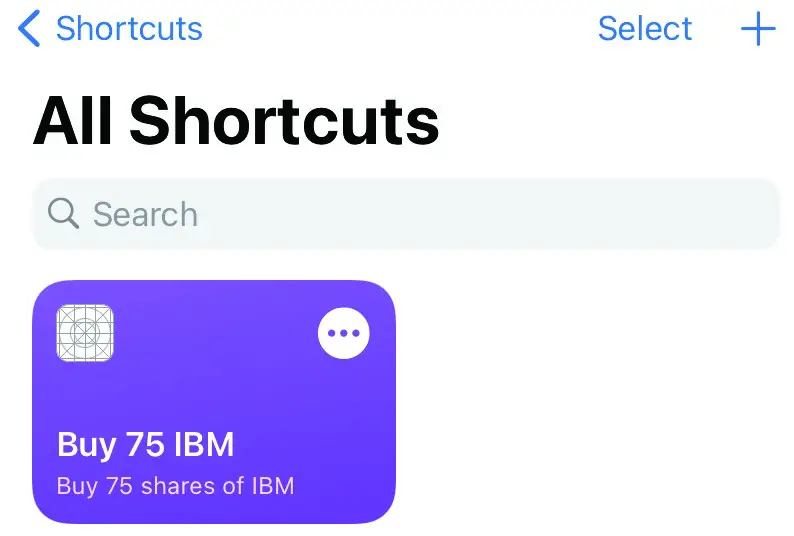
Figure 46-24
Press and hold the Home button to launch Siri and speak the shortcut phrase. Siri will seek confirmation that the purchase is to be made. After completing the purchase, Siri will use the success response template declared in the Intent Definition file to confirm that the transaction was successful.
After making a purchase using the shortcut, open the ShortcutDemo app and verify that the transaction appears in the transaction history (keeping in mind that it may be necessary to switch between the Buy and History screens before the purchase appears due to the previously mentioned SwiftUI bug).
Designing the Intent UI
When the shortcut was tested, the intent UI will have appeared as a large empty space. Clearly some additional steps are required before the shortcut is complete. Begin by selecting the MainInterface.storyboard file located in the ShortcutDemoIntentUI folder in the project navigator so that it loads into Interface Builder.
Add a Label to the layout by clicking on the button marked A in Figure 46-25 below and dragging and dropping a Label object from the Library (B) onto the layout canvas as indicated by the arrow:
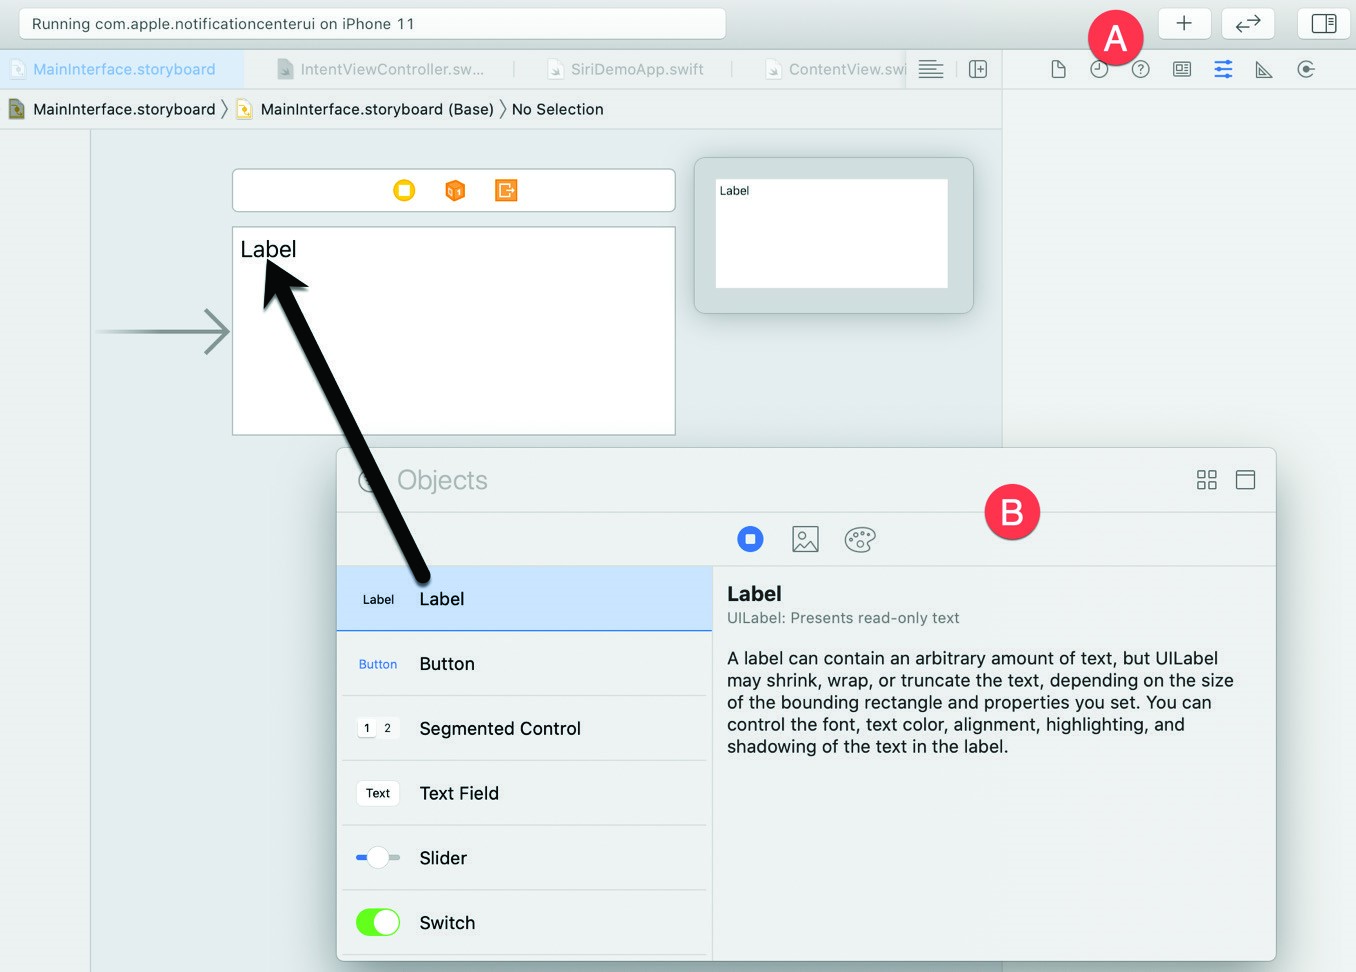
Figure 46-25
Next, the Label needs to be constrained so that it has a 5dp margin between the leading, trailing and top edges of the parent view. With the Label selected in the canvas, click on the Add New Constraints button located in the bottom right-hand corner of the editor to display the menu shown in Figure 46-26 below:
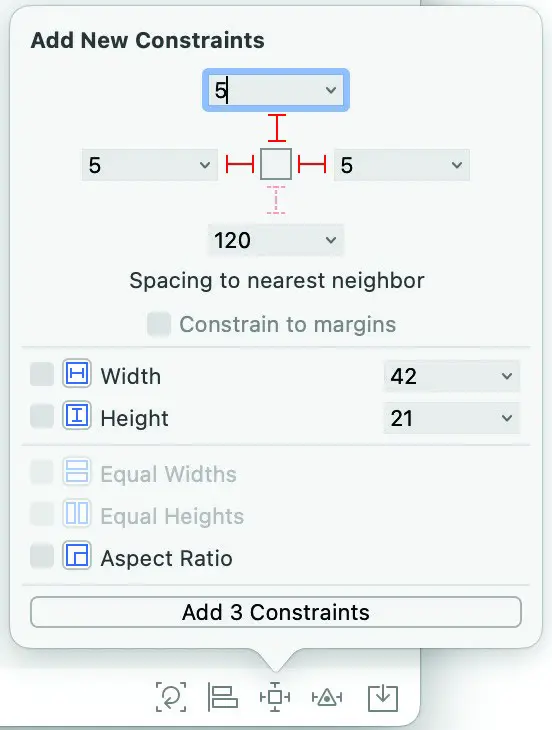
Figure 46-26
Enter 5 into the top, left and right boxes and click on the I-beam icons next to each value so that they are displayed in solid red instead of dashed lines before clicking on the Add 3 Constraints button.
Before proceeding to the next step, establish an outlet connection from the Label component to a variable in the IntentViewController.swift file named contentLabel. This will allow the view controller to change the text displayed on the Label to reflect the intent content parameter. This is achieved using the Assistant Editor which is displayed by selecting the Xcode Editor -> Assistant menu option. Once displayed, Ctrl-click on the Label in the canvas and drag the resulting line to a position in the Assistant Editor immediately above the viewDidLoad() method declaration:
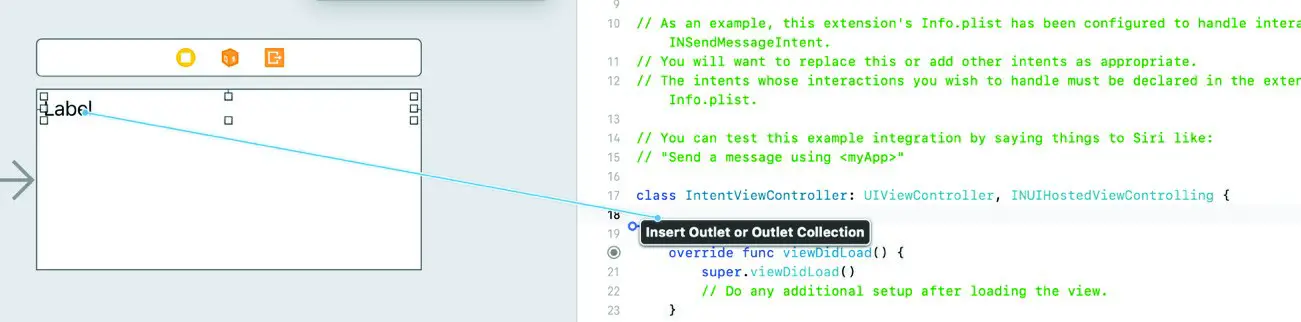
Figure 46-27
On releasing the line, the dialog shown in Figure 46-28 will appear. Enter contentLabel into the Name field before clicking on Connect to establish the outlet.
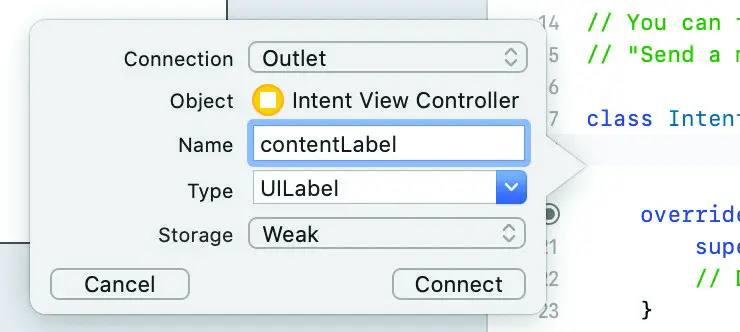
Figure 46-28
On completion of these steps, the outlets should appear in the IntentViewController.swift file as follows:
class IntentViewController: UIViewController, INUIHostedViewControlling {

    @IBOutlet weak var contentLabel: UILabel!
.
.Code language: Swift (swift)
Edit the IntentViewController.swift file and modify the configureView() method and declaredSize variable so that the code reads as follows:
func configureView(for parameters: Set<INParameter>,
  of interaction: INInteraction,
  interactiveBehavior: INUIInteractiveBehavior,
  context: INUIHostedViewContext,
  completion: @escaping (Bool, Set<INParameter>, CGSize) -> Void) {

    guard let intent = interaction.intent as? BuyStockIntent else {
        completion(false, Set(), .zero)
        return
    }

    if let symbol = intent.symbol, let quantity = intent.quantity {
        self.contentLabel.text = "Buy \(quantity) \(symbol) shares?"
    }

    completion(true, parameters, self.desiredSize)
}

var desiredSize: CGSize {
    return CGSize.init(width: 10, height: 100)
}Code language: Swift (swift)
Re-build and run the app, then use Siri to trigger the shortcut. This time the intent UI will contain text describing the purchase to be made:
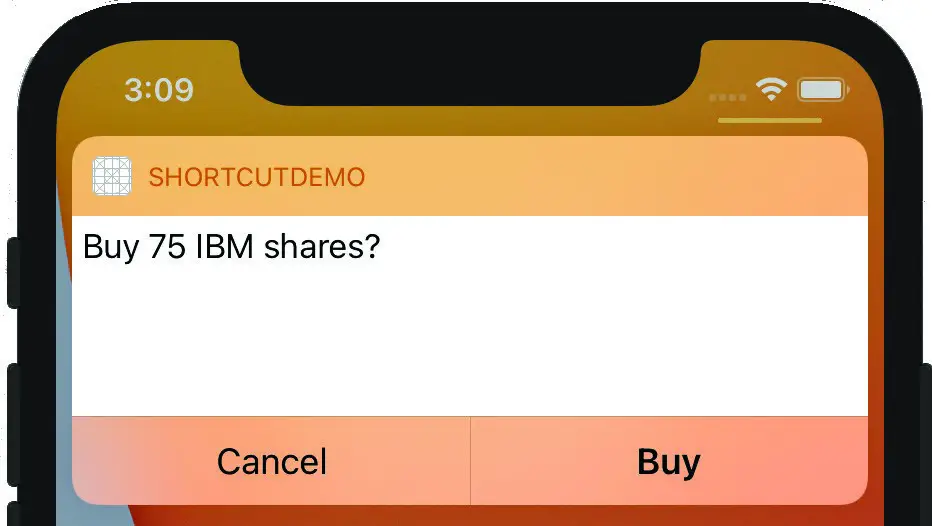
Figure 46-29
Summary
This chapter has provided a practical demonstration of how to integrate Siri shortcut support into a SwiftUI app. This included the creation and configuration of an Intent Definition file, the addition of a custom intent extension and the implementation of intent handling code.