
It is a common requirement for an app to need to store small amounts of data which will persist through app restarts. This is particularly useful for storing user preference settings, or when restoring a scene to the exact state it was in last time it was accessed by the user. SwiftUI provides two property wrappers (@AppStorage and @SceneStorage) for the specific purpose of persistently storing small amounts of app data, details of which will be covered in this chapter.
The @SceneStorage Property Wrapper
The @SceneStorage property wrapper is used to store small amounts of data within the scope of individual app scene instances and is ideal for saving and restoring the state of a screen between app launches. Consider a situation where a user, partway through entering information into a form within an app, is interrupted by a phone call or text message, and places the app into the background. The user subsequently forgets to return to the app, complete the form and save the entered information. If the background app were to exit (either because of a device restart, the user terminating the app, or the system killing the app to free up resources) the partial information entered into the form would be lost. Situations such as this can be avoided, however, by using scene storage to retain and restore the data.
Scene storage is declared using the @SceneStorage property wrapper together with a key string value which is used internally to store the associated value. The following code, for example, declares a scene storage property designed to store a String value using a key name set to “city” with an initial default value set to an empty string:
@SceneStorage("city") var city: String = ""Code language: Swift (swift)Once declared, the stored property could, for example, be used in conjunction with a TextEditor as follows:
var body: some View {
    TextEditor(text: $city)
        .padding()
}Code language: Swift (swift)
When implemented in an app, this will ensure that any text entered into the text field is retained within the scene through app restarts. If multiple instances of the scene are launched by the user on multi-windowing platforms such as iPadOS or macOS, each scene will have its own distinct copy of the saved value.
 |
You are reading a sample chapter from an old edition of iOS App Development Essentials. Purchase the fully updated iOS 18 App Development Essentials book. The full book contains 71 chapters, over 612 pages of in-depth information, downloadable source code, and access to over 50 SwiftUI knowledge test quizzes. |
The @AppStorage Property Wrapper
The @SceneStorage property wrapper allows each individual scene within an app to have its own copy of stored data. In other words, the data stored by one scene is not accessible to any other scenes in the app (even other instances of the same scene). The @AppStorage property wrapper, on the other hand, is used to store data that is universally available throughout the entire app.
App Storage is built on top of UserDefaults, a feature which has been available in iOS for many years. Primarily provided as a way for apps to access and store default user preferences (such as language preferences or color choices), UserDefaults can also be used to store small amounts of data needed by the app in the form of keyvalue pairs.
As with scene storage, the @AppStorage property wrapper requires a string value to serve as a key and may be declared as follows:
@AppStorage("mystore") var mytext: String = ""Code language: Swift (swift)By default, data will be stored in the standard UserDefaults storage. It is also possible, however, to specify a custom App Group in which to store the data. App Groups allow apps to share data with other apps and targets within the same group. App Groups are assigned a name (typically similar to group.com.mydomain.myappname) and are enabled and configured within the Xcode project Signing & Capabilities screen. Figure 26-1, for example, shows a project target with App Groups enabled and a name set to group.com.ebookfrenzy.userdefaults:
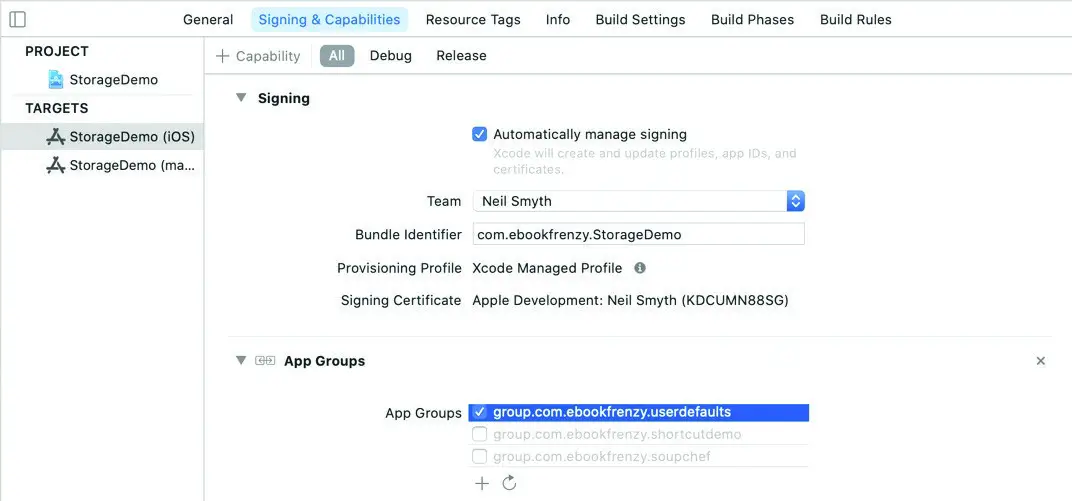
Figure 26-1
|
You are reading a sample chapter from an old edition of iOS App Development Essentials. Purchase the fully updated iOS 18 App Development Essentials book. The full book contains 71 chapters, over 612 pages of in-depth information, downloadable source code, and access to over 50 SwiftUI knowledge test quizzes. |
The following @AppStorage declaration references an app group to use for storing data:
@AppStorage("mystore",
  store: UserDefaults(
         suiteName: "group.com.ebookfrenzy.userdefaults"))
              var mytext: String = ""Code language: Swift (swift)
As with the @State property wrapper, changes to the stored value will cause the user interface to refresh to reflect the new data.
With the basics of app and scene storage covered, the remainder of this chapter will demonstrate these property wrappers in action.
Creating and Preparing the StorageDemo Project
Begin this tutorial by launching Xcode and selecting the options to create a new Multiplatform App project named StorageDemo.
Begin the project design by selecting the ContentView.swift file and changing the view body so that it contains a TabView as outlined below:
|
You are reading a sample chapter from an old edition of iOS App Development Essentials. Purchase the fully updated iOS 18 App Development Essentials book. The full book contains 71 chapters, over 612 pages of in-depth information, downloadable source code, and access to over 50 SwiftUI knowledge test quizzes. |
import SwiftUI

struct ContentView: View {

    var body: some View {

        TabView {
            SceneStorageView()
                .tabItem {
                    Image(systemName: "circle.fill")
                    Text("SceneStorage")
                }

            AppStorageView()
                .tabItem {
                    Image(systemName: "square.fill")
                    Text("AppStorage")
                }
         }
    }
}
.
.Code language: Swift (swift)
Next, use the File -> New -> File… menu option to add two new SwiftUI View files named SceneStorageView and AppStorageView respectively.
Using Scene Storage
Edit the SceneStorageView.swift file and modify it so that it reads as follows:
import SwiftUI

struct SceneStorageView: View {

    @State private var editorText: String = ""

    var body: some View {
        TextEditor(text: $editorText)
            .padding(30)
            .font(.largeTitle)
    }
}Code language: Swift (swift)
This declaration makes use of the TextEditor view. This is a view designed to allow multiline text to be displayed and edited within a SwiftUI app and includes scrolling when the displayed text extends beyond the viewable area. The TextEditor view is passed a binding to a state property into which any typed text will be stored (note that we aren’t yet using scene storage).
With the changes made, build and run the app on a device or simulator and, once launched, enter some text into the TextEditor view. Place the app into the background so that the device home screen appears, then terminate the app using the stop button located in the Xcode toolbar.
Run the app a second time and verify that the previously entered text has not been restored into the TextEditor view. Clearly this app would benefit from the use of scene storage.
|
You are reading a sample chapter from an old edition of iOS App Development Essentials. Purchase the fully updated iOS 18 App Development Essentials book. The full book contains 71 chapters, over 612 pages of in-depth information, downloadable source code, and access to over 50 SwiftUI knowledge test quizzes. |
Return to the SceneStorageView.swift file and convert the @State property to an @SceneStorage property as follows:
struct SceneStorageView: View {

        @SceneStorage("mytext") private var editorText = ""
.
.Code language: Swift (swift)
Run the app again, enter some text, place it into the background and terminate it. This time, when the app is relaunched, the text will be restored into the TextEditor view.
When working with scene storage it is important to keep in mind that each instance of a scene has its own storage which is entirely separate from any other scenes. To experience this in action, run the StorageDemo app on an iPad device or simulator in landscape orientation. Once the app is running, swipe upward from the bottom of the screen to display the dock. Perform a long press on the launch icon for the StorageDemo app and, once the icon lifts from the screen, drag it to the right hand edge of the screen as shown in Figure 26-2:
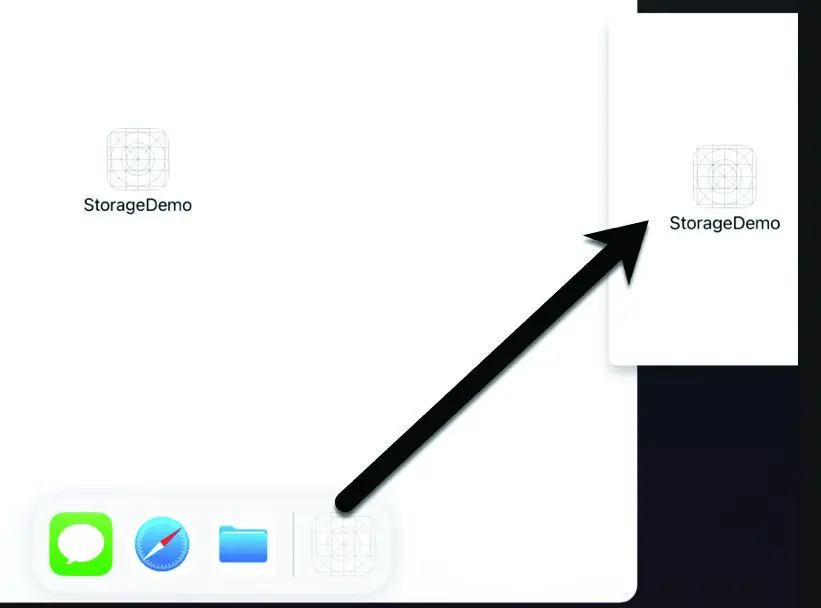
Figure 26-2
On releasing the drag, the screen will be equally divided with two scene instances visible. Enter different text into each scene as shown in Figure 26-3 below:
|
You are reading a sample chapter from an old edition of iOS App Development Essentials. Purchase the fully updated iOS 18 App Development Essentials book. The full book contains 71 chapters, over 612 pages of in-depth information, downloadable source code, and access to over 50 SwiftUI knowledge test quizzes. |
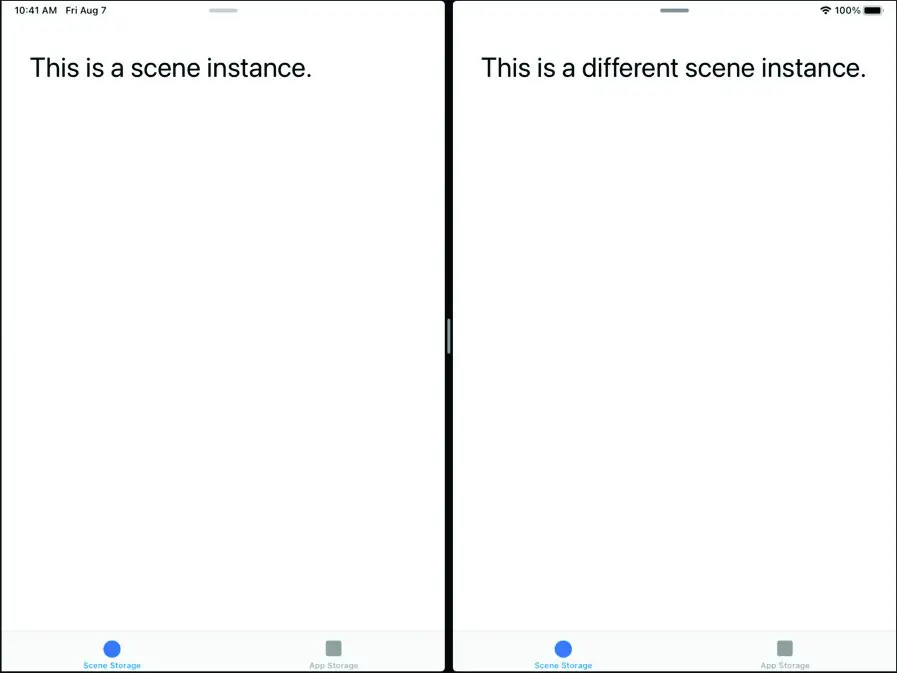
Figure 26-3
Use the home button to place the app into the background, terminate the app and then re-launch it. On restarting, the two scenes will appear just as they were before the app was placed into the background, thereby demonstrating that each scene has a copy of its own stored data.
Using App Storage
The final task in this tutorial is to demonstrate the use of app storage. Within Xcode, edit the AppStorageView.swift file and modify it so that it reads as follows:
import SwiftUI

struct AppStorageView: View {

    @AppStorage("mytext") var editorText: String = "Sample Text"

    var body: some View {
        TextEditor(text: $editorText)
            .padding(30)
            .font(.largeTitle)
    }
}
.
.Code language: Swift (swift)
With the changes made, run the app on the iPad once again and repeat the steps to display two scene instances side-by-side. Select the App Storage tab within both scenes and note that the scene instances are displaying the default sample text. Tap in one of the scenes and add some additional text. As text is added in one scene, the changes are reflected in the second scene as each character is typed:
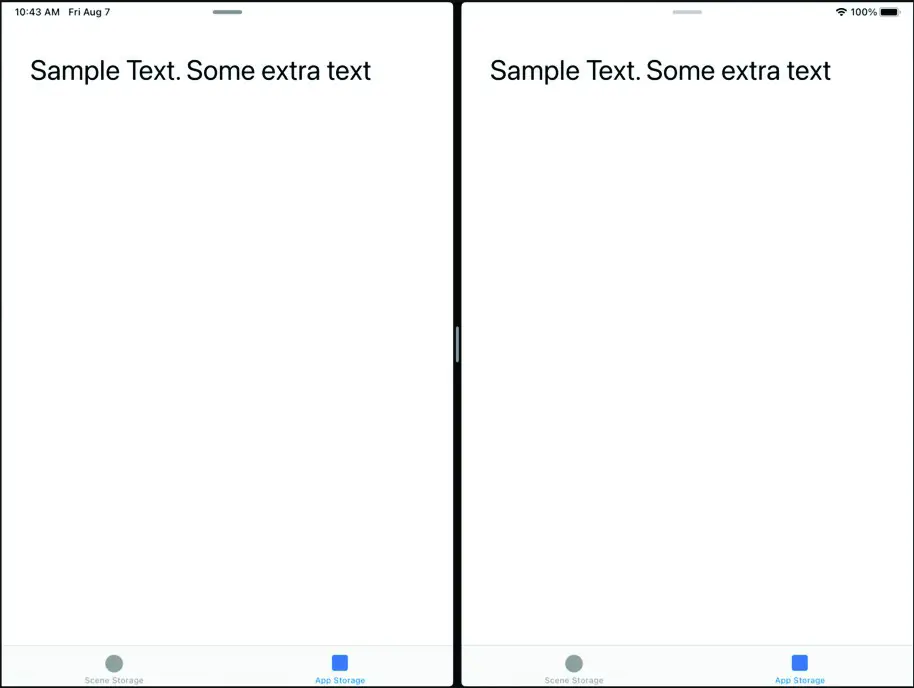
Figure 26-4
|
You are reading a sample chapter from an old edition of iOS App Development Essentials. Purchase the fully updated iOS 18 App Development Essentials book. The full book contains 71 chapters, over 612 pages of in-depth information, downloadable source code, and access to over 50 SwiftUI knowledge test quizzes. |
Terminate the app while it is in the foreground (unlike scene storage, app storage data is stored in real-time, not just when the app is placed into the background) and relaunch it to confirm that the text changes were saved and restored.
Storing Custom Types
The @AppStorage and @SceneStorage property wrappers only allow values of certain types to be stored. Specifically Bool, Int, Double, String, URL and Data types. This means that any other type that needs to be stored must first be encoded as a Swift Data object in order to be stored and subsequently decoded when retrieved. Consider, for example, the following struct declaration and initialization:
struct UserName {
    var firstName: String
    var secondName: String
}

var username = UserName(firstName: "Mark", secondName: "Wilson")Code language: Swift (swift)
Because UserName is not a supported type, it is not possible to store our username instance directly into app or scene-based storage. Instead, the instance needs to be encoded and encapsulated into a Data instance before it can be saved. The exact steps to perform the encoding and decoding will depend on the type of the data being stored. The key requirement, however, is that the type conforms to the Encodable and Decodable protocols. For example:
struct UserName: Encodable, Decodable {
    var firstName: String
    var secondName: String
}Code language: Swift (swift)
The following example uses a JSON encoder to encode our username instance and store it using the @AppStorage property wrapper:
@AppStorage("username") var namestore: Data = Data()
.
.
let encoder = JSONEncoder()

if let data = try? encoder.encode(username) {
    namestore = data
}Code language: Swift (swift)
When the time comes to retrieve the data from storage, the process is reversed using the JSON decoder:
|
You are reading a sample chapter from an old edition of iOS App Development Essentials. Purchase the fully updated iOS 18 App Development Essentials book. The full book contains 71 chapters, over 612 pages of in-depth information, downloadable source code, and access to over 50 SwiftUI knowledge test quizzes. |
let decoder = JSONDecoder()

if let name = try? decoder.decode(UserName.self, from: namestore) {
    username = name
}Code language: Swift (swift)
Using this technique, it is even possible to store an image using either of the storage property wrappers, for example:
@AppStorage("myimage") var imagestore: Data = Data()

var image = UIImage(named: "profilephoto")

// Encode and store image

if let data = image!.pngData() {
    imagestore = data
}

// Retrieve and decode image

if let decodedImage: UIImage = UIImage(data: imagestore) {
     image = decodedImage
}Code language: Swift (swift)
Summary
The @SceneStorage and @AppStorage property wrappers provide two ways to persistently store small amounts of data within a SwiftUI app. Scene storage is intended primarily for saving and restoring the state of a scene when an app is terminated while in the background. Each scene within an app has its own local scene storage which is not directly accessible to other areas of the app. App storage uses the UserDefaults system and is used for storing data that is to be accessible from anywhere within an app. Through the use of App Groups, app storage may also be shared between different targets within the same app project, or even entirely different apps. Changes to app storage are immediate regardless of whether the app is currently in the foreground or background.
Both the @AppStorage and @SceneStorage property wrappers support storing Bool, Int, Double, String, URL and Data types. Other types need to be encoded and encapsulated in Data objects before being placed into storage.