
In this chapter, we will create a project that makes use of the Column and Row components to display items in a list format. In addition to creating the list, the tutorial will also enable scrolling and provide a demonstration of programmatic scrolling.
Creating the ListDemo project
Launch Android Studio and select the New Project option from the welcome screen. In the new project dialog, choose the Empty Compose Activity template before clicking on the Next button.
Enter ListDemo into the Name field and specify com.example.listdemo as the package name. Before clicking on the Finish button, change the Minimum API level setting to API 26: Android 8.0 (Oreo). Within the MainActivity.kt file, delete the Greeting function and add a new empty composable named MainScreen:
@Composable
fun MainScreen() {

}Code language: Kotlin (kotlin)
Next, edit the onCreateActivity() method and DefaultPreview function to call MainScreen instead of Greeting.
Creating a Column-based list
We will start this tutorial by creating a basic list layout using the Column composable to display a scrollable list of Text component items. Start by modifying the MainActivity.kt file as follows to add and call a new composable named ColumnList:
 |
You are reading a sample chapter from an old edition of the Jetpack Compose Essentials book. Purchase the fully updated Jetpack Compose 1.7 Essentials edition of this book in eBook or Print format. The full book contains 67 chapters and over 700 pages of in-depth information. Buy the full book now in Print or eBook format. Learn more. |
.
.
import androidx.compose.foundation.layout.Column
import androidx.compose.foundation.layout.padding
import androidx.compose.ui.unit.dp
.
.
@Composable
fun MainScreen() {
    ColumnList()
}

@Composable
fun ColumnList() {
    Column {
        repeat(500) {
            Text("List Item $it",
            style = MaterialTheme.typography.h4,
            modifier = Modifier.padding(5.dp))
        }
    }
}Code language: Kotlin (kotlin)
The code within the ColumnList composable creates a Column containing a list of 500 Text components. The Text component is customized using the “Heading 4” Material typographical style and a padding modifier. Each Text instance displays a string including the current item number.
To best view the layout, modify the Preview composable to display the system UI:
@Preview(showBackground = true, showSystemUi = true)
@Composable
fun DefaultPreview() {
    ListDemoTheme {
        MainScreen()
    }
}Code language: Kotlin (kotlin)
Once these changes have been made, the preview should be rendered as follows:

Figure 33-1
Start interactive mode in the Preview panel and note that it is not possible to scroll the list to view the items A Compose Row and Column List Tutorial currently outside the bounds of the screen viewing area. To resolve this we need to enable vertical scrolling support on the Column component.
|
You are reading a sample chapter from an old edition of the Jetpack Compose Essentials book. Purchase the fully updated Jetpack Compose 1.7 Essentials edition of this book in eBook or Print format. The full book contains 67 chapters and over 700 pages of in-depth information. Buy the full book now in Print or eBook format. Learn more. |
Enabling list scrolling
The first requirement when enabling scrolling support within a Column is a ScrollState state instance which can be obtained via a call to the rememberScrollState() function. Once the state has been obtained, it needs to be passed to the Column via the verticalScroll() modifier:
.
.
import androidx.compose.foundation.rememberScrollState
import androidx.compose.foundation.verticalScroll
.
.
@Composable
fun ColumnList() {

    val scrollState = rememberScrollState()

    Column(Modifier.verticalScroll(scrollState)) {
        repeat(500) {
            Text("List Item $it",
                style = MaterialTheme.typography.h4,
                modifier = Modifier.padding(5.dp))
        }
    }
}Code language: Kotlin (kotlin)
After adding scrolling support, refresh the interactive preview, then click and drag the list up and down to verify that vertical scrolling is now working.
Manual scrolling
The next step in this tutorial is to add some buttons to the layout that can be used to instantly scroll to the top and bottom of the list. As previously discussed, the list scroll position can be controlled from within code by making calls to methods of the ScrollState instance, specifying the target list position. Since these are coroutine functions, we also need to obtain a coroutine scope within which to initiate the scrolling action. We create coroutine scope instances via a call to the rememberCoroutineScope() function.
Locate the ColumnList function in the MainActivity.kt file and modify it so that the list column is embedded in a new Column which also contains two Buttons arranged using a Row component:
.
.
import androidx.compose.foundation.layout.Row
import androidx.compose.material.Button
import androidx.compose.runtime.rememberCoroutineScope
.
.
@Composable
fun ColumnList() {

    val scrollState = rememberScrollState()
    val coroutineScope = rememberCoroutineScope()

    Column {

        Row {
            Button(onClick = {

            },
                modifier = Modifier.weight(0.5f)
                .padding(2.dp)) {
                Text("Top")
            }

            Button(onClick = {

            },
                modifier = Modifier.weight(0.5f)
                .padding(2.dp)) {
                Text("End")
            }
        }

        Column(Modifier.verticalScroll(scrollState)) {
            repeat(500) {
                Text(
                    "List Item $it",
                    style = MaterialTheme.typography.h4,
                    modifier = Modifier.padding(5.dp)
                )
            }
        }
    }
}Code language: Kotlin (kotlin)
All that remains is to create a coroutine scope instance and then use it to perform the scrolling within the Button onClick actions:
|
You are reading a sample chapter from an old edition of the Jetpack Compose Essentials book. Purchase the fully updated Jetpack Compose 1.7 Essentials edition of this book in eBook or Print format. The full book contains 67 chapters and over 700 pages of in-depth information. Buy the full book now in Print or eBook format. Learn more. |
.
.
import kotlinx.coroutines.launch
.
.
Row {
    Button(onClick = {
        coroutineScope.launch {
            scrollState.animateScrollTo(0)
        }
    },
        modifier = Modifier.weight(0.5f)
        .padding(2.dp)) {
        Text("Top")
    }

    Button(onClick = {
        coroutineScope.launch {
            scrollState.animateScrollTo(scrollState.maxValue)
        }
    },
        modifier = Modifier.weight(0.5f)
        .padding(2.dp)) {
        Text("End")
    }
}Code language: Kotlin (kotlin)
Instead of scrolling instantly to the top and bottom of the list, we have used animated scrolling. Since the target list position is specified by pixel position, the code uses 0 as the top target. To find the end position of the list, the code accesses the maxValue property of the ScrollState instance and passes it to the animateScrollTo() function.
Preview the app in interactive mode, or run it on a device or emulator and test that the two buttons scroll to the top and bottom of the list as expected. Figure 33-2, for example, shows the list after the End button has been clicked:
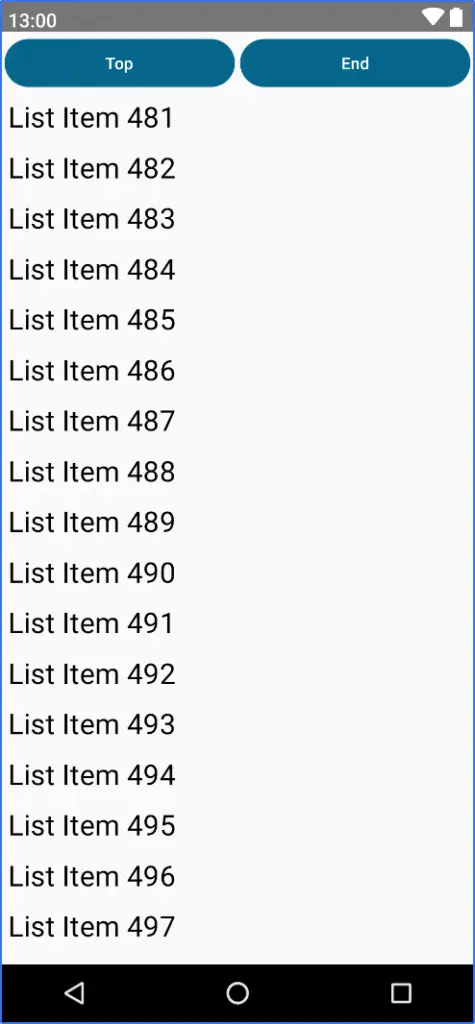
Figure 33-2
A Row list example
In addition to vertical Column-based lists we can, of course, also use the Row composable to create horizontal lists. To try out a horizontally scrolling Row list, add the following composable to the MainActivity.kt file and modify the MainScreen function to call it instead of ColumnList:
.
.
import androidx.compose.foundation.horizontalScroll
.
.
@Composable
fun MainScreen() {
RowList()
}
@Composable
fun RowList() {
val scrollState = rememberScrollState()
Row(Modifier.horizontalScroll(scrollState)) {
repeat(50) {
Text(" $it ",
style = MaterialTheme.typography.h1,
modifier = Modifier.padding(5.dp))
}
}
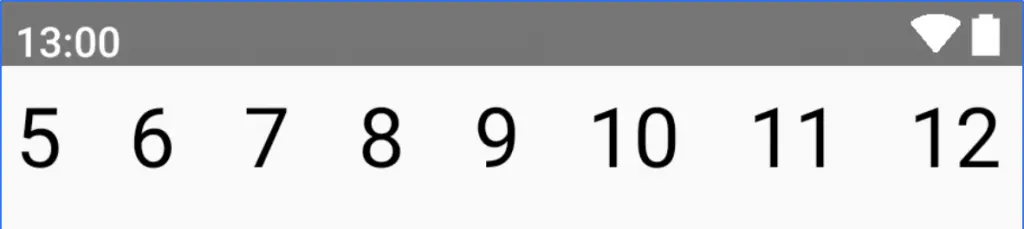
}Code language: Kotlin (kotlin)Preview the list in interactive mode and click and drag the list sideways to test horizontal scrolling as shown in Figure 33-3 below:
|
You are reading a sample chapter from an old edition of the Jetpack Compose Essentials book. Purchase the fully updated Jetpack Compose 1.7 Essentials edition of this book in eBook or Print format. The full book contains 67 chapters and over 700 pages of in-depth information. Buy the full book now in Print or eBook format. Learn more. |
Summary
In this chapter, we have used the Row and Column components to create vertical and horizontal lists. In both cases, scrolling was enabled to allow us to move through the list items using drag motions. In the case of the vertical list, buttons were added and configured to scroll directly to the top and bottom of the list when clicked.
This involved launching the animateScrollTo() method of the ScrollState instance from within a coroutine scope.