
When Google decided to introduce a map service many years ago, it is hard to say whether or not they ever anticipated having a version available for integration into mobile applications. When the first web-based version of what would eventually be called Google Maps was introduced in 2005, the iPhone had yet to ignite the smartphone revolution, and the company that was developing the Android operating system would not be acquired by Google for another six months. Whatever aspirations Google had for the future of Google Maps, it is remarkable to consider that all of the power of Google Maps can now be accessed directly via Android applications using the Google Maps Android API.
This chapter is intended to provide an overview of the Google Maps system and Google Maps Android API. The chapter will provide an overview of the different elements that make up the API, detail the steps necessary to configure a development environment to work with Google Maps and then work through some code examples demonstrating some of the basics of Google Maps Android integration.
The Elements of the Google Maps Android API
The Google Maps Android API consists of a core set of classes that combine to provide mapping capabilities in Android applications. The key elements of a map are as follows:
- GoogleMap – The main class of the Google Maps Android API. This class is responsible for downloading and displaying map tiles and for displaying and responding to map controls. The GoogleMap object is not created directly by the application but is instead created when MapView or MapFragment instances are created. A reference to the GoogleMap object can be obtained within application code via a call to the getMap() method of a MapView, MapFragment or SupportMapFragment instance.
- MapView – A subclass of the View class, this class provides the view canvas onto which the map is drawn by the GoogleMap object, allowing a map to be placed in the user interface layout of an activity.
- SupportMapFragment – A subclass of the Fragment class, this class allows a map to be placed within a Fragment in an Android layout.
- Marker – The purpose of the Marker class is to allow locations to be marked on a map. Markers are added to a map by obtaining a reference to the GoogleMap object associated with a map and then making a call to the addMarker() method of that object instance. The position of a marker is defined via Longitude and Latitude. Markers can be configured in a number of ways, including specifying a title, text and an icon. Markers may also be made to be “draggable”, allowing the user to move the marker to different positions on a map.
- Shapes – The drawing of lines and shapes on a map is achieved through the use of the Polyline, Polygon and Circle classes.
- UiSettings – The UiSettings class provides a level of control from within an application of which user interface controls appear on a map. Using this class, for example, the application can control whether or not the zoom, current location and compass controls appear on a map. This class can also be used to configure which touch screen gestures are recognized by the map.
- My Location Layer – When enabled, the My Location Layer displays a button on the map which, when selected by the user, centers the map on the user’s current geographical location. If the user is stationary, this location is represented on the map by a blue marker. If the user is in motion the location is represented by a chevron indicating the user’s direction of travel.
The best way to gain familiarity with the Google Maps Android API is to work through an example. The remainder of this chapter will create a Google Maps based application while highlighting the key areas of the API.
Creating the Google Maps Project
Select the New Project option from the welcome screen and, within the resulting new project dialog, choose the Google Maps Activity template before clicking on the Next button.
Enter MapDemo into the Name field and specify com.ebookfrenzy.mapdemo as the package name. Before clicking on the Finish button, change the Minimum API level setting to API 26: Android 8.0 (Oreo) and the Language menu to Java.
Creating a Google Cloud Billing Account
Before you can use the Google Map APIs you must first create Google Cloud billing account (unless you already have one, in which case you can skip to the next section). To do this, open a browser and use the following link to navigate to the Google Cloud Console:
https://console.cloud.google.com/
Next, click on the menu button in the top left-hand corner of the console page and select the Billing entry as illustrated in Figure 74-1 below:
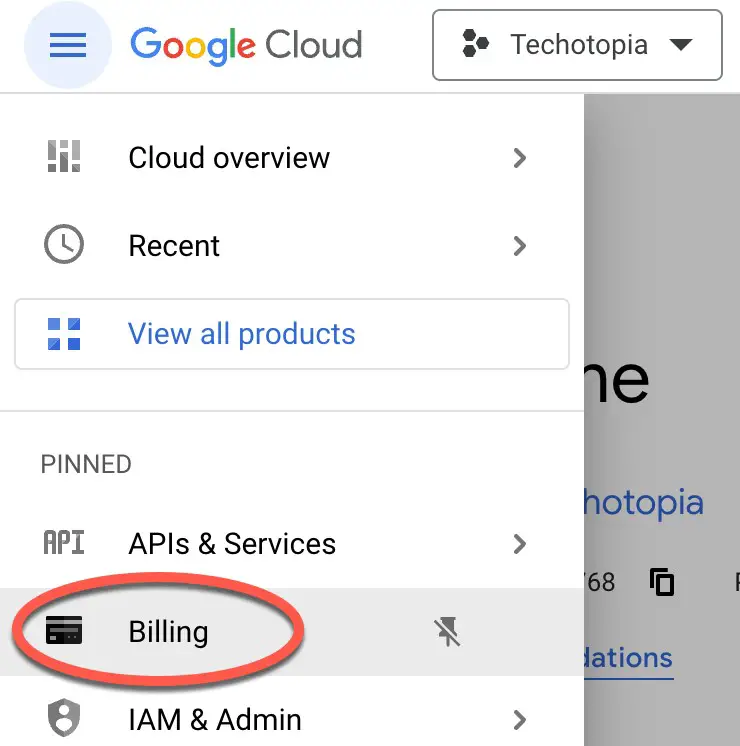
Figure 74-1
On the Billing page, select the option to add a new billing account and then follow the steps to start a free trial. You will need to provide a credit card to open the account, but Google won’t charge you when the free trial ends without your consent.
Creating a New Google Cloud Project
The next step is to create a Google Cloud project to be associated with the MapDemo app. To do this, return to the Google Cloud Console dashboard by using the following URL:
https://console.cloud.google.com/home/dashboard
Within the dashboard, click the Select a project button located in the top toolbar:
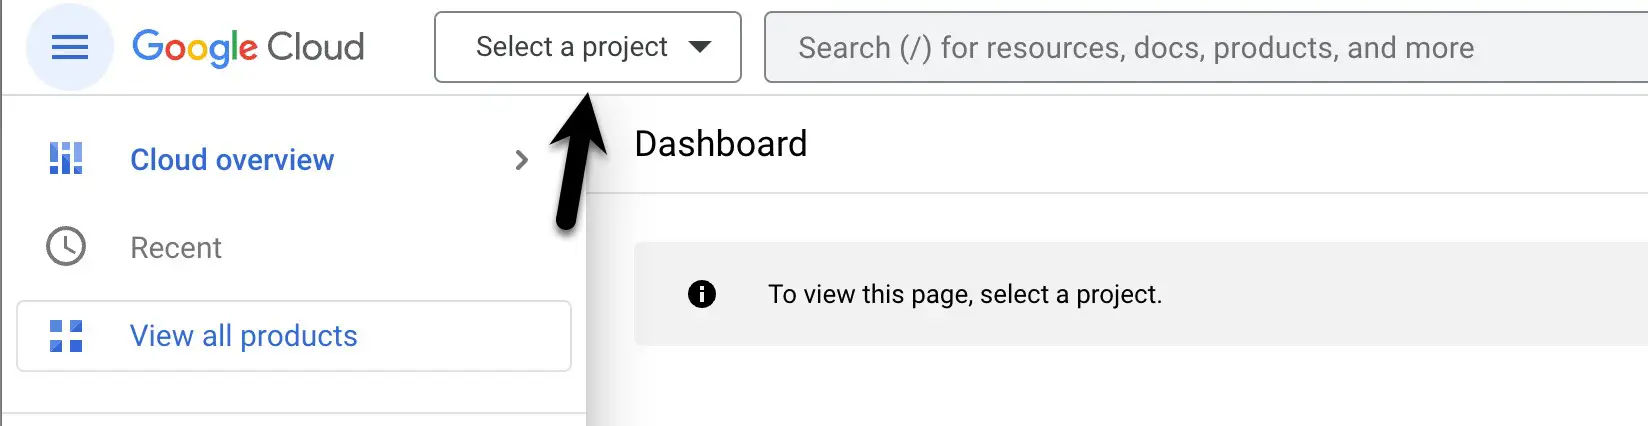
Figure 74-2
When the project selection dialog appears, click on the New Project button (highlighted in Figure 74-3):
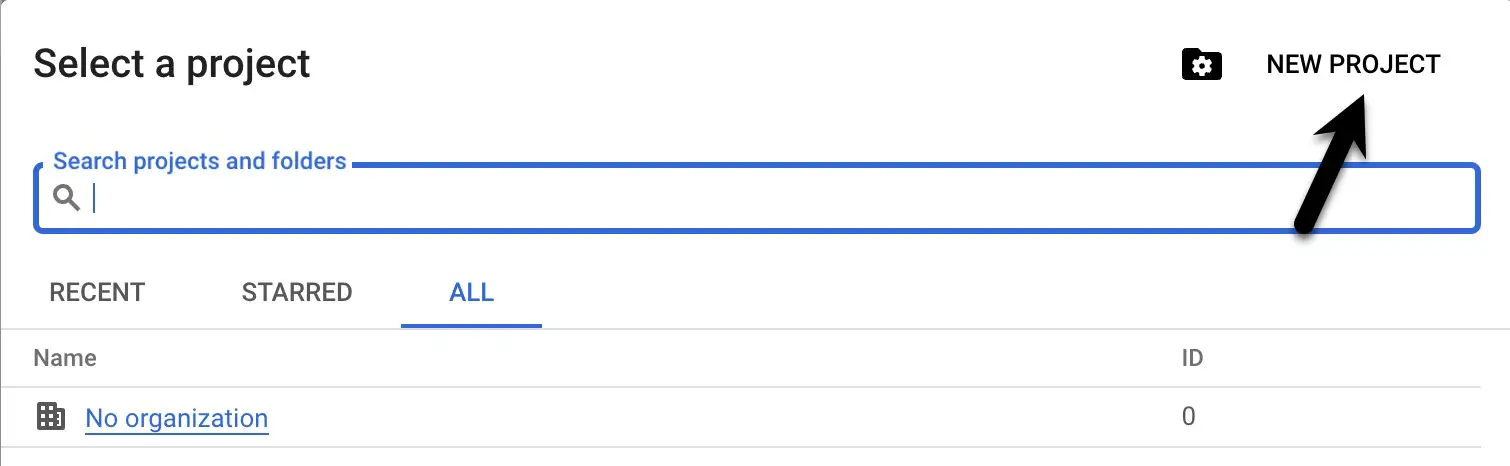
Figure 74-3
When the new project screen appears, provide a name for the project. The console will display a default id for the project beneath the project name field. If you don’t like the default id, click the Edit button to change it:
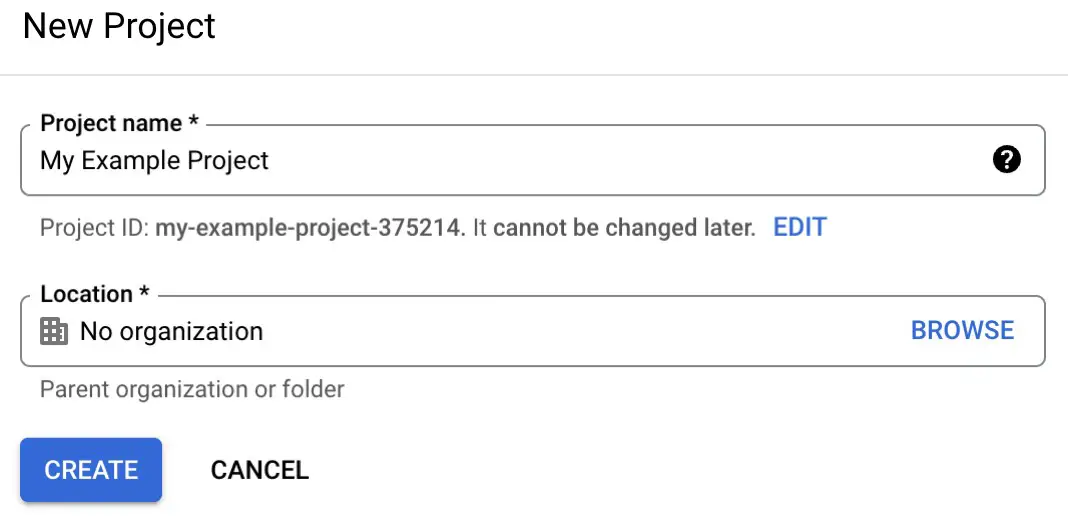
Figure 74-4
Click the Create button, and after a brief pause, you will be returned to the dashboard where your new project will be listed.
Enabling the Google Maps SDK
Now that we have created a new Google Cloud project, the next step is to allow the project to use the Google Maps SDK. To enable Google Maps support, select your project in the Google Cloud Console, click the menu button in the top left-hand corner and select the Google Maps Platform entry. Then, from the resulting menu, select the APIs option as shown in Figure 74-5:
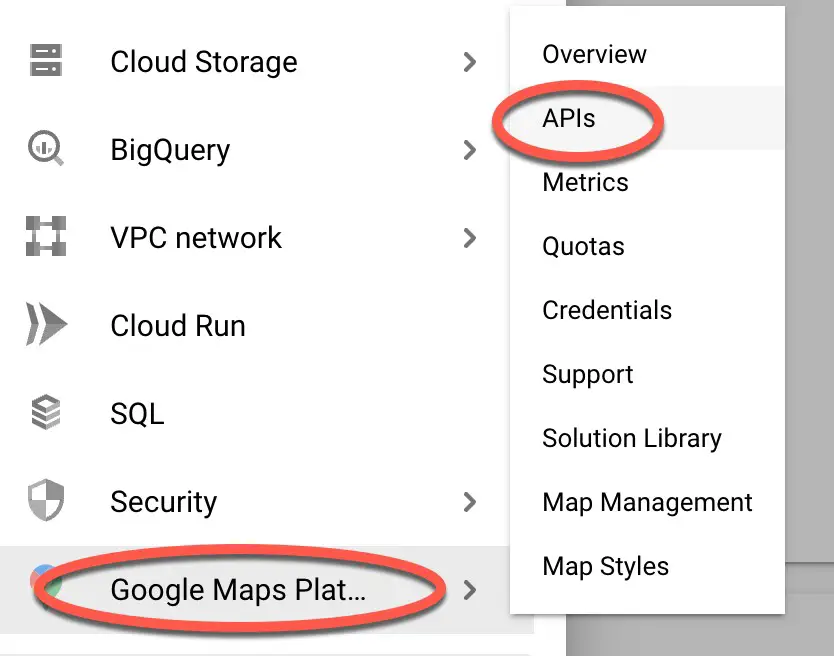
Figure 74-5
On the APIs screen, click on the Maps SDK for Android option and, on the resulting screen, click the Enable button:
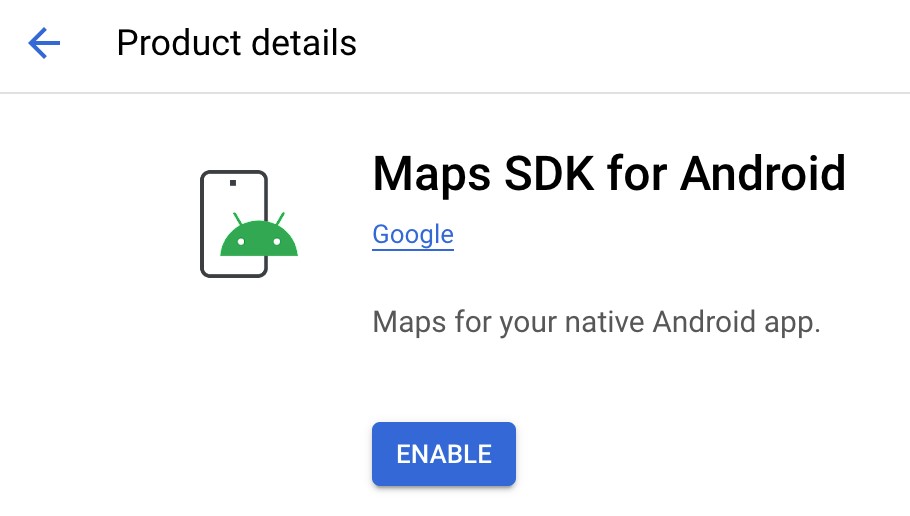
Figure 74-6
Repeat the above steps to enable the Geocoding API credential, which will be needed later in the chapter to allow our app to display the user’s current location.
Once you have enabled the credentials for your project, click the back arrow to return to the product details page in preparation for the next step.
Generating a Google Maps API Key
Before an application can use the Google Maps Android SDK, it must first be configured with an API key that will associate it with a Maps-enabled Google Cloud project. To generate an API key, select the Credentials menu option (marked A in Figure 74-7) followed by Create Credentials button (B):
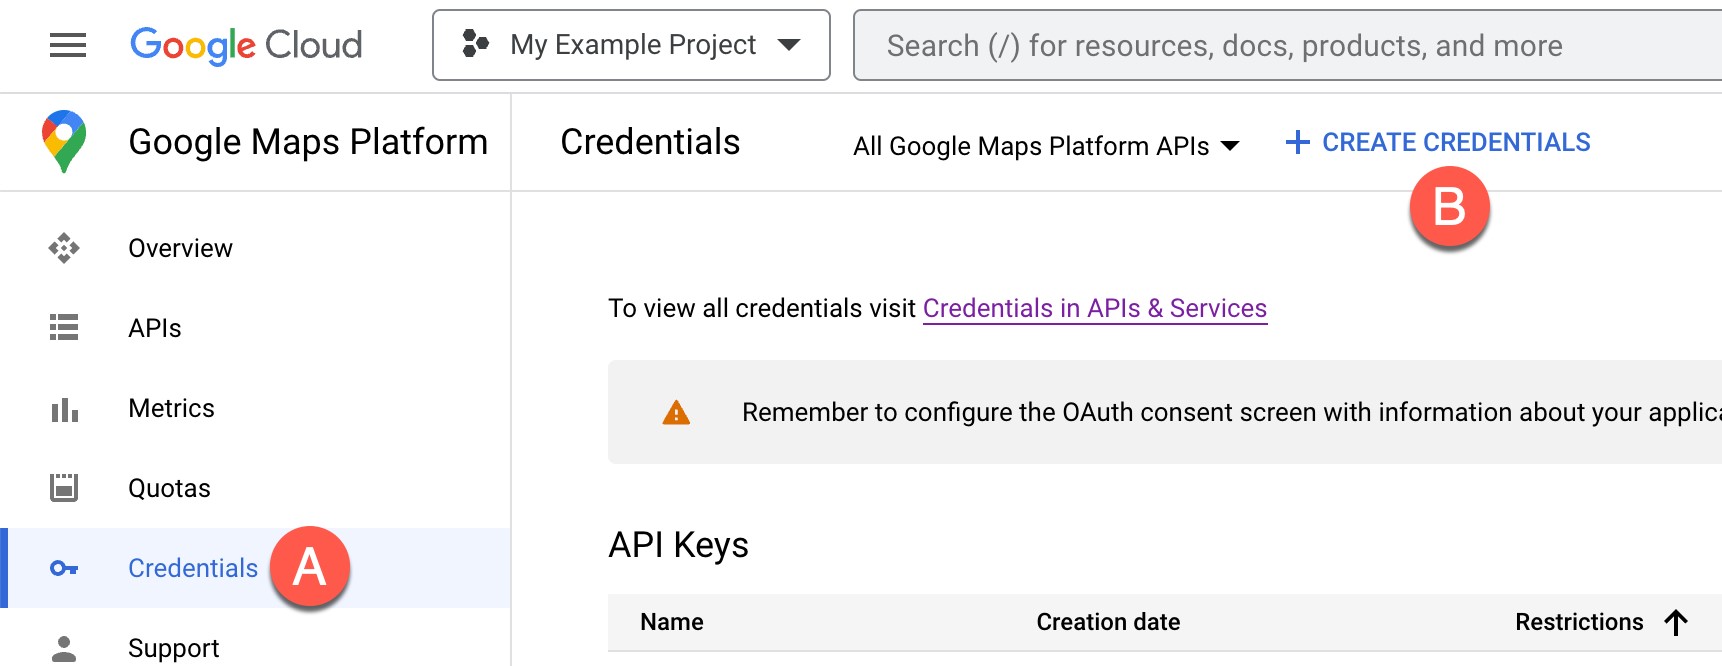
Figure 74-7
After the credential has been created, a dialog will appear displaying the API key. Copy the key before closing the API dialog:
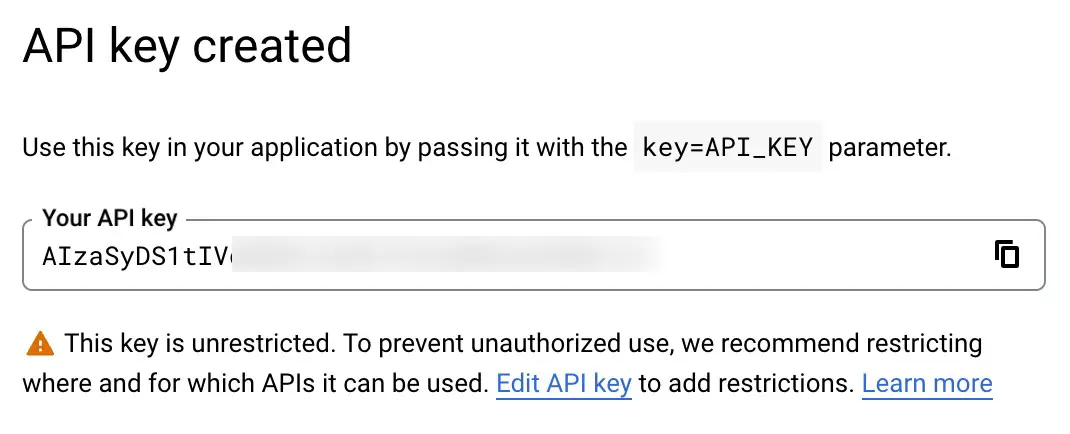
Figure 74-8
Adding the API Key to the Android Studio Project
Now that we have generated an API key that will allow our app to use the Google Maps SDK, we need to add it to our project. Return to Android Studio, edit the manifests -> AndroidManifest.xml file, and locate the API key entry, which will read as follows:
<meta-data
            android:name="com.google.android.geo.API_KEY"
            android:value="YOUR_API_KEY" />Code language: HTML, XML (xml)
Delete the text that reads “YOUR_API_KEY” and replace it with the API key created in the Google Play Console.
Next, edit the Gradle Scripts -> local.properties file and add a new line that reads as follows (where the API key for your project replaces YOUR_API_KEY):
MAPS_API_KEY=YOUR_API_KEYCode language: HTML, XML (xml)Adding the Apache HTTP Legacy Library Requirement
Since this example project will be built for use with Android version 9.0 or later, the following declaration needs to be added within the <application> section of the AndroidManifest.xml file as follows:
.
.
    <application
        android:allowBackup="true"
        android:dataExtractionRules="@xml/data_extraction_rules"
        android:fullBackupContent="@xml/backup_rules"
        android:icon="@mipmap/ic_launcher"
        android:label="@string/app_name"
        android:supportsRtl="true"
        android:theme="@style/Theme.MapDemo"
        tools:targetApi="31">

        <uses-library
                android:name="org.apache.http.legacy"
                android:required="false" />
.
.Code language: HTML, XML (xml)
Testing the Application
Perform a test run of the application to verify that the API key is correctly configured. Assuming the configuration is correct, the application will run and display a map on the screen.
If a map is not displayed, check the following areas:
- If the application is running on an emulator, make sure that the emulator is running a version of Android that includes the Google APIs. The current operating system can be changed for an AVD configuration by selecting the Tools -> Android -> AVD Manager menu option, clicking on the pencil icon in the Actions column of the AVD followed by the Change… button next to the current Android version. Within the system image dialog, select a target that includes the Google APIs.
- Check the Logcat output for any areas relating to authentication problems with regard to the Google Maps API.
This usually means the API key was entered incorrectly. Ensure that the API key in both the AndroidManifest.xml and local.properties files matches the key generated in the Google Cloud console.
- Verify within the Google API Console that Maps SDK for Android has been enabled in the Credentials panel.
Understanding Geocoding and Reverse Geocoding
It is impossible to talk about maps and geographical locations without first covering the subject of Geocoding. Geocoding can best be described as the process of converting a textual-based geographical location (such as a street address) into geographical coordinates expressed in terms of longitude and latitude.
Geocoding can be achieved using the Android Geocoder class. An instance of the Geocoder class can, for example, be passed a string representing a location, such as a city name, street address or airport code. The Geocoder will attempt to find a match for the location and return a list of Address objects that potentially match the location string, ranked in order with the closest match at position 0 in the list. A variety of information can then be extracted from the Address objects, including the longitude and latitude of the potential matches.
The following code, for example, requests the location of the National Air and Space Museum in Washington, D.C.:
import java.io.IOException;
import java.util.List;

import android.location.Address;
import android.location.Geocoder;
.
.
double latitude;
double longitude;

List<Address> geocodeMatches = null;

try {
       geocodeMatches =
          new Geocoder(this).getFromLocationName(
               "600 Independence Ave SW, Washington, DC 20560", 1);
    } catch (IOException e) {
       // TODO Auto-generated catch block
       e.printStackTrace();
}

if (!geocodeMatches.isEmpty())
{
       latitude = geocodeMatches.get(0).getLatitude();
       longitude = geocodeMatches.get(0).getLongitude();
}Code language: Java (java)
Note that the value of 1 is passed through as the second argument to the getFromLocationName() method. This simply tells the Geocoder to return only one result in the array. Given the specific nature of the address provided, there should only be one potential match. For more vague location names, however, it may be necessary to request more potential matches and allow the user to choose the correct one.
The above code is an example of forward-geocoding in that coordinates are calculated based on a text location description. Reverse-geocoding, as the name suggests, involves the translation of geographical coordinates into a human readable address string. Consider, for example, the following code:
import java.io.IOException;
import java.util.List;

import android.location.Address;
import android.location.Geocoder;
.
.
List<Address> geocodeMatches = null;
String Address1;
String Address2;
String State;
String Zipcode;
String Country;

try {
       geocodeMatches =
         new Geocoder(this).getFromLocation(38.8874245, -77.0200729, 1);
} catch (IOException e) {
       // TODO Auto-generated catch block
       e.printStackTrace();
}

if (!geocodeMatches.isEmpty())
{
       Address1 = geocodeMatches.get(0).getAddressLine(0);
       Address2 = geocodeMatches.get(0).getAddressLine(1);
       State = geocodeMatches.get(0).getAdminArea();
       Zipcode = geocodeMatches.get(0).getPostalCode();
       Country = geocodeMatches.get(0).getCountryName();
}Code language: Java (java)
In this case, the Geocoder object is initialized with latitude and longitude values via the getFromLocation() method. Once again, only a single matching result is requested. The text based address information is then extracted from the resulting Address object.
It should be noted that the geocoding is not actually performed on the Android device, but rather on a server to which the device connects when a translation is required and the results subsequently returned when the translation is complete. As such, geocoding can only take place when the device has an active internet connection.
Adding a Map to an Application
The simplest way to add a map to an application is to specify it in the user interface layout XML file for an activity. The following example layout file shows the SupportMapFragment instance added to the activity_maps. xml file created by Android Studio:
<fragment xmlns:android="http://schemas.android.com/apk/res/android"
    xmlns:tools="http://schemas.android.com/tools"
    android:layout_width="match_parent"
    android:layout_height="match_parent"
    android:id="@+id/map"
    tools:context=".MapsActivity"
    android:name="com.google.android.gms.maps.SupportMapFragment"/> Code language: HTML, XML (xml)
Requesting Current Location Permission
As outlined in the chapter entitled “Making Runtime Permission Requests in Android”, certain permissions are considered dangerous and require special handling for Android 6.0 or later. One set of permissions allows applications to identify the user’s current location. Edit the AndroidManifest.xml file located under app -> manifests in the Project tool window and add the following permission lines:
<uses-permission
    android:name="android.permission.ACCESS_FINE_LOCATION" />

<uses-permission
    android:name="android.permission.ACCESS_COARSE_LOCATION" />Code language: HTML, XML (xml)
These settings will ensure that the app can provide permission for the app to obtain location information when installed on older versions of Android. To support Android 6.0 or later, however, we need to add some code to the MapsActivity.java file to request this permission at runtime.
Begin by adding some import directives and a constant to act as the permission request code:
package com.ebookfrenzy.mapdemo;
.
.
import androidx.annotation.NonNull;
import androidx.core.content.ContextCompat;
import androidx.core.app.ActivityCompat;
import android.Manifest;
import android.widget.Toast;
import android.content.pm.PackageManager;
.
.
public class MapsActivity extends FragmentActivity implements OnMapReadyCallback {
    private static final int LOCATION_REQUEST_CODE = 101;
    private GoogleMap mMap;
.
.
}Code language: Java (java)
Next, a method needs to be added to the class to request a specified permission from the user. Remaining within the MapsActivity.java class file, implement this method as follows:
protected void requestPermission(String permissionType,
                                 int requestCode) {

    ActivityCompat.requestPermissions(this,
            new String[]{permissionType}, requestCode
    );
}Code language: Java (java)
When the user has responded to the permission request, the onRequestPermissionsResult() method will be called on the activity. Remaining in the MapsActivity.java file, implement this method now so that it reads as follows:
@Override
public void onRequestPermissionsResult(int requestCode,
             @NonNull String[] permissions, @NonNull int[] grantResults) {

    super.onRequestPermissionsResult(requestCode, permissions, grantResults);
    if (requestCode == LOCATION_REQUEST_CODE) {
        if (grantResults.length == 0
                || grantResults[0] !=
                PackageManager.PERMISSION_GRANTED) {
            Toast.makeText(this,
                    "Unable to show location - permission required",
                    Toast.LENGTH_LONG).show();
        } else {

            SupportMapFragment mapFragment =
                    (SupportMapFragment) getSupportFragmentManager()
                            .findFragmentById(R.id.map);
            mapFragment.getMapAsync(this);
        }
    }
}Code language: Java (java)
If permission has not been granted by the user, the app displays a message indicating that the current location cannot be displayed. If, on the other hand, permission was granted, the map is refreshed to provide an opportunity for the location marker to be displayed.
Displaying the User’s Current Location
Once the appropriate permission has been granted, the user’s current location may be displayed on the map by obtaining a reference to the GoogleMap object associated with the displayed map and calling the setMyLocationEnabled() method of that instance, passing through a value of true.
When the map is ready to display, the onMapReady() method of the activity is called. This method will also be called when the map is refreshed within the onRequestPermissionsResult() method above. By default, Android Studio has implemented this method and added some code to orient the map over Australia with a marker positioned over the city of Sidney. Locate and edit the onMapReady() method in the MapsActivity.java file to remove this template code and to add code to check the location permission has been granted before enabling display of the user’s current location. If permission has not been granted, a request is made to the user via a call to the previously added requestPermission() method:
@Override
public void onMapReady(GoogleMap googleMap) {
    mMap = googleMap;

    // Add a marker in Sydney and move the camera
    LatLng sydney = new LatLng(-34, 151);
    mMap.addMarker(new MarkerOptions().position(sydney).title("Marker in Sydney"));
    mMap.moveCamera(CameraUpdateFactory.newLatLng(sydney));

    if (mMap != null) {
        int permission = ContextCompat.checkSelfPermission(this,
              Manifest.permission.ACCESS_FINE_LOCATION);

        if (permission == PackageManager.PERMISSION_GRANTED) {
            mMap.setMyLocationEnabled(true);
        } else {
                requestPermission(
                  Manifest.permission.ACCESS_FINE_LOCATION,
                        LOCATION_REQUEST_CODE);
        }
     }
}Code language: Java (java)
When the app is now run, the dialog shown in Figure 74-9 will appear requesting location permission. If permission is granted, a blue dot will appear on the map indicating the current location of the device.
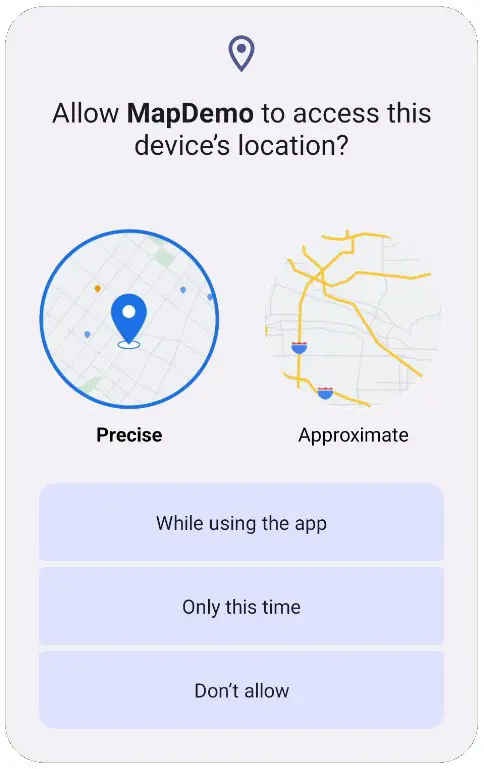
Figure 74-9
Changing the Map Type
The type of map displayed can be modified dynamically by making a call to the setMapType() method of the corresponding GoogleMap object, passing through one of the following values:
- GoogleMap.MAP_TYPE_NONE – An empty grid with no mapping tiles displayed.
- GoogleMap.MAP_TYPE_NORMAL – The standard view consisting of the classic road map.
- GoogleMap.MAP_TYPE_SATELLITE – Displays the satellite imagery of the map region.
- GoogleMap.MAP_TYPE_HYBRID – Displays satellite imagery with the road map superimposed.
- GoogleMap.MAP_TYPE_TERRAIN – Displays topographical information such as contour lines and colors.
The following code change to the onMapReady() method, for example, switches a map to Satellite mode:
.
.
if (mMap != null) {
    int permission = ContextCompat.checkSelfPermission(
              this, Manifest.permission.ACCESS_FINE_LOCATION);

    if (permission == PackageManager.PERMISSION_GRANTED) {
        mMap.setMyLocationEnabled(true);
    } else {
        requestPermission(Manifest.permission.ACCESS_FINE_LOCATION,
                LOCATION_REQUEST_CODE);
    }
    mMap.setMapType(GoogleMap.MAP_TYPE_SATELLITE);
}
.
.Code language: Java (java)
Alternatively, the map type may be specified in the XML layout file in which the map is embedded using the map:mapType property together with a value of none, normal, hybrid, satellite or terrain. For example:
<?xml version="1.0" encoding="utf-8"?>
<fragment xmlns:android="http://schemas.android.com/apk/res/android"
          xmlns:map="http://schemas.android.com/apk/res-auto"
          android:id="@+id/map"
          android:layout_width="match_parent"
          android:layout_height="match_parent"
          map:mapType="hybrid"
          android:name="com.google.android.gms.maps.SupportMapFragment"/>Code language: HTML, XML (xml)
Displaying Map Controls to the User
The Google Maps Android API provides a number of controls that may be optionally displayed to the user consisting of zoom in and out buttons, a “my location” button and a compass.
Whether or not the zoom and compass controls are displayed may be controlled either programmatically or within the map element in XML layout resources. To configure the controls programmatically, a reference to the UiSettings object associated with the GoogleMap object must be obtained:
import com.google.android.gms.maps.UiSettings;
.
.
UiSettings mapSettings;
mapSettings = mMap.getUiSettings();Code language: Java (java)
The zoom controls are enabled and disabled via the calls to the setZoomControlsEnabled() method of the UiSettings object. For example:
mapSettings.setZoomControlsEnabled(true);Code language: Java (java)Alternatively, the map:uiZoomControls property may be set within the map element of the XML resource file:
map:uiZoomControls="false"Code language: Java (java)The compass may be displayed either via a call to the setCompassEnabled() method of the UiSettings instance, or through XML resources using the map:uiCompass property. Note the compass icon only appears when the map camera is tilted or rotated away from the default orientation.
The “My Location” button will only appear when My Location mode is enabled as outlined earlier in this chapter. The button may be prevented from appearing even when in this mode via a call to the setMyLocationButtonEnabled() method of the UiSettings instance.
Handling Map Gesture Interaction
The Google Maps Android API is capable of responding to a number of different user interactions. These interactions can be used to change the area of the map displayed, the zoom level and even the angle of view (such that a 3D representation of the map area is displayed for certain cities).
Map Zooming Gestures
Support for gestures relating to zooming in and out of a map may be enabled or disabled using the setZoomGesturesEnabled() method of the UiSettings object associated with the GoogleMap instance. For example, the following code disables zoom gestures for our example map:
UiSettings mapSettings;
mapSettings = map.getUiSettings();
mapSettings.setZoomGesturesEnabled(false);Code language: Java (java)
The same result can be achieved within an XML resource file by setting the map:uiZoomGestures property to true or false.
When enabled, zooming will occur when the user makes pinching gestures on the screen. Similarly, a double tap will zoom in while a two finger tap will zoom out. One finger zooming gestures, on the other hand, are performed by tapping twice but not releasing the second tap and then sliding the finger up and down on the screen to zoom in and out respectively.
Map Scrolling/Panning Gestures
A scrolling, or panning gesture allows the user to move around the map by dragging the map around the screen with a single finger motion. Scrolling gestures may be enabled within code via a call to the setScrollGesturesEnabled() method of the UiSettings instance:
UiSettings mapSettings;
mapSettings = mMap.getUiSettings();
mapSettings.setScrollGesturesEnabled(true);Code language: Java (java)
Alternatively, scrolling on a map instance may be enabled in an XML resource layout file using the map:uiScrollGestures property.
Map Tilt Gestures
Tilt gestures allow the user to tilt the angle of projection of the map by placing two fingers on the screen and moving them up and down to adjust the tilt angle. Tilt gestures may be enabled or disabled via a call to the setTiltGesturesEnabled() method of the UiSettings instance, for example:
UiSettings mapSettings;
mapSettings = mMap.getUiSettings();
mapSettings.setTiltGesturesEnabled(true);Code language: Java (java)
Tilt gestures may also be enabled and disabled using the map:uiTiltGestures property in an XML layout resource file.
Map Rotation Gestures
By placing two fingers on the screen and rotating them in a circular motion, the user may rotate the orientation of a map when map rotation gestures are enabled. This gesture support is enabled and disabled in code via a call to the setRotateGesturesEnabled() method of the UiSettings instance, for example:
UiSettings mapSettings;
mapSettings = mMap.getUiSettings();
mapSettings.setRotateGesturesEnabled(true);Code language: Java (java)
Rotation gestures may also be enabled or disabled using the map:uiRotateGestures property in an XML layout resource file.
Creating Map Markers
Markers are used to notify the user of locations on a map and take the form of either a standard or custom icon. Markers may also include a title and optional text (referred to as a snippet) and may be configured such that they can be dragged to different locations on the map by the user. When tapped by the user an info window will appear displaying additional information about the marker location.
Markers are represented by instances of the Marker class and are added to a map via a call to the addMarker() method of the corresponding GoogleMap object. Passed through as an argument to this method is a MarkerOptions class instance containing the various options required for the marker such as the title and snippet text. The location of a marker is defined by specifying latitude and longitude values, also included as part of the MarkerOptions instance. For example, the following code adds a marker including a title, snippet and a position to a specific location on the map:
import com.google.android.gms.maps.model.Marker;
import com.google.android.gms.maps.model.LatLng;
import com.google.android.gms.maps.model.MarkerOptions;
.
.
.
LatLng position = new LatLng(38.8874245, -77.0200729);
Marker museum = mMap.addMarker(new MarkerOptions()
                  .position(position)
                  .title("Museum")
                  .snippet("National Air and Space Museum"));Code language: Java (java)
When executed, the above code will mark the location specified which, when tapped, will display an info window containing the title and snippet as shown in Figure 74-10:
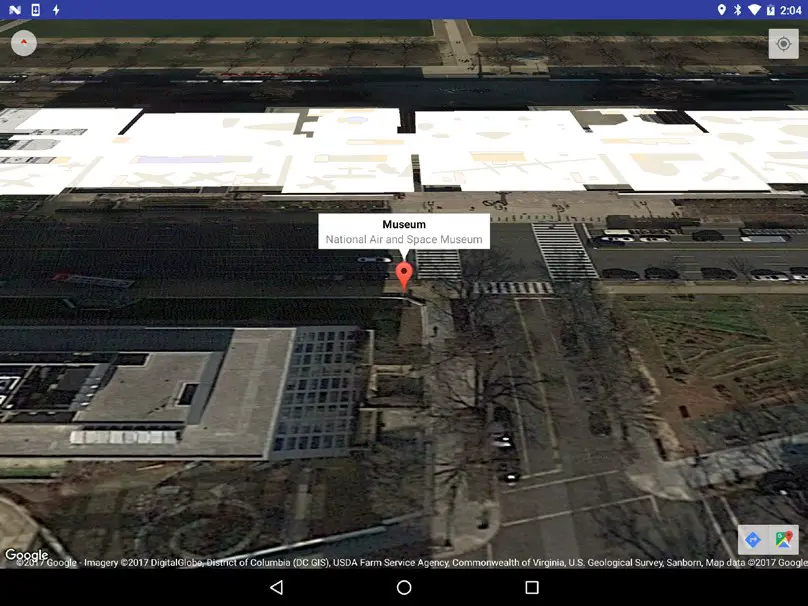
Figure 74-10
Controlling the Map Camera
Because Android device screens are flat and the world is a sphere, the Google Maps Android API uses the Mercator projection to represent the earth on a flat surface. The default view of the map is presented to the user as though through a camera suspended above the map and pointing directly down at the map. The Google Maps Android API allows the target, zoom, bearing and tilt of this camera to be changed in real-time from within the application:
- Target – The location of the center of the map within the device display specified in terms of longitude and latitude.
- Zoom – The zoom level of the camera specified in levels. Increasing the zoom level by 1.0 doubles the width of the amount of the map displayed.
- Tilt – The viewing angle of the camera specified as a position on an arc spanning directly over the center of the viewable map area measured in degrees from the top of the arc (this being the nadir of the arc where the camera points directly down to the map).
- Bearing – The orientation of the map in degrees measured in a clockwise direction from North.
Camera changes are made by creating an instance of the CameraUpdate class with the appropriate settings. CameraUpdate instances are created by making method calls to the CameraUpdateFactory class. Once a CameraUpdate instance has been created, it is applied to the map via a call to the moveCamera() method of the GoogleMap instance. To obtain a smooth animated effect as the camera changes, the animateCamera() method may be called instead of moveCamera().
A summary of CameraUpdateFactory methods is as follows:
- CameraUpdateFactory.zoomIn() – Provides a CameraUpdate instance zoomed in by one level.
- CameraUpdateFactory.zoomOut() – Provides a CameraUpdate instance zoomed out by one level.
- CameraUpdateFactory.zoomTo(float) – Generates a CameraUpdate instance that changes the zoom level to the specified value.
- CameraUpdateFactory.zoomBy(float) – Provides a CameraUpdate instance with a zoom level increased or decreased by the specified amount.
- CameraUpdateFactory.zoomBy(float, Point) – Creates a CameraUpdate instance that increases or decreases the zoom level by the specified value.
- CameraUpdateFactory.newLatLng(LatLng) – Creates a CameraUpdate instance that changes the camera’s target latitude and longitude.
- CameraUpdateFactory.newLatLngZoom(LatLng, float) – Generates a CameraUpdate instance that changes the camera’s latitude, longitude and zoom.
- CameraUpdateFactory.newCameraPosition(CameraPosition) – Returns a CameraUpdate instance that moves the camera to the specified position. A CameraPosition instance can be obtained using CameraPosition. Builder().
The following code, for example, zooms in the camera by one level using animation:
mMap.animateCamera(CameraUpdateFactory.zoomIn());Code language: Java (java)The following code, on the other hand, moves the camera to a new location and adjusts the zoom level to 10 without animation:
private static final LatLng position =
       new LatLng(38.8874245, -77.0200729);

mMap.moveCamera(CameraUpdateFactory.newLatLngZoom(position, 10));Code language: Java (java)
Finally, the next code example uses CameraPosition.Builder() to create a CameraPosition object with changes to the target, zoom, bearing and tilt. This change is then applied to the camera using animation:
import com.google.android.gms.maps.model.CameraPosition;
import com.google.android.gms.maps.CameraUpdateFactory;
.
.
CameraPosition cameraPosition = new CameraPosition.Builder()
    .target(position)
    .zoom(50)
    .bearing(70)
    .tilt(25)
    .build();
mMap.animateCamera(CameraUpdateFactory.newCameraPosition(
                            cameraPosition));Code language: Java (java)
Summary
This chapter has provided an overview of the key classes and methods that make up the Google Maps Android API and outlined the steps involved in preparing both the development environment and an application project to make use of the API.