
The iOS Photo Editing extension’s primary purpose is to allow an app’s photo editing capabilities to be made available from within the standard iOS Photos app. Consider, for example, a scenario where a developer has published an app that allows users to apply custom changes and special effects to videos or photos. Before the introduction of extensions, the only way for a user to access these capabilities would have been to launch and work within that app. However, by placing some of the app’s functionality into a Photo Editing extension, the user can now select videos or photos from within the Photos app and choose the extension from a range of editing options available on the device. Once selected, the user interface for the extension is displayed to the user so that changes can be made to the chosen image or video. Once the user has finished making the changes and exits the extension, the modified image or video is returned to the Photos app.
Creating a Photo Editing Extension
As with all extension types, using an Xcode template is the easiest starting point when creating a Photo Editing extension. For this chapter, create a new Xcode project using the iOS App template with the Swift and Storyboard options selected, entering PhotoDemo as the product name.
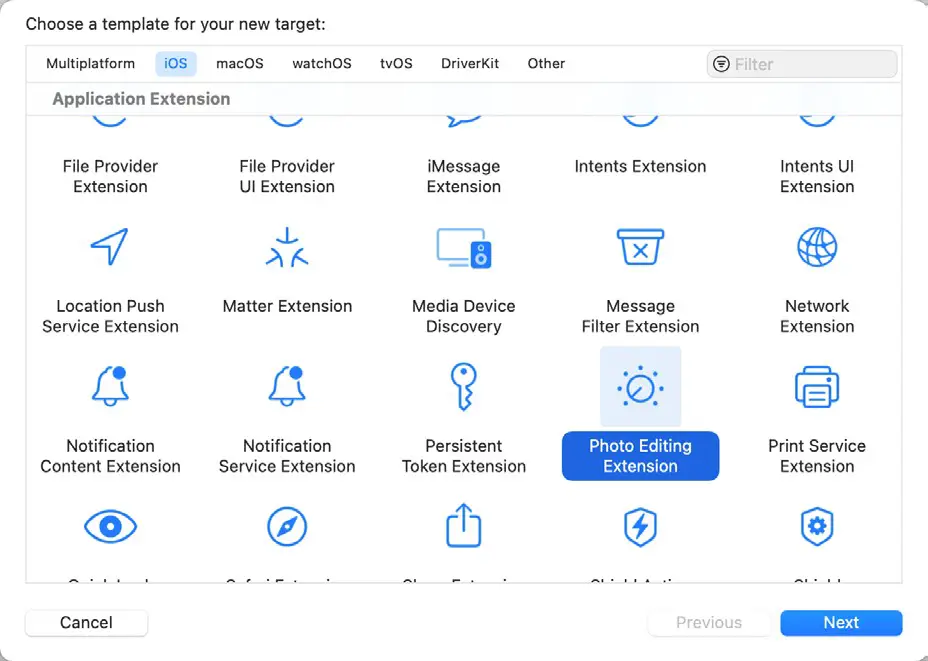
Once the app project has been created, a new target will be added for the Photo Editing extension. To achieve this, select the File -> New -> Target… menu option and choose the Photo Editing Extension template from the main panel as shown in Figure 76-1:
With the appropriate options selected, click the Next button and enter MyPhotoExt into the Product Name field. Leave the remaining fields to default values and click on Finish to complete the extension creation process. When prompted, click on the Activate button to activate the scheme created by Xcode to enable the extension to be built and run.
Once the extension has been added, it will appear in the project navigator panel under the MyPhotoExt folder. This folder will contain the Swift source code file for the extension’s view controller named PhotoEditingViewController. swift and the corresponding user interface storyboard file named MainInterface.storyboard. In addition, an Info. plist file will be present in the sub-folder.
 |
You are reading a sample chapter from Building iOS 17 Apps using Xcode Storyboards.
Buy the full book now in eBook or Print format. The full book contains 96 chapters and 760 pages of in-depth information. |
Accessing the Photo Editing Extension
Before beginning work on implementing the extension’s functionality, it is important to learn how to access such an extension from within the iOS Photos app. Begin by verifying that the MyPhotoExt build scheme is selected in the Xcode toolbar, as illustrated in Figure 76-2.

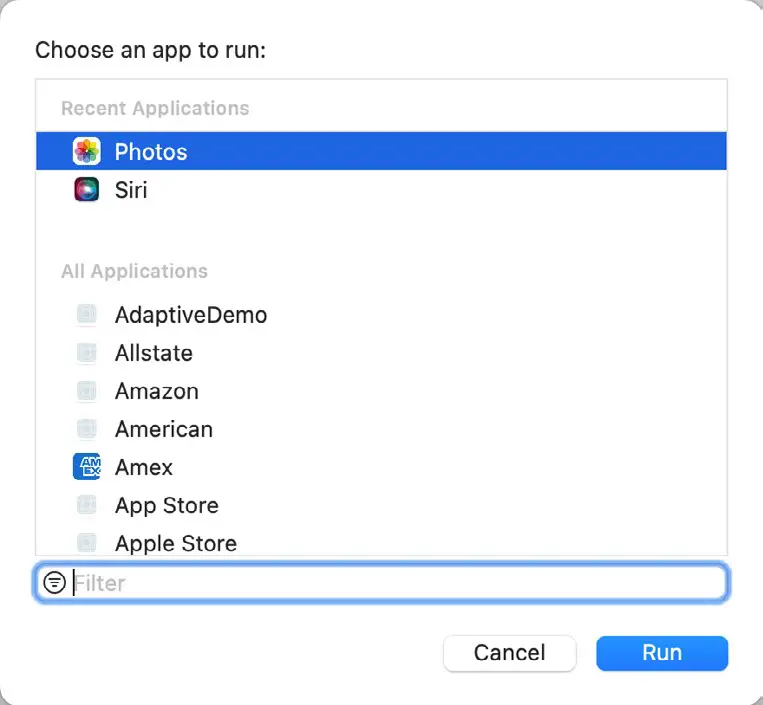
If the extension is not selected, click on the current scheme name and select MyPhotoExt from the drop-down menu. Having verified that the appropriate scheme is selected, click on the toolbar run button. Since this is an extension, it can only be run within the context of a host app. As a result, Xcode will display a panel listing the apps installed on the attached device. Select the Photos app from this list of available apps (Figure 76-3) and click on the Run button.
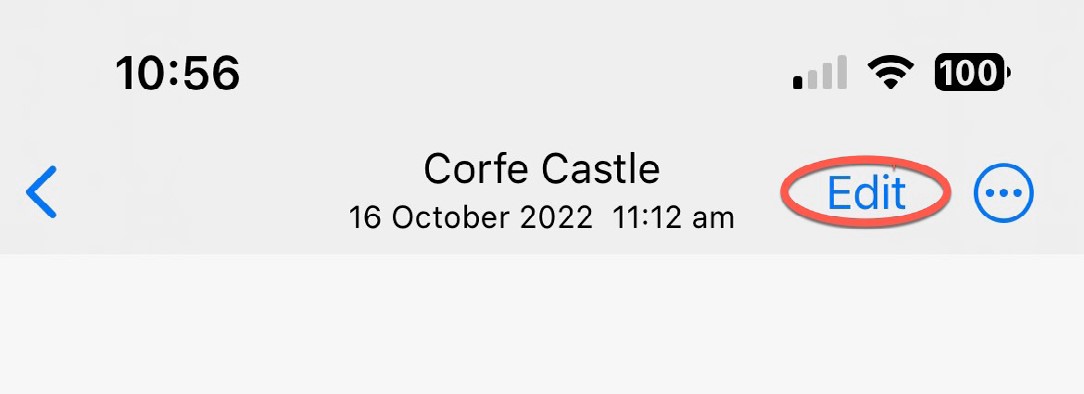
After the extension and containing app have been compiled and installed, the Photos app will automatically launch. If it does not, launch it manually from the device screen. Once the Photos app appears, select a photo from those stored on the device and, once selected, tap on the Edit button located in the toolbar along the top edge of the screen, as illustrated in Figure 76-4, to enter the standard editing interface of the Photos app.
Within the tab bar along the bottom of the Photos editing tool is a small round button containing three dots (as highlighted in Figure 76-5):

Tapping this button will display the action panel (as shown in Figure 76-6), where Photo Editing extensions may be chosen and used to edit videos and images.
|
You are reading a sample chapter from Building iOS 17 Apps using Xcode Storyboards.
Buy the full book now in eBook or Print format. The full book contains 96 chapters and 760 pages of in-depth information. |
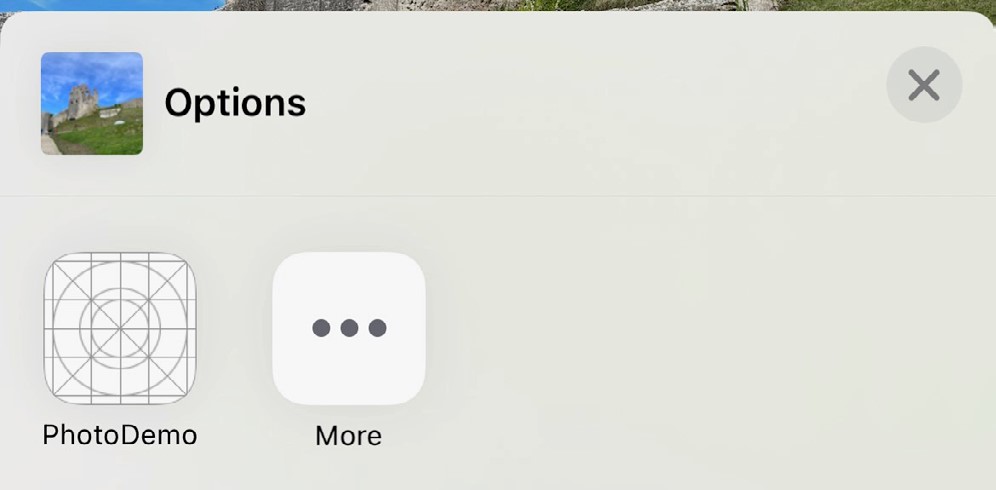
Assuming that the extension for our PhotoDemo app is displayed, select it and wait for the extension to launch. Once the extension has loaded, it will appear in the form of the user interface as defined in the MyPhotoExt -> MainInterface.storyboard file.
Configuring the Info.plist File
A Photo Editing extension must declare the type of media it can edit. This is specified via the PHSupportedMediaTypes key within the NSExtension section of the extension’s Info.plist file. By default, the Photo Editing template declares that the extension can only edit images. To confirm this, right-click on the Info entry within the MyPhotoExt folder in the Project Navigator and select the Open as Source code option and check that the NSExtension settings match the following:
<?xml version="1.0" encoding="UTF-8"?>
.
.
       <key>NSExtension</key>
        <dict>
                <key>NSExtensionAttributes</key>
                <dict>
                        <key>PHSupportedMediaTypes</key>
                        <array>
                                <string>Image</string>
                        </array>
                </dict>
                <key>NSExtensionMainStoryboard</key>
                <string>MainInterface</string>
                <key>NSExtensionPointIdentifier</key>
                <string>com.apple.photo-editing</string>
        </dict>
</dict>
</plist>Code language: HTML, XML (xml)
If the extension is also able to edit video files, the PHSupportedMediaTypes entry within the file would be modified as follows:
<key>PHSupportedMediaTypes</key>
      <array>
          <string>Video</string>
          <string>Image</string>
      </array>Code language: HTML, XML (xml)
For this example, leave the Info.plist file unchanged with support for images only.
Designing the User Interface
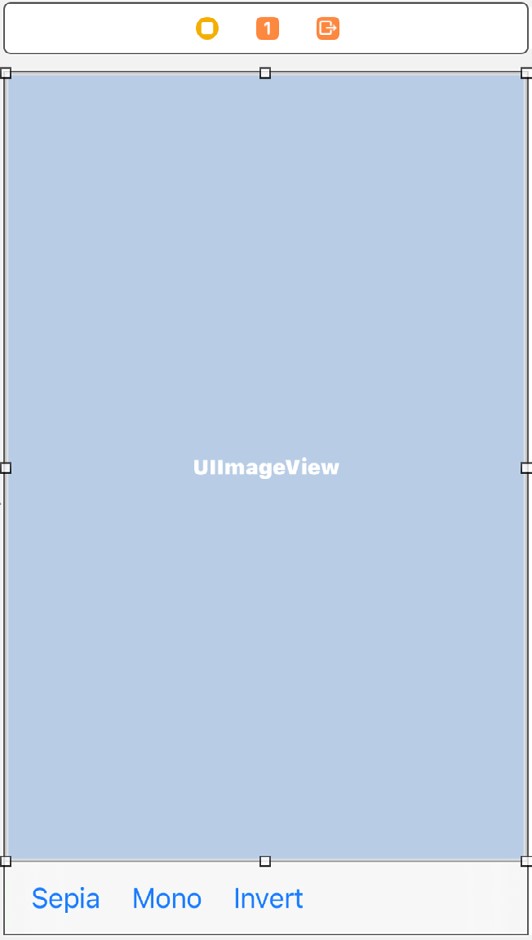
The extension’s user interface will consist of an Image View and a Toolbar containing three Bar Button Items. First, within the Xcode project navigator panel, locate and load the MyPhotoExt -> MainInterface.storyboard file into Interface Builder and select and delete the “Hello World” Label view. Then, with a clean canvas, design and configure the layout so that it consists of an Image View, a Toolbar, and three Toolbar Button Items, as shown in Figure 76-7:
|
You are reading a sample chapter from Building iOS 17 Apps using Xcode Storyboards.
Buy the full book now in eBook or Print format. The full book contains 96 chapters and 760 pages of in-depth information. |
Select the Image View, display the Attributes Inspector panel, and change the Content Mode setting to Aspect Fit.
With the Image View still selected, display the Auto Layout Add New Constraints menu and set Spacing to nearest neighbor constraints on all four sides of the view with the Constrain to margins option switched off.
Click to select the Toolbar view and use the Auto Layout Add New Constraints menu again to apply Spacing to nearest neighbor constraints on the left, right, and bottom edges of the view with the Constrain to margins option still switched off. Before adding the constraints, enable the Height constraint option using the currently displayed value.
Display the Assistant Editor and verify that it displays the source code for the PhotoEditingViewController.swift file. Next, select the Bar Button Item displaying the “Sepia” text (note that it may be necessary to click twice since the first click will select the parent Toolbar view). With the item selected, Ctrl-click on the item and drag the resulting line to a position immediately beneath the end of implementing the viewDidLoad method in the Assistant Editor panel. Next, release the line and, in the connection dialog, establish an Action named sepiaSelected. Repeat these steps for the “Mono” and “Invert” Bar Button Items, naming the Actions monoSelected and invertSelected, respectively.
Finally, Right-click on the Image View and drag the resulting line to a position beneath the “class PhotoEditingViewController” declaration. Then, release the line and establish an Outlet for the Image View named imageView.
|
You are reading a sample chapter from Building iOS 17 Apps using Xcode Storyboards.
Buy the full book now in eBook or Print format. The full book contains 96 chapters and 760 pages of in-depth information. |
The PHContentEditingController Protocol
When Xcode created the template for the Photo Editing extension, it created a View Controller class named PhotoEditingViewController and declared it as implementing the PHContentEditingController protocol. It also generated stub methods for each method that must be implemented for the class to conform with the protocol. The remainder of implementing a Photo Editing extension primarily consists of writing the code for these methods to implement the required editing behavior. One of the first methods that will need to be implemented relates to the issue of adjustment data.
Photo Extensions and Adjustment Data
When the user selects a Photo Extension, a method named canHandle(adjustmentData:) is called on the view controller class of the extension. The method must return a true or false value depending on whether or not the extension supports adjustment data.
If an extension supports adjustment data, a copy of the original image or video is passed together with data outlining any earlier modifications made to the media during previous editing sessions. The extension then re-applies those changes to the file or video to get it back to the point where it was at the end of the last editing session. The advantage of this approach is that the extension can allow the user to undo any editing operations performed within previous sessions using the extension. Then, when editing is completed, the extension returns the modified image or video file and any new adjustment data reflecting edits performed during the current session.
If an image editing extension indicates that it does not support adjustment data, it is passed a copy of the modified image as it appeared at the end of the last editing session. This enables the user to perform additional editing tasks but does not allow previous edits to be undone. In the case of video editing extensions that do not support adjustment data, the extension will be passed the original video, and previous edits will be lost. Therefore, supporting adjustment data is an important requirement for video editing.
While the example contained within this tutorial will store and return adjustment data to the Photos app allowing for future improvements to the extension, it will not handle incoming adjustment data. Within the PhotoEditingViewController.swift file, therefore, locate and review the canHandle(adjustmentData:) method and verify that it is configured to return a false value:
|
You are reading a sample chapter from Building iOS 17 Apps using Xcode Storyboards.
Buy the full book now in eBook or Print format. The full book contains 96 chapters and 760 pages of in-depth information. |
func canHandle(_ adjustmentData: PHAdjustmentData) -> Bool {
    return false
}Code language: Swift (swift)
Receiving the Content
The next method called on the extension View Controller class is the startContentEditing method.
This method is passed as arguments a PHContentEditingInput object and a placeholder image. For images, this object contains a compressed version of the image suitable for displaying to the user, a URL referencing the location of the full-size image, information about the orientation of the image, and, in the case of extensions with adjustment data support, a set of adjustment data from previous edits.
As previously discussed, image extensions with adjustment data support implemented are passed the original image and a set of adjustments to be made to reach parity with the latest state of editing. Since it can take time to render these changes, the placeholder argument contains a snapshot of the image as it currently appears. This can be displayed to the user while the adjustment data is applied and the image is rendered in the background. For this example, the startContentEditing method will be implemented as follows:
import UIKit
import Photos
import PhotosUI

class PhotoEditingViewController: UIViewController, PHContentEditingController {

    @IBOutlet weak var imageView: UIImageView!

    var input: PHContentEditingInput?
    var displayedImage: UIImage?
    var imageOrientation: Int32?
.
.
    func startContentEditing(with contentEditingInput:
         PHContentEditingInput, placeholderImage: UIImage) {

        input = contentEditingInput

        if let input = input {
            displayedImage = input.displaySizeImage
            imageOrientation = input.fullSizeImageOrientation
            imageView.image = displayedImage
        }
    }
.
.
}Code language: Swift (swift)
The above changes declare two optional variables to reference the display-sized image and the image orientation.
The code in the method then assigns the display-sized image from the PHContentEditingInput object passed to the method to the displayedImage variable and also stores the orientation setting in the imageOrientation variable. Finally, the display-sized image is displayed on the Image View in the user interface so that it is visible to the user.
|
You are reading a sample chapter from Building iOS 17 Apps using Xcode Storyboards.
Buy the full book now in eBook or Print format. The full book contains 96 chapters and 760 pages of in-depth information. |
Compile and run the extension, selecting the Photos app as the host app, and verify that the extension displays a copy of the image in the Image View of the extension View Controller.
Implementing the Filter Actions
The actions connected to the Bar Button Items will change the image by applying Core Image sepia, monochrome, and invert filters. Until the user commits the edits made in the extension, any filtering will be performed only on the display-sized image to avoid the rendering delays that are likely to be incurred working on the full-sized image. Having performed the filter, the modified image will be displayed on the image view instance.
Remaining within the PhotoEditingViewController.swift file, implement the three action methods as follows:
class PhotoEditingViewController: UIViewController,
 PHContentEditingController {

    @IBOutlet weak var imageView: UIImageView!

    var input: PHContentEditingInput?
    var displayedImage: UIImage?
    var imageOrientation: Int32?
    var currentFilter = "CIColorInvert"

    override func viewDidLoad() {
        super.viewDidLoad()
        // Do any additional setup after loading the view.
    }

    @IBAction func sepiaSelected(_ sender: Any) {
        currentFilter = "CISepiaTone"

        if let image = displayedImage {
            imageView.image = performFilter(image,
                                            orientation: nil)
        }
    }

    @IBAction func monoSelected(_ sender: Any) {
        currentFilter = "CIPhotoEffectMono"

        if let image = displayedImage {
            imageView.image = performFilter(image,
                                            orientation: nil)
        }
    }

    @IBAction func invertSelected(_ sender: Any) {
        currentFilter = "CIColorInvert"

        if let image = displayedImage {
            imageView.image = performFilter(image,
                                            orientation: nil)
        }
    }
.
.
}Code language: Swift (swift)
In each case, a method named performFilter is called to perform the image filtering task. The next step is to implement this method using the techniques outlined in the chapter entitled Drawing iOS 2D Graphics with Core Graphics:
func performFilter(_ inputImage: UIImage, orientation: Int32?)
    -> UIImage?
{
    var resultImage: UIImage?
    var cimage: CIImage

    cimage = CIImage(image: inputImage)!

    if let orientation = orientation {
        cimage = cimage.oriented(forExifOrientation: orientation)
    }

    if let filter = CIFilter(name: currentFilter) {
        filter.setDefaults()
        filter.setValue(cimage, forKey: "inputImage")

        switch currentFilter {

            case "CISepiaTone", "CIEdges":
                filter.setValue(0.8, forKey: "inputIntensity")

            case "CIMotionBlur":
                filter.setValue(25.00, forKey:"inputRadius")
                filter.setValue(0.00, forKey:"inputAngle")

            default:
                break
        }

        if let ciFilteredImage = filter.outputImage {
            let context = CIContext(options: nil)
            if let cgImage = context.createCGImage(ciFilteredImage,
                         from: ciFilteredImage.extent) {
                resultImage = UIImage(cgImage: cgImage)
            }
        }
    }
    return resultImage
}Code language: Swift (swift)
The above method takes the image passed through as a parameter, takes steps to maintain the original orientation, and performs an appropriately configured filter operation on the image based on the value assigned to the currentFilter variable. The filtered image is then returned to the calling method.
|
You are reading a sample chapter from Building iOS 17 Apps using Xcode Storyboards.
Buy the full book now in eBook or Print format. The full book contains 96 chapters and 760 pages of in-depth information. |
Compile and run the extension again, this time using the filter buttons to change the appearance of the displayed image.
Returning the Image to the Photos App
When the user has finished making changes to the image and touches the Done button located in the extension toolbar, the finishContentEditing(completionHandler:) method of the View Controller is called. This is passed a reference to a completion handler which must be called once the image has been rendered and is ready to be returned to the Photos app.
Before calling the completion handler, however, this method performs the following tasks:
- Obtains a copy of the full-size version of the image.
- Ensures that the original orientation of the image is preserved through the rendering process.
- Applies to the full-sized image all of the editing operations previously performed on the display-sized image.
- Renders the new version of the full-sized image.
- Packages up the adjustment data outlining the edits performed during the session.
Since the above tasks (particularly the rendering phase) are likely to take time, these must be performed within a separate asynchronous thread. The code to complete this example extension can now be implemented within the template stub of the method as follows:
func finishContentEditing(completionHandler: @escaping ((PHContentEditingOutput?) -> Void)) {
    // Update UI to reflect that editing has finished, and output is being rendered.

    // Render and provide output on a background queue.
    DispatchQueue.global().async {
        // Create editing output from the editing input.
        if let input = self.input {
            let output = PHContentEditingOutput(contentEditingInput: input)

            let url = self.input?.fullSizeImageURL

            if let imageUrl = url,
                let fullImage = UIImage(contentsOfFile: imageUrl.path),
                let resultImage = self.performFilter(fullImage,
                               orientation: self.imageOrientation) {

                if let renderedJPEGData =
                    resultImage.jpegData(compressionQuality: 0.9)  {
                    try! renderedJPEGData.write(to:
                        output.renderedContentURL)
                }

                do {
                    let archivedData =
                     try NSKeyedArchiver.archivedData(
                             withRootObject: self.currentFilter,
                      requiringSecureCoding: true)

                    let adjustmentData =
                        PHAdjustmentData(formatIdentifier:
                            "com.ebookfrenzy.photoext",
                                         formatVersion: "1.0",
                                         data: archivedData)

                    output.adjustmentData = adjustmentData
                } catch {
                    print("Unable to archive image data")
                }
            }
            completionHandler(output)
        }
    }
}Code language: Swift (swift)
The code begins by creating a new instance of the PHContentEditingOutput class, initialized with the content of the input object originally passed into the extension:
|
You are reading a sample chapter from Building iOS 17 Apps using Xcode Storyboards.
Buy the full book now in eBook or Print format. The full book contains 96 chapters and 760 pages of in-depth information. |
if let input = self.input {
    let output = PHContentEditingOutput(contentEditingInput: input)Code language: Swift (swift)
Next, the URL of the full-sized version of the image is extracted from the original input object, and the corresponding image is loaded into a UIImage instance. The full-sized image is then filtered via a call to the performFilter method:
if let imageUrl = url,
   let fullImage = UIImage(contentsOfFile: imageUrl.path),
   let resultImage = self.performFilter(fullImage,
                                    orientation: self.imageOrientation) {Code language: Swift (swift)
With the editing operations now applied to the full-sized image, it is rendered into JPEG format and written out to a location specified by the URL assigned to the renderedContentURL property of the previously created PHContentEditingOutput instance:
if let renderedJPEGData =
     resultImage.jpegData(compressionQuality: 0.9)  {
     try! renderedJPEGData.write(to: output.renderedContentURL)
}Code language: Swift (swift)
Although the extension had previously indicated that it could not accept adjustment data, returning adjustment data reflecting the edits performed on the image to the Photos app is mandatory. For this tutorial, the name of the Core Image filter used to modify the image is archived into a Data instance with a revision number and a unique identifier. This object is then packaged into a PHAdjustmentData instance and assigned to the adjustmentData property of the output object:
let archivedData = try NSKeyedArchiver.archivedData(
                             withRootObject: self.currentFilter,
                             requiringSecureCoding: true)
let adjustmentData =
            PHAdjustmentData(formatIdentifier:
                                 "com.ebookfrenzy.photoext",
                             formatVersion: "1.0",
                             data: archivedData)

output.adjustmentData = adjustmentDataCode language: Swift (swift)
If the extension were to be enhanced to handle adjustment data, code would need to be added to the canHandle(adjustmentData:) method to compare the formatVersion and formatIdentifier values from the incoming adjustment data with those specified in the outgoing data to verify that the data is compatible with the editing capabilities of the extension.
Finally, the completion handler is called and passed the fully configured output object. At this point, control will return to the Photos app, and the modified image will appear on the editing screen.
|
You are reading a sample chapter from Building iOS 17 Apps using Xcode Storyboards.
Buy the full book now in eBook or Print format. The full book contains 96 chapters and 760 pages of in-depth information. |
Testing the App
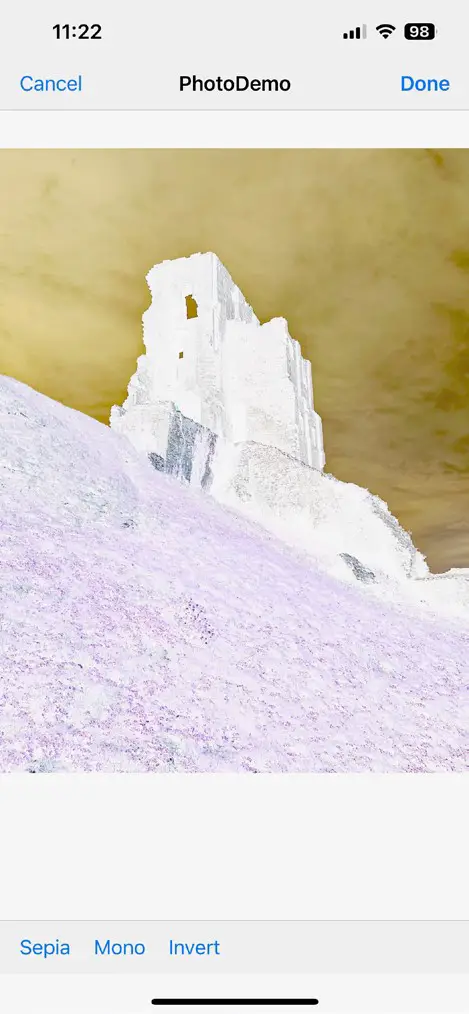
Build and run the extension using the Photos app as the host and take the familiar steps to select an image and invoke the newly created Photo Editing extension. Use a toolbar button to change the image’s appearance before tapping the Done button. The modified image will subsequently appear within the Photos app editing screen (Figure 76-8 shows the results of the invert filter), where the changes can be committed or discarded:
Summary
The Photo Editing extension allows the image editing capabilities of a containing app to be accessed from within the standard iOS Photos app. A Photo Editing extension takes the form of a view controller, which implements the PHContentEditingController protocol and the protocol’s associated delegate methods.