
In this, the last chapter dedicated to the Sprite Kit framework, the use of the Particle Emitter class and editor to add special effects to Sprite Kit-based games will be covered. Having provided an overview of the various elements that make up particle emitter special effects, the SpriteKitDemo app will be extended using particle emitter features to make the balls burst when an arrow hits. This will also involve the addition of an audio action.
What is the Particle Emitter?
The Sprite Kit particle emitter is designed to add special effects to games. It comprises the SKEmitterNode class and the Particle Emitter Editor bundled with Xcode. A particle emitter special effect begins with an image file representing the particle. The emitter generates multiple instances of the particle on the scene and animates each particle subject to a set of properties. These properties control aspects of the special effect, such as the rate of particle generation, the angle, and speed of motion of particles, whether or not particles rotate, and how the particles blend in with the background.
With some time and experimentation, a wide range of special effects, from smoke to explosions, can be created using particle emitters.
The Particle Emitter Editor
The Particle Emitter Editor is built into Xcode and provides a visual environment to design particle emitter effects. In addition to providing a platform for developing custom effects, the editor also offers a collection of pre-built particle-based effects, including rain, fire, magic, snow, and sparks. These template effects also provide an excellent starting point on which to base other special effects.
Within the editor environment, a canvas displays the current particle emitter configuration. A settings panel allows the various properties of the emitter node to be changed, with each modification reflected in the canvas in real time, thereby making creating and refining special effects much easier. Once the design of the special effect is complete, the effect is saved in a Sprite Kit particle file. This file actually contains an archived SKEmitterNode object configured to run the particle effects designed in the editor.
 |
You are reading a sample chapter from Building iOS 17 Apps using Xcode Storyboards.
Buy the full book now in eBook or Print format. The full book contains 96 chapters and 760 pages of in-depth information. |
The SKEmitterNode Class
The SKEmitterNode displays and runs the particle emitter effect within a Sprite Kit game. As with other Sprite Node classes, the SKEmitterNode class has many properties and behaviors of other classes in the Sprite Kit family. Generally, an SKEmitterNode class is created and initialized with a Sprite Kit particle file created using the Particle Emitter editor. The following code fragment, for example, initializes an SKEmitterNode instance with a particle file, configures it to appear at a specific position within the current scene, and adds it to the scene so that it appears within the game:
if let burstNode = SKEmitterNode(fileNamed: "BurstParticle.sks") {
    burstNode.position = CGPoint(x: target_x, y: target_y)
    secondNode.removeFromParent()
    self.addChild(burstNode)
}Code language: Swift (swift)
Once created, all of the emitter properties available within the Particle Emitter Editor are also controllable from within the code, allowing the effect’s behavior to be changed in real time. The following code, for example, adjusts the number of particles the emitter is to emit before ending:
burstNode.numParticlesToEmit = 400Code language: Swift (swift)In addition, actions may be assigned to particles from within the app code to add additional behavior to a special effect. The particles can, for example, be made to display an animation sequence.
Using the Particle Emitter Editor
By far, the easiest and most productive approach to designing particle emitter-based special effects is to use the Particle Emitter Editor tool bundled with Xcode. To experience the editor in action, launch Xcode and create a new iOS Game-based project named ParticleDemo with the Language menu set to Swift.
Once the new project has been created, select the File -> New -> File… menu option. Then, in the resulting panel, choose the SpriteKit Particle File template option as outlined in Figure 95-1:
|
You are reading a sample chapter from Building iOS 17 Apps using Xcode Storyboards.
Buy the full book now in eBook or Print format. The full book contains 96 chapters and 760 pages of in-depth information. |
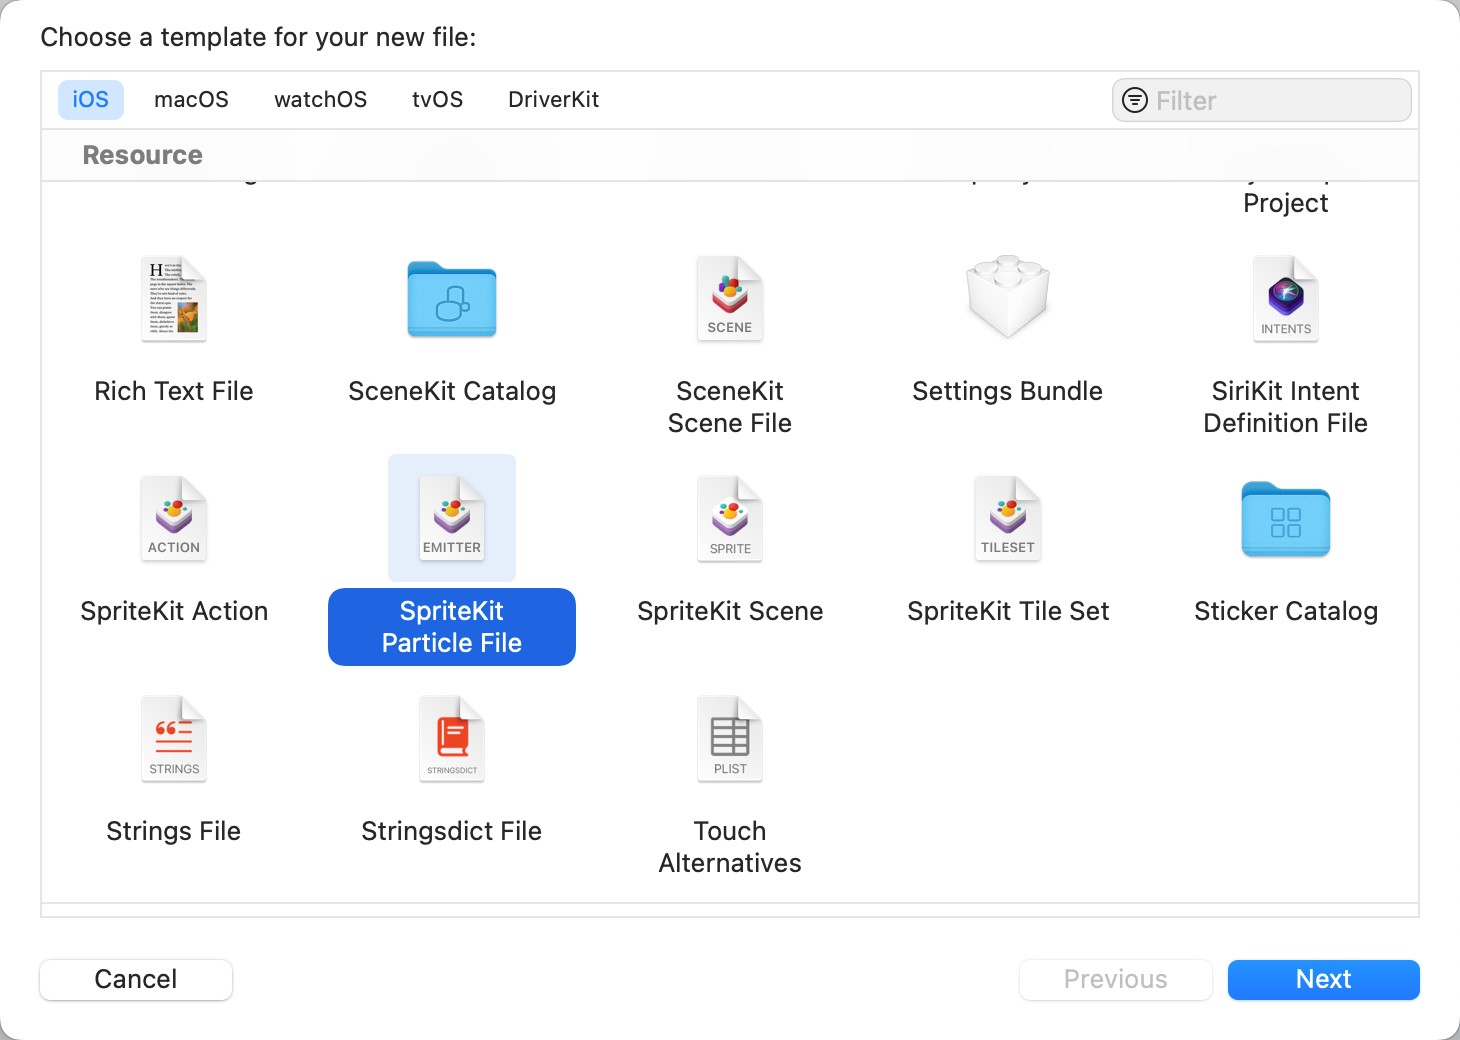
Click Next and choose a Particle template on which to base the special effect. For this example, we will use the Fire template. Click Next and name the file RocketFlame before clicking on Create.
At this point, Xcode will have added two files to the project. One is an image file named spark.png representing the particle, and the other is the RocketFlame.sks file containing the particle emitter configuration. In addition, Xcode should also have pre-loaded the Particle Emitter Editor panel with the fire effect playing in the canvas, as shown in Figure 95-2 (the editor can be accessed at any time by selecting the corresponding sks file in the project navigator panel).
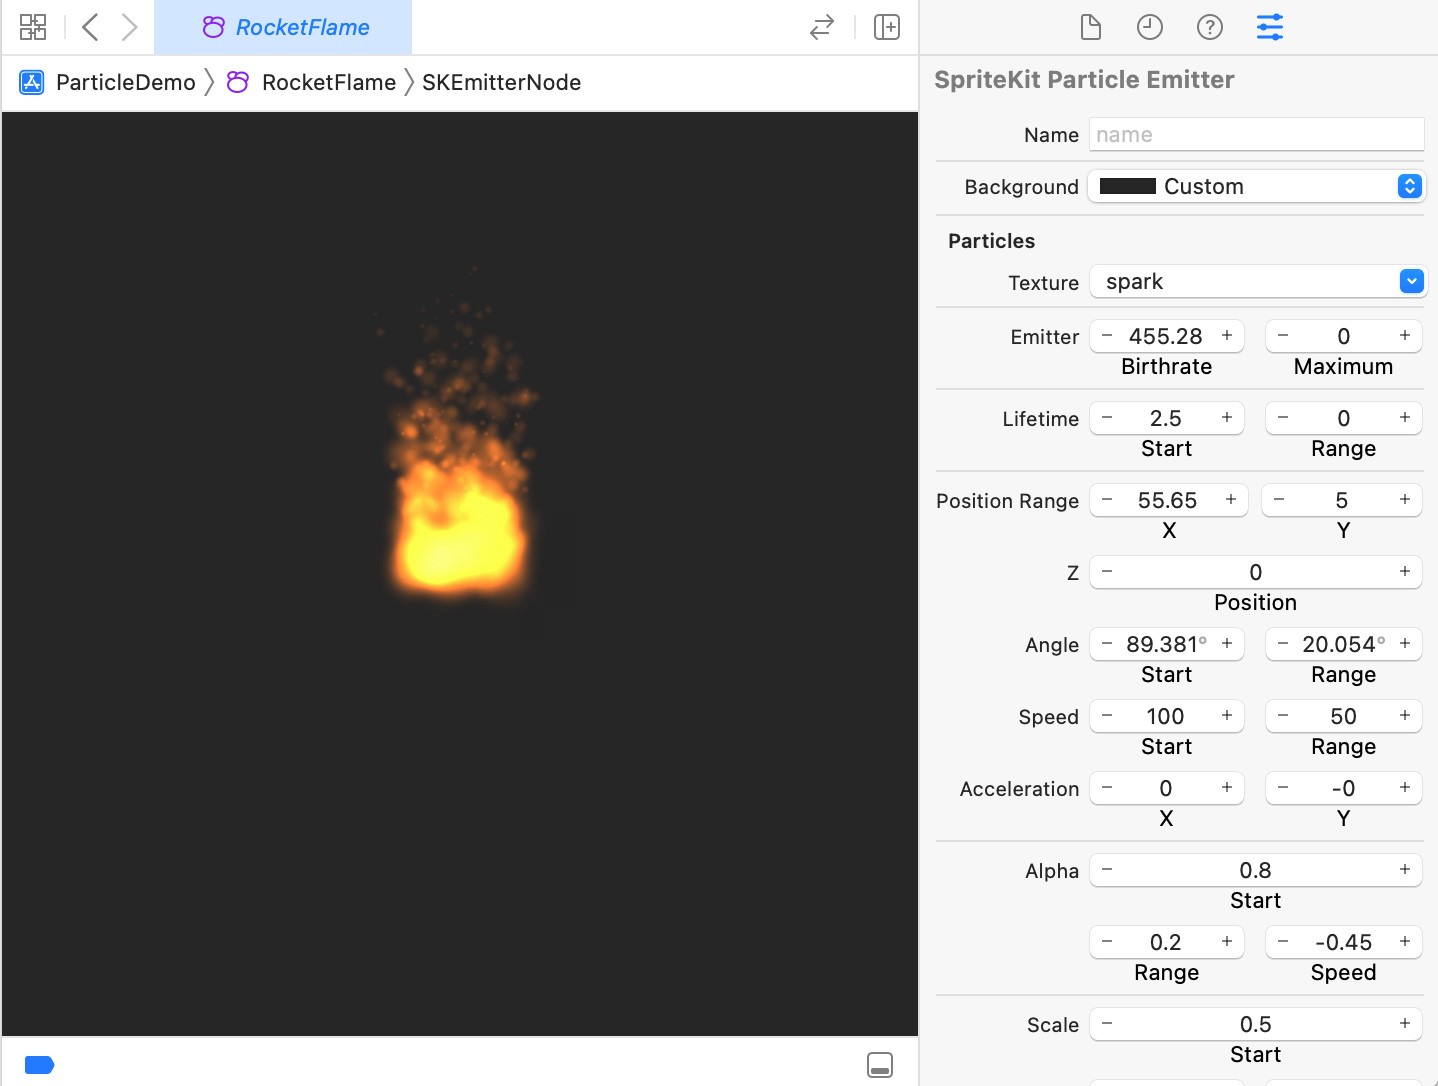
The right-hand panel of the editor provides access to and control of all of the properties associated with the emitter node. To access these property settings, click the right-hand toolbar button in the right-hand panel.
Much about particle emitter special effects can be learned through experimentation with the particle editor. However, before modifying the fire effects in this example, it will be helpful to provide an overview of what these properties do.
Particle Emitter Node Properties
A range of property settings controls the behavior of a particle emitter and associated particles. These properties can be summarized as follows:
|
You are reading a sample chapter from Building iOS 17 Apps using Xcode Storyboards.
Buy the full book now in eBook or Print format. The full book contains 96 chapters and 760 pages of in-depth information. |
Background
Though presented as an option within the editor, this is not actually a property of the emitter node. This option is provided so that the appearance of the effect can be tested against different backgrounds. This is particularly important when the particles are configured to blend with the background. Use this setting to test the particle effects against any background colors the effect is likely to appear with within the game.
Particle Texture
The image file containing the texture that will be used to represent the particles within the emitter.
Particle Birthrate
The birthrate defines the rate at which the node emits new particles. The greater the value, the faster new particles are generated. However, it is recommended that the minimum number of particles needed to achieve the desired effect be used to avoid performance degradation. Therefore, the total number of particles emitted may also be specified. A value of zero causes particles to be emitted indefinitely. If a limit is specified, the node will stop emitting particles when that value is reached.
Particle Life Cycle
The lifetime property controls the time in seconds a particle lives (and is therefore visible) before disappearing from view. The range property may be used to introduce variance in the lifetime from one particle to the next based on a random time value between 0 and the specified range value.
Particle Position Range
The position properties define the location from which particles are created. For example, the X and Y values can be used to declare an area around the center of the node location from which particles will be created randomly.
|
You are reading a sample chapter from Building iOS 17 Apps using Xcode Storyboards.
Buy the full book now in eBook or Print format. The full book contains 96 chapters and 760 pages of in-depth information. |
Angle
The angle at which a newly emitted particle will travel away from the creation point in counter-clockwise degrees, where a value of 0 degrees equates to rightward movement. Random variance in direction can be introduced via the range property.
Particle Speed
The speed property specifies the particles’ initial speed at the creation time. The speed can be randomized by specifying a range value.
Particle Acceleration
The acceleration properties control the degree to which a particle accelerates or decelerates after emission in terms of both X and Y directions.
Particle Scale
The size of the particles can be configured to change using the scale properties. These settings cause the particles to grow or shrink throughout their lifetimes. Random resizing behavior can be implemented by specifying a range value. The speed setting controls the speed with which the size changes take place.
Particle Rotation
The rotation properties control the speed and amount of rotation applied to the particles after creation. Values are specified in degrees, with positive and negative values correlating to clockwise and counter-clockwise rotation. In addition, the speed of rotation may be specified in degrees per second.
|
You are reading a sample chapter from Building iOS 17 Apps using Xcode Storyboards.
Buy the full book now in eBook or Print format. The full book contains 96 chapters and 760 pages of in-depth information. |
Particle Color
The particles created by an emitter can be configured to transition through a range of colors during a lifetime. To add a new color in the lifecycle timeline, click on the color ramp at the location where the color is to change and select a new color. Change an existing color by double-clicking the marker to display the color selection dialog.
Figure 95-3, for example, shows a color ramp with three color transitions specified:
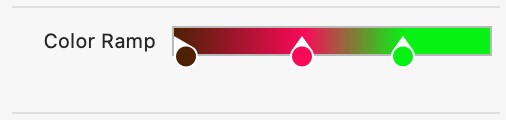
To remove a color from the color ramp, click and drag it downward out of the editor panel.
The color blend settings control the amount by which the colors in the particle’s texture blend with the prevailing color in the color ramp at any given time during the particle’s life. The greater the Factor property, the greater the colors blend, with 0 indicating no blending. By adjusting the speed property, the blending factor can be randomized by specifying a range and the speed at which the blend is performed.
Particle Blend Mode
The Blend Mode property governs how particles blend with other images, colors, and graphics in Sprite Kit game scenes. Options available are as follows:
|
You are reading a sample chapter from Building iOS 17 Apps using Xcode Storyboards.
Buy the full book now in eBook or Print format. The full book contains 96 chapters and 760 pages of in-depth information. |
- Alpha – Blends transparent pixels in the particle with the background.
- Add – Adds the particle pixels to the corresponding background image pixels.
- Subtract – Subtracts the particle pixels from the corresponding background image pixels.
- Multiply – Multiplies the particle pixels by the corresponding background image pixels—resulting in a darker particle effect.
- MultiplyX2 – This creates a darker particle effect than the standard Multiply mode.
- Screen – Inverts pixels, multiplies, and inverts a second time—resulting in lighter particle effects. • Replace – No blending with the background. Only the particle’s colors are used.
Experimenting with the Particle Emitter Editor
Creating compelling special effects with the particle emitter is largely a case of experimentation. As an example of adapting a template effect for another purpose, we will now modify the fire effect in the RocketFlame.sks file so that instead of resembling a campfire, it could be attached to the back of a sprite to represent the flame of a rocket launching into space.
Within Xcode, select the previously created RocketFlame.sks file so that it loads into the Particle Emitter Editor. The animation should appear and resemble a campfire, as illustrated in Figure 95-2.
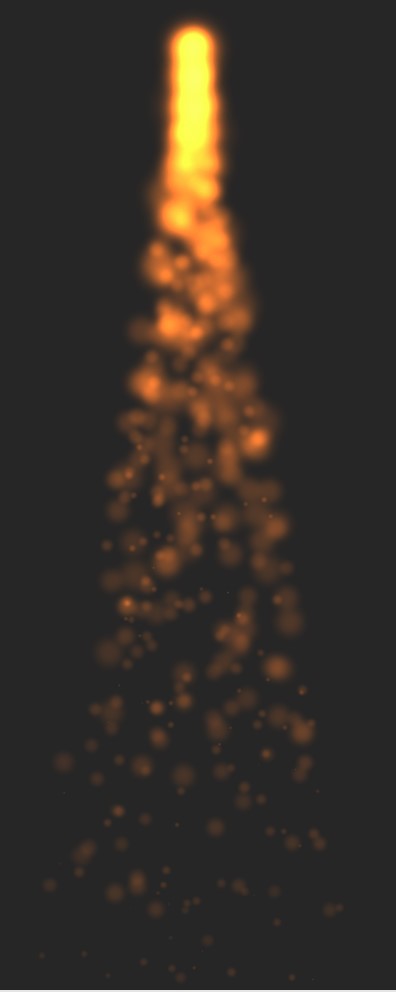
- The first step in modifying the effect is to change the angle of the flames so that they burn downwards. To achieve this, change the Start property of the Angle setting to 270 degrees. The fire should now be inverted.
- Change the X value of the Position Range property to 5 so that the flames become narrower and more intense.
- Increase the Start value of the Speed property to 450.
- Change the Lifetime start property to 7.
The effect now resembles the flames a user might expect to see shooting out of the back of a rocket against a nighttime sky (Figure 95-4). Note also that the effects of the motion of the emitter node may be simulated by clicking and dragging the node around the canvas.
Bursting a Ball using Particle Emitter Effects
The final task is to update the SpriteKitDemo game so that the balls burst when they are hit by an arrow shot by the archer sprite.
The particles for the bursting ball will be represented by the BallFragment.png file located in the sample code download archive in the sprite_images folder. Open the SpriteKitDemo project within Xcode, locate the BallFragment.png file in a Finder window, and drag and drop it onto the list of image sets in the Assets file.
|
You are reading a sample chapter from Building iOS 17 Apps using Xcode Storyboards.
Buy the full book now in eBook or Print format. The full book contains 96 chapters and 760 pages of in-depth information. |
Select the File -> New -> File… menu option and, in the resulting panel, select the SpriteKit Particle File template option. Click Next, and on the template screen, select the Spark template. Click Next, name the file BurstParticle, and click Create.
The Particle Emitter Editor will appear with the spark effect running. Since the scene on which the effect will run has a white background, click on the black swatch next to Background in the Attributes Inspector panel and change the color to white.
Click on the Particles Texture drop-down menu, select the BallFragment image, and change the Blend Mode menu to Alpha.
Many ball fragments should now be visible, blended with the yellow color specified in the ramp. Set the Emitter Birthrate property to 15 to reduce the number of particles emitted. Click on the yellow marker at the start of the color ramp and change the color to White in the resulting color dialog. The particles should now look like fragments of the ball used in the game.
The fragments of a bursting ball would be expected to originate from any part of the ball. As such, the Position Range X and Y values need to match the dimensions of the ball. Set both of these values to 86 accordingly.
|
You are reading a sample chapter from Building iOS 17 Apps using Xcode Storyboards.
Buy the full book now in eBook or Print format. The full book contains 96 chapters and 760 pages of in-depth information. |
Finally, limit the number of particles by changing the Emitter Maximum property in the Particles section to 8. The burst particle effect is now ready to be incorporated into the game logic.
Adding the Burst Particle Emitter Effect
When an arrow scores a hit on a ball node, the ball node will be removed from the scene and replaced with a BurstParticle SKEmitterNode instance. To implement this behavior, edit the ArcheryScene.swift file and modify the didBegin(contact:) method to add a new method call to extract the SKEmitterNode from the archive in the BurstParticle file, remove the ball node from the scene and replace it at the same position with the emitter:
func didBegin(_ contact: SKPhysicsContact) {
    let secondNode = contact.bodyB.node as! SKSpriteNode

    if (contact.bodyA.categoryBitMask == arrowCategory) &&
        (contact.bodyB.categoryBitMask == ballCategory) {

        let contactPoint = contact.contactPoint
        let contact_y = contactPoint.y
        let target_x = secondNode.position.x
        let target_y = secondNode.position.y
        let margin = secondNode.frame.size.height/2 - 25

        if (contact_y > (target_y - margin)) &&
            (contact_y < (target_y + margin)) {

            if let burstNode = SKEmitterNode(fileNamed: "BurstParticle.sks")
            {
                burstNode.position = CGPoint(x: target_x, y: target_y)
                secondNode.removeFromParent()
                self.addChild(burstNode)
            }
            score += 1
        }
    }
}Code language: Swift (swift)
Compile and run the app. For example, when an arrow hits a ball, it should now be replaced by the particle emitter effect:

Adding an Audio Action
The final effect to add to the game is a bursting sound when an arrow hits the ball. We will again use the Xcode Action Editor to add this effect.
Begin by adding the sound file to the project. This file is named burstsound.mp3 and is located in the audiofiles folder of the book code samples download. Locate this file in a Finder window and drag it onto the Project Navigator panel. In the resulting panel, enable the Copy items if needed option and click on Finish.
|
You are reading a sample chapter from Building iOS 17 Apps using Xcode Storyboards.
Buy the full book now in eBook or Print format. The full book contains 96 chapters and 760 pages of in-depth information. |
Within the Project Navigator panel, select the ArcherScene.sks file. Then, from the Library panel, locate the PlaySound-File-Named-Action object and drag and drop it onto the timeline so that it is added to the archerNode object:
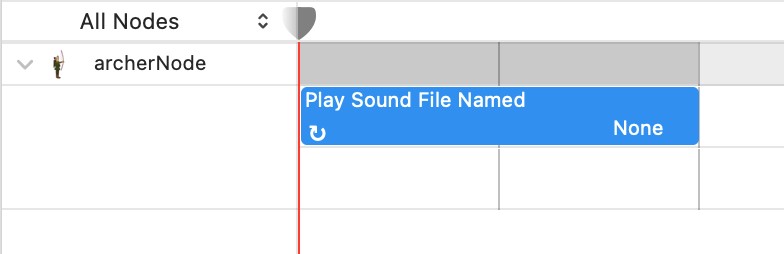
Select the new action object in the timeline and use the Attributes Inspector panel to set the Filename property to the burstsound file.
Right-click on the sound action and select the Convert to Reference menu option. Name the reference audioAction and click on the Create button. The action has now been saved to the ArcherActions.sks file. Next, select the object in the timeline, right-click, and select the Delete option to remove it from the scene file. Finally, modify the didBegin(contact:) method to play the sound action when a ball bursts:
func didBegin(_ contact: SKPhysicsContact) {
    let secondNode = contact.bodyB.node as! SKSpriteNode

    if (contact.bodyA.categoryBitMask == arrowCategory) &&
        (contact.bodyB.categoryBitMask == ballCategory) {

        let contactPoint = contact.contactPoint
        let contact_y = contactPoint.y
        let target_x = secondNode.position.x
        let target_y = secondNode.position.y
        let margin = secondNode.frame.size.height/2 - 25

        if (contact_y > (target_y - margin)) &&
            (contact_y < (target_y + margin)) {
            print("Hit")

            if let burstNode = SKEmitterNode(fileNamed: "BurstParticle.sks")
            {
                burstNode.position = CGPoint(x: target_x, y: target_y)
                secondNode.removeFromParent()
                self.addChild(burstNode)
                if let audioAction = SKAction(named: "audioAction") {
                    burstNode.run(audioAction)
                }
            }
            score += 1
        }
    }
}Code language: Swift (swift)
Run the app and verify that the sound file plays when a hit is registered on a ball.
Summary
The particle emitter allows special effects to be added to Sprite Kit games. All that is required is an image file to represent the particles and some configuration of the particle emitter properties. This work can be simplified using the Particle Emitter Editor included with Xcode. The editor is supplied with a set of pre-configured special effects, such as smoke, fire, and rain, which can be used as supplied or modified to meet many special effects needs.
|
You are reading a sample chapter from Building iOS 17 Apps using Xcode Storyboards.
Buy the full book now in eBook or Print format. The full book contains 96 chapters and 760 pages of in-depth information. |