
Since the introduction of iOS 9, users can display and interact with two apps side by side on the iPad screen, a concept referred to as multitasking. Although the inclusion of support for multitasking within an iOS iPad app is optional, enabling support where appropriate is recommended to provide the user with the best possible experience when using the app.
This chapter will provide an introduction to multitasking in terms of what it means to the user and the steps that can be taken to effectively adopt and support multitasking within an iOS app running on an iPad device. Once these areas have been covered, the next chapter (An iPadOS Multitasking Example) will create an example project designed to support multitasking.
Before reading this chapter, it is important to understand that multitasking support makes extensive use of both the Size Classes and Auto Layout features of iOS, topics which were covered in the An Introduction to Auto Layout in iOS 17 and Using Trait Variations to Design Adaptive iOS 17 User Interfaces chapters of this book.
Using iPad Multitasking
Before implementing multitasking support for an iPad app, it is first essential to understand multitasking from the user’s perspective. Traditionally, when an app was launched from the iPad screen, it would fill the entire display and continue to do so until placed into the background by the user. However, since the introduction of iOS 9, two apps can now share the iPad display.
Multitasking mode is initiated by tapping the three gray dots at the top of the screen to display the menu shown in Figure 33-1:
 |
You are reading a sample chapter from Building iOS 17 Apps using Xcode Storyboards.
Buy the full book now in eBook or Print format. The full book contains 96 chapters and 760 pages of in-depth information. |
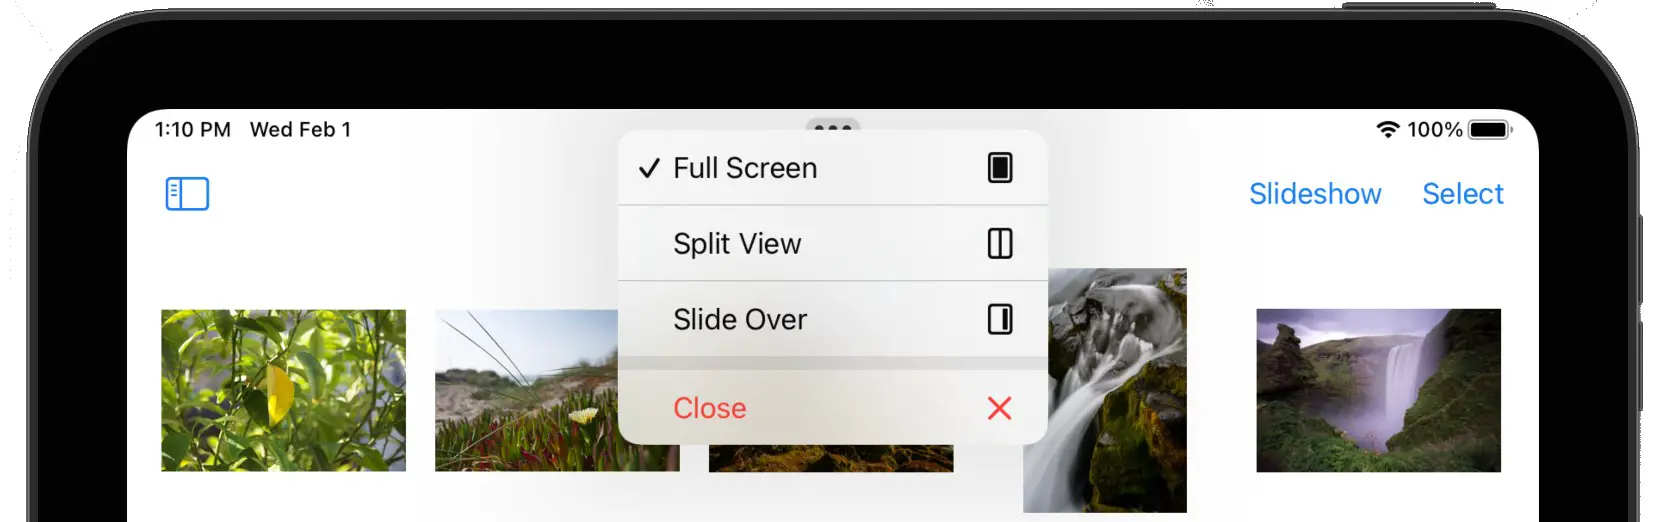
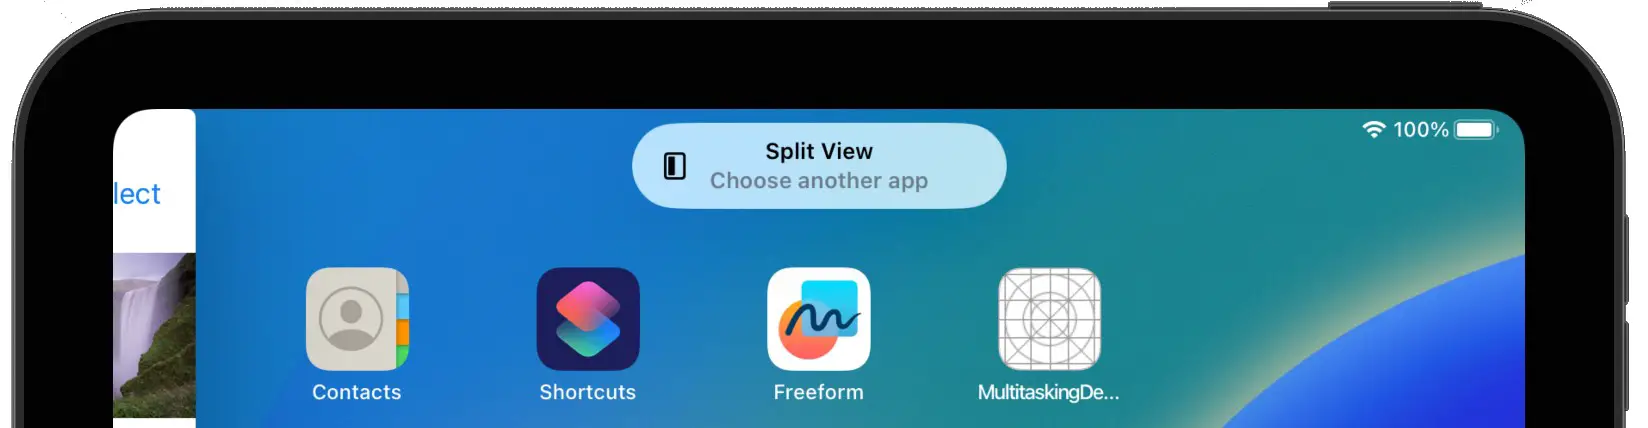
The Full Screen option, as the name suggests, will make the app currently in the foreground occupy the full device screen. On the other hand, the Split View option will split the screen between the current app and any other app of your choice. When selected, the current app will slide to the size allowing you to choose a second app from the launch screen:
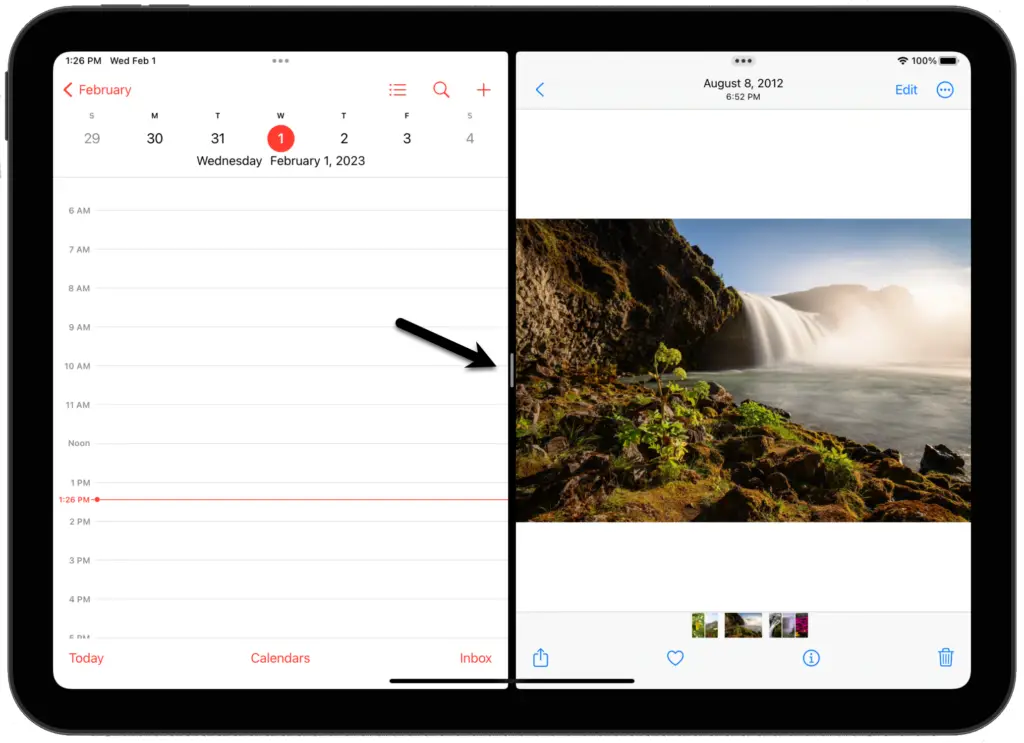
Once a second app has been selected, both apps will appear in adjacent panels. Once the display is in Split View mode, touching and dragging the narrow white button located in the divider between the two panels (indicated in Figure 33-3) allows the position of the division between the primary and secondary apps to be adjusted:
In Slide Over Mode, the app will appear in a floating window, as is the case in Figure 33-4 below:
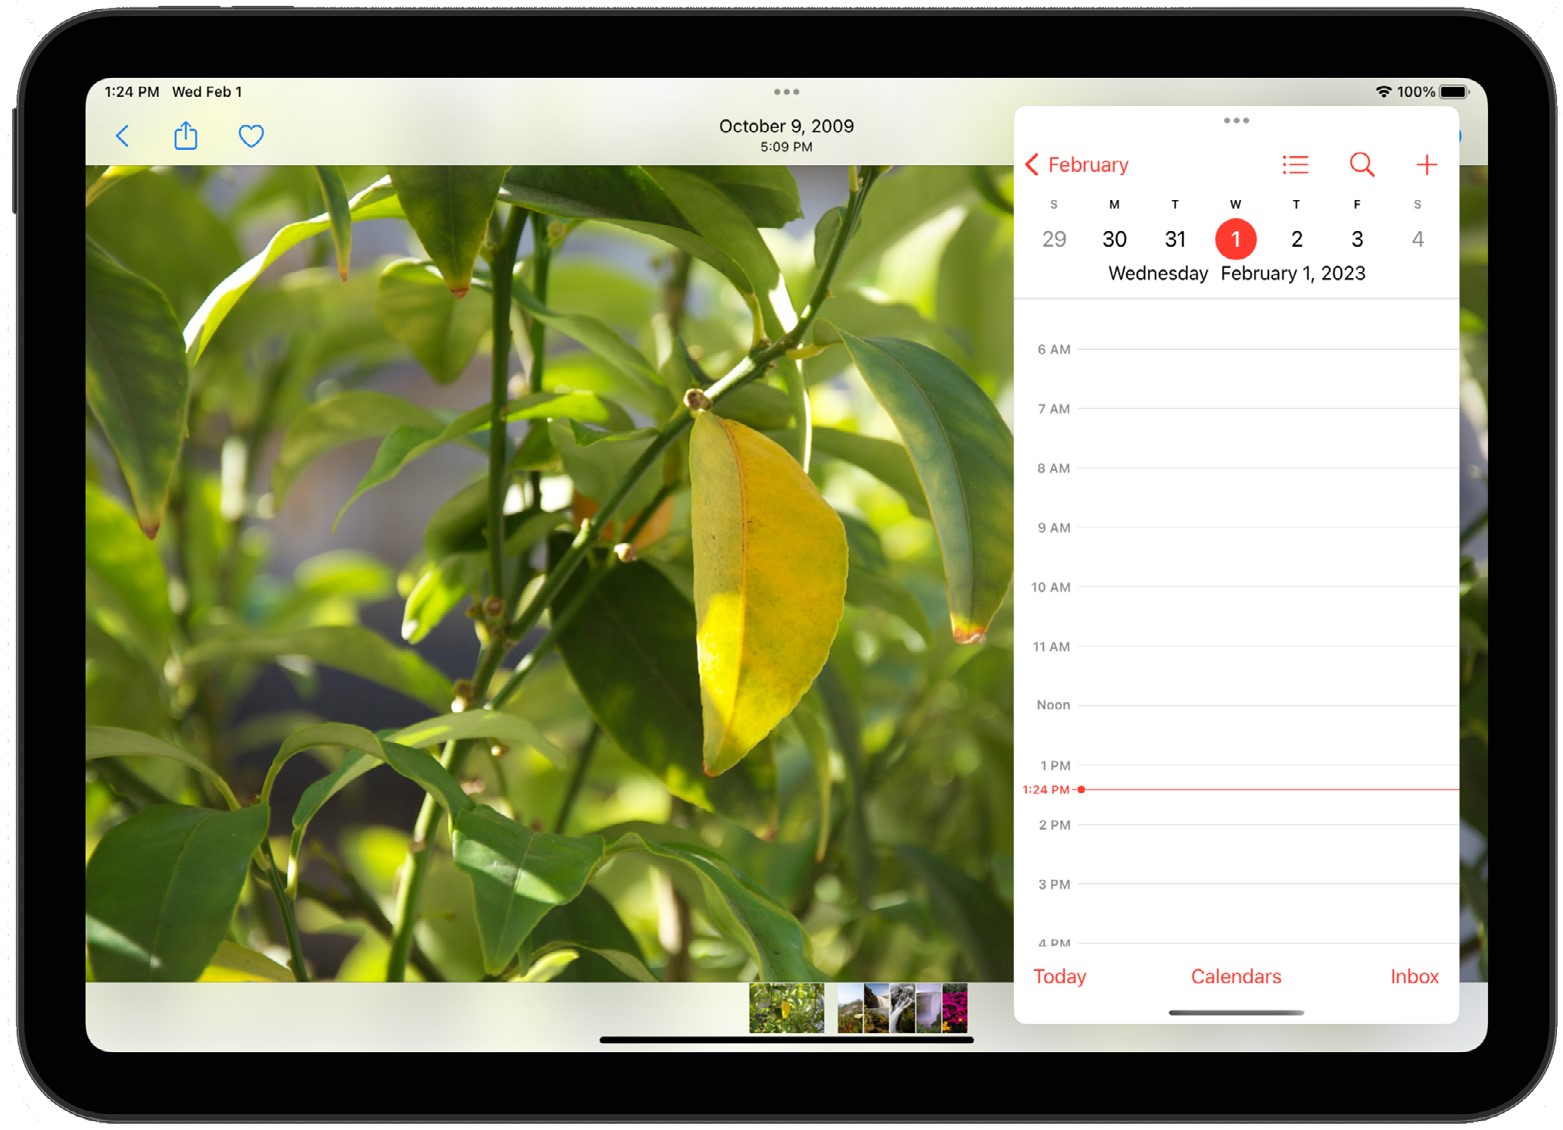
The three dots at the top of the secondary app can move the slide-over window to the left or right side of the screen by touching and dragging.
To hide a Slide Over view app, drag it sideways off the right side of the screen. Then, swipe left from the righthand screen edge to restore the app.
|
You are reading a sample chapter from Building iOS 17 Apps using Xcode Storyboards.
Buy the full book now in eBook or Print format. The full book contains 96 chapters and 760 pages of in-depth information. |
Picture-In-Picture Multitasking
In addition to Split View and Slide Over modes, multitasking also supports the presentation of a movable and resizable video playback window over the top of the primary app window. This topic will be covered in the chapter entitled An iPadOS Multitasking Example.
Multitasking and Size Classes
A key part of supporting multitasking involves ensuring that the storyboard scenes within an app can adapt to various window sizes. Each of the different window sizes an app will likely encounter in a multitasking mode corresponds to one of the existing size classes outlined in the chapter entitled Using Trait Variations to Design Adaptive iOS 17 User Interfaces. As outlined in that chapter, the height and width available to an app are classified as compact or regular. So, for example, an app running in portrait mode on an iPhone 14 would use the compact width and regular height size class, while the same app running in portrait orientation would use the regular width and compact height size class.
When running in a multitasking environment, the primary and secondary apps will pass through a range of compact and regular widths depending on the prevailing multitasking configuration. The diagrams in Figure 33-4 illustrate how the different multitasking modes translate to equivalent regular and compact-size classes.
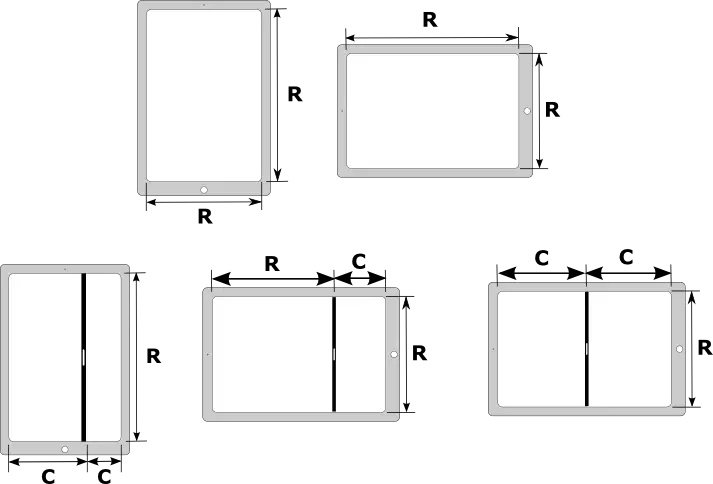
The above rules change slightly when the app runs in Split View mode on an iPad Pro. Due to the larger screen size of the iPad Pro, both apps are presented in Split View mode using the regular width, as illustrated in Figure 33-6:

Implementing multitasking support within an iOS app involves designing layouts that adapt appropriately to the different size classes outlined in the above diagram.
|
You are reading a sample chapter from Building iOS 17 Apps using Xcode Storyboards.
Buy the full book now in eBook or Print format. The full book contains 96 chapters and 760 pages of in-depth information. |
Handling Multitasking in Code
Much can be achieved using Auto Layout and Size Classes to adapt to the size changes associated with multitasking. There will, however, inevitably be instances where some code needs to be executed when a scene transitions from one size class to another (for example, when an app transitions from Slide Over to Split View). Fortunately, UIKit will call three delegate methods on the container instance (typically a view controller) of the current scene during the transition to notify it of the transition where code can be added to perform app-specific tasks at different points in the transition. These delegate methods are outlined below in the order in which they are called during the transition:
willTransition(to newcollection: with coordinator:)
This method is called immediately before the traits for the currently displayed view controller view are changed. For example, the UITraitCollection class represents a trait, which contains a collection of values consisting of size class settings, the display density of the screen, and the user interface idiom (which is simply a value indicating whether the device is on which the app is running is an iPhone or iPad).
When called, this method is passed a UITraitCollection object containing the new trait collection from which information can be accessed and used to decide how to respond to the transition. The following code, for example, checks that the app is running on an iPad before identifying whether the horizontal size class is transitioning to a regular or compact size class:
override func willTransition(to newCollection: UITraitCollection, with
	coordinator: UIViewControllerTransitionCoordinator) {

    super.willTransition(to: newCollection,
                with: coordinator)

    if newCollection.userInterfaceIdiom == .pad
        if newCollection.horizontalSizeClass == .regular {
               // Transitioning to Regular Width Size Class
        } else if newCollection.horizontalSizeClass == .compact {
               // Transitioning to Compact Width Size Class
        }
    }
}Code language: Swift (swift)
The second argument passed through to the method is a UIViewControllerTransitionCoordinator object. This is the coordinator object that is handling the transition and can be used to add additional animations to those being performed by UIKit during the transition.
viewWillTransition(to size: with coordinator:)
This method is also called before the size change is implemented and is passed a CGSize value and a coordinator object. The size object can be used to obtain the new height and width to which the view is transitioning. The following sample code outputs the new height and width values to the console:
|
You are reading a sample chapter from Building iOS 17 Apps using Xcode Storyboards.
Buy the full book now in eBook or Print format. The full book contains 96 chapters and 760 pages of in-depth information. |
override func viewWillTransition(to size: CGSize,
                         with coordinator:
    UIViewControllerTransitionCoordinator) {

    super.viewWillTransition(to: size,
                             with: coordinator)

    print("Height = \(size.height), Width = \(size.width)")
}Code language: Swift (swift)
traitCollectionDidChange(_:)
This method is called once the transition from one trait collection to another is complete and is passed the UITraitCollection object for the previous trait. In the following example implementation, the method checks to find out whether the previous horizontal size class was regular or compact:
override func traitCollectionDidChange(_ previousTraitCollection:
                UITraitCollection?) {

    super.traitCollectionDidChange(previousTraitCollection)

    if previousTraitCollection?.horizontalSizeClass == .regular {
        // The previous horizontal size class was regular
    }

    if previousTraitCollection?.horizontalSizeClass == .compact {
        // The previous horizontal size class was compact
    }
}Code language: Swift (swift)
Lifecycle Method Calls
In addition to the transition delegate methods outlined above, several lifecycle methods are called on the app’s application delegate during a multitasking transition. For example, when the user moves the divider, the applicationWillResignActive method is called at the point that the divider position changes. Likewise, when the user slides the divider to the edge of the screen so that the app is no longer visible, the applicationDidEnterBackground delegate method is called.
These method calls are particularly important when considering what happens behind the scenes when the user moves the divider. As the divider moves, the system repeatedly resizes the app off-screen and takes snapshots of various sizes as the slider moves. These snapshots make the sliding transition appear to take place smoothly. The applicationWillResignActive method may need to be used to preserve the state of the user interface so that when the user releases the divider, the same data and navigation position within the user interface is presented as before the slider change.
Opting Out of Multitasking
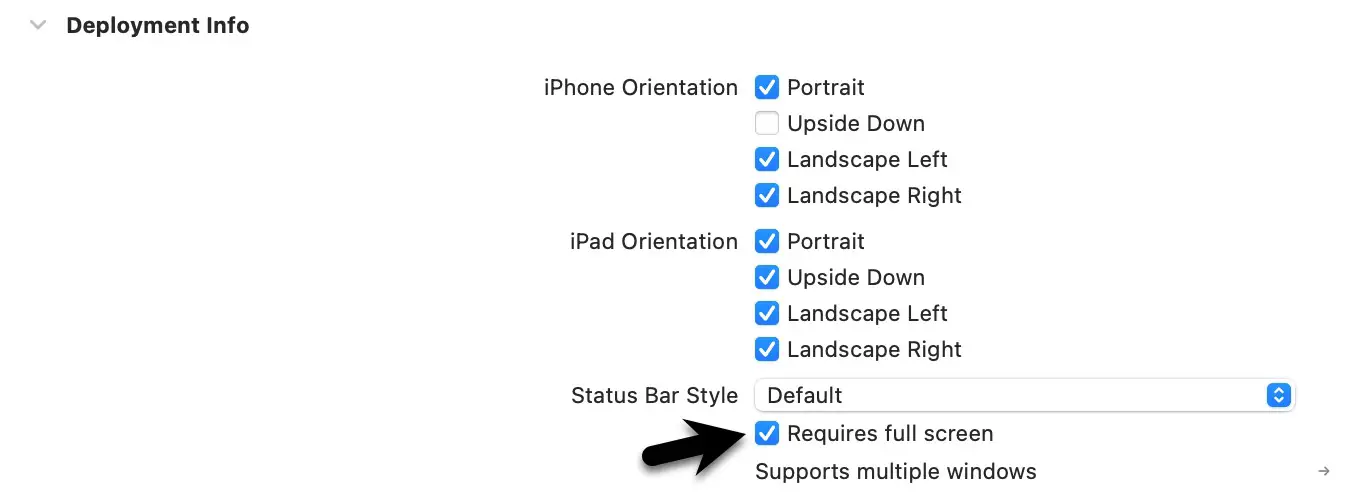
To disable multitasking support for an app, add the UIRequiresFullScreen key to the project’s Info.plist file with the value set to true. This can be set manually within the Info.plist file itself or the Deployment Info section of the General settings panel for the project target:
Summary
Multitasking allows the user to display and interact with two apps concurrently when running on recent models of iPad devices. Multitasking apps are categorized as primary and secondary and can be displayed in either Slide Over or Split View configurations. Multitasking also supports a “Picture-in-Picture” option whereby video playback is displayed in a floating, resizable window over the top of the existing app.
|
You are reading a sample chapter from Building iOS 17 Apps using Xcode Storyboards.
Buy the full book now in eBook or Print format. The full book contains 96 chapters and 760 pages of in-depth information. |
Supporting multitasking within an iOS app primarily involves designing the user interface to support both regular and compact-size classes. A range of delegate methods also allows view controllers to receive size change notifications and respond accordingly.
Projects created in Xcode 14 are configured to support multitasking by default. However, it is also possible to opt out of multitasking with a change to the project Info.plist file.