All Linux distributions are provided with a firewall solution of some form. In the case of Ubuntu, this takes the form of the Uncomplicated Firewall outlined in the previous chapter. This chapter will introduce a more advanced firewall solution available for Ubuntu in the form of firewalld.
An Introduction to firewalld
Originally developed for Red Hat-based Linux distributions, the firewalld service uses a set of rules to control incoming network traffic and define which traffic is to be blocked and which is to be allowed to pass through to the system and is built on top of a more complex firewall tool named iptables.
The firewalld system provides a flexible way to manage incoming traffic. The firewall could, for example, be configured to block traffic arriving from a specific external IP address or to prevent all traffic arriving on a particular TCP/IP port. Rules may also be defined to forward incoming traffic to different systems or to act as an internet gateway to protect other computers on a network.
In keeping with common security practices, a default firewalld installation is configured to block all access with the exception of SSH remote login and the DHCP service used by the system to obtain a dynamic IP address (both of which are essential if the system administrator is to be able to gain access to the system after completing the installation).
The key elements of firewall configuration on Ubuntu are zones, interfaces, services, and ports.
 |
You are reading a sample chapter from Ubuntu 22.04 Essentials. Buy the full book now in eBook ($24.99) format. Includes 36 chapters. Learn more. |
Zones
By default, firewalld is installed with a range of pre-configured zones. A zone is a preconfigured set of rules which can be applied to the system at any time to quickly implement firewall configurations for specific scenarios. The block zone, for example, blocks all incoming traffic, while the home zone imposes less strict rules on the assumption that the system is running in a safer environment where a greater level of trust is expected. New zones may be added to the system, and existing zones modified to add or remove rules. Zones may also be deleted entirely from the system. Table 16-1 lists the set of zones available by default on an Ubuntu system:
|
Zone |
Description |
|
drop |
The most secure zone. Only outgoing connections are permitted and all incoming connections are dropped without any notification to the connecting client. |
|
block |
Similar to the drop zone with the exception that incoming connections are rejected with an icmp-host-prohibited or icmp6-adm-prohibited notification. |
|
public |
Intended for use when connected to public networks or the internet where other computers are not known to be trustworthy. Allows select incoming connections. |
|
external |
When a system is acting as the internet gateway for a network of computers, the external zone is applied to the interface that is connected to the internet. This zone is used in conjunction with the internal zone when implementing masquerading or network address translation (NAT) as outlined later in this chapter. Allows select incoming connections |
|
internal |
Used with the external zone and applied to the interface that is connected to the internal network. Assumes that the computers on the internal network are trusted. Allows select incoming connections. |
|
dmz |
For use when the system is running in the demilitarized zone (DMZ). These are generally computers that are publicly accessible but isolated from other parts of your internal network. Allows select incoming connections. |
|
work |
For use when running a system on a network in a work environment where other computers are trusted. Allows select incoming connections. |
|
home |
For use when running a system on a home network where other computers are trusted. Allows select incoming connections. |
|
trusted |
The least secure zone. All incoming connections are accepted. |
To review specific settings for a zone, refer to the corresponding XML configuration file located on the system in the /usr/lib/firewalld/zones directory. The following, for example, lists the content of the public.xml zone configuration file:
<?xml version=”1.0” encoding=”utf-8”?>
<zone>
  <short>Public</short>
  <description>For use in public areas. You do not trust the other computers on networks to not harm your computer. Only selected incoming connections are accepted.</description>
  <service name=”ssh”/>
  <service name=”mdns”/>
  <service name=”dhcpv6-client”/>
</zone>Code language: HTML, XML (xml)
Interfaces
Any Ubuntu system connected to the internet or a network (or both) will contain at least one interface in the form of either a physical or virtual network device. When firewalld is active, each of these interfaces is assigned to a zone allowing different levels of firewall security to be assigned to different interfaces. Consider a server containing two interfaces, one connected externally to the internet and the other to an internal network. In such a scenario, the external facing interface would most likely be assigned to the more restrictive external zone, while the internal interface might use the internal zone.
Services
TCP/IP defines a set of services that communicate on standard ports. Secure HTTPS web connections, for example, use port 443, while the SMTP email service uses port 25. To selectively enable incoming traffic for specific services, firewalld rules can be added to zones. The home zone, for example, does not permit incoming HTTPS connections by default. This traffic can be enabled by adding rules to a zone to allow incoming HTTPS connections without having to reference the specific port number.
Ports
Although common TCP/IP services can be referenced when adding firewalld rules, situations will arise where incoming connections need to be allowed on a specific port that is not allocated to a service. This can be achieved by adding rules that reference specific ports instead of services. 16.2 Checking firewalld Status
|
You are reading a sample chapter from Ubuntu 22.04 Essentials. Buy the full book now in eBook ($24.99) format. Includes 36 chapters. Learn more. |
The firewalld service is not usually installed and enabled by default on all Ubuntu installations. The status of the service can be checked via the following command:
# systemctl status firewalld
● firewalld.service - firewalld - dynamic firewall daemon
     Loaded: loaded (/lib/systemd/system/firewalld.service; enabled; vendor preset: enabled)
     Active: active (running) since Mon 2023-07-17 19:21:53 UTC; 16s ago
       Docs: man:firewalld(1)
   Main PID: 27151 (firewalld)
      Tasks: 2 (limit: 4517)
     Memory: 24.0M
        CPU: 244ms
     CGroup: /system.slice/firewalld.service
             └─27151 /usr/bin/python3 /usr/sbin/firewalld --nofork --nopid

Jul 17 19:21:53 demoserver systemd[1]: Starting firewalld - dynamic firewall daemon...
Jul 17 19:21:53 demoserver systemd[1]: Started firewalld - dynamic firewall daemon.Code language: plaintext (plaintext)
If necessary, the firewalld service may be installed as follows:
# apt install firewalldCode language: plaintext (plaintext)The firewalld service is enabled by default, so it will start automatically both after installation is complete and each time the system boots.
Configuring Firewall Rules with firewall-cmd
The firewall-cmd command-line utility allows information about the firewalld configuration to be viewed and changes to be made to zones and rules from within a terminal window.
When making changes to the firewall settings, it is important to be aware of the concepts of runtime and permanent configurations. By default, any rule changes are considered to be runtime configuration changes. This means that while the changes will take effect immediately, they will be lost next time the system restarts, or the firewalld service reloads, for example, by issuing the following command:
|
You are reading a sample chapter from Ubuntu 22.04 Essentials. Buy the full book now in eBook ($24.99) format. Includes 36 chapters. Learn more. |
# firewall-cmd --reloadCode language: plaintext (plaintext)To make a change permanent, the –permanent command-line option must be used. Permanent changes do not take effect until the firewalld service reloads but will remain in place until manually changed.
Identifying and Changing the Default Zone
To identify the default zone (in other words, the zone to which all interfaces will be assigned unless a different zone is specifically selected), use the firewall-cmd tool as follows:
# firewall-cmd --get-default-zone
publicCode language: plaintext (plaintext)
To change the default to a different zone:
# firewall-cmd --set-default-zone=home
successCode language: plaintext (plaintext)
Displaying Zone Information
To list all of the zones available on the system:
# firewall-cmd --get-zones
block dmz drop external home internal public trusted workCode language: plaintext (plaintext)
Obtain a list of zones currently active together with the interfaces to which they are assigned as follows:
|
You are reading a sample chapter from Ubuntu 22.04 Essentials. Buy the full book now in eBook ($24.99) format. Includes 36 chapters. Learn more. |
# firewall-cmd --get-active-zones
external
  interfaces: eth0
internal
 interfaces: ethCode language: plaintext (plaintext)
All of the rules currently configured for a specific zone may be listed as follows:
# firewall-cmd --zone=home --list-all
home (active)
  target: default
  icmp-block-inversion: no
  interfaces: eth0
  sources:
  services: cockpit dhcpv6-client http mdns samba-client ssh
  ports:
  protocols:
  masquerade: no
  forward-ports:
  source-ports:
  icmp-blocks:
  rich rules:Code language: plaintext (plaintext)
Use the following command to list the services currently available for inclusion in a firewalld rule:
 # firewall-cmd --get-services
RH-Satellite-6 amanda-client amanda-k5-client amqp amqps apcupsd audit bacula bacula-client bgp bitcoin bitcoin-rpc bitcoin-testnet bitcoin-testnet-rpc ceph ceph-mon cfengine cockpit ...Code language: plaintext (plaintext)
To list the services currently enabled for a zone:
# firewall-cmd --zone=public --list-services
cockpit dhcpv6-client sshCode language: plaintext (plaintext)
A list of port rules can be obtained as follows:
# firewall-cmd --zone=public --list-ports
9090/tcpCode language: plaintext (plaintext)
Adding and Removing Zone Services
To add a service to a zone, in this case, adding HTTPS to the public zone, the following command would be used:
|
You are reading a sample chapter from Ubuntu 22.04 Essentials. Buy the full book now in eBook ($24.99) format. Includes 36 chapters. Learn more. |
# firewall-cmd --zone=public --add-service=https
successCode language: plaintext (plaintext)
By default, this is a runtime change, so the added rule will be lost after a system reboot. To add a service permanently so that it remains in effect next time the system restarts, use the –permanent flag:
# firewall-cmd --zone=public --permanent --add-service=https
successCode language: plaintext (plaintext)
To verify that a service has been added permanently, be sure to include the –permanent flag when requesting the service list:
# firewall-cmd --zone=public --permanent --list-services cockpit dhcpv6-client http https sshCode language: plaintext (plaintext)Note that as a permanent change, this new rule will not take effect until the system restarts or firewalld reloads:
# firewall-cmd --reloadCode language: plaintext (plaintext)Remove a service from a zone using the –remove-service option. Since this is a runtime change, the rule will be re-instated the next time the system restarts:
# firewall-cmd --zone=public --remove-service=httpsCode language: plaintext (plaintext)To remove a service permanently, use the –permanent flag, remembering to reload firewalld if the change is required to take immediate effect:
|
You are reading a sample chapter from Ubuntu 22.04 Essentials. Buy the full book now in eBook ($24.99) format. Includes 36 chapters. Learn more. |
# firewall-cmd --zone=public --permanent --remove-service=httpsCode language: plaintext (plaintext)Working with Port-based Rules
To enable a specific port, use the –add-port option. Note that when manually defining the port, both the port number and protocol (TCP or UDP) will need to be provided:
# firewall-cmd --zone=public --permanent --add-port=5000/tcpCode language: plaintext (plaintext)It is also possible to specify a range of ports when adding a rule to a zone:
# firewall-cmd --zone=public --permanent --add-port=5900-5999/udpCode language: plaintext (plaintext)Creating a New Zone
An entirely new zone may be created by running the following command. Once created, the zone may be managed in the same way as any of the predefined zones:
# firewall-cmd --permanent --new-zone=myoffice
successCode language: plaintext (plaintext)
After adding a new zone, firewalld will need to be restarted before the zone becomes available:
# firewall-cmd --reload
successCode language: plaintext (plaintext)
Changing Zone/Interface Assignments
As previously discussed, each interface on the system must be assigned to a zone. The zone to which an interface is assigned can also be changed using the firewall-cmd tool. In the following example, the eth0 interface is assigned to the public zone:
|
You are reading a sample chapter from Ubuntu 22.04 Essentials. Buy the full book now in eBook ($24.99) format. Includes 36 chapters. Learn more. |
# firewall-cmd --zone=public --change-interface=eth0
successCode language: plaintext (plaintext)
Masquerading
Masquerading is better known in networking administration circles as Network Address Translation (NAT). When using an Ubuntu system as a gateway to the internet for a network of computers, masquerading allows all of the internal systems to use the IP address of that Ubuntu system when communicating over the internet. This has the advantage of hiding the internal IP addresses of any systems from malicious external entities and also avoids the necessity to allocate a public IP address to every computer on the network.
Use the following command to check whether masquerading is already enabled on the firewall:
# firewall-cmd --zone=external --query-masqueradeCode language: plaintext (plaintext)Use the following command to enable masquerading (remembering to use the –permanent flag if the change is to be permanent):
# firewall-cmd --zone=external --add-masqueradeCode language: plaintext (plaintext)Adding ICMP Rules
The Internet Control Message Protocol (ICMP) is used by client systems on networks to send information such as error messages to each other. It is also the foundation of the ping command, which network administrators and users alike use to detect whether a particular client is alive on a network. The ICMP category allows for the blocking of specific ICMP message types. For example, an administrator might choose to block incoming ping (Echo Request) ICMP messages to prevent the possibility of a ping-based denial of service (DoS) attack (where a server is maliciously bombarded with so many ping messages that it becomes unable to respond to legitimate requests).
To view the ICMP types available for inclusion in firewalld rules, run the following command:
|
You are reading a sample chapter from Ubuntu 22.04 Essentials. Buy the full book now in eBook ($24.99) format. Includes 36 chapters. Learn more. |
# firewall-cmd --get-icmptypes address-unreachable bad-header beyond-scope communication-prohibited destinationunreachable echo-reply ...Code language: plaintext (plaintext)The following command, for example, permanently adds a rule to block echo-reply (ping request) messages for the public zone:
# firewall-cmd --zone=public --permanent --add-icmp-block=echo-replyCode language: plaintext (plaintext)Implementing Port Forwarding
Port forwarding is used in conjunction with masquerading when the Ubuntu system acts as a gateway to the internet for an internal network of computer systems. Port forwarding allows traffic arriving at the firewall via the internet on a specific port to be forwarded to a particular system on the internal network. This is perhaps best described by way of an example.
Suppose that an Ubuntu system is acting as the firewall for an internal network of computers and one of the systems on the network is configured as a web server. Let’s assume the web server system has an IP address of 192.168.2.20. The domain record for the website hosted on this system is configured with the public IP address behind which the Ubuntu firewall system sits. When an HTTP web page request arrives on port 80 the Ubuntu system acting as the firewall needs to know what to do with it. By configuring port forwarding it is possible to direct all web traffic to the internal system hosting the web server (in this case, IP address 192.168.2.20), either continuing to use port 80 or diverting the traffic to a different port on the destination server. In fact, port forwarding can even be configured to forward the traffic to a different port on the same system as the firewall (a concept known as local forwarding).
To use port forwarding, begin by enabling masquerading as follows (in this case the assumption is made that the interface connected to the internet has been assigned to the external zone):
# firewall-cmd --zone=external --add-masqueradeCode language: plaintext (plaintext)To forward from a port to a different local port, a command similar to the following would be used:
|
You are reading a sample chapter from Ubuntu 22.04 Essentials. Buy the full book now in eBook ($24.99) format. Includes 36 chapters. Learn more. |
# firewall-cmd --zone=external --add-forward-port=port=22:proto=tcp:toport=2750Code language: plaintext (plaintext)In the above example, any TCP traffic arriving on port 22 will be forwarded to port 2750 on the local system. The following command, on the other hand, forwards port 20 on the local system to port 22 on the system with the IP address of 192.168.0.19:
# firewall-cmd --zone=external \
          --add-forward-port=port=20:proto=tcp:toport=22:toaddr=192.168.0.19Code language: plaintext (plaintext)
Similarly, the following command forwards local port 20 to port 2750 on the system with IP address 192.168.0.18:
# firewall-cmd --zone=external --add-forward-port=port=20:proto=tcp:toport=2750:to addr=192.168.0.18Code language: plaintext (plaintext)Managing firewalld using firewall-config
If you have access to the graphical desktop environment, the firewall may also be configured using the firewall-config tool. Though not installed by default, firewall-config may be installed as follows:
# apt install firewall-configCode language: plaintext (plaintext)When launched, the main firewall-config screen appears as illustrated in Figure 16-1:
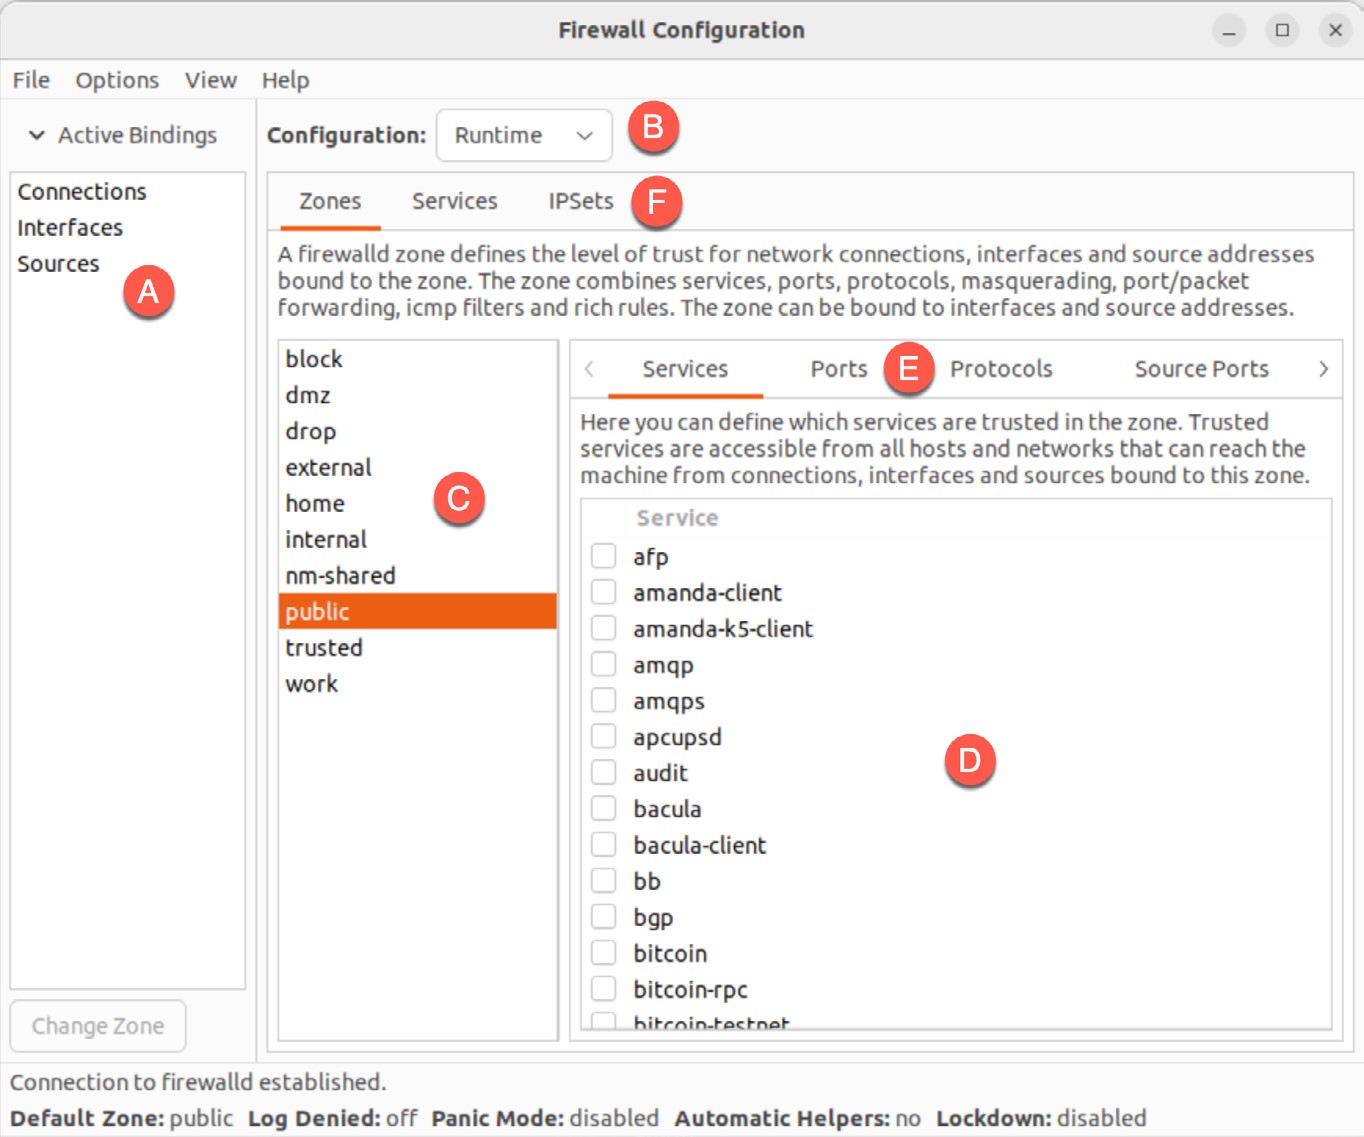
The key areas of the tool can be summarized as follows:
|
You are reading a sample chapter from Ubuntu 22.04 Essentials. Buy the full book now in eBook ($24.99) format. Includes 36 chapters. Learn more. |
- – Displays all of the currently active interfaces and the zones to which they are assigned. To assign an interface to a different zone, select it from this panel, click on the Change Zone button, and select the required zone from the resulting dialog.
- – Controls whether the information displayed and any changes made within the tool apply to the runtime or permanent rules.
- – The list of zones, services or IPSets configured on the system. The information listed in this panel depends on the selection made from toolbar F. Selecting an item from the list in this panel updates the main panel marked D.
- – The main panel containing information about the current category selection in toolbar E. In this example, the panel is displaying services for the public zone. The checkboxes next to each service control whether the service is enabled or not within the firewall. It is within these category panels that new rules can be added or existing rules configured or removed.
- – Controls the content displayed in panel D. Selecting items from this bar displays the current rule for the chosen category.
- – Controls the list displayed in panel C.
The firewall-config tool is straightforward and intuitive to use and allows many of the tasks available with firewall-cmd to be performed in a visual environment.
Summary
A carefully planned and implemented firewall is a vital component of any secure system. In the case of Ubuntu, the firewalld service provides a firewall system that is both flexible and easy to administer.
The firewalld service uses the concept of zones to group together sets of firewall rules and includes a suite of pre-defined zones designed to meet a range of firewall protection requirements. These zones may be modified to add or remove rules or entirely new zones created and configured. The network devices on the system that connect to networks or the internet are referred to as interfaces. Each interface, in turn, is assigned to a zone. The primary tools for working with firewalld are the firewall-cmd command-line tool and the firewall-config graphical utility.