
The chapter entitled SwiftUI Architecture introduced the concept of SwiftUI scenes and explained that the SwiftUI framework, in addition to allowing you to build your own scenes, also includes two pre-built scene types in the form of WindowGroup and DocumentGroup. So far, the examples in this book have made exclusive use of the WindowGroup scene. This chapter will introduce the DocumentGroup scene and explain how it can be used to build document-based apps in SwiftUI.
Documents in Apps
If you have used iOS for an appreciable amount of time, the chances are good that you will have encountered the built-in Files app. The Files app provides a way to browse, select, and manage the Documents stored both on the local device file system and iCloud storage in addition to third-party providers such as Google Drive. Documents in this context can include just about any file type, including plain text, image, data, and binary files. Figure 46-1 shows a typical browsing session within the iOS Files app:
The purpose of the DocumentGroup scene is to allow the same capabilities provided by the Files app to be built into SwiftUI apps, in addition to the ability to create new files.
Document support can be built into an app with relatively little work. Xcode includes a project template specifically for this task which performs much of the setup work for you. Before attempting to work with DocumentGroups, however, some basic concepts first need to be covered. A good way to traverse this learning curve is to review the Document App project template generated by Xcode.
Creating the DocDemo App
Begin by launching Xcode and creating a new project using the Multiplatform Document App template option, as shown in Figure 46-2 below:
 |
You are reading a sample chapter from an old edition of iOS App Development Essentials. Purchase the fully updated iOS 18 App Development Essentials book. The full book contains 71 chapters, over 612 pages of in-depth information, downloadable source code, and access to over 50 SwiftUI knowledge test quizzes. |
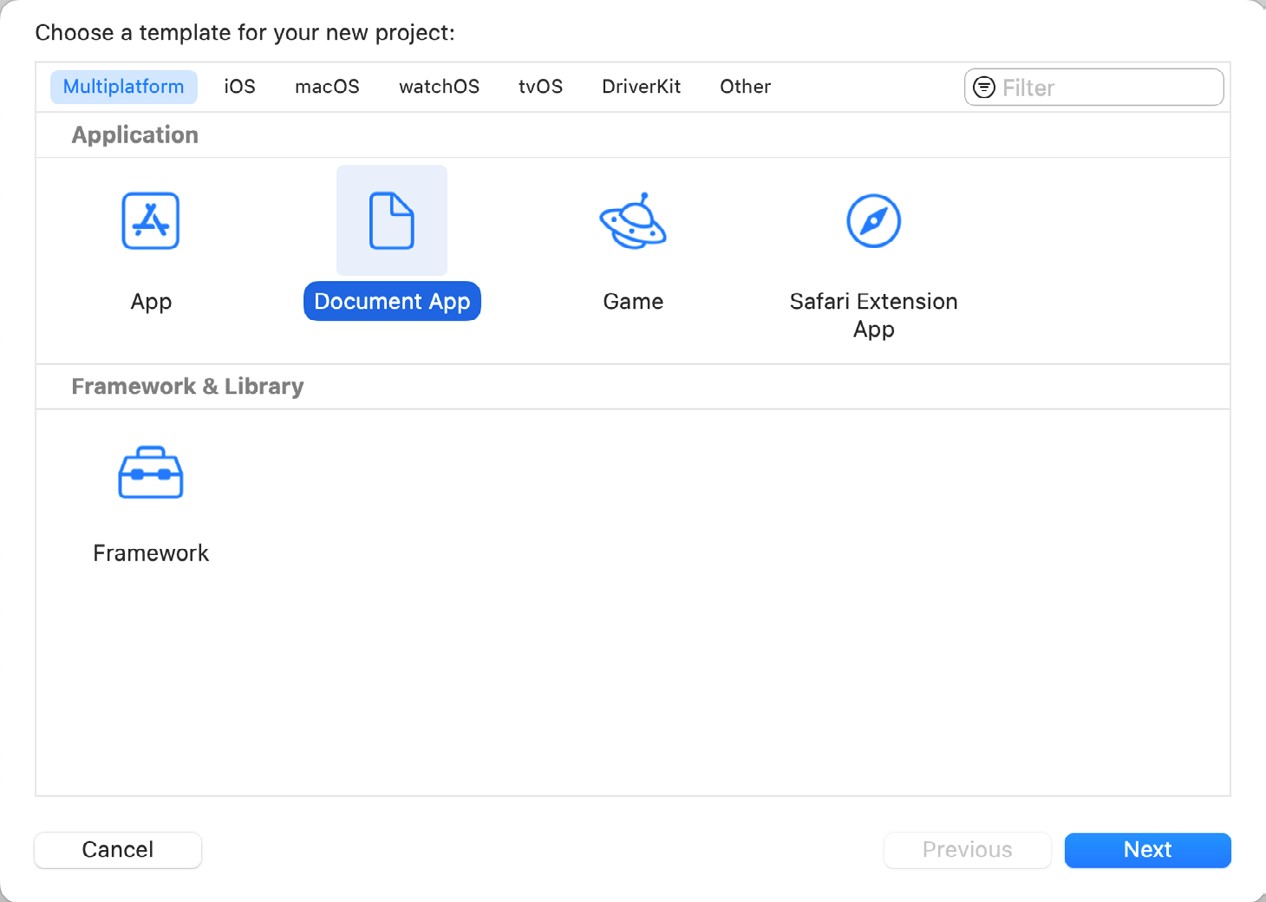
Click the Next button, name the project DocDemo, and save the project to a suitable location.
The DocumentGroup Scene
The DocumentGroup scene contains most of the infrastructure necessary to provide app users with the ability to create, delete, move, rename, and select files and folders from within an app. An initial document group scene is declared by Xcode within the DocDemoApp.swift file as follows:
import SwiftUI

@main
struct DocDemoApp: App {
    var body: some Scene {
        DocumentGroup(newDocument: DocDemoDocument()) { file in
            ContentView(document: file.$document)
        }
    }
}Code language: Swift (swift)
As currently implemented, the first scene presented to the user when the app starts will be the DocumentGroup user interface which will resemble Figure 46-1 above. Passed through to the DocumentGroup is a DocDemoDocument instance which, along with some additional configuration settings, contains the code to create, read, and write files. When a user either selects an existing file or creates a new one, the content view is displayed and passed the DocDemoDocument instance for the selected file from which the content may be extracted and presented to the user:
ContentView(document: file.$document)Code language: Swift (swift)The DocDemoDocument.swift file generated by Xcode is designed to support plain text files and may be used as the basis for supporting other file types. Before exploring this file in detail, we first need to understand file types.
Declaring File Type Support
A key step in implementing document support is declaring the file types that the app supports. The DocumentGroup user interface uses this information to ensure that only files of supported types are selectable when browsing. A user browsing documents in an app which only supports image files, for example, would see documents of other types (such as plain text) grayed out and unselectable within the document list. This can be separated into the following components:
|
You are reading a sample chapter from an old edition of iOS App Development Essentials. Purchase the fully updated iOS 18 App Development Essentials book. The full book contains 71 chapters, over 612 pages of in-depth information, downloadable source code, and access to over 50 SwiftUI knowledge test quizzes. |
Document Content Type Identifier
Defining the types of files supported by an app begins by declaring a document content type identifier. This is declared using Uniform Type Identifier (UTI) syntax, which typically takes the form of a reverse domain name combined with a common type identifier. A document identifier for an app that supports plain text files, for example, might be declared as follows:
com.ebookfrenzy.plain-text
Handler Rank
The document content type may also declare a handler rank value. This value declares to the system how the app relates to the file type. If the app uses its own custom file type, this should be set to Owner. If the app is to be opened as the default app for files of this type, the value should be set to Default. If, on the other hand, the app can handle files of this type but is not intended to be the default handler, a value of Alternate should be used. Finally, None should be used if the app is not to be associated with the file type.
Type Identifiers
Having declared a document content type identifier, this identifier must have associated with it a list of specific data types to which it conforms. This is achieved using type identifiers. These type identifiers can be chosen from an extensive list of built-in types provided by Apple and are generally prefixed with “public.”. For example, the UTI for a plain text document is public.plain-text, while that for any type of image file is public.image. Similarly, if an app only supports JPEG image files, the public.jpeg UTI would be used.
Each of the built-in UTI types has associated with it a UTType equivalent which can be used when working with types programmatically. The public.plain-text UTI, for example, has a UTType instance named plainText while the UTType instance for public.mpeg4move is named mpeg4Movie. A full list of supported UTType declarations can be found at the following URL:
|
You are reading a sample chapter from an old edition of iOS App Development Essentials. Purchase the fully updated iOS 18 App Development Essentials book. The full book contains 71 chapters, over 612 pages of in-depth information, downloadable source code, and access to over 50 SwiftUI knowledge test quizzes. |
Filename Extensions
In addition to declaring the type identifiers, filename extensions for which support is provided may also be specified (for example .txt, .png, .doc, .mydata etc.). Note that many of the built-in type identifiers are already configured to support associated file types. The public.png type, for example, is pre-configured to recognize .png filename extensions.
The extension declared here will also be appended to the filename of any new documents created by the app.
Custom Type Document Content Identifiers
When working with proprietary data formats (perhaps your app has its own database format), it is also possible to declare your own document content identifier without using one of the common identifiers. A document type identifier for a custom type might, therefore, be declared as follows:
com.ebookfrenzy.mydataCode language: plaintext (plaintext)Exported vs. Imported Type Identifiers
When a built-in type is used (such as plain.image), it is said to be an imported type identifier (since it is imported into the app from the range of identifiers already known to the system). A custom type identifier, on the other hand, is described as an exported type identifier because it originates from within the app and is exported to the system so that the browser can recognize files of that type as being associated with the app.
|
You are reading a sample chapter from an old edition of iOS App Development Essentials. Purchase the fully updated iOS 18 App Development Essentials book. The full book contains 71 chapters, over 612 pages of in-depth information, downloadable source code, and access to over 50 SwiftUI knowledge test quizzes. |
Configuring File Type Support in Xcode
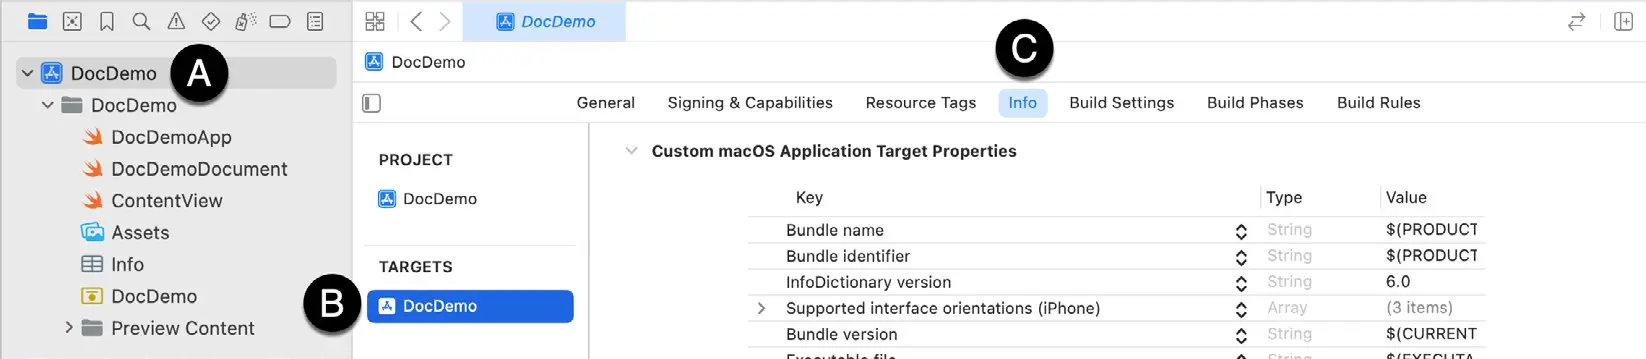
All of the above settings are configured within the project’s Info.plist file. Although these changes can be made with the Xcode property list editor, a better option is to access the settings via the Xcode Info screen of the app target. To review the settings for the example project using this approach, select the DocDemo entry at the top of the project navigator window (marked A in Figure 46-3), followed by the DocDemo target (B) before clicking on the Info tab (C).
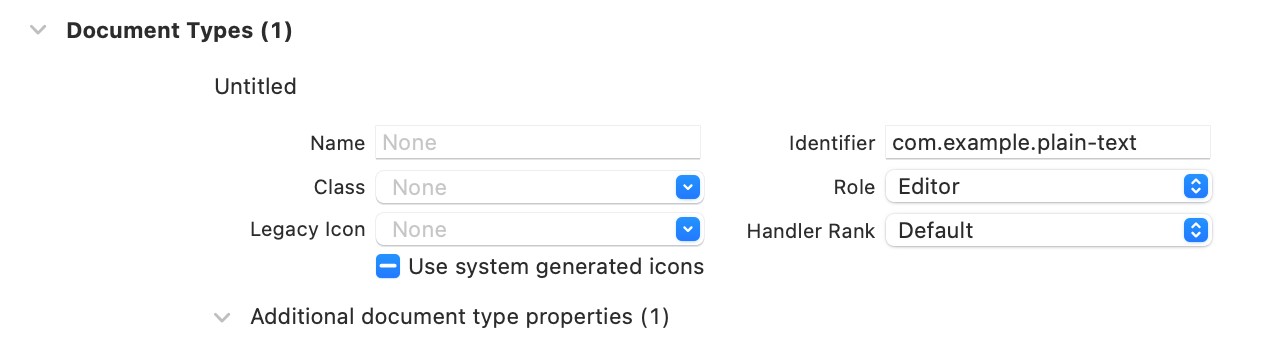
Scroll down to the Document Types section within the Info screen and note that Xcode has created a single document content type identifier set to com.example.plain-text with the handler rank set to Default:
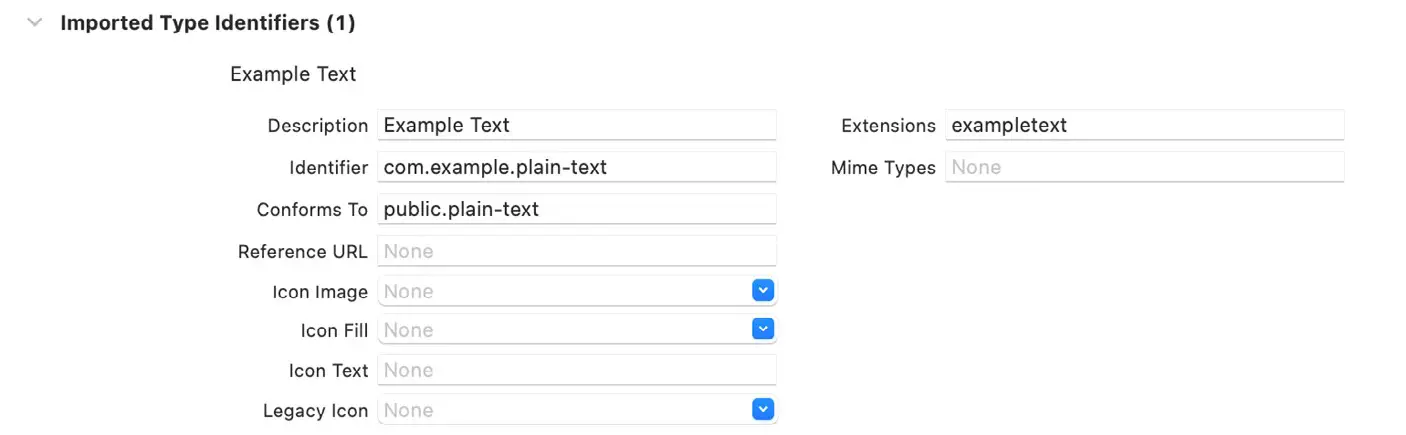
Next, scroll down to the Imported Type Identifiers section, where we can see that our document content type identifier (com.example.plain-text) has been declared as conforming to the public.plain-text type with a single filename extension of exampletext:
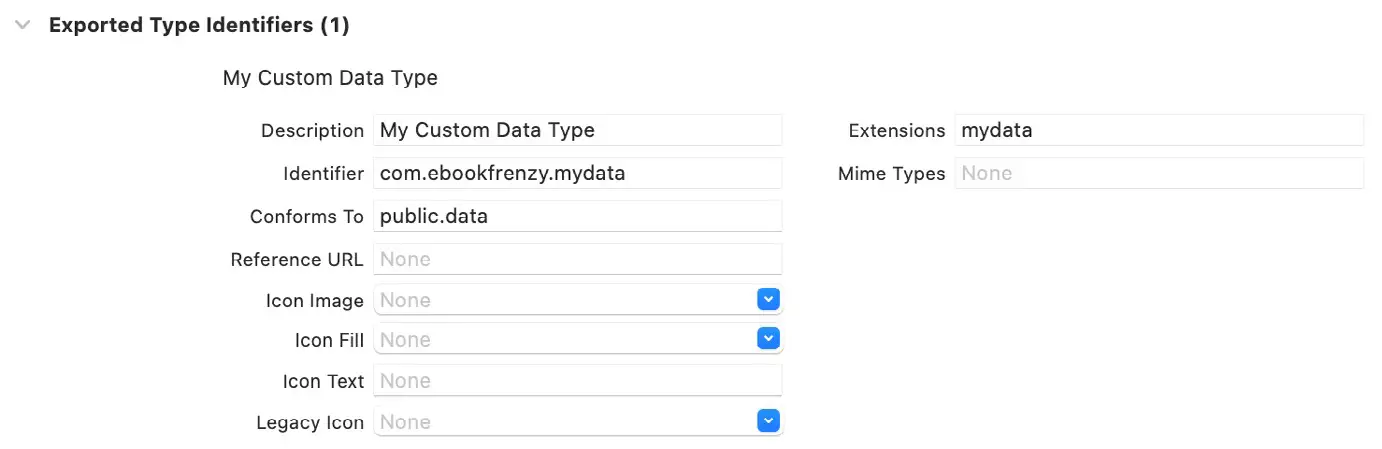
Type identifiers for custom types are declared in the Exported Type Identifiers section of the Info screen. For example, a binary custom file might be declared as conforming to public.data while the file names for this type might have a mydata filename extension:
Note that in both cases, icons may be added to represent the files within the document browser user interface.
|
You are reading a sample chapter from an old edition of iOS App Development Essentials. Purchase the fully updated iOS 18 App Development Essentials book. The full book contains 71 chapters, over 612 pages of in-depth information, downloadable source code, and access to over 50 SwiftUI knowledge test quizzes. |
The Document Structure
When the example project was created, Xcode generated a file named DocDemoDocument.swift, an instance of which is passed to ContentView within the App declaration. As generated, this file reads as follows:
import SwiftUI
import UniformTypeIdentifiers

extension UTType {
    static var exampleText: UTType {
        UTType(importedAs: "com.example.plain-text")
    }
}

struct DocDemoDocument: FileDocument {
    var text: String

    init(text: String = "Hello, world!") {
        self.text = text
    }

    static var readableContentTypes: [UTType] { [.exampleText] }

    init(configuration: ReadConfiguration) throws {
        guard let data = configuration.file.regularFileContents,
              let string = String(data: data, encoding: .utf8)
        else {
            throw CocoaError(.fileReadCorruptFile)
        }
        text = string
    }

    func fileWrapper(configuration: WriteConfiguration) throws -> FileWrapper {
        let data = text.data(using: .utf8)!
        return .init(regularFileWithContents: data)
    }
}Code language: Swift (swift)
The structure is based on the FileDocument class and begins by declaring a new UTType named exampleText which imports our com.example.plain-text identifier. This is then referenced in the readableContentTypes array to indicate which types of files can be opened by the app:
extension UTType {
    static var exampleText: UTType {
        UTType(importedAs: "com.example.plain-text")
    }
}
.
.
    static var readableContentTypes: [UTType] { [.exampleText] }Code language: Swift (swift)
The structure also includes two initializers, the first of which will be called when the creation of a new document is requested by the user and simply configures a sample text string as the initial data:
init(text: String = "Hello, world!") {
    self.text = text
}Code language: Swift (swift)
The second initializer, on the other hand, is called when the user opens an existing document and is passed a ReadConfiguration instance:
init(configuration: ReadConfiguration) throws {
    guard let data = configuration.file.regularFileContents,
          let string = String(data: data, encoding: .utf8)
    else {
        throw CocoaError(.fileReadCorruptFile)
    }
    text = string
}Code language: Swift (swift)
The ReadConfiguration instance holds the content of the file in Data format, which may be accessed via the regularFileContents property. Steps are then taken to decode this data and convert it to a String so that it can be displayed to the user. The exact steps to decode the data will depend on how the data was originally encoded within the fileWrapper() method. In this case, the method is designed to work with String data:
|
You are reading a sample chapter from an old edition of iOS App Development Essentials. Purchase the fully updated iOS 18 App Development Essentials book. The full book contains 71 chapters, over 612 pages of in-depth information, downloadable source code, and access to over 50 SwiftUI knowledge test quizzes. |
func fileWrapper(configuration: WriteConfiguration) throws -> FileWrapper {
    let data = text.data(using: .utf8)!
    return .init(regularFileWithContents: data)
}Code language: Swift (swift)
The fileWrapper() method is passed a WriteConfiguration instance for the selected file and is expected to return a FileWrapper instance initialized with the data to be written. For the content to be written to the file it must first be converted to data and stored in a Data object. In this case, the text String value is simply encoded into data. The steps involved to achieve this in your own apps will depend on the type of content being stored in the document.
The Content View
As we have seen early in the chapter, the ContentView is passed an instance of the DocDemoDocument structure from within the App declaration:
ContentView(document: file.$document)Code language: Swift (swift)In the case of the DocDemo example, the ContentView binds to this property and references it as the content for a TextEditor view:
struct ContentView: View {
    @Binding var document: DocDemoDocument

    var body: some View {
        TextEditor(text: $document.text)
    }
}Code language: Swift (swift)
When the view appears, it will display the current string assigned to the text property of the document instance, and as the user edits the text, the changes will be stored. When the user navigates back to the document browser, a call to the fileWrapper() method will be triggered automatically, and the changes saved to the document.
Adding Navigation
Behind the scenes, the DocumentGroup uses a NavigationStack to navigate between the browser and the content views. If we were to run the DocDemo app now, we could create and edit a document, but there would be no way to return to the document browser. We can resolve this by adding a navigation title to the TextEditor view as follows:
|
You are reading a sample chapter from an old edition of iOS App Development Essentials. Purchase the fully updated iOS 18 App Development Essentials book. The full book contains 71 chapters, over 612 pages of in-depth information, downloadable source code, and access to over 50 SwiftUI knowledge test quizzes. |
import SwiftUI
struct ContentView: View {
@Binding var document: DocDemoDocument
var body: some View {
TextEditor(text: $document.text)
.navigationTitle("Edit Document")
}
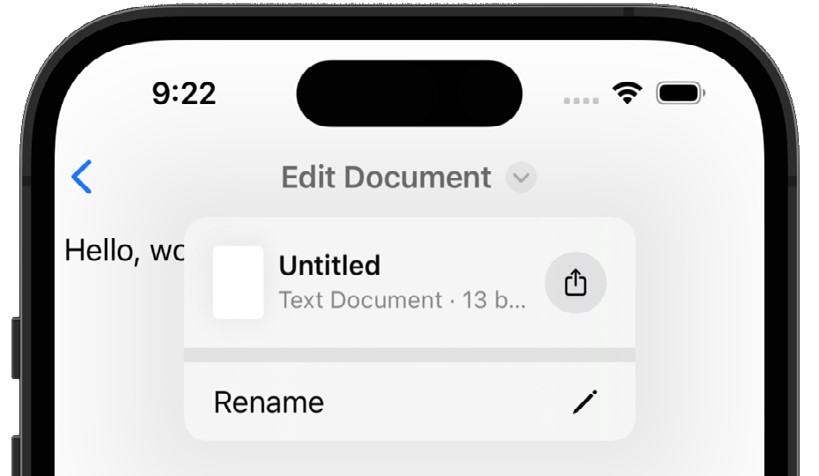
}Code language: Swift (swift)In addition to providing a back arrow to return to the browser, the navigation title includes a drop-down menu allowing the document to be renamed or shared:
Running the Example App
Having explored the internals of the example DocDemo app, the final step is to experience the app in action. With this in mind, compile and run the app on a device or simulator and, once running, select the Browse tab located at the bottom of the screen:
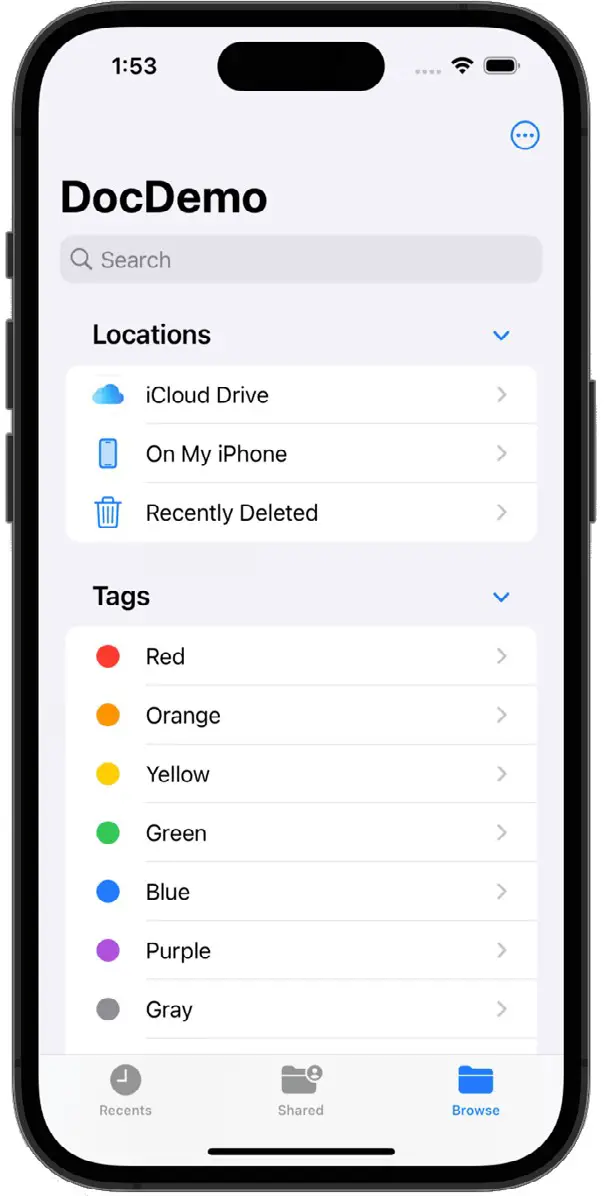
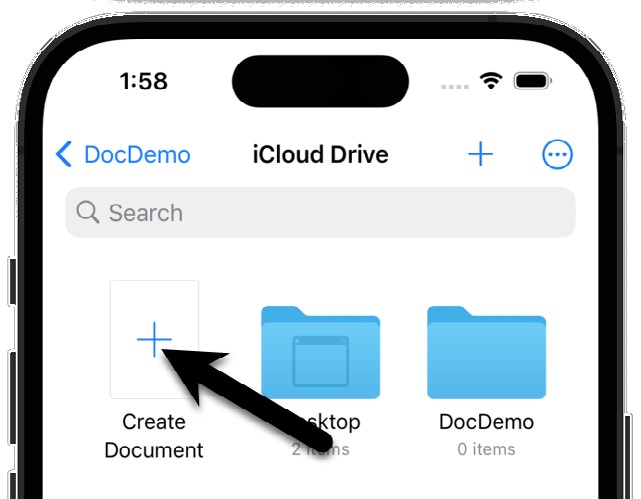
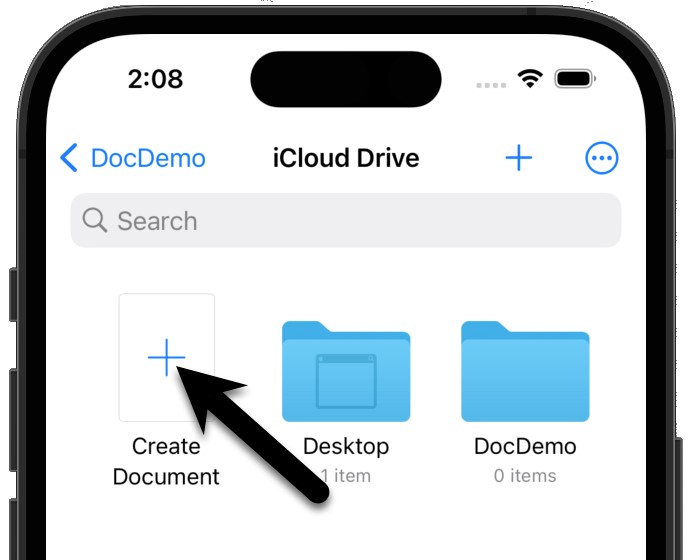
Navigate to a suitable location either on the device or within your iCloud storage and click on the Create Document entry, as shown in Figure 46-9:
The new file will be created, and the content loaded into the ContentView. Edit the sample text and return to the document browser, where the document (named untitled) will now be listed. Open the document once again so that it loads into the ContentView and verify that the changes were saved.
Summary
The SwiftUI DocumentGroup scene allows the document browsing and management capabilities available within the built-in Files app to be integrated into apps with relatively little effort. The core element of DocumentGroup implementation is the document declaration which acts as the interface between the document browser and views that make up the app and is responsible for encoding and decoding document content. In addition, the Info.plist file for the app must include information about the types of files the app can support.
|
You are reading a sample chapter from an old edition of iOS App Development Essentials. Purchase the fully updated iOS 18 App Development Essentials book. The full book contains 71 chapters, over 612 pages of in-depth information, downloadable source code, and access to over 50 SwiftUI knowledge test quizzes. |