
The previous chapter introduced the List, NavigationStack, and NavigationLink views and explained how these can be used to present a navigable and editable list of items to the user. This chapter will work through the creation of a project intended to provide a practical example of these concepts.
About the ListNavDemo Project
When completed, the project will consist of a List view in which each row contains a cell displaying image and text information. Selecting a row within the list will navigate to a details screen containing more information about the selected item. In addition, the List view will include options to add and remove entries and to change the ordering of rows in the list.
The project extensively uses state properties and observable objects to keep the user interface synchronized with the data model.
Creating the ListNavDemo Project
Launch Xcode and select the option to create a new Multiplatform App named ListNavDemo.
Preparing the Project
Launch Xcode and select the option to create a new Multiplatform App named ListNavDemo.
 |
You are reading a sample chapter from an old edition of iOS App Development Essentials. Purchase the fully updated iOS 18 App Development Essentials book. The full book contains 71 chapters, over 612 pages of in-depth information, downloadable source code, and access to over 50 SwiftUI knowledge test quizzes. |
Before beginning the development of the app project, some preparatory work needs to be performed involving the addition of image and data assets which will be needed later in the chapter.
The assets to be used in the project are included in the source code sample download provided with the book available from the following URL:
https://www.ebookfrenzy.com/web/swiftui-ios15/
Once the code samples have been downloaded and unpacked, open a Finder window, and locate the CarAssets.xcassets folder and drag and drop it onto the project navigator panel as illustrated in Figure 31-1:
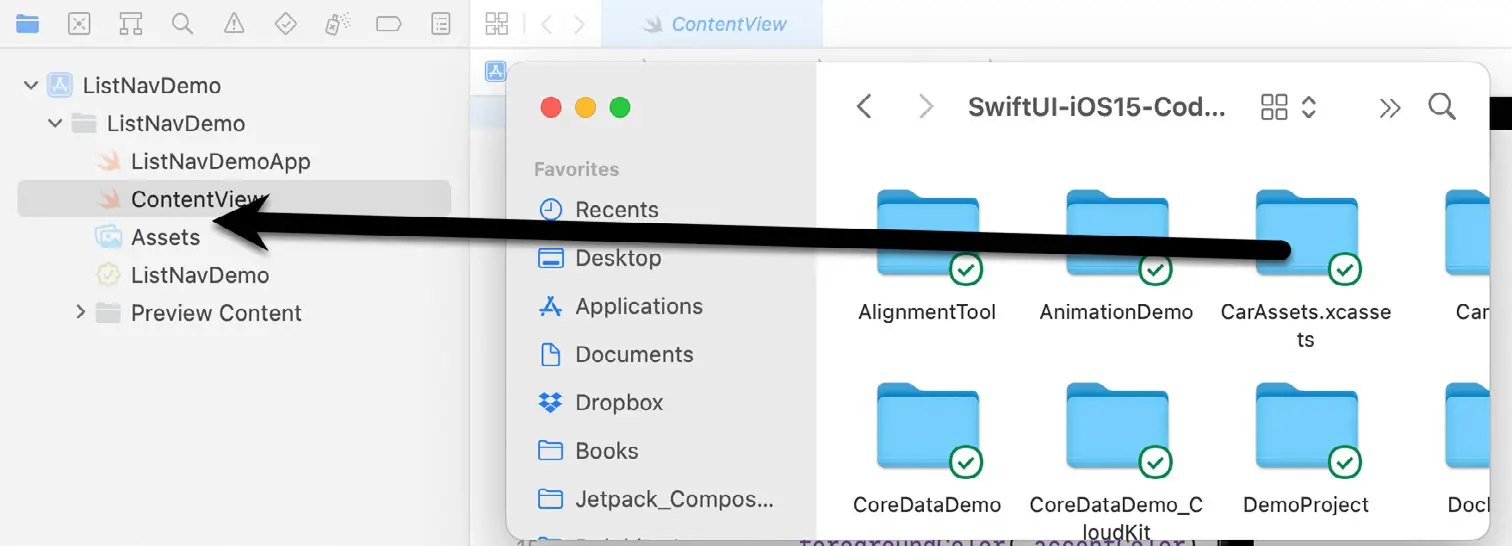
Figure 31-1
|
You are reading a sample chapter from an old edition of iOS App Development Essentials. Purchase the fully updated iOS 18 App Development Essentials book. The full book contains 71 chapters, over 612 pages of in-depth information, downloadable source code, and access to over 50 SwiftUI knowledge test quizzes. |
When the options dialog appears, enable the Copy items if needed option so that the assets are included within the project folder before clicking on the Finish button. With the image assets added, find the carData.json file located in the CarData folder and drag and drop it onto the Project navigator panel to also add it to the project.
This JSON file contains entries for different hybrid and electric cars including a unique id, model, description, a Boolean property indicating whether or not it is a hybrid vehicle, and the filename of the corresponding car image in the asset catalog. The following, for example, is the JSON entry for the Tesla Model 3:
{
    "id": "aa32jj887hhg55",
    "name": "Tesla Model 3",
    "description": "Luxury 4-door all-electric car. Range of 310 miles. 0-60mph in 3.2 seconds ",
    "isHybrid": false,
    "imageName": "tesla_model_3"
}Code language: JSON / JSON with Comments (json)
Adding the Car Structure
Now that the JSON file has been added to the project, a structure needs to be declared to represent each car model. Add a new Swift file to the project by selecting the File -> New -> File… menu option, selecting Swift File in the template dialog and clicking on the Next button. Name the file Car.swift on the subsequent screen before clicking on the Create button.
Once created, the new file will load into the code editor where it needs to be modified so that it reads as follows:
import SwiftUI

struct Car : Codable, Identifiable {
    var id: String
    var name: String

    var description: String
    var isHybrid: Bool

    var imageName: String
}Code language: Swift (swift)
As we can see, the structure contains a property for each field in the JSON file and is declared as conforming to the Identifiable protocol so that each instance can be uniquely identified within the List view.
|
You are reading a sample chapter from an old edition of iOS App Development Essentials. Purchase the fully updated iOS 18 App Development Essentials book. The full book contains 71 chapters, over 612 pages of in-depth information, downloadable source code, and access to over 50 SwiftUI knowledge test quizzes. |
31.5 Loading the JSON Data
The project will also need a way to load the carData.json file and translate the car entries into an array of Car objects. For this, we will add another Swift file containing a convenience function that reads the JSON file and initializes an array that can be accessed elsewhere in the project.
Using the steps outlined previously, add another Swift file named CarData.swift to the project and modify it as follows:
import UIKit
import SwiftUI

var carData: [Car] = loadJson("carData.json")

func loadJson<T: Decodable>(_ filename: String) -> T {
    let data: Data

    guard let file = Bundle.main.url(forResource: filename,
                                  withExtension: nil)
    else {
        fatalError("\(filename) not found.")
    }

    do {
        data = try Data(contentsOf: file)
    } catch {
        fatalError("Could not load \(filename): \(error)")
    }

    do {
        return try JSONDecoder().decode(T.self, from: data)
    } catch {
        fatalError("Unable to parse \(filename): \(error)")
    }
}Code language: Swift (swift)
The file contains a variable referencing an array of Car objects which is initialized by a call to the loadJson() function. The loadJson() function is a standard example of how to load a JSON file and can be used in your own projects.
Adding the Data Store
When the user interface has been designed, the List view will rely on an observable object to ensure that the latest data is always displayed to the user. So far, we have a Car structure and an array of Car objects loaded from the JSON file to act as a data source for the project. The last step in getting the data ready for use in the app is to add a data store structure. This structure will need to contain a published property that can be observed by the user interface to keep the List view up to date. Add another Swift file to the project, this time named CarStore. swift, and implement the class as follows:
import SwiftUI
import Combine

class CarStore : ObservableObject {

    @Published var cars: [Car]

    init (cars: [Car] = []) {
        self.cars = cars
    }
}Code language: Swift (swift)
This file contains a published property in the form of an array of Car objects and an initializer which is passed the array to be published.
|
You are reading a sample chapter from an old edition of iOS App Development Essentials. Purchase the fully updated iOS 18 App Development Essentials book. The full book contains 71 chapters, over 612 pages of in-depth information, downloadable source code, and access to over 50 SwiftUI knowledge test quizzes. |
With the data side of the project complete, it is now time to begin designing the user interface.
Designing the Content View
Select the ContentView.swift file and modify it as follows to add a state object binding to an instance of CarStore, passing through to its initializer the carData array created in the CarData.swift file:
import SwiftUI

struct ContentView: View {

    @StateObject var carStore : CarStore = CarStore(cars: carData)
.
.Code language: Swift (swift)
The content view is going to require a List view to display information about each car. Now that we have access to the array of cars via the carStore property, we can use a ForEach loop to display a row for each car model. The cell for each row will be implemented as an HStack containing an Image and a Text view, the content of which will be extracted from the carData array elements. Remaining in the ContentView.swift file, delete the existing views and implement the list as follows:
.
.
var body: some View {

        List {
            ForEach (0..<carStore.cars.count, id: \.self) { i in
                HStack {
                    Image(carStore.cars[i].imageName)
                        .resizable()
                        .aspectRatio(contentMode: .fit)
                        .frame(width: 100, height: 60)
                    Text(carStore.cars[i].name)
               }
            }
        }
    }
}
.
.Code language: Swift (swift)
With the change made to the view, use the preview canvas to verify that the list populates with content as shown in Figure 31-2:
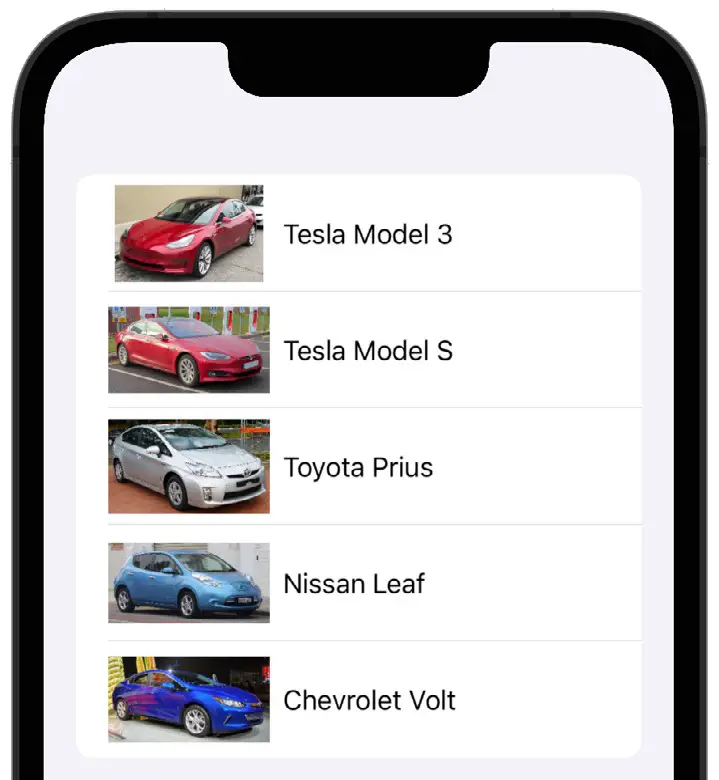
Figure 31-2
|
You are reading a sample chapter from an old edition of iOS App Development Essentials. Purchase the fully updated iOS 18 App Development Essentials book. The full book contains 71 chapters, over 612 pages of in-depth information, downloadable source code, and access to over 50 SwiftUI knowledge test quizzes. |
Before moving to the next step in the tutorial, the cell declaration will be extracted to a subview to make the declaration tidier. Within the editor, hover the mouse pointer over the HStack declaration and hold down the keyboard Command key so that the declaration highlights. With the Command key still depressed, left-click and select the Extract Subview menu option:
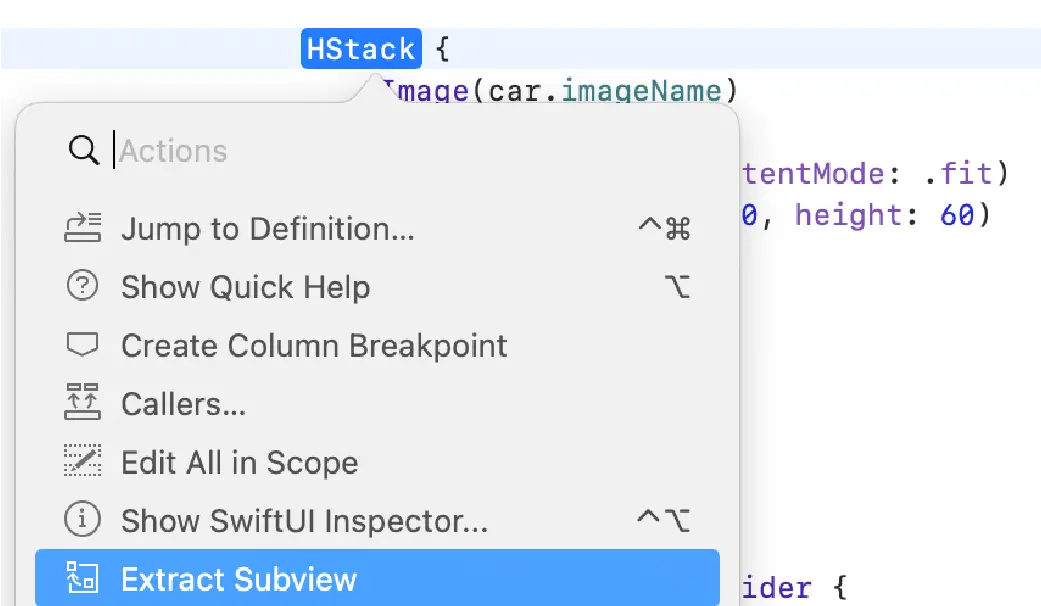
Figure 31-3
Once the view has been extracted, change the name from the default ExtractedView to ListCell. Because the ListCell subview is used within a ForEach statement, the current car will need to be passed through when it is used. Modify both the ListCell declaration and the reference as follows to remove the syntax errors:
    var body: some View {

            List {
                ForEach (0..<carStore.cars.count, id: \.self) { i in
                    ListCell(car: carStore.cars[i])
            }
        }
    }
}

struct ListCell: View {

    var car: Car

    var body: some View {
        HStack {
            Image(car.imageName)
                .resizable()
                .aspectRatio(contentMode: .fit)
                .frame(width: 100, height: 60)
            Text(car.name)
        }
    }
}Code language: Swift (swift)
Use the preview canvas to confirm that the extraction of the cell as a subview has worked successfully.
Designing the Detail View
When a user taps a row in the list, a detail screen will appear showing additional information about the selected car. The layout for this screen will be declared in a separate SwiftUI View file which now needs to be added to the project. Use the File -> New -> File… menu option once again, this time selecting the SwiftUI View template option and naming the file CarDetail.
|
You are reading a sample chapter from an old edition of iOS App Development Essentials. Purchase the fully updated iOS 18 App Development Essentials book. The full book contains 71 chapters, over 612 pages of in-depth information, downloadable source code, and access to over 50 SwiftUI knowledge test quizzes. |
When the user navigates to this view from within the List, it will need to be passed the Car instance for the selected car so that the correct details are displayed. Begin by adding a property to the structure and configuring the preview provider to display the details of the first car in the carData array within the preview canvas as follows:
import SwiftUI

struct CarDetail: View {

    let selectedCar: Car

    var body: some View {
.
.
    }
}

struct CarDetail_Previews: PreviewProvider {
    static var previews: some View {
        CarDetails(selectedCar: carData[0])
    }
}Code language: Swift (swift)
For this layout, a Form container will be used to organize the views. This is a container view that allows views to be grouped and divided into different sections. The Form also places a line divider between each child view.
Within the body of the CarDetail.swift file, implement the layout as follows:
var body: some View {
    Form {
        Section(header: Text("Car Details")) {
            Image(selectedCar.imageName)
                .resizable()
                .cornerRadius(12.0)
                .aspectRatio(contentMode: .fit)
                .padding()

                Text(selectedCar.name)
                    .font(.headline)

                Text(selectedCar.description)
                    .font(.body)

                HStack {
                    Text("Hybrid").font(.headline)
                    Spacer()
                    Image(systemName: selectedCar.isHybrid ?
                            "checkmark.circle" : "xmark.circle" )
                }
          }
    }
}Code language: Swift (swift)
Note that the Image view is configured to be resizable and scaled to fit the available space while retaining the aspect ratio. Rounded corners are also applied to make the image more visually appealing and either a circle or checkmark image is displayed in the HStack based on the setting of the isHybrid Boolean setting of the selected car.
When previewed, the screen should match that shown in Figure 31-4:
|
You are reading a sample chapter from an old edition of iOS App Development Essentials. Purchase the fully updated iOS 18 App Development Essentials book. The full book contains 71 chapters, over 612 pages of in-depth information, downloadable source code, and access to over 50 SwiftUI knowledge test quizzes. |

Figure 31-4
Adding Navigation to the List
The next step in this tutorial is to return to the List view in the ContentView.swift file and implement navigation so that selecting a row displays the detail screen populated with the corresponding car details.
With the ContentView.swift file loaded into the code editor, locate the call to the ListCell subview declaration and embed it within a NavigationLink using the current ForEach counter as the link value:
var body: some View {
    List {
        ForEach (0..<carStore.cars.count, id: \.self) { i in
            NavigationLink(value: i) {
                ListCell(car: carStore.cars[i])
            }
        }

    }
}Code language: Swift (swift)
For this navigation link to function, the List view must also be embedded in a NavigationStack as follows:
var body: some View {
    NavigationStack {
        List {
            ForEach (0..<carStore.cars.count, id: \.self) { i in
                NavigationLink(value: i) {
                    ListCell(car: carStore.cars[i])
                }
            }
        }
    }
}Code language: Swift (swift)
Next, we need to add the navigation destination modifier to the list so that tapping an item navigates to the CarDetail view containing details of the selected car:
|
You are reading a sample chapter from an old edition of iOS App Development Essentials. Purchase the fully updated iOS 18 App Development Essentials book. The full book contains 71 chapters, over 612 pages of in-depth information, downloadable source code, and access to over 50 SwiftUI knowledge test quizzes. |
NavigationStack {
    List {
        ForEach (0..<carStore.cars.count, id: \.self) { i in
            NavigationLink(value: i) {
                ListCell(car: carStore.cars[i])
            }
        }
    }
    .navigationDestination(for: Int.self) { i in
        CarDetail(selectedCar: carStore.cars[i])
    }
}Code language: Swift (swift)
Test that the navigation works using the preview canvas in Live mode and selecting different rows, confirming each time that the detail view appears containing information matching the selected car model.
Designing the Add Car View
The final view to be added to the project is the screen to be displayed when the user is adding a new car to the list. Add a new SwiftUI View file to the project named AddNewCar.swift including some state properties and a declaration for storing a reference to the carStore binding (this reference will be passed to the view from the ContentView when the user taps an Add button). Also, modify the preview provider to pass the carData array into the view for testing purposes:
import SwiftUI

struct AddNewCar: View {

    @StateObject var carStore : CarStore
    @State private var isHybrid = false
    @State private var name: String = ""
    @State private var description: String = ""
.
.
struct AddNewCar_Previews: PreviewProvider {
    static var previews: some View {
        AddNewCar(carStore: CarStore(cars: carData))
    }
}Code language: Swift (swift)
Next, add a new subview to the declaration that can be used to display a Text and TextField view pair into which the user will enter details of the new car. This subview will be passed a String value for the text to appear on the Text view and a state property binding into which the user’s input is to be stored. As outlined in the chapter entitled SwiftUI State Properties, Observable, State and Environment Objects, a property must be declared using the @Binding property wrapper if the view is being passed a state property. Remaining in the AddNewCar. swift file, implement this subview as follows:
struct DataInput: View {

    var title: String
    @Binding var userInput: String

    var body: some View {
        VStack(alignment: HorizontalAlignment.leading) {
            Text(title)
                .font(.headline)
            TextField("Enter \(title)", text: $userInput)
                        .textFieldStyle(RoundedBorderTextFieldStyle())
        }
        .padding()
    }
}Code language: Swift (swift)
With the subview added, declare the user interface layout for the main view as follows:
var body: some View {

    Form {
        Section(header: Text("Car Details")) {
            Image(systemName: "car.fill")
                .resizable()
                .aspectRatio(contentMode: .fit)
                .padding()

            DataInput(title: "Model", userInput: $name)
            DataInput(title: "Description", userInput: $description)

            Toggle(isOn: $isHybrid) {
                    Text("Hybrid").font(.headline)
            }.padding()
        }

        Button(action: addNewCar) {
            Text("Add Car")
            }
        }
}Code language: Swift (swift)
Note that two instances of the DataInput subview are included in the layout with an Image view, a Toggle, and a Button. The Button view is configured to call an action method named addNewCar when clicked. Within the body of the ContentView declaration, add this function now so that it reads as follows:
|
You are reading a sample chapter from an old edition of iOS App Development Essentials. Purchase the fully updated iOS 18 App Development Essentials book. The full book contains 71 chapters, over 612 pages of in-depth information, downloadable source code, and access to over 50 SwiftUI knowledge test quizzes. |
.
.
            Button(action: addNewCar) {
                Text("Add Car")
                }
            }
    }

    func addNewCar() {
        let newCar = Car(id: UUID().uuidString,
                      name: name, description: description,
                      isHybrid: isHybrid, imageName: "tesla_model_3" )

        carStore.cars.append(newCar)
    }
}Code language: Swift (swift)
The new car function creates a new Car instance using the Swift UUID() method to generate a unique identifier for the entry and the content entered by the user. For simplicity, rather than add code to select a photo from the photo library the function reuses the tesla_model_3 image for new car entries. Finally, the new Car instance is appended to the carStore car array.
When rendered in the preview canvas, the AddNewCar view should match Figure 31-5 below:

Figure 31-5
With this view completed, the next step is to modify the ContentView layout to include Add and Edit buttons.
31.11 Implementing Add and Edit Buttons
The Add and Edit buttons will be added to a navigation bar applied to the List view in the ContentView layout. The Navigation bar will also be used to display a title at the top of the list. These changes require the use of the navigationBarTitle() and navigationBarItems() modifiers as follows:
|
You are reading a sample chapter from an old edition of iOS App Development Essentials. Purchase the fully updated iOS 18 App Development Essentials book. The full book contains 71 chapters, over 612 pages of in-depth information, downloadable source code, and access to over 50 SwiftUI knowledge test quizzes. |
var body: some View {
    NavigationStack {
        List {
            ForEach (0..<carStore.cars.count, id: \.self) { i in
                NavigationLink(value: i) {
                    ListCell(car: carStore.cars[i])
                }
            }
        }
        .navigationDestination(for: Int.self) { i in
            CarDetail(selectedCar: carStore.cars[i])
        }
        .navigationBarTitle(Text("EV Cars"))
                .navigationBarItems(leading:
                NavigationLink(value: "Add Car") {
                    Text("Add")
                        .foregroundColor(.blue)
                }, trailing: EditButton())
    }
}Code language: Swift (swift)
The Add button is configured to appear at the leading edge of the navigation bar and is implemented as a NavigationLink using a string value that reads “Add Car”. We now need to add a second navigation destination modifier for this string-based link that displays the AddNewCar view:
NavigationStack {
    List {
        ForEach (0..<carStore.cars.count, id: \.self) { i in
            NavigationLink(value: i) {
                ListCell(car: carStore.cars[i])
            }
        }
    }
    .navigationDestination(for: Int.self) { i in
        CarDetail(selectedCar: carStore.cars[i])
    }
    .navigationDestination(for: String.self) { _ in
        AddNewCar(carStore: self.carStore)
    }
    .navigationBarTitle(Text("EV Cars"))
Code language: Swift (swift)
The Edit button, on the other hand, is positioned on the trailing edge of the navigation bar and is configured to display the built-in EditButton view. A preview of the modified layout at this point should match the following figure:

Figure 31-6
Using Live Preview mode, test that the Add button displays the new car screen and that entering new car details and clicking the Add Car button causes the new entry to appear in the list after tapping the back button to return to the content view screen. Ideally, the Add Car button should automatically return us to the content view without the need to use the back button. To implement this, we will need to use a navigation path.
Adding a Navigation Path
Begin by editing the ContentView.swift file, adding a NavigationPath declaration, and passing it through to the NavigationStack:
|
You are reading a sample chapter from an old edition of iOS App Development Essentials. Purchase the fully updated iOS 18 App Development Essentials book. The full book contains 71 chapters, over 612 pages of in-depth information, downloadable source code, and access to over 50 SwiftUI knowledge test quizzes. |
struct ContentView: View {

    @StateObject var carStore : CarStore = CarStore(cars: carData)
    @State private var stackPath = NavigationPath()

    var body: some View {
        NavigationStack(path: $stackPath) {
.
.Code language: Swift (swift)
Having created a navigation path, we need to pass it to the AddNewCar view so that it can be used to return to the content view within the addNewCar() function. Edit the string-based .navigationDestination() modifier to pass the path binding to the view:
.navigationDestination(for: String.self) { _ in
    AddNewCar(carStore: carStore: self.carStore, path: $stackPath)
}Code language: Swift (swift)
Edit the AddNewCar.swift file to add the path binding parameter as follows:
struct AddNewCar: View {

    @StateObject var carStore : CarStore
    @Binding var path: NavigationPath
.
.Code language: Swift (swift)
We also need to comment out the preview provider, since the view is now expecting to be passed a navigation view to which we do not have access within the live preview:
/*
struct AddNewCar_Previews: PreviewProvider {
    static var previews: some View {
        AddNewCar(carStore: CarStore(cars: carData))
    }
}
*/Code language: plaintext (plaintext)
The last task in this phase of the tutorial is to call removeLast() on the navigation path to pop the current view off the navigation stack and return to the content view:
func addNewCar() {
    let newCar = Car(id: UUID().uuidString,
                  name: name, description: description,
                  isHybrid: isHybrid, imageName: "tesla_model_3" )

    carStore.cars.append(newCar)
    path.removeLast()
}Code language: Swift (swift)
Build and run the app on a device or simulator and test that the Add Car button returns to the content view when clicked.
|
You are reading a sample chapter from an old edition of iOS App Development Essentials. Purchase the fully updated iOS 18 App Development Essentials book. The full book contains 71 chapters, over 612 pages of in-depth information, downloadable source code, and access to over 50 SwiftUI knowledge test quizzes. |
Adding the Edit Button Methods
The final task in this tutorial is to add some action methods to be used by the EditButton view added to the navigation bar in the previous section. Because these actions are to be available for every row in the list, the actions must be applied to the list cells as follows:
var body: some View {
    NavigationStack(path: $stackPath) {
        List {
            ForEach (0..<carStore.cars.count, id: \.self) { i in
                NavigationLink(value: i) {
                    ListCell(car: carStore.cars[i])
                }
            }
            .onDelete(perform: deleteItems)
            .onMove(perform: moveItems)
        }
        .navigationDestination(for: Int.self) { i in
.
.Code language: Swift (swift)
Next, add the deleteItems() and moveItems() functions within the scope of the body declaration:
.
.
            .navigationBarTitle(Text("EV Cars"))
                    .navigationBarItems(leading:
                    NavigationLink(value: "Add Car") {
                        Text("Add")
                            .foregroundColor(.blue)
                    }, trailing: EditButton())
        }
    }

    func deleteItems(at offsets: IndexSet) {
        carStore.cars.remove(atOffsets: offsets)
    }

    func moveItems(from source: IndexSet, to destination: Int) {
        carStore.cars.move(fromOffsets: source, toOffset: destination)
    }
}Code language: Swift (swift)
In the case of the deleteItems() function, the offsets of the selected rows are provided and used to remove the corresponding elements from the car store array. The moveItems() function, on the other hand, is called when the user moves rows to a different location within the list. This function is passed source and destination values which are used to match the row position in the array.
Using Live Preview, click the Edit button and verify that it is possible to delete rows by tapping the red delete icon next to a row and to move rows by clicking and dragging on the three horizontal lines at the far-right edge of a row. In each case, the list contents should update to reflect the changes:
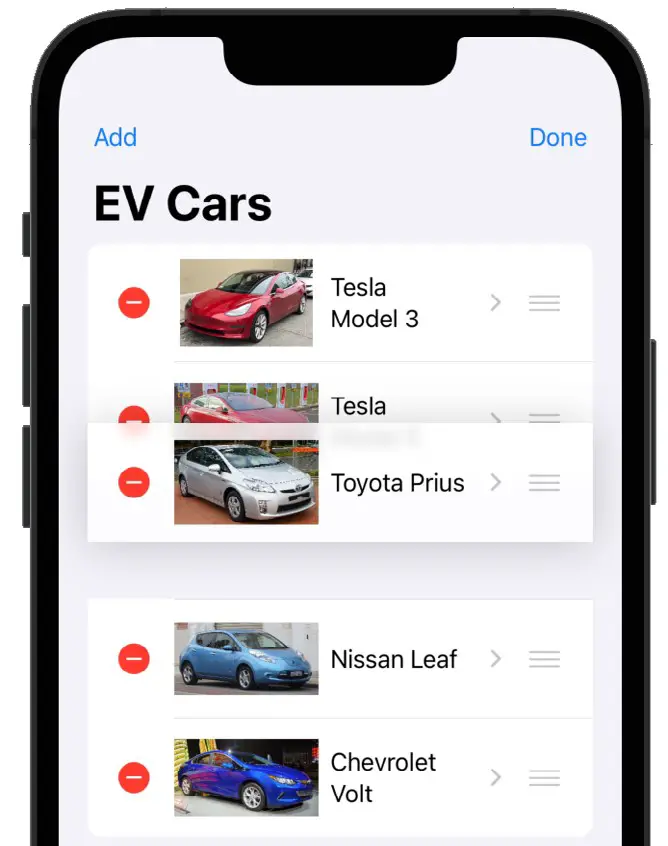
Figure 31-7
|
You are reading a sample chapter from an old edition of iOS App Development Essentials. Purchase the fully updated iOS 18 App Development Essentials book. The full book contains 71 chapters, over 612 pages of in-depth information, downloadable source code, and access to over 50 SwiftUI knowledge test quizzes. |
Summary
The main objective of this chapter has been to provide a practical example of using lists, navigation views, and navigation links within a SwiftUI project. This included the implementation of dynamic lists and list editing features. The chapter also served to reinforce topics covered in previous chapters including the use of observable objects, state properties, and property bindings. The chapter also introduced some additional SwiftUI features including the Form container view, navigation bar items, and the TextField view.