
The previous chapter introduced us to the SwiftUI NavigationSplitView component and described how multicolumn navigation is implemented and configured. This chapter will take what we have learned about NavigationSplitView and use it to create an example iOS app project.
About the Project
This tutorial will create the three-column split navigation app illustrated in the previous chapter. The sidebar column will list categories which, when selected, will update the content column to list icons belonging to the chosen category. The detail column will, in turn, display the currently selected icon from the content list.
Creating the NavSplitDemo Project
Launch Xcode and select the option to create a new Multiplatform App project named NavSplitDemo.
Adding the Project Data
Our first requirement is a class declaration we can use to store category names and corresponding icons. Right-click on the NavSplitDemo folder in the Project navigator, select the New File… menu option, and create a new Swift file named IconCategory.swift. With the file added to the project, modify it to declare a structure for storing each icon category:
import Foundation

struct IconCategory: Identifiable, Hashable {
    let id = UUID()
    var categoryName: String
    var images: [String]
}Code language: Swift (swift)
Next, edit the ContentView.swift file and add a state array variable populated with categories and icon names:
 |
You are reading a sample chapter from an old edition of iOS App Development Essentials. Purchase the fully updated iOS 18 App Development Essentials book. The full book contains 71 chapters, over 612 pages of in-depth information, downloadable source code, and access to over 50 SwiftUI knowledge test quizzes. |
import SwiftUI

struct ContentView: View {

    @State private var categories = [
        IconCategory(categoryName: "Folders", images: ["questionmark.folder.ar",
                                                   "questionmark.folder",
                                                   "questionmark.folder.fill.ar",
                                                   "folder.fill.badge.gear",
                                                   "questionmark.folder.fill"]),
        IconCategory(categoryName: "Circles", images: ["book.circle",
                                                    "books.vertical.circle",
                                                    "books.vertical.circle.fill",
                                                    "book.circle.fill",
                                                    "book.closed.circle"]),
        IconCategory(categoryName: "Clouds", images: ["cloud.rain",
                                                   "cloud",
                                                   "cloud.drizzle.fill",
                                                   "cloud.fill",
                                                   "cloud.drizzle"])
    ]
.
.Code language: Swift (swift)
Creating the Navigation View
The next step is to replace the default view within the ContentView with a NavigationSplitView as outlined below. As the project requires three columns, we need to include the sidebar, content, and detail declarations:
.
.
var body: some View {
    NavigationSplitView {

    } content: {

    } detail: {

    }
}
.
.Code language: Swift (swift)
Building the Sidebar Column
Now that we have added the NavigationSplitView we are ready to add the list of categories in the sidebar column. While doing this, we also need to add a state variable to store the currently selected item in the list. Remaining in the ContentView.swift file, make these changes as follows:
.
.
@State private var selectedCategory: IconCategory?
var body: some View {
    NavigationSplitView(columnVisibility: $columnVisibility) {
        List(categories, selection: $selectedCategory) { category in
            Text(category.categoryName).tag(category)
        }
    } content: {
.
.Code language: Swift (swift)
The code we have added displays a List view where each item is a Text view displaying a category name from the categories array. The List is passed a reference to our selectedCategory state variable for storing the most recent item selection.
Check the Preview panel and verify that the sidebar appears as shown in Figure 1-1 below:
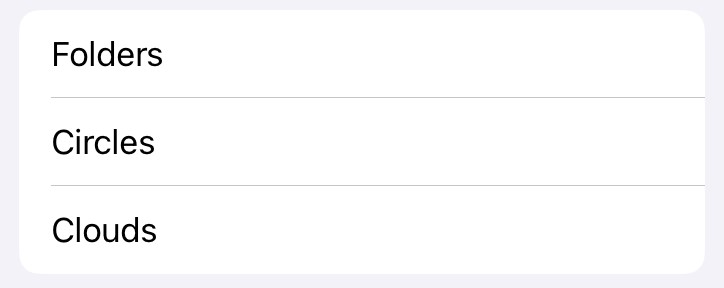
Figure 1-1
|
You are reading a sample chapter from an old edition of iOS App Development Essentials. Purchase the fully updated iOS 18 App Development Essentials book. The full book contains 71 chapters, over 612 pages of in-depth information, downloadable source code, and access to over 50 SwiftUI knowledge test quizzes. |
Adding the Content Column List
With the sidebar completed, we are ready to add a list within the content column. Since we also need to keep track of the currently selected icon name we will need another state variable. To avoid showing a blank column, we also need to add some code to display a message if the user has not yet made a category selection. We can do this by using an if-let statement to evaluate the selectedCategory state variable:
.
.
@State private var selectedCategory: IconCategory?
@State private var selectedImage: String?

var body: some View {
    NavigationSplitView {
        List(categories, selection: $selectedCategory) { category in
            Text(category.categoryName).tag(category)
        }
    } content: {
        if let selectedCategory {
            List(selectedCategory.images, id: \.self,
                           selection: $selectedImage) { image in
                HStack {
                    Image(systemName: image)
                    Text(image)
                }.tag(image)
            }
        } else {
            Text("Select a category")
        }
    } detail: {

    }
}
.
.Code language: Swift (swift)
For each item in the list, we are using a horizontal stack containing the icon and name text. Select an iPad or iPhone Pro Max simulator or physical device as the run target and build and run the app. Once the app is running, rotate the device or simulator into landscape orientation. If the app is functioning as expected, selecting items from the sidebar should cause the content column to list the corresponding icon options as shown in Figure 1-2:
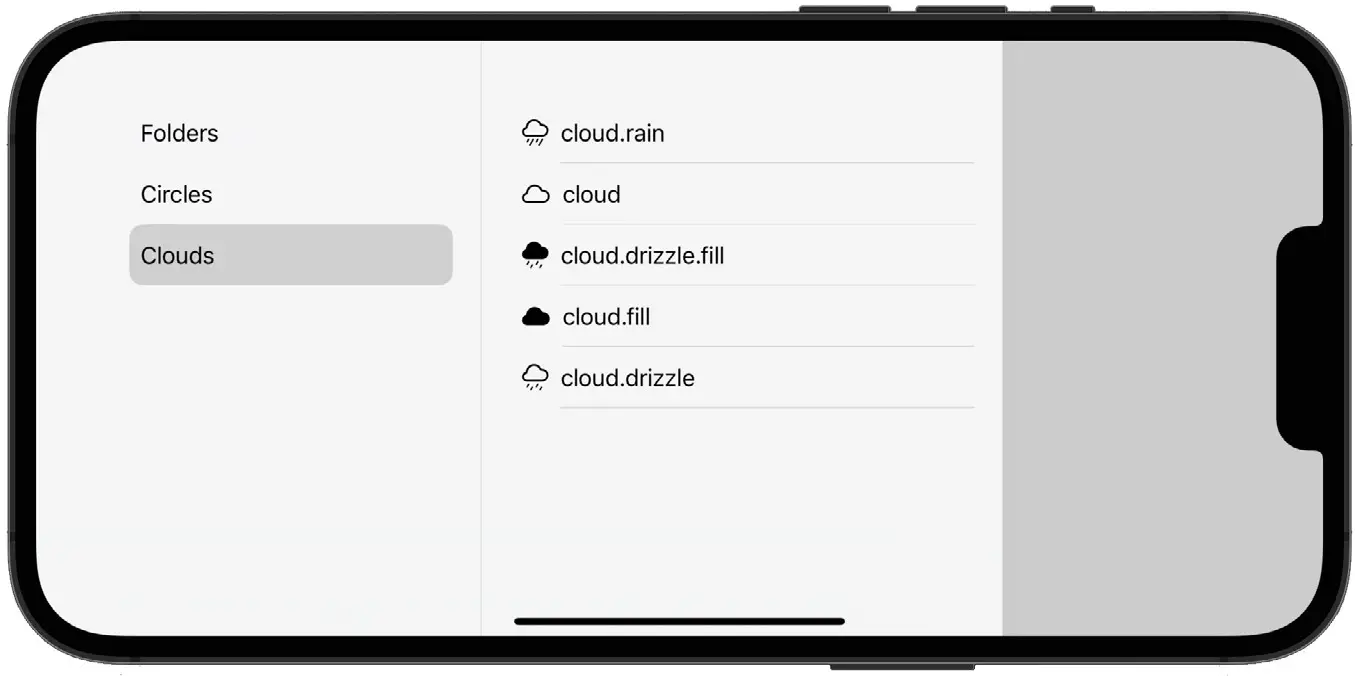
Figure 1-2
Adding the Detail Column
The detail column will display the selected icon in response to selections made within the content list. Locate the detail section within the NavigationSplitView declaration and modify it as follows, once again adding code to let the user know an icon needs to be selected:
NavigationSplitView {
    List(categories, selection: $selectedCategory) { category in
        Text(category.categoryName).tag(category)
    }
} content: {
.
.
} detail: {
    if let selectedImage {
        Image(systemName: selectedImage)
            .resizable()
            .aspectRatio(contentMode: .fit)
            .padding()
    } else {
        Text("Select an image")
    }
}Code language: Swift (swift)
When the app is launched it will appear with only the detail column visible as shown in Figure 1-3:
|
You are reading a sample chapter from an old edition of iOS App Development Essentials. Purchase the fully updated iOS 18 App Development Essentials book. The full book contains 71 chapters, over 612 pages of in-depth information, downloadable source code, and access to over 50 SwiftUI knowledge test quizzes. |
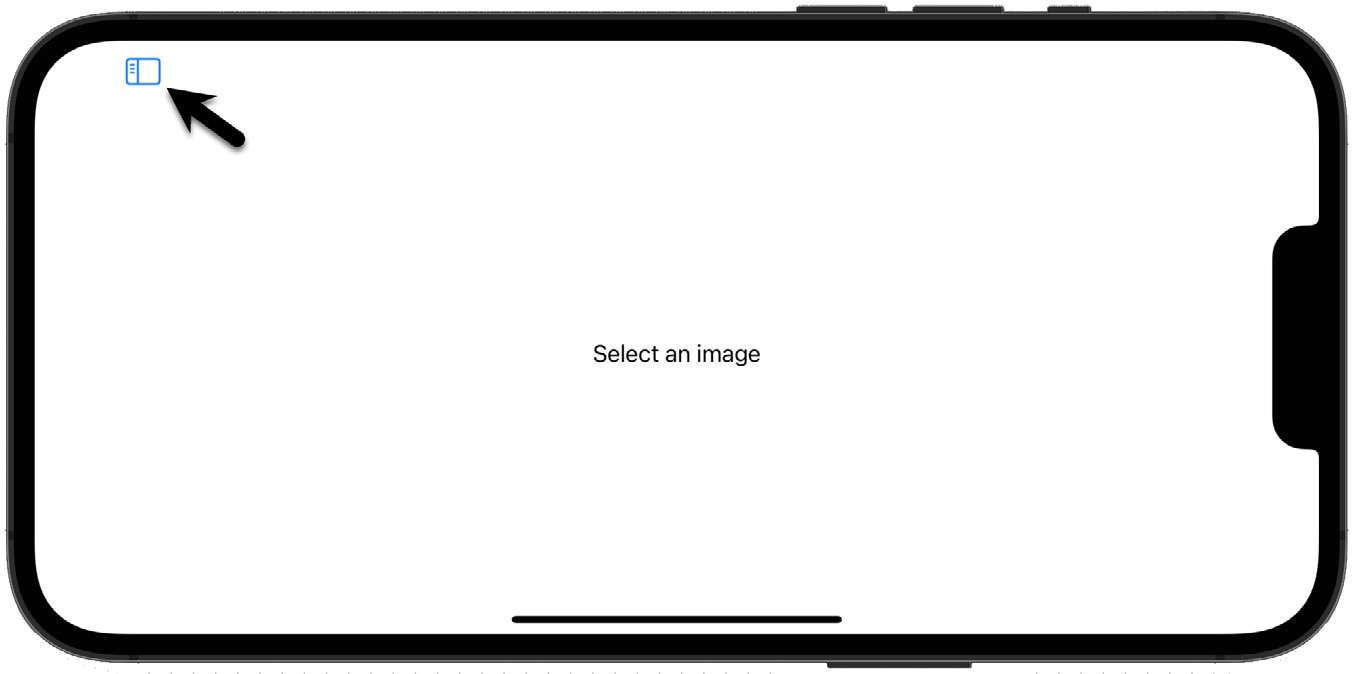
Figure 1-3
Clicking on the button marked by the arrow in the above figure will display the content column. Unfortunately, since we haven’t yet made a category selection, this column only shows the “Select a category” message. Clicking the Back button will finally give us access to the sidebar column where we can begin to make selections. Once a category and icon have been selected we can see that the detail column is obscured by the sidebar and content panels. To view the entire icon image we have to click on the detail column to hide the other two columns. While this may be the desired behavior in some situations, this is the opposite of the experience we are looking for in our app so some additional configuration is required.
Configuring the Split Navigation Experience
The average user would probably find our split navigation implementation confusing. To make the app more intuitive, we need all three columns to be visible when the app first launches. We can achieve this by passing the all value to the columnVisibility parameter of the NavigationSplitView instance as follows:
.
.
@State private var selectedCategory: IconCategory?
@State private var selectedImage: String?
@State private var columnVisibility = NavigationSplitViewVisibility.all

var body: some View {
    NavigationSplitView(columnVisibility: $columnVisibility) {
        List(categories, selection: $selectedCategory) { category in
            Text(category.categoryName).tag(category)
        }
.
.Code language: Swift (swift)
When we test the app, we will see all three columns but still have the problem that the detail view is obscured by the sidebar and content columns. The final change is to use the navigationSplitViewStyle() modifier to apply the balanced style:
.
.
           if let selectedImage {
                Image(systemName: selectedImage)
                    .resizable()
                    .aspectRatio(contentMode: .fit)
                    .padding()
            } else {
                Text("Select an image")
            }
        }
        .navigationSplitViewStyle(.balanced)
    }
}
.
.Code language: Swift (swift)
With this final change applied, the running app should now match Figure 1-4:
|
You are reading a sample chapter from an old edition of iOS App Development Essentials. Purchase the fully updated iOS 18 App Development Essentials book. The full book contains 71 chapters, over 612 pages of in-depth information, downloadable source code, and access to over 50 SwiftUI knowledge test quizzes. |
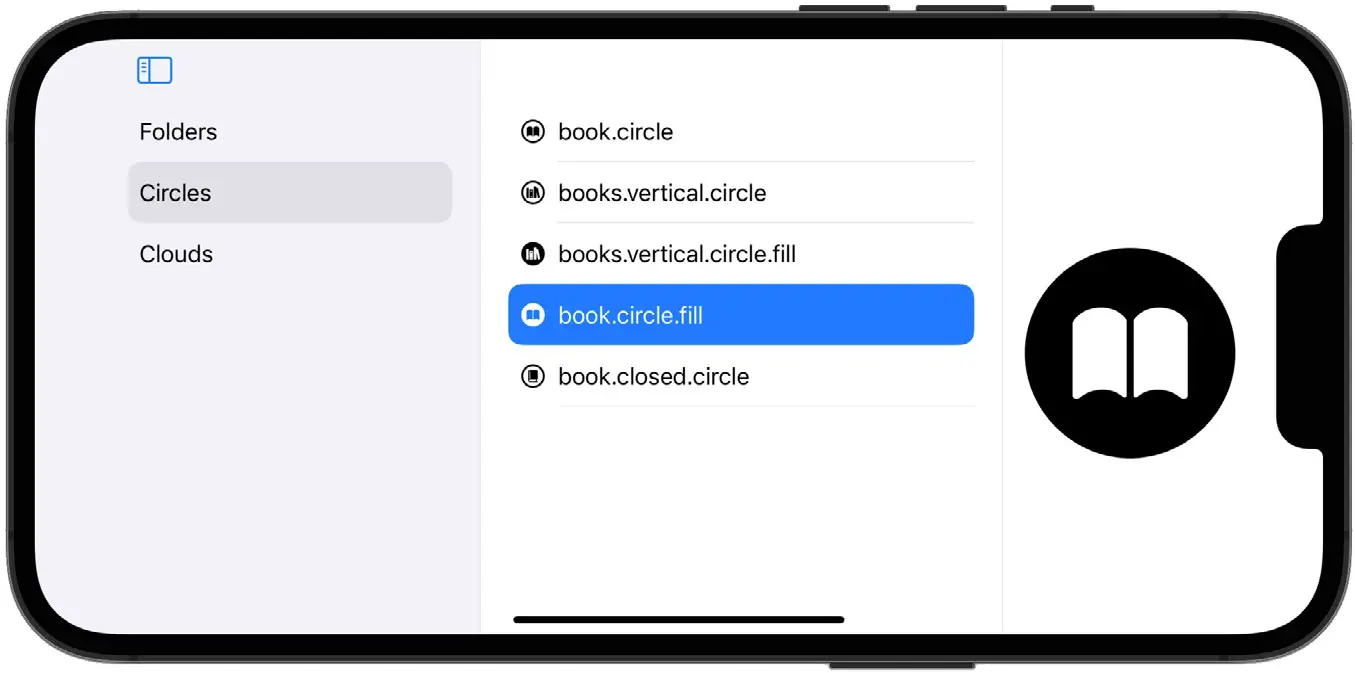
Figure 1-4
Summary
In this chapter, we created a SwiftUI-based app project that implements three-column navigation using the NavigationSplitView component. We also changed the default navigation behavior to match the requirements of our app.