
Very few Android apps today consist of just a single screen. In reality, most apps comprise multiple screens through which the user navigates using screen gestures, button clicks, and menu selections. Before the introduction of Android Jetpack, the implementation of navigation within an app was largely a manual coding process with no easy way to view and organize potentially complex navigation paths. This situation improved considerably, however, with the introduction of the Android Navigation Architecture Component which has now been extended to support navigation in Compose-based apps. This chapter will provide an overview of navigation within Compose including explanations of routes, navigation graphs, the navigation back stack, passing arguments, and the NavHostController and NavHost classes.
Understanding navigation
Every app has a home screen that appears after the app has launched and after any splash screen has appeared (a splash screen being the app branding screen that appears temporarily while the app loads). From this home screen, the user will typically perform tasks that will result in other screens appearing. These screens will usually take the form of other composables within the project. A messaging app, for example, might have a home screen listing current messages from which the user can navigate to either another screen to access a contact list, or to a settings screen. The contacts list screen, in turn, might allow the user to navigate to other screens where new users can be added or existing contacts updated. Graphically, the app’s navigation graph might be represented as shown in Figure 44-1:
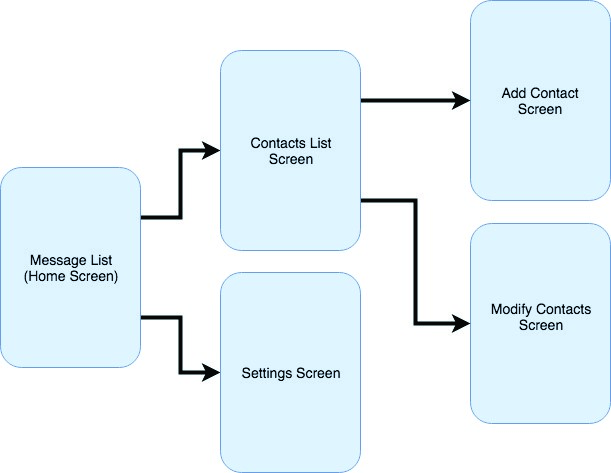
Figure 44-1
Each screen that makes up an app, including the home screen, is referred to as a destination and is usually a composable or activity. The Android navigation architecture uses a navigation back stack to track the user’s path through the destinations within the app. When the app first launches, the home screen is the first destination placed onto the stack and becomes the current destination. When the user navigates to another destination, that screen becomes the current destination and is pushed onto the back stack above the home destination. As the user navigates to other screens, they are also pushed onto the stack. Figure 44-2, for example, shows the current state of the navigation stack for the hypothetical messaging app after the user has launched the app and is navigating to the “Add Contact” screen:
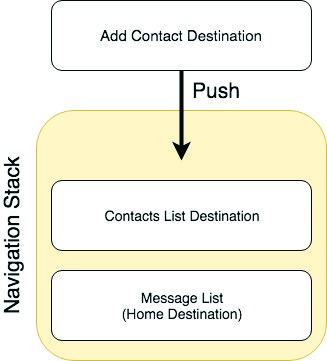
Figure 44-2
 |
You are reading a sample chapter from an old edition of the Jetpack Compose Essentials book. Purchase the fully updated Jetpack Compose 1.7 Essentials edition of this book in eBook or Print format. The full book contains 67 chapters and over 700 pages of in-depth information. Buy the full book now in Print or eBook format. Learn more. |
As the user navigates back through the screens using the system back button, each destination composable is popped off the stack until the home screen is once again the only destination on the stack. In Figure 44-3, the user has navigated back from the Add Contact screen, popping it off the stack and making the Contact List screen composable the current destination:
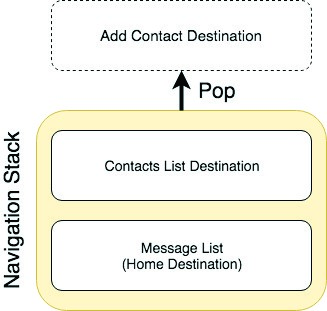
Figure 44-3
All of the work involved in navigating between destinations and managing the navigation stack is handled by a navigation controller which is represented by the NavHostController class. It is also possible to manually pop composables off the stack so that the app returns to a screen lower down the stack when the user navigates backward from the current screen.
Adding navigation to an Android project using the Navigation Architecture Component is a straightforward process involving a navigation host, navigation graph, navigation actions, and a minimal amount of code writing to obtain a reference to, and interact with, the navigation controller instance.
Declaring a navigation controller
The first step in adding navigation to an app project is to create a NavHostController instance. This is responsible for managing the back stack and keeping track of which composable is the current destination. So that the integrity of the back stack is maintained through recomposition, NavHostController is a stateful object and is created via a call to the rememberNavController() method as follows:
|
You are reading a sample chapter from an old edition of the Jetpack Compose Essentials book. Purchase the fully updated Jetpack Compose 1.7 Essentials edition of this book in eBook or Print format. The full book contains 67 chapters and over 700 pages of in-depth information. Buy the full book now in Print or eBook format. Learn more. |
val navController = rememberNavController()Code language: Kotlin (kotlin)Once a navigation controller has been created it needs to be assigned to a NavHost instance.
Declaring a navigation host
The navigation host (NavHost) is a special component that is added to the user interface layout of an activity and serves as a placeholder for the destinations through which the user will navigate. Figure 44-4, for example, shows a typical activity screen and highlights the area represented by the navigation host:
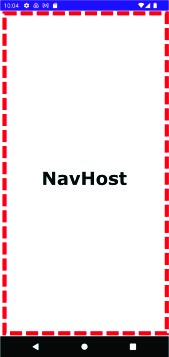
Figure 44-4
When it is called, NavHost must be passed a NavHostController instance, a composable to serve as the start destination, and a navigation graph. The navigation graph consists of all the composables that are to be available as navigation destinations within the context of the navigation controller. These destinations are declared in the form of routes:
NavHost(navController = navController, startDestination = <start route>) {
    // Navigation graph destinations
}Code language: Kotlin (kotlin)
Adding destinations to the navigation graph
Destinations are added to the navigation graph by making calls to the composable() method and providing a route and destination. The route is simply a string value that uniquely identifies the destination within the context of the current navigation controller and the destination is the composable to be called when the navigation is performed. The following NavHost declaration includes a navigation graph consisting of three destinations, with the “home” route configured as the start destination:
|
You are reading a sample chapter from an old edition of the Jetpack Compose Essentials book. Purchase the fully updated Jetpack Compose 1.7 Essentials edition of this book in eBook or Print format. The full book contains 67 chapters and over 700 pages of in-depth information. Buy the full book now in Print or eBook format. Learn more. |
NavHost(navController = navController, startDestination = "home") {

    composable("home") {
        Home()
    }

    composable("customers") {
        Customers()
    }

    composable("purchases") {
        Purchases()
    }
}Code language: Kotlin (kotlin)
A more flexible alternative to hard coding the route strings into the composable() method calls is to define the routes in a sealed class:
sealed class Routes(val route: String) {
    object Home : Routes("home")
    object Customers : Routes("customers")
    object Purchases : Routes("purchases")
}Code language: Kotlin (kotlin)
With the class declared, the NavHost will now reference the routes as follows:
NavHost(navController = navController, startDestination = Routes.Home.route) {

    composable(Routes.Home.route) {
        Home()
    }

    composable(Routes.Customers.route) {
        Customers()
    }

    composable(Routes.Purchases.route) {
        Purchases()
    }
}Code language: Kotlin (kotlin)
The use of the sealed class approach gives us the advantage of a single location in which to make changes to the routes, and also adds syntax validation to avoid mistyping a route string when creating a NavHost or performing navigation.
Navigating to destinations
The primary mechanism for triggering navigation is via calls to the navigate() method of the navigation controller instance, specifying the route for the destination composable. The following code, for example, configures a Button component to navigate to the Customers screen when clicked:
Button(onClick = {
    navController.navigate(Routes.Customers.route)
}) {
    Text(text = "Navigate to Customers")
}Code language: Kotlin (kotlin)
The navigate() method also accepts a trailing lambda containing navigation options, one of which is the popUpTo() function. Consider, for example, a scenario where the user starts on the home screen and then navigates to the customer screen. The customer screen displays a list of customer names which, when clicked navigates to the purchases screen populated with a list of the selected customer’s previous purchases. At this point, the back stack contains the customer and home destinations. If the user where to tap the back button located at the bottom of the screen, the app will navigate back to the customer screen. The popUpTo() navigation option allows us to pop items off the stack back to the specific destination. We could, for example, pop all destinations off the stack before navigating to the purchases screen so that only the home destination remains on the back stack as follows:
|
You are reading a sample chapter from an old edition of the Jetpack Compose Essentials book. Purchase the fully updated Jetpack Compose 1.7 Essentials edition of this book in eBook or Print format. The full book contains 67 chapters and over 700 pages of in-depth information. Buy the full book now in Print or eBook format. Learn more. |
Button(onClick = {
    navController.navigate(Routes.Customers.route) {
        popUpTo(Routes.Home.route)
    }
}) {
    Text(text = "Navigate to Customers")
}Code language: JavaScript (javascript)
Now when the user clicks the back button on the purchases screen, the app will navigate directly to the home screen. The popUpTo() method also accepts options. The following, for example, uses the inclusive option to also pop the home destination off the stack before performing the navigation:
Button(onClick = {
    navController.navigate(Routes.Customers.route) {
        popUpTo(Routes.Home.route) {
            inclusive = true
        }
    }
}) {
    Text(text = "Navigate to Customers")
}Code language: Kotlin (kotlin)
By default, an attempt to navigate from the current destination to itself will push an additional instance of the destination onto the stack. In most situations, this is unlikely to be the desired behavior. To prevent the addition of multiple instances of the same destination to the top of the stack, set the launchSingleTop option to true when calling the navigate() method:
Button(onClick = {
    navController.navigate(Routes.Customers.route) {
        launchSingleTop = true
    }
}) {
    Text(text = "Navigate to Customers")
}Code language: Kotlin (kotlin)
The saveState and restoreState options, if set to true, will automatically save and restore the state of back stack entries when the user reselects a destination that has been selected previously.
Passing arguments to a destination
It is a common requirement when navigating from one screen to another to need to pass an argument to the destination. Compose supports the passing of arguments of a wide range of types from one screen to another and involves several steps. In our hypothetical example, we would probably need to pass the name of the selected customer from the customer screen to the purchases screen so that the correct purchase history can be displayed.
The first step in navigating with arguments involves adding the argument name to the destination route. We can, for example, add an argument named “customerName” to the purchases route as follows:
|
You are reading a sample chapter from an old edition of the Jetpack Compose Essentials book. Purchase the fully updated Jetpack Compose 1.7 Essentials edition of this book in eBook or Print format. The full book contains 67 chapters and over 700 pages of in-depth information. Buy the full book now in Print or eBook format. Learn more. |
NavHost(navController = navController, startDestination = Routes.Home.route) {
.
.
    composable(Routes.Purchases.route + "/{customerName}") {
        Purchases()
    }
.
.
}Code language: Kotlin (kotlin)
When the app triggers navigation to the customer destination, the value to be assigned to the argument will be stored within the corresponding back stack entry. The back stack entry for the current navigation is passed as a parameter to the trailing lambda of the composable() method where it can be extracted and passed to the Customer composable:
composable(Routes.Purchases.route + "/{customerName}") { backStackEntry ->

    val customerName = backStackEntry.arguments?.getString("customerName")

    Purchases(customerName)
}Code language: Kotlin (kotlin)
By default, the navigation argument is assumed to be of String type. To pass arguments of different types, the type must be specified using the NavType enumeration via the composable() method arguments parameter. In the following example, the parameter type is declared as being of type Int. Note also that the argument now needs to be extracted from the back stack entry using getInt() instead of getString():
composable(Routes.Purchases.route + "/{customerId}",
  arguments = listOf(navArgument("customerId") { type = NavType.IntType })) {
                          navBackStack ->
    Customers(navBackStack.arguments?.getInt("customerId"))
}Code language: JavaScript (javascript)
The final step is to pass a value for the argument when making the navigate() method call. We do this by appending the argument value to the end of the destination route. Assuming that the value we need to pass to the purchases screen is stored as a state variable named selectedCustomer, the navigate() call would be written as follows:
@Composable
fun Customers(customerName: String?) {
.
.
}Code language: CSS (css)
When the button is clicked, the following sequence of events will occur:
- A back stack entry is created for the current destination.
- The current selectedCustomer state value is stored in the back stack entry.
- The back stack entry is pushed onto the back stack.
- The composable() method for the purchase route in the NavHost declaration is called.
- The trailing lambda of the composable() method extracts the argument value from the back stack entry and passes it to the Purchases composable.
Working with bottom navigation bars
So far in this chapter, we have focused on navigation in response to click events on Button components. Another common form of navigation involves the bottom navigation bar.
|
You are reading a sample chapter from an old edition of the Jetpack Compose Essentials book. Purchase the fully updated Jetpack Compose 1.7 Essentials edition of this book in eBook or Print format. The full book contains 67 chapters and over 700 pages of in-depth information. Buy the full book now in Print or eBook format. Learn more. |
The bottom navigation bar appears at the bottom of the screen and displays a list of navigation items usually comprising an icon and a label. Clicking on an item navigates to the different screen within the current activity. An example bottom navigation bar is illustrated in Figure 44-5 below:

Figure 44-5
The core components of bottom bar navigation are the Compose BottomNavigation and BottomNavigationItem components. Implementation typically involves a parent BottomNavigationBar containing a forEach loop which iterates through a list creating each BottomNavigationItem child. Each child is configured with the label and icon to be displayed and an onClick handler to perform the navigation to the corresponding destination. Typical syntax will read as follows:
BottomNavigation {

    <items list>.forEach { navItem ->

        BottomNavigationItem(
            selected = <true | false>,
            onClick = {
                navController.navigate(navItem.route) {
                    popUpTo(navController.graph.findStartDestination().id) {
                        saveState = true
                    }
                    launchSingleTop = true
                    restoreState = true
                }
            },

            icon = {
                <icon>
            },
            label = {
                <text>
            },
        )
    }
}Code language: Kotlin (kotlin)
Note that the PopUpTo() method is called to make sure that if the user clicks the back button the navigation returns to the start destination. We can identify the start destination by calling the findStartDestination() method on the navigation graph:
navController.graph.findStartDestination()Code language: Kotlin (kotlin)Also, the launchSingleTop, saveState, and restoreState options need to be enabled when working with bottom bar navigation.
|
You are reading a sample chapter from an old edition of the Jetpack Compose Essentials book. Purchase the fully updated Jetpack Compose 1.7 Essentials edition of this book in eBook or Print format. The full book contains 67 chapters and over 700 pages of in-depth information. Buy the full book now in Print or eBook format. Learn more. |
Each BottomNavigationItem needs to be told whether it is the currently selected item via the selected property. When working with bottom bar navigation, you will need to write code to compare the route associated with the item against the current route selection. The current route selection can be obtained by gaining access to the back stack via the currentBackStackEntryAsState() method of the navigation controller and accessing the destination route property, for example:
BottomNavigation {
    val backStackEntry by navController.currentBackStackEntryAsState()
    val currentRoute = backStackEntry?.destination?.route

    NavBarItems.BarItems.forEach { navItem ->

        BottomNavigationItem(
            selected = currentRoute == navItem.route
.
.Code language: Kotlin (kotlin)
The two routes are then compared and the result assigned to the selected property. A more detailed example of bottom bar navigation will be demonstrated in the chapter entitled “A Compose Bottom Navigation Bar Tutorial”.
Summary
This chapter has covered the addition of navigation to Android apps using the Compose support built into the Jetpack Navigation Architecture Component. Navigation is implemented by creating an instance of the NavHostController class and associating it with a NavHost instance. The NavHost instance is configured with the starting destination and the navigation routes that make up the navigation graph for the current activity. Navigation is then performed by making calls to the navigate() method of the navigation controller instance, passing through the path of the destination composable. Compose also supports the passing of arguments to the destination composable. Navigation may also be added to screens using the Compose BottomNavigation and BottomNavigationItem components.