
In the previous chapter, we explored how to integrate in-app purchasing into an Android project and also looked at some code samples that can be used when working on your own projects. This chapter will put this theory into practice by creating an example project that demonstrates how to add a consumable in-app product to an Android app. The tutorial will also show how in-app products are added and managed within the Google Play Console and explain how to enable test payments so that purchases can be made during testing without having to spend real money.
About the In-App Purchasing Example Project
The simple concept behind this project is an app in which an in-app product must be purchased before a button can be clicked. This in-app product is consumed each time the button is clicked, requiring the user to re-purchase the product each time they want to be able to click the button. On initialization, the app will connect to the app store, obtain details of the product, and display the product name. Once the app has established that the product is available, a purchase button will be enabled which, when clicked, will step through the purchase process. On completion of the purchase, the main button will be enabled so that the user can click on it and consume the purchase.
Creating the InAppPurchase Project
The first step in this exercise is to create a new project. Begin by launching Android Studio, selecting the New Project option from the welcome screen. In the new project dialog, choose the Empty Activity template before clicking on the Next button.
Enter InAppPurchase into the Name field and specify a package name that will uniquely identify your app within the Google Play ecosystem (for example com.<your company>.InAppPurchase). Before clicking on the Finish button, change the Minimum API level setting to API 26: Android 8.0 (Oreo) and the Language menu to Java. Once the project has been created, use the steps outlined in section 11.8 Migrating a Project to View Binding to convert the project to use view binding.
Adding Libraries to the Project
Before we start writing code, some libraries need to be added to the project build configuration, one of which is the standard Android billing client library. Later in the project, we will also need to use the ImmutableList class which is part of Google’s Guava Core Java libraries. Add these libraries now by modifying the Gradle Scripts -> build.gradle (Module: InAppPurchase.app) file with the following changes:
.
.
dependencies {
.
.
    implementation 'com.android.billingclient:billing:5.0.0'
    implementation 'com.google.guava:guava:24.1-jre'
    implementation 'com.google.guava:guava:27.0.1-android'
.
.Code language: Gradle (gradle)
After adding the library, click on the Sync Now link at the top of the editor panel to commit the changes.
Designing the User Interface
The user interface will consist of the existing TextView and two Buttons. With the activity_main.xml file loaded into the editor, drag and drop two Button views onto the layout so that one is above and the other below the TextView. Select the TextView and change the id attribute to statusText.
Click on the Clear all Constraints button in the toolbar and shift-click to select all three views. Right-click on the top-most Button view and select the Center -> Horizontally in Parent menu option. Repeat this step once more, this time selecting Chains -> Create Vertical Chain. Change the text attribute of the top button so that it reads “Consume Purchase”, the id to consumeButton, and set the enabled property to false. Also, configure the onClick property to call a method named consumePurchase.
Select the bottom-most button and repeat the above steps, this time setting the text to “Buy Product”, the id to buyButton, the onClick callback to makePurchase, and the enabled property to false. Once completed, the layout should match that shown in Figure 84-1:
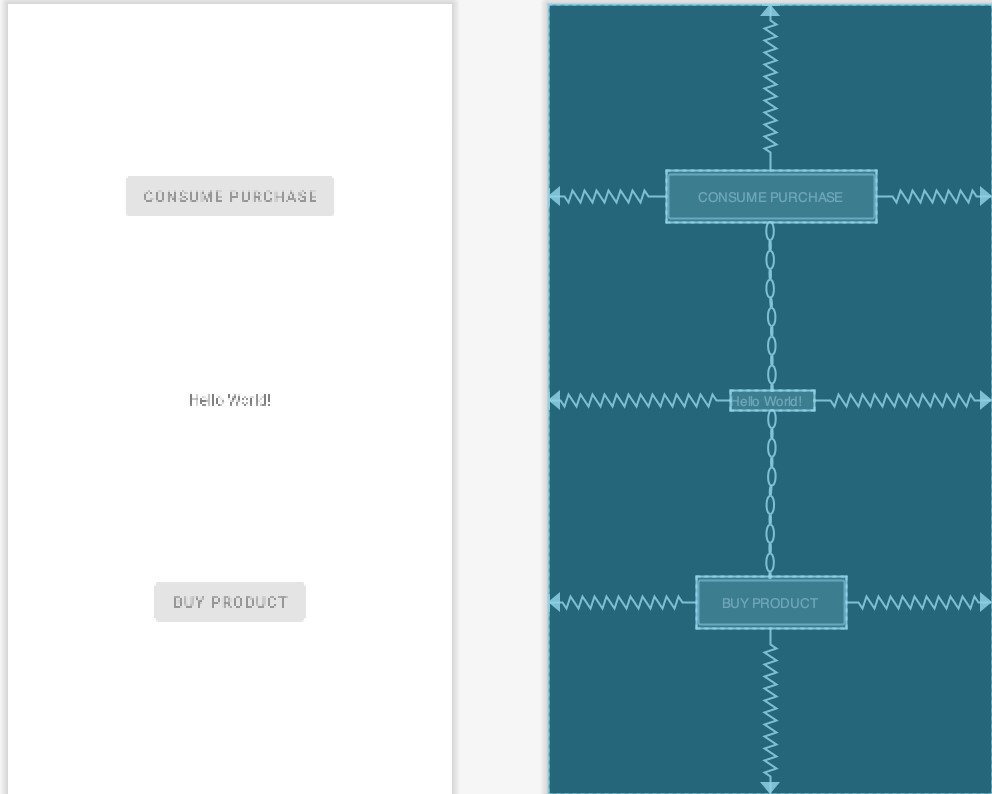
Figure 84-1
Adding the App to the Google Play Store
Using the steps outlined in the chapter entitled “Creating, Testing and Uploading an Android App Bundle”, sign into the Play Console, create a new app, and set up a new internal testing track including the email addresses of designated testers. Return to Android Studio and generate a signed release app bundle for the project. Once the bundle file has been generated, upload it to the internal testing track and roll it out for testing.
Now that the app has a presence in the Google Play Store, we are ready to create an in-app product for the project.
Creating an In-App Product
With the app selected in the Play Console, scroll down the list of options in the left-hand panel until the Monetize section comes into view. Within this section, select the In-app products option listed under Products as shown in Figure 84-2:
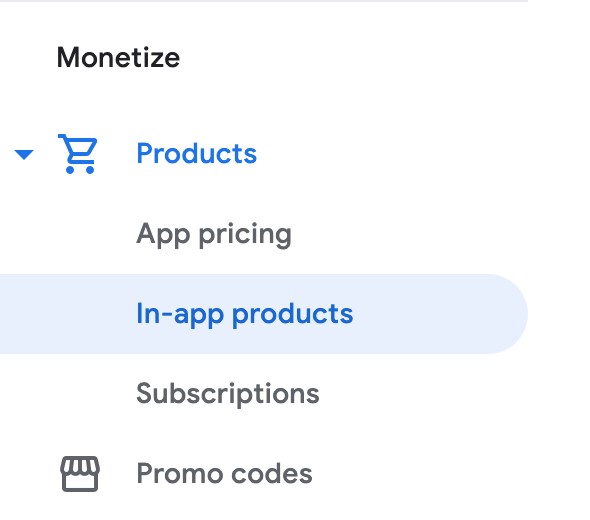
Figure 84-2
On the In-app products page, click on the Create product button:

Figure 84-3
On the new product screen, enter the following information before saving the new product:
- Product ID: one_button_click
- Name: A Button Click
- Description: This is a test in-app product that allows a button to be clicked once.
- Default price: Set to the lowest possible price in your preferred currency.
Enabling License Testers
When testing in-app billing it is useful to be able to make test purchases without spending any money. This can be achieved by enabling license testing for the internal track testers. License testers can use a test payment card when making purchases so that they are not charged.
Within the Play Console, return to the main home screen and select the Setup -> License testing option:
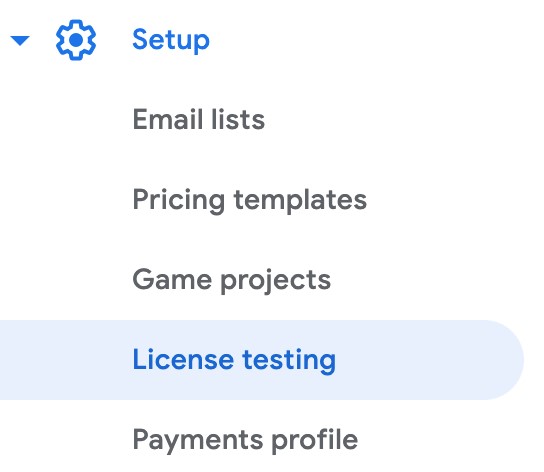
Figure 84-4
Within the license testing screen, add the testers that were added for the internal testing track, change the License response setting to RESPOND_NORMALLY, and save the changes:
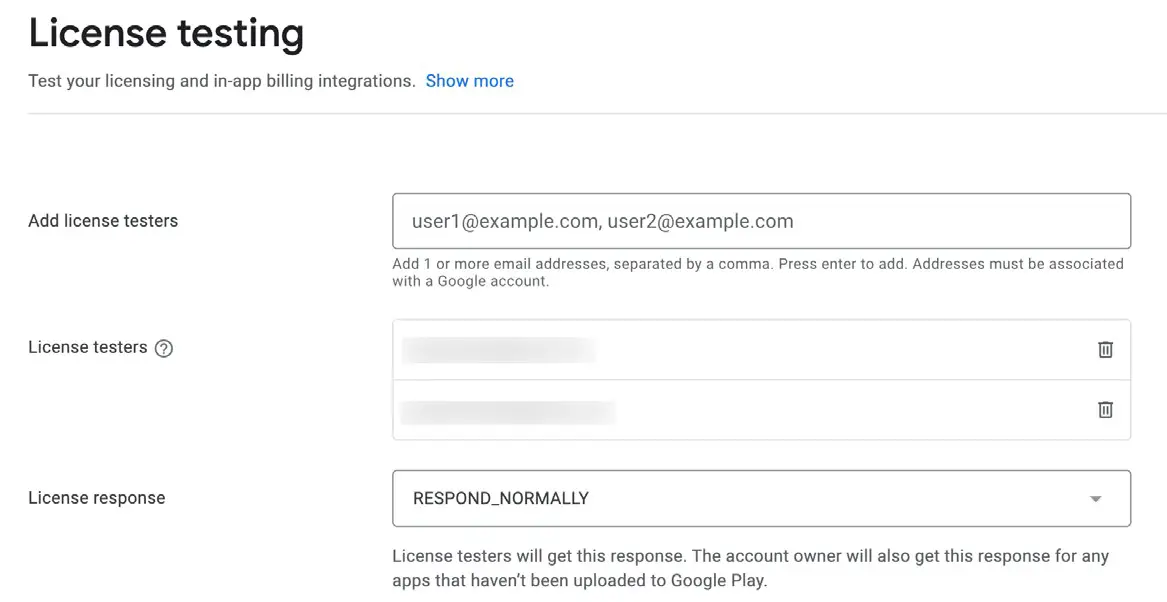
Figure 84-5
Now that both the app and the in-app product have been set up in the Play Console, we can start adding code to the project.
Initializing the Billing Client
Edit the MainActivity.java file and make the following changes to begin implementing the in-app purchase functionality:
.
.
import androidx.annotation.NonNull;

import android.util.Log;
import com.android.billingclient.api.*;
.
.
public class MainActivity extends AppCompatActivity {

    private ActivityMainBinding binding;
    private BillingClient billingClient;
    private ProductDetails productDetails;
    private Purchase purchase;

    static final String TAG = "InAppPurchaseTag";

    @Override
    protected void onCreate(Bundle savedInstanceState) {
        super.onCreate(savedInstanceState);
        binding = ActivityMainBinding.inflate(getLayoutInflater());
        View view = binding.getRoot();
        setContentView(view);
        billingSetup();
    }

    private void billingSetup() {

        billingClient = BillingClient.newBuilder(this)
                .setListener(purchasesUpdatedListener)
                .enablePendingPurchases()
                .build();

        billingClient.startConnection(new BillingClientStateListener() {

            @Override
            public void onBillingSetupFinished(
                       @NonNull BillingResult billingResult) {

                if (billingResult.getResponseCode() ==
                          BillingClient.BillingResponseCode.OK) {
                    Log.i(TAG, "OnBillingSetupFinish connected");
                    queryProduct();
                } else {
                    Log.i(TAG, "OnBillingSetupFinish failed");
                }
            }

            @Override
            public void onBillingServiceDisconnected() {
                Log.i(TAG, "OnBillingSetupFinish connection lost");
            }
        });
    }
.
.Code language: Java (java)
When the app starts, the onCreate() method will now call billingSetup() which will, in turn, create a new billing client instance and attempt to connect to the Google Play Billing Library. The onBillingSetupFinished() listener will be called when the connection attempt completes and output Logcat messages indicating the success or otherwise of the connection attempt. Finally, we have also implemented the onBillingServiceDisconnected() callback which will be called if the Google Play Billing Library connection is lost.
If the connection is successful a method named queryProduct() is called. Both this method and the purchasesUpdatedListener assigned to the billing client now need to be added.
Querying the Product
To make sure the product is available for purchase, we need to create a QueryProductDetailsParams instance configured with the product ID that was specified in the Play Console, and pass it to the queryProductDetailsAsync() method of the billing client. This will require that we also add the onProductDetailsResponse() callback method where we will check that the product exists, extract the product name, and display it on the status TextView. Now that we have obtained the product details, we can also safely enable the buy button. Within the MainActivity.java file, add the queryProduct() method so that it reads as follows:
.
.
import com.google.common.collect.ImmutableList;

import java.util.List;
.
.
private void queryProduct() {

    QueryProductDetailsParams queryProductDetailsParams =
        QueryProductDetailsParams.newBuilder()
                .setProductList(
                        ImmutableList.of(
                                QueryProductDetailsParams.Product.newBuilder()
                                        .setProductId("one_button_click")
                                        .setProductType(
                                         BillingClient.ProductType.INAPP)
                                            .build()))
                    .build();

    billingClient.queryProductDetailsAsync(
            queryProductDetailsParams,
            new ProductDetailsResponseListener() {
                public void onProductDetailsResponse(
                      @NonNull BillingResult billingResult,
                           @NonNull List productDetailsList) {

                    if (!productDetailsList.isEmpty()) {
                        productDetails = productDetailsList.get(0);
                        runOnUiThread(() -> {
                            binding.buyButton.setEnabled(true);
                            binding.statusText.setText(productDetails.getName());
                        });
                    } else {
                        Log.i(TAG, "onProductDetailsResponse: No products");
                    }
                }
            }
    );
}Code language: Java (java)
Much of the code used here should be familiar from the previous chapter. The listener code checks that at least one product was found that matches the query criteria. The ProductDetails object is then extracted from the first matching product, stored in the productDetails variable, and the product name property displayed is on the TextView.
One point of note is that when we enable the buy button and display the product name on the status TextView we do so by calling runOnUiThread(). This is necessary because the listener is not running on the main thread so cannot safely make direct changes to the user interface.
Launching the Purchase Flow
When the user clicks the buy button, a method named makePurchase() will be called to start the purchase process. We can now add this method as follows:
public void makePurchase(View view) {

    BillingFlowParams billingFlowParams =
        BillingFlowParams.newBuilder()
            .setProductDetailsParamsList(
                ImmutableList.of(
                    BillingFlowParams.ProductDetailsParams.newBuilder()
                        .setProductDetails(productDetails)
                        .build()
                 )
            )
            .build();

    billingClient.launchBillingFlow(this, billingFlowParams);
}Code language: Java (java)
Handling Purchase Updates
The results of the purchase process will be reported to the app via the PurchaseUpdatedListener that was assigned to the billing client during the initialization phase. Add this handler now as follows:
private final PurchasesUpdatedListener purchasesUpdatedListener = new PurchasesUpdatedListener() {
    @Override
    public void onPurchasesUpdated(BillingResult billingResult,
                            List purchases) {

        if (billingResult.getResponseCode() ==
                         BillingClient.BillingResponseCode.OK
                && purchases != null) {
            for (Purchase purchase : purchases) {
                completePurchase(purchase);
            }
        } else if (billingResult.getResponseCode() ==
               BillingClient.BillingResponseCode.USER_CANCELED) {
            Log.i(TAG, "onPurchasesUpdated: Purchase Canceled");
        } else {
            Log.i(TAG, "onPurchasesUpdated: Error");
        }
    }
};Code language: Java (java)
The handler will output log messages if the user cancels the purchase or another error occurs. A successful purchase, however, results in a call to a method named completePurchase() which is passed the current Purchase object. Add this method as outlined below:
private void completePurchase(Purchase item) {

    purchase = item;

    if (purchase.getPurchaseState() == Purchase.PurchaseState.PURCHASED)
        runOnUiThread(() -> {
                binding.consumeButton.setEnabled(true);
                binding.statusText.setText("Purchase Complete");
        });
}Code language: Java (java)
This method stores the purchase before verifying that the product has indeed been purchased and that payment is not still pending. The “consume” button is then enabled and the user is notified that the purchase was successful.
Consuming the Product
With the user now able to click on the “consume” button, the next step is to make sure the product is consumed so that only one click can be performed before another button click is purchased. This requires that we now write the consumePurchase() method:
public void consumePurchase(View view) {
    ConsumeParams consumeParams =
            ConsumeParams.newBuilder()
                    .setPurchaseToken(purchase.getPurchaseToken())
                    .build();

    ConsumeResponseListener listener = new ConsumeResponseListener() {
        @Override
        public void onConsumeResponse(BillingResult billingResult,
                  @NonNull String purchaseToken) {
            if (billingResult.getResponseCode() ==
                         BillingClient.BillingResponseCode.OK) {
                runOnUiThread(() -> {
                    binding.consumeButton.setEnabled(false);
                    binding.statusText.setText("Purchase consumed");
                });
            }
        }
    };
    billingClient.consumeAsync(consumeParams, listener);
}Code language: Java (java)
This method creates a ConsumeParams instance and configures it with the purchase token for the current purchase (obtained from the Purchase object previously saved in the completePurchase() method). A handler is declared to disable the consume button and update the status text if the consumption is successful. Finally, the consumeAsync() method of the billing client is called and passed both the consumer parameters and a reference to the listener.
Testing the App
Before we can test the app we need to upload this latest version to the Play Console. As we already have version 1 uploaded, we first need to increase the version number in the build.gradle (Module: InAppPurchase.app) file:
.
.
defaultConfig {
    applicationId "com.ebookfrenzy.inapppurchase"
    minSdk 26
    targetSdk 32
    versionCode 2
    versionName "2.0"
.
.Code language: Gradle (gradle)
Sync the build configuration, then follow the steps in the “Creating, Testing and Uploading an Android App Bundle” chapter to generate a new app bundle, upload it to the internal test track and roll it out to the testers. Using the testing track link, install the app on a device or emulator on which one of the test accounts is signed in.
After the app starts it should, after a short delay, display the product name on the TextView and enable the buy button. Clicking the buy button will begin the purchase flow as shown in Figure 84-6:
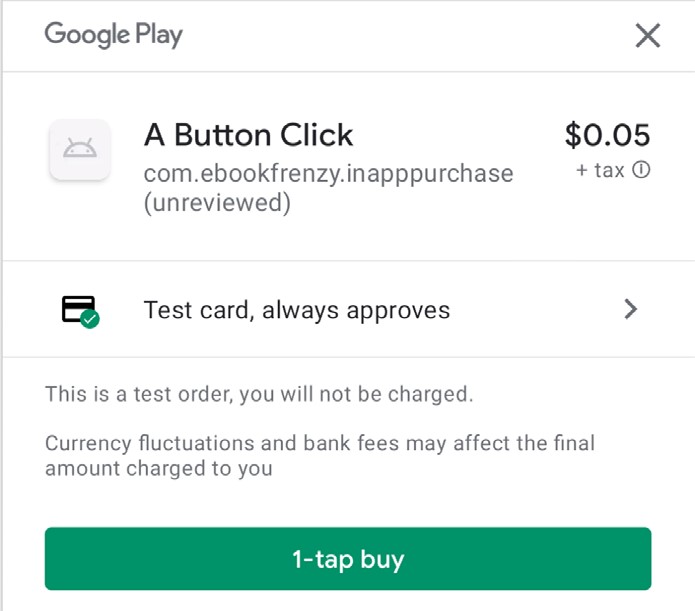
Figure 84-6
Tap the buy button to complete the purchase using the test card and wait for the Consume Purchase button to be enabled. Before tapping this button, attempt to purchase the product again and verify that it is not possible to do so because you already own the product.
Tap the Consume Purchase button and wait for the “Purchase consumed” message to appear on the TextView. With the product consumed, it should now be possible to purchase it again.
Troubleshooting
If you encounter problems with the purchase, make sure the device is attached to Android Studio, either via a USB cable or WiFi, and select it from within the Logcat panel. Enter InAppPurchaseTag into the Logcat search bar and check the diagnostic output, adding additional Log calls in the code if necessary. For additional information about failures, a useful trick is to access the debug message from BillingResult instances, for example:
.
.
} else if (billingResult.getResponseCode()
            == BillingClient.BillingResponseCode.USER_CANCELED) {
    Log.i(TAG, "onPurchasesUpdated: Purchase Canceled");
} else {
    Log.i(TAG, billingResult.getDebugMessage());
}Code language: Java (java)
Note that as long as you leave the app version number unchanged in the module-level build.gradle file, you should now be able to run modified versions of the app directly on the device or emulator without having to re-bundle and upload it to the console.
If the test payment card is not listed, make sure the user account on the device has been added to the license testers list. If the app is running on a physical device, try running it on an emulator. If all else fails, you can enter a valid payment method to make test purchases, and then refund yourself using the Order management screen accessible from the Play Console home page.
Summary
In this chapter, we created a project that demonstrated how to add an in-app product to an Android app. This included the creation of the product within the Google Play Console and the writing of code to initialize and connect to the billing client, querying of available products, and, finally, the purchase and consumption of the product. We also explained how to add license testers with the Play Console so that purchases can be made during testing without spending money.