
Before introducing the Swift programming language in the following chapters, it is first worth learning about a feature of Xcode known as Playgrounds. This is a feature of Xcode designed to make learning Swift and experimenting with the iOS SDK much easier. The concepts covered in this chapter can be put to use when experimenting with many of the introductory Swift code examples contained in the chapters that follow.
What is a Playground?
A playground is an interactive environment where Swift code can be entered and executed with the results appearing in real-time. This makes an ideal environment in which to learn the syntax of Swift and the visual aspects of iOS app development without the need to work continuously through the edit/compile/run/debug cycle that would ordinarily accompany a standard Xcode iOS project. With support for rich text comments, playgrounds are also a good way to document code for future reference or as a training tool.
Creating a New Playground
To create a new Playground, start Xcode and select the File -> New -> Playground… menu option. Choose the iOS option on the resulting panel and select the Blank template.
The Blank template is useful for trying out Swift coding. The Single View template, on the other hand, provides a view controller environment for trying out code that requires a user interface layout. The game and map templates provide preconfigured playgrounds that allow you to experiment with the iOS MapKit and SpriteKit frameworks respectively.
On the next screen, name the playground LearnSwift and choose a suitable file system location into which the playground should be saved before clicking on the Create button.
 |
You are reading a sample chapter from an old edition of iOS App Development Essentials. Purchase the fully updated iOS 18 App Development Essentials book. The full book contains 71 chapters, over 612 pages of in-depth information, downloadable source code, and access to over 50 SwiftUI knowledge test quizzes. |
Once the playground has been created, the following screen will appear ready for Swift code to be entered:
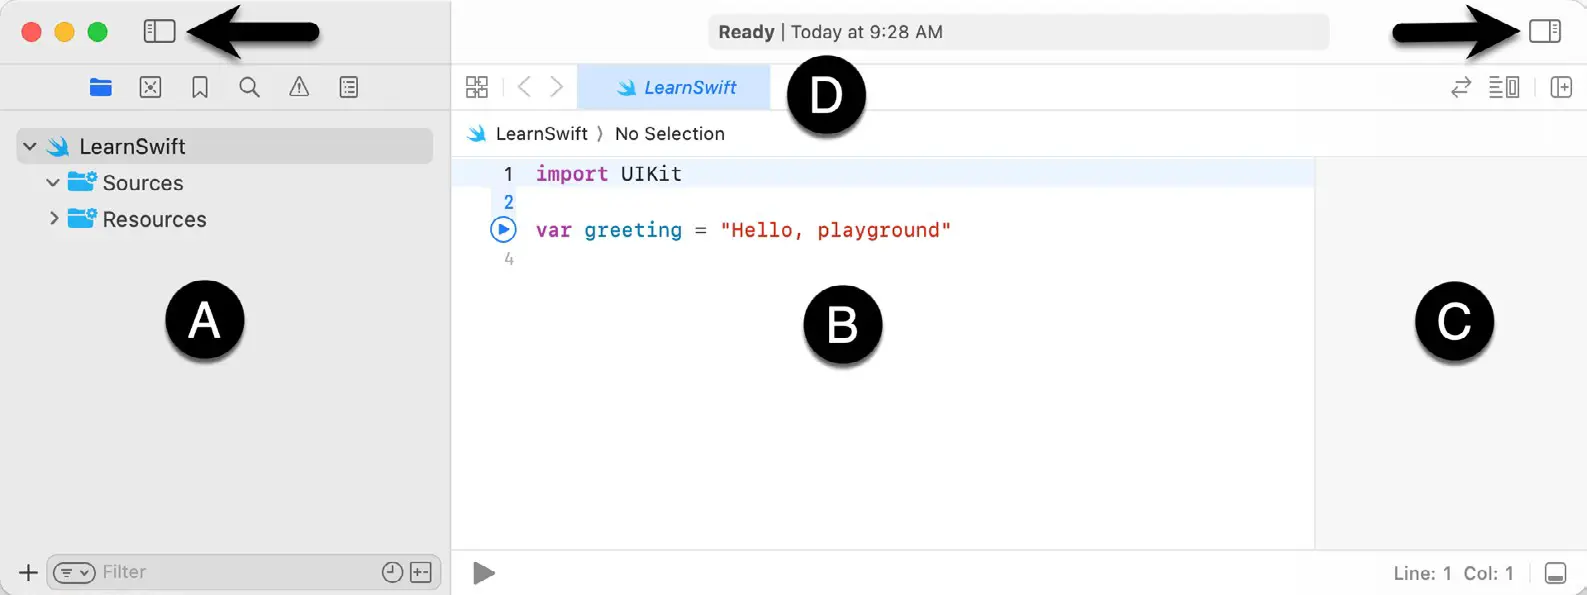
The panel on the left-hand side of the window (marked A in Figure 4-1) is the Navigator panel which provides access to the folders and files that make up the playground. To hide and show this panel, click on the button indicated by the left-most arrow. The center panel (B) is the playground editor where the lines of Swift code are entered. The right-hand panel (C) is referred to as the results panel and is where the results of each Swift expression entered into the playground editor panel are displayed. The tab bar (D) will contain a tab for each file currently open within the playground editor. To switch to a different file, simply select the corresponding tab. To close an open file, hover the mouse pointer over the tab and click on the “X” button when it appears to the left of the file name.
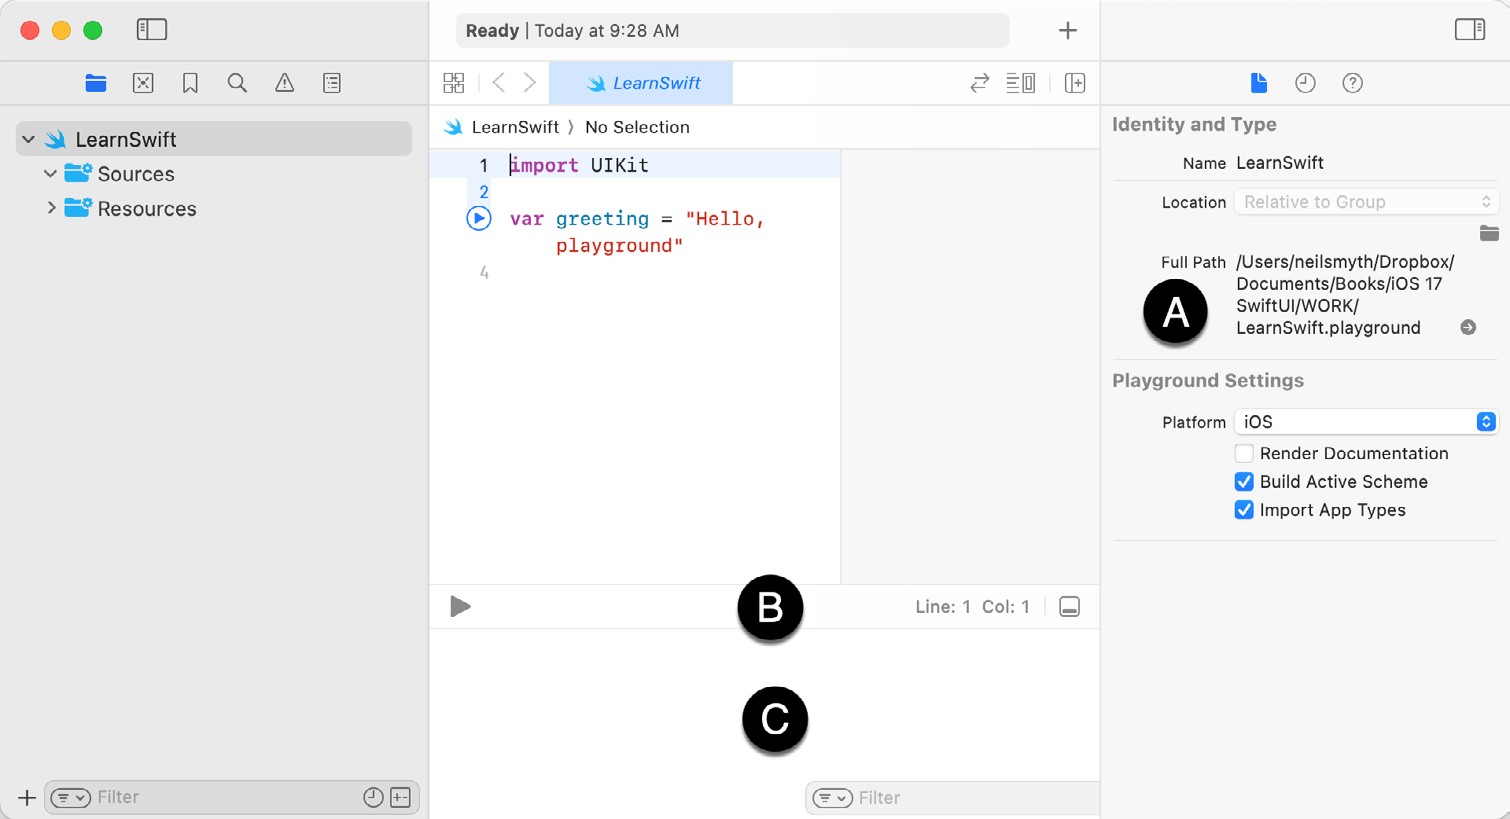
The button marked by the right-most arrow in the above figure is used to hide and show the Inspectors panel (marked A in Figure 4-2 below) where a variety of properties relating to the playground may be configured. Clicking and dragging the bar (B) upward will display the Debug Area (C) where diagnostic output relating to the playground will appear when code is executed:
By far the quickest way to gain familiarity with the playground environment is to work through some simple examples.
A Swift Playground Example
Perhaps the simplest of examples in any programming language (that at least does something tangible) is to write some code to output a single line of text. Swift is no exception to this rule so, within the playground window, begin adding another line of Swift code so that it reads as follows:
|
You are reading a sample chapter from an old edition of iOS App Development Essentials. Purchase the fully updated iOS 18 App Development Essentials book. The full book contains 71 chapters, over 612 pages of in-depth information, downloadable source code, and access to over 50 SwiftUI knowledge test quizzes. |
import UIKit

var greeting = "Hello, playground"

print("Welcome to Swift")Code language: Swift (swift)
All that the additional line of code does is make a call to the built-in Swift print function which takes as a parameter a string of characters to be displayed on the console. Those familiar with other programming languages will note the absence of a semi-colon at the end of the line of code. In Swift, semi-colons are optional and generally only used as a separator when multiple statements occupy the same line of code.
Note that although some extra code has been entered, nothing yet appears in the results panel. This is because the code has yet to be executed. One option to run the code is to click on the Execute Playground button located in the bottom left-hand corner of the main panel as indicated by the arrow in Figure 4-3:

When clicked, this button will execute all the code in the current playground page from the first line of code to the last. Another option is to execute the code in stages using the run button located in the margin of the code editor, as shown in Figure 4-4:
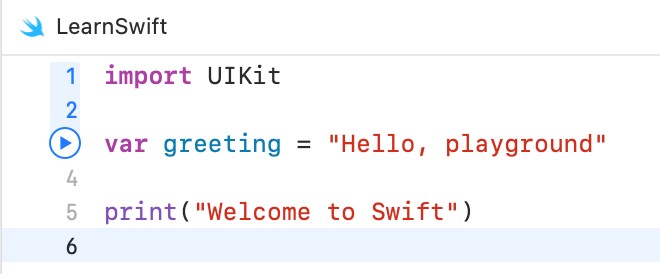
This button executes the line numbers with the shaded blue background including the line on which the button is currently positioned. In the above figure, for example, the button will execute lines 1 through 3 and then stop.
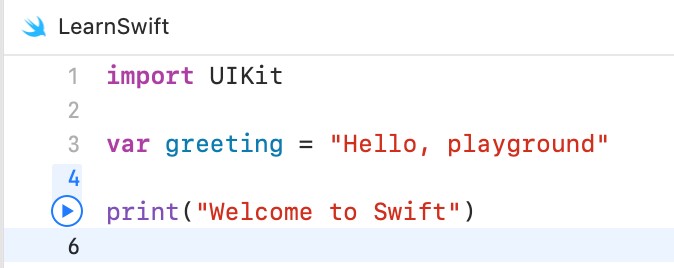
The position of the run button can be moved by hovering the mouse pointer over the line numbers in the editor. In Figure 4-5, for example, the run button is now positioned on line 5 and will execute lines 4 and 5 when clicked. Note that lines 1 to 3 are no longer highlighted in blue indicating that these have already been executed and are not eligible to be run this time:
|
You are reading a sample chapter from an old edition of iOS App Development Essentials. Purchase the fully updated iOS 18 App Development Essentials book. The full book contains 71 chapters, over 612 pages of in-depth information, downloadable source code, and access to over 50 SwiftUI knowledge test quizzes. |
This technique provides an easy way to execute the code in stages making it easier to understand how the code functions and to identify problems in code execution.
To reset the playground so that execution can be performed from the start of the code, simply click on the stop button as indicated in Figure 4-6:

Using this incremental execution technique, execute lines 1 through 3 and note that output now appears in the results panel indicating that the variable has been initialized:

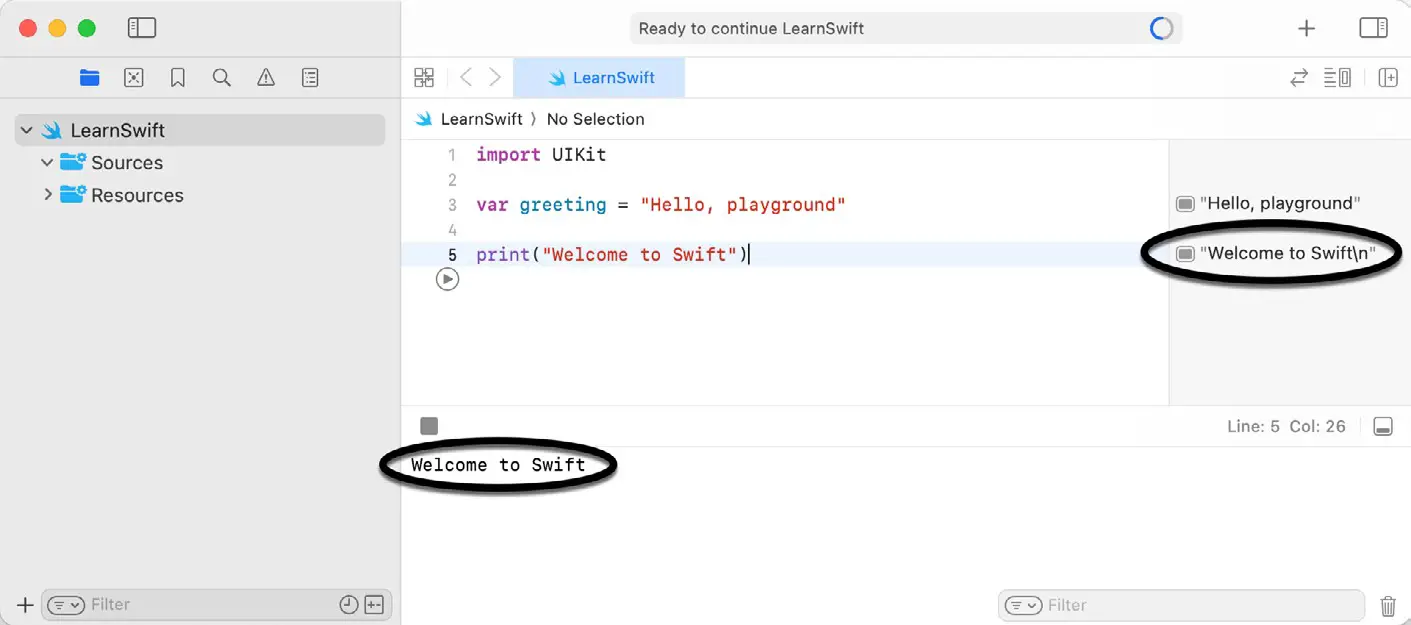
Next, execute the remaining lines up to and including line 5 at which point the “Welcome to Swift” output should appear both in the results panel and debug area:
Viewing Results
Playgrounds are particularly useful when working and experimenting with Swift algorithms. This can be useful when combined with the Quick Look feature. Remaining within the playground editor, enter the following lines of code beneath the existing print statement:
|
You are reading a sample chapter from an old edition of iOS App Development Essentials. Purchase the fully updated iOS 18 App Development Essentials book. The full book contains 71 chapters, over 612 pages of in-depth information, downloadable source code, and access to over 50 SwiftUI knowledge test quizzes. |
var x = 10

for index in 1...20 {
    let y = index * x
    x -= 1
}Code language: Swift (swift)
This expression repeats a loop 20 times, performing arithmetic expressions on each iteration of the loop. Once the code has been entered into the editor, click on the run button positioned at line 13 to execute these new lines of code. The playground will execute the loop and display in the results panel the final value for each variable. More interesting information, however, may be obtained by hovering the mouse pointer over the results line so that an additional button appears, as shown in Figure 4-9:
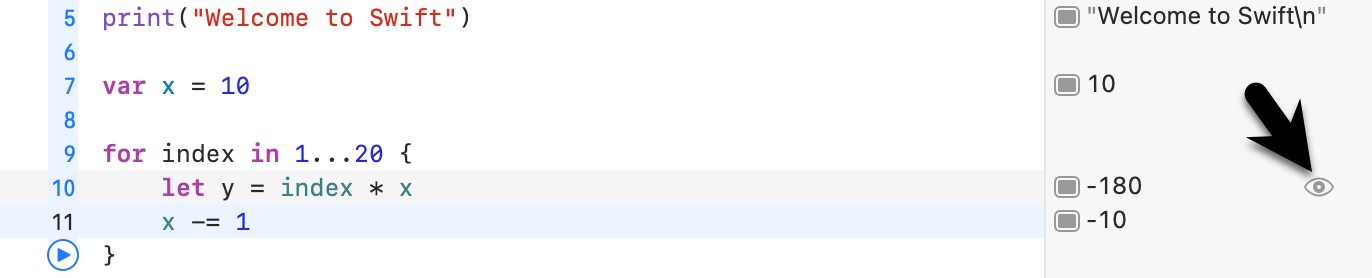
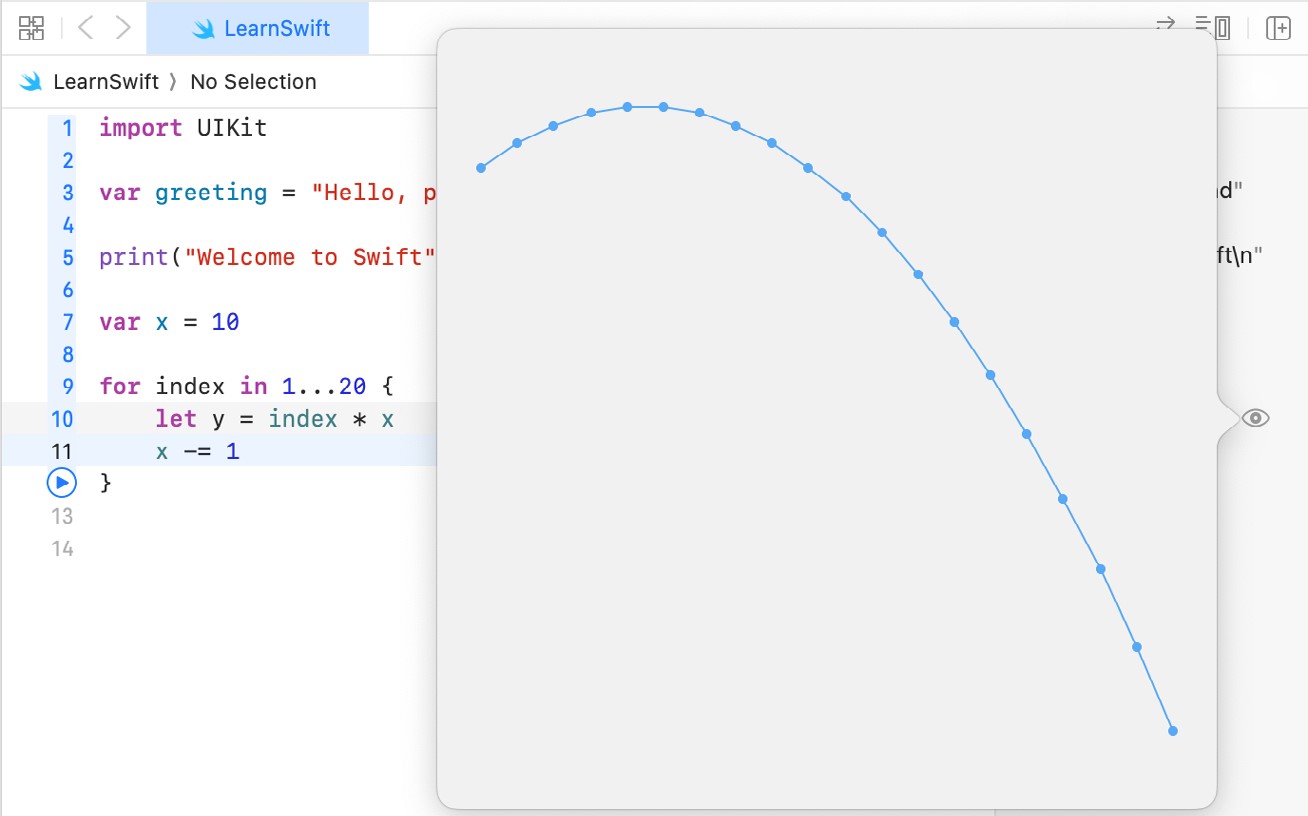
Hovering over the output will display the Quick Look button on the far right which, when selected, will show a popup panel displaying the results, as shown in Figure 4-10:
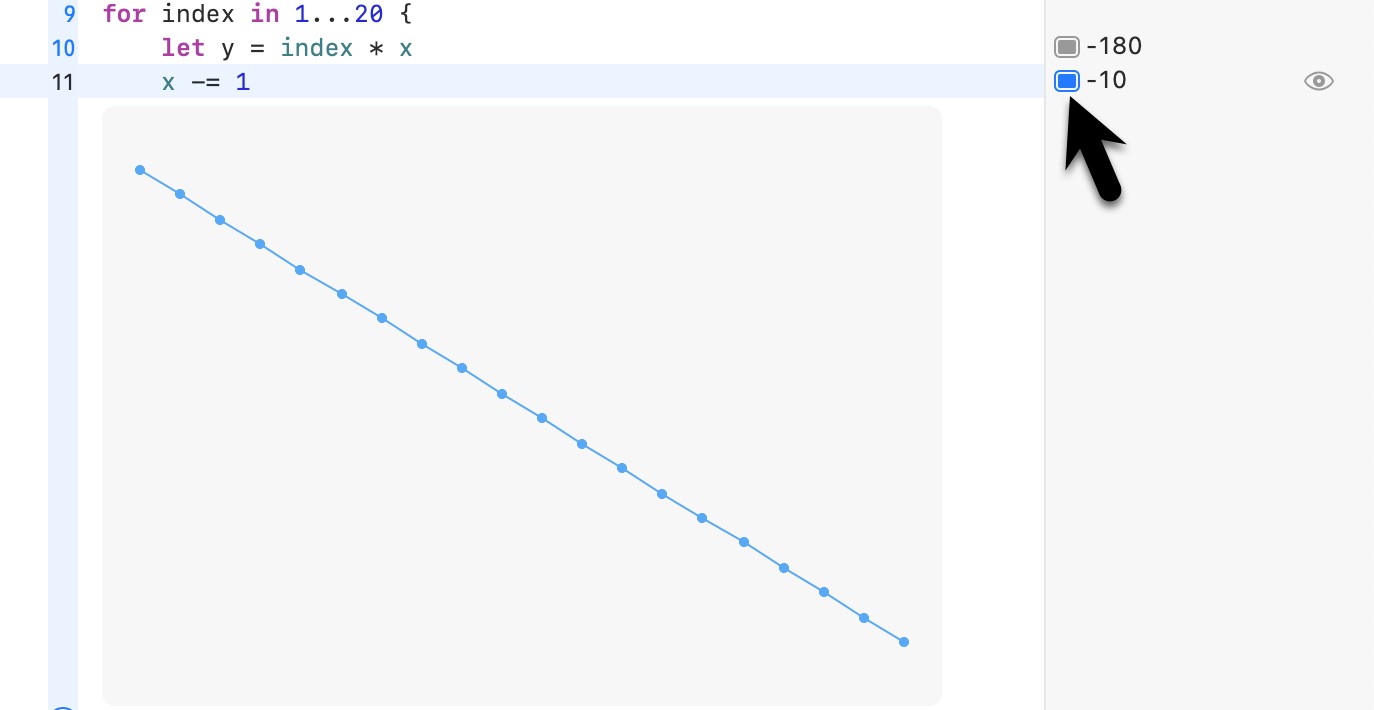
The left-most button is the Show Result button which, when selected, displays the results in-line with the code:
Adding Rich Text Comments
Rich text comments allow the code within a playground to be documented in a way that is easy to format and read. A single line of text can be marked as being rich text by preceding it with a //: marker. For example:
//: This is a single line of documentation textCode language: Markdown (markdown)Blocks of text can be added by wrapping the text in /*: and */ comment markers:
|
You are reading a sample chapter from an old edition of iOS App Development Essentials. Purchase the fully updated iOS 18 App Development Essentials book. The full book contains 71 chapters, over 612 pages of in-depth information, downloadable source code, and access to over 50 SwiftUI knowledge test quizzes. |
/*:
This is a block of documentation text that is intended
to span multiple lines
*/Code language: Markdown (markdown)
The rich text uses the Markup language and allows text to be formatted using a lightweight and easy-to-use syntax. A heading, for example, can be declared by prefixing the line with a ‘#’ character while text is displayed in italics when wrapped in ‘*’ characters. Bold text, on the other hand, involves wrapping the text in ‘**’ character sequences. It is also possible to configure bullet points by prefixing each line with a single ‘*’. Among the many other features of Markup is the ability to embed images and hyperlinks into the content of a rich text comment. To see rich text comments in action, enter the following markup content into the playground editor immediately after the print(“Welcome to Swift”) line of code:
/*:
# Welcome to Playgrounds
This is your *first* playground which is intended to demonstrate:
* The use of **Quick Look**
* Placing results **in-line** with the code
*/Code language: Markdown (markdown)
As the comment content is added it is said to be displayed in raw markup format. To display in rendered markup format, either select the Editor -> Show Rendered Markup menu option, or enable the Render Documentation option located under Playground Settings in the Inspector panel (marked A in Figure 4-2). If the Inspector panel is not currently visible, click on the button indicated by the right-most arrow in Figure 4-1 to display it. Once rendered, the above rich text should appear, as illustrated in Figure 4-12:

Detailed information about the Markup syntax can be found online at the following URL:
Working with Playground Pages
A playground can consist of multiple pages, with each page containing its own code, resources and, rich text comments. So far, the playground used in this chapter contains a single page. Add a page to the playground now by selecting the LearnSwift entry at the top of the Navigator panel, right-clicking, and selecting the New Playground Page menu option. If the Navigator panel is not currently visible, click the button indicated by the left-most arrow in Figure 4-1 above to display it. Note that two pages are now listed in the Navigator named “Untitled Page” and “Untitled Page 2”. Select and then click a second time on the “Untitled Page 2” entry so that the name becomes editable and change the name to SwiftUI Example as outlined in Figure 4-13:
|
You are reading a sample chapter from an old edition of iOS App Development Essentials. Purchase the fully updated iOS 18 App Development Essentials book. The full book contains 71 chapters, over 612 pages of in-depth information, downloadable source code, and access to over 50 SwiftUI knowledge test quizzes. |
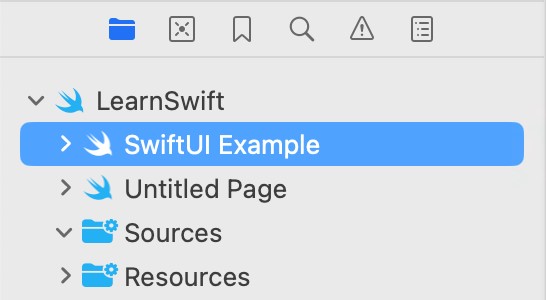
Note that the newly added page has Markup links which, when clicked, navigate to the previous or next page in the playground.
Working with SwiftUI and Live View in Playgrounds
In addition to allowing you to experiment with the Swift programming language, playgrounds may also be used to work with SwiftUI. Not only does this allow SwiftUI views to be prototyped, but when combined with the playground live view feature, it is also possible to run and interact with those views.
To try out SwiftUI and live view, begin by selecting the newly added SwiftUI Example page, deleting the current code lines, and modifying it to import both the SwiftUI and PlaygroundSupport frameworks:
import SwiftUI
import PlaygroundSupportCode language: Swift (swift)
The PlaygroundSupport module provides several useful features for playgrounds including the ability to present a live view within the playground timeline.
Beneath the import statements, add the following code (rest assured, all of the techniques used in this example will be thoroughly explained in later chapters):
|
You are reading a sample chapter from an old edition of iOS App Development Essentials. Purchase the fully updated iOS 18 App Development Essentials book. The full book contains 71 chapters, over 612 pages of in-depth information, downloadable source code, and access to over 50 SwiftUI knowledge test quizzes. |
struct ExampleView: View {
var body: some View {
VStack {
Rectangle()
.fill(Color.blue)
.frame(width: 200, height: 200)
Button(action: {
}) {
Text("Rotate")
}
}
.padding(10)
}
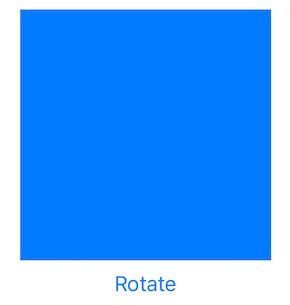
}Code language: Swift (swift)This declaration creates a custom SwiftUI view named ExampleView consisting of a blue Rectangle view and a Button, both contained within a vertical stack (VStack).
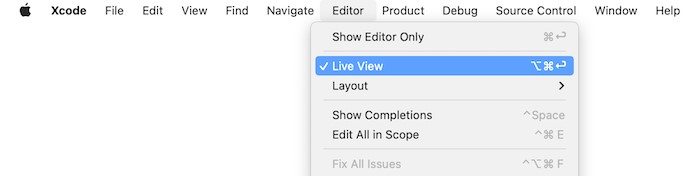
The PlaygroundSupport module includes a class named PlaygroundPage which allows playground code to interact with the pages that make up a playground. This is achieved through a range of methods and properties of the class, one of which is the current property. This property, in turn, provides access to the current playground page. To execute the code within the playground, the liveView property of the current page needs to be set to our new container. To display the Live View panel, enable the Xcode Editor -> Live View menu option, as shown in Figure 4-14:
Once the live view panel is visible, add the code to assign the container to the live view of the current page as follows:
.
.
        VStack {
            Rectangle()
                .fill(Color.blue)
                .frame(width: 200, height: 200)
            Button(action: {
                       }) {
                       Text("Rotate")
            }
        }
        .padding(10)
    }
}

PlaygroundPage.current.setLiveView(ExampleView()
    .padding(100))Code language: Swift (swift)
With the changes made, click on the run button to start the live view. After a short delay, the view should appear, as shown in Figure 4-15 below:
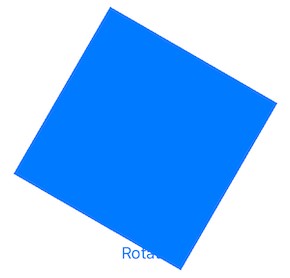
Since the button is not yet configured to do anything when clicked, it is difficult to see that the view is live. To see the live view in action, click on the stop button and modify the view declaration to rotate the blue square by 60° each time the button is clicked:
|
You are reading a sample chapter from an old edition of iOS App Development Essentials. Purchase the fully updated iOS 18 App Development Essentials book. The full book contains 71 chapters, over 612 pages of in-depth information, downloadable source code, and access to over 50 SwiftUI knowledge test quizzes. |
import SwiftUI
import PlaygroundSupport

struct ExampleView: View {

    @State private var rotation: Double = 0

    var body: some View {

        VStack {
            Rectangle()
                .fill(Color.blue)
                .frame(width: 200, height: 200)
                .rotationEffect(.degrees(rotation))
                .animation(.linear(duration: 2), value: rotation)
            Button(action: {
                 rotation = (rotation < 360 ? rotation + 60 : 0)
                       }) {
                       Text("Rotate")
                   }
        }
        .padding(10)
    }
}

PlaygroundPage.current.setLiveView(ExampleView()
    .padding(100))Code language: Swift (swift)
Click the run button to launch the view in the live view and note that the square rotates each time the button is clicked.
Summary
This chapter has introduced the concept of playgrounds. Playgrounds provide an environment in which Swift code can be entered and the results of that code viewed dynamically. This provides an excellent environment both for learning the Swift programming language and for experimenting with many of the classes and APIs included in the iOS SDK without the need to create Xcode projects and repeatedly edit, compile and run code.