
If you are new to the Swift programming language then the next few chapters are recommended reading. Although SwiftUI makes the development of apps easier, it will still be necessary to learn Swift programming both to understand SwiftUI and develop fully functional apps.
If, on the other hand, you are familiar with the Swift programming language you can skip the Swift specific chapters that follow (though if you are not familiar with implicit returns from single expressions, opaque return types and property wrappers you should at least read the sections and chapters relating to these features before moving on to the SwiftUI chapters).
Prior to the introduction of iOS 8, the stipulated programming language for the development of iOS applications was Objective-C. When Apple announced iOS 8, however, the company also introduced an alternative to Objective-C in the form of the Swift programming language.
Due entirely to the popularity of iOS, Objective-C had become one of the more widely used programming languages. With origins firmly rooted in the 40-year-old C Programming Language, however, and despite recent efforts to modernize some aspects of the language syntax, Objective-C was beginning to show its age.
Swift, on the other hand, is a relatively new programming language designed specifically to make programming easier, faster and less prone to programmer error. Starting with a clean slate and no burden of legacy, Swift is a new and innovative language with which to develop applications for iOS, iPadOS, macOS, watchOS and tvOS with the advantage that much of the syntax will be familiar to those with experience of other programming languages.
 |
You are reading a sample chapter from an old edition of iOS App Development Essentials. Purchase the fully updated iOS 18 App Development Essentials book. The full book contains 71 chapters, over 612 pages of in-depth information, downloadable source code, and access to over 50 SwiftUI knowledge test quizzes. |
The next several chapters will provide an overview and introduction to Swift programming. The intention of these chapters is to provide enough information so that you can begin to confidently program using Swift. For an exhaustive and in-depth guide to all the features, intricacies and capabilities of Swift, some time spent reading Apple’s excellent book entitled “The Swift Programming Language” (available free of charge from within the Apple Books app) is strongly recommended.
Using a Swift Playground
Both this and the following few chapters are intended to introduce the basics of the Swift programming language. As outlined in the previous chapter, entitled An Introduction to Xcode 15 Playgrounds the best way to learn Swift is to experiment within a Swift playground environment. Before starting this chapter, therefore, create a new playground and use it to try out the code in both this and the other Swift introduction chapters that follow.
Swift Data Types
When we look at the different types of software that run on computer systems and mobile devices, from financial applications to graphics intensive games, it is easy to forget that computers are really just binary machines. Binary systems work in terms of 0 and 1, true or false, set and unset. All the data sitting in RAM, stored on disk drives and flowing through circuit boards and buses are nothing more than sequences of 1s and 0s. Each 1 or 0 is referred to as a bit and bits are grouped together in blocks of 8, each group being referred to as a byte. When people talk about 32-bit and 64-bit computer systems they are talking about the number of bits that can be handled simultaneously by the CPU bus. A 64-bit CPU, for example, is able to handle data in 64-bit blocks, resulting in faster performance than a 32-bit based system.
Humans, of course, don’t think in binary. We work with decimal numbers, letters and words. In order for a human to easily (easily being a subjective term in this context) program a computer, some middle ground between human and computer thinking is needed. This is where programming languages such as Swift come into play. Programming languages allow humans to express instructions to a computer in terms and structures we understand and then compile that down to a format that can be executed by a CPU.
One of the fundamentals of any program involves data, and programming languages such as Swift define a set of data types that allow us to work with data in a format we understand when programming. For example, if we want to store a number in a Swift program, we could do so with syntax similar to the following:
|
You are reading a sample chapter from an old edition of iOS App Development Essentials. Purchase the fully updated iOS 18 App Development Essentials book. The full book contains 71 chapters, over 612 pages of in-depth information, downloadable source code, and access to over 50 SwiftUI knowledge test quizzes. |
var mynumber = 10Code language: Swift (swift)In the above example, we have created a variable named mynumber and then assigned to it the value of 10. When we compile the source code down to the machine code used by the CPU, the number 10 is seen by the computer in binary as:
1010Code language: Swift (swift)Now that we have a basic understanding of the concept of data types and why they are necessary we can take a closer look at some of the more commonly used data types supported by Swift.
Integer Data Types
Swift integer data types are used to store whole numbers (in other words a number with no decimal places). Integers can be signed (capable of storing positive, negative and zero values) or unsigned (positive and zero values only).
Swift provides support for 8, 16, 32 and 64-bit integers (represented by the Int8, Int16, Int32 and Int64 types respectively). The same variants are also available for unsigned integers (UInt8, UInt16, UInt32 and UInt64).
In general, Apple recommends using the Int data type rather than one of the above specifically sized data types. The Int data type will use the appropriate integer size for the platform on which the code is running.
|
You are reading a sample chapter from an old edition of iOS App Development Essentials. Purchase the fully updated iOS 18 App Development Essentials book. The full book contains 71 chapters, over 612 pages of in-depth information, downloadable source code, and access to over 50 SwiftUI knowledge test quizzes. |
All integer data types contain bounds properties which can be accessed to identify the minimum and maximum supported values of that particular type. The following code, for example, outputs the minimum and maximum bounds for the 32-bit signed integer data type:
print("Int32 Min = \(Int32.min) Int32 Max = \(Int32.max)")Code language: Swift (swift)When executed, the above code will generate the following output:
Int32 Min = -2147483648 Int32 Max = 2147483647Code language: Swift (swift)Floating Point Data Types
The Swift floating point data types are able to store values containing decimal places. For example, 4353.1223 would be stored in a floating-point data type. Swift provides two floating point data types in the form of Float and Double. Which type to use depends on the size of value to be stored and the level of precision required. The Double type can be used to store up to 64-bit floating point numbers with a level of precision of 15 decimal places or greater. The Float data type, on the other hand, is limited to 32-bit floating point numbers and offers a level of precision as low as 6 decimal places depending on the native platform on which the code is running. Alternatively, the Float16 type may be used to store 16-bit floating point values. Float16 provides greater performance at the expense of lower precision.
Bool Data Type
Swift, like other languages, includes a data type for the purpose of handling true or false (1 or 0) conditions. Two Boolean constant values (true and false) are provided by Swift specifically for working with Boolean data types.
Character Data Type
The Swift Character data type is used to store a single character of rendered text such as a letter, numerical digit, punctuation mark or symbol. Internally characters in Swift are stored in the form of grapheme clusters. A grapheme cluster is made of two or more Unicode scalars that are combined to represent a single visible character.
|
You are reading a sample chapter from an old edition of iOS App Development Essentials. Purchase the fully updated iOS 18 App Development Essentials book. The full book contains 71 chapters, over 612 pages of in-depth information, downloadable source code, and access to over 50 SwiftUI knowledge test quizzes. |
The following lines assign a variety of different characters to Character type variables:
var myChar1 = "f"
var myChar2 = ":"
var myChar3 = "X"Code language: Swift (swift)
Characters may also be referenced using Unicode code points. The following example assigns the ‘X’ character to a variable using Unicode:
var myChar4 = "\u{0058}"Code language: Swift (swift)String Data Type
The String data type is a sequence of characters that typically make up a word or sentence. In addition to providing a storage mechanism, the String data type also includes a range of string manipulation features allowing strings to be searched, matched, concatenated and modified. Strings in Swift are represented internally as collections of characters (where a character is, as previously discussed, comprised of one or more Unicode scalar values).
Strings can also be constructed using combinations of strings, variables, constants, expressions, and function calls using a concept referred to as string interpolation. For example, the following code creates a new string from a variety of different sources using string interpolation before outputting it to the console:
var userName = "John"
var inboxCount = 25
let maxCount = 100

var message = "\(userName) has \(inboxCount) messages. Message capacity remaining is \(maxCount - inboxCount) messages."

print(message)Code language: Swift (swift)
When executed, the code will output the following message:
|
You are reading a sample chapter from an old edition of iOS App Development Essentials. Purchase the fully updated iOS 18 App Development Essentials book. The full book contains 71 chapters, over 612 pages of in-depth information, downloadable source code, and access to over 50 SwiftUI knowledge test quizzes. |
John has 25 messages. Message capacity remaining is 75 messages.Code language: plaintext (plaintext)A multiline string literal may be declared by encapsulating the string within triple quotes as follows:
var multiline = """

    The console glowed with flashing warnings.
    Clearly time was running out.

    "I thought you said you knew how to fly this!" yelled Mary.

    "It was much easier on the simulator" replied her brother,
     trying to keep the panic out of his voice.

"""

print(multiline)Code language: Swift (swift)
The above code will generate the following output when run:
    The console glowed with flashing warnings.
    Clearly time was running out.

    "I thought you said you knew how to fly this!" yelled Mary.

    "It was much easier on the simulator" replied her brother,
    trying to keep the panic out of his voice.Code language: plaintext (plaintext)
The amount by which each line is indented within a multiline literal is calculated as the number of characters by which the line is indented minus the number of characters by which the closing triple quote line is indented. If, for example, the fourth line in the above example had a 10-character indentation and the closing triple quote was indented by 5 characters, the actual indentation of the fourth line within the string would be 5 characters. This allows multiline literals to be formatted tidily within Swift code while still allowing control over the indentation of individual lines.
Special Characters/Escape Sequences
In addition to the standard set of characters outlined above, there is also a range of special characters (also referred to as escape sequences) available for specifying items such as a new line, tab or a specific Unicode value within a string. These special characters are identified by prefixing the character with a backslash (a concept referred to as escaping). For example, the following assigns a new line to the variable named newline:
var newline = "\n"Code language: Swift (swift)In essence, any character that is preceded by a backslash is considered to be a special character and is treated accordingly. This raises the question as to what to do if you actually want a backslash character. This is achieved by escaping the backslash itself:
|
You are reading a sample chapter from an old edition of iOS App Development Essentials. Purchase the fully updated iOS 18 App Development Essentials book. The full book contains 71 chapters, over 612 pages of in-depth information, downloadable source code, and access to over 50 SwiftUI knowledge test quizzes. |
var backslash = "\\"Code language: Swift (swift)Commonly used special characters supported by Swift are as follows:
- \n – New line
- \r – Carriage return
- \t – Horizontal tab
- \\ – Backslash
- \” – Double quote (used when placing a double quote into a string declaration)
- \’ – Single quote (used when placing a single quote into a string declaration)
- \u{nn} – Single byte Unicode scalar where nn is replaced by two hexadecimal digits representing the Unicode character.
- \u{nnnn} – Double byte Unicode scalar where nnnn is replaced by four hexadecimal digits representing the Unicode character.
- \u{nnnnnnnn} – Four-byte Unicode scalar where nnnnnnnn is replaced by eight hexadecimal digits representing the Unicode character.
Swift Variables
Variables are essentially locations in computer memory reserved for storing the data used by an application. Each variable is given a name by the programmer and assigned a value. The name assigned to the variable may then be used in the Swift code to access the value assigned to that variable. This access can involve either reading the value of the variable or changing the value. It is, of course, the ability to change the value of variables, which gives them the name variable.
Swift Constants
A constant is like a variable in that it provides a named location in memory to store a data value. Constants differ in one significant way in that once a value has been assigned to a constant it cannot subsequently be changed.
Constants are particularly useful if a value is used repeatedly throughout the application code. Rather than use the value each time, it makes the code easier to read if the value is first assigned to a constant which is then referenced in the code. For example, it might not be clear to someone reading your Swift code why you used the value 5 in an expression. If, instead of the value 5, you use a constant named interestRate the purpose of the value becomes much clearer. Constants also have the advantage that if the programmer needs to change a widely used value, it only needs to be changed once in the constant declaration and not each time it is referenced.
As with variables, constants have a type, a name and a value. Unlike variables, however, once a value has been assigned to a constant, that value cannot subsequently be changed.
|
You are reading a sample chapter from an old edition of iOS App Development Essentials. Purchase the fully updated iOS 18 App Development Essentials book. The full book contains 71 chapters, over 612 pages of in-depth information, downloadable source code, and access to over 50 SwiftUI knowledge test quizzes. |
Declaring Constants and Variables
Variables are declared using the var keyword and may be initialized with a value at creation time. If the variable is declared without an initial value, it must be declared as being optional (a topic that will be covered later in this chapter). The following, for example, is a typical variable declaration:
var userCount = 10Code language: Swift (swift)Constants are declared using the let keyword.
let maxUserCount = 20Code language: Swift (swift)For greater code efficiency and execution performance, Apple recommends using constants rather than variables whenever possible.
Type Annotations and Type Inference
Swift is categorized as a type safe programming language. This essentially means that once the data type of a variable has been identified, that variable cannot subsequently be used to store data of any other type without inducing a compilation error. This contrasts to loosely typed programming languages where a variable, once declared, can subsequently be used to store other data types.
There are two ways in which the type of a constant or variable will be identified. One approach is to use a type annotation at the point the variable or constant is declared in the code. This is achieved by placing a colon after the constant or variable name followed by the type declaration. The following line of code, for example, declares a variable named userCount as being of type Int:
|
You are reading a sample chapter from an old edition of iOS App Development Essentials. Purchase the fully updated iOS 18 App Development Essentials book. The full book contains 71 chapters, over 612 pages of in-depth information, downloadable source code, and access to over 50 SwiftUI knowledge test quizzes. |
var userCount: Int = 10Code language: Swift (swift)In the absence of a type annotation in a declaration, the Swift compiler uses a technique referred to as type inference to identify the type of the constant or variable. When relying on type inference, the compiler looks to see what type of value is being assigned to the constant or variable at the point that it is initialized and uses that as the type. Consider, for example, the following variable and constant declarations:
var signalStrength = 2.231
let companyName = "My Company"Code language: Swift (swift)
During compilation of the above lines of code, Swift will infer that the signalStrength variable is of type Double (type inference in Swift defaults to Double for all floating-point numbers) and that the companyName constant is of type String.
When a constant is declared without a type annotation it must be assigned a value at the point of declaration:
let bookTitle = "SwiftUI Essentials"Code language: Swift (swift)If a type annotation is used when the constant is declared, however, the value can be assigned later in the code. For example:
let bookTitle: String
.
.
if iosBookType {
    bookTitle = "SwiftUI Essentials"
} else {
    bookTitle = "Android Studio Development Essentials"
}Code language: Swift (swift)
It is important to note that a value may only be assigned to a constant once. A second attempt to assign a value to a constant will result in a syntax error.
|
You are reading a sample chapter from an old edition of iOS App Development Essentials. Purchase the fully updated iOS 18 App Development Essentials book. The full book contains 71 chapters, over 612 pages of in-depth information, downloadable source code, and access to over 50 SwiftUI knowledge test quizzes. |
The Swift Tuple
Before proceeding, now is a good time to introduce the Swift tuple. The tuple is perhaps one of the simplest, yet most powerful features of the Swift programming language. A tuple is, quite simply, a way to temporarily group together multiple values into a single entity. The items stored in a tuple can be of any type and there are no restrictions requiring that those values all be of the same type. A tuple could, for example, be constructed to contain an Int value, a Double value and a String as follows:
let myTuple = (10, 432.433, "This is a String")Code language: Swift (swift)The elements of a tuple can be accessed using a number of different techniques. A specific tuple value can be accessed simply by referencing the index position (with the first value being at index position 0). The code below, for example, extracts the string resource (at index position 2 in the tuple) and assigns it to a new string variable:
let myTuple = (10, 432.433, "This is a String")
let myString = myTuple.2 print(myString)Code language: Swift (swift)
Alternatively, all the values in a tuple may be extracted and assigned to variables or constants in a single statement:
let (myInt, myFloat, myString) = myTupleCode language: Swift (swift)This same technique can be used to extract selected values from a tuple while ignoring others by replacing the values to be ignored with an underscore character. The following code fragment extracts the integer and string values from the tuple and assigns them to variables, but ignores the floating-point value:
var (myInt, _, myString) = myTupleCode language: Swift (swift)When creating a tuple, it is also possible to assign a name to each value:
|
You are reading a sample chapter from an old edition of iOS App Development Essentials. Purchase the fully updated iOS 18 App Development Essentials book. The full book contains 71 chapters, over 612 pages of in-depth information, downloadable source code, and access to over 50 SwiftUI knowledge test quizzes. |
let myTuple = (count: 10, length: 432.433, message: "This is a String")Code language: Swift (swift)The names assigned to the values stored in a tuple may then be used to reference those values in code. For example, to output the message string value from the myTuple instance, the following line of code could be used:
print(myTuple.message)Code language: Swift (swift)Perhaps the most powerful use of tuples is, as will be seen in later chapters, the ability to return multiple values from a function.
The Swift Optional Type
The Swift optional data type is a new concept that does not exist in most other programming languages. The purpose of the optional type is to provide a safe and consistent approach to handling situations where a variable or constant may not have any value assigned to it.
Variables are declared as being optional by placing a ? character after the type declaration. The following code declares an optional Int variable named index:
var index: Int?Code language: Swift (swift)The variable index can now either have an integer value assigned to it or have nothing assigned to it. Behind the scenes, and as far as the compiler and runtime are concerned, an optional with no value assigned to it actually has a value of nil.
|
You are reading a sample chapter from an old edition of iOS App Development Essentials. Purchase the fully updated iOS 18 App Development Essentials book. The full book contains 71 chapters, over 612 pages of in-depth information, downloadable source code, and access to over 50 SwiftUI knowledge test quizzes. |
An optional can easily be tested (typically using an if statement) to identify whether it has a value assigned to it as follows:
var index: Int?

if index != nil {
    // index variable has a value assigned to it
} else {
    // index variable has no value assigned to it
}Code language: Swift (swift)
If an optional has a value assigned to it, that value is said to be “wrapped” within the optional. The value wrapped in an optional may be accessed using a concept referred to as forced unwrapping. This simply means that the underlying value is extracted from the optional data type, a procedure that is performed by placing an exclamation mark (!) after the optional name.
To explore this concept of unwrapping optional types in more detail, consider the following code:
var index: Int?

index = 3

var treeArray = ["Oak", "Pine", "Yew", "Birch"]

if index != nil {
    print(treeArray[index!])
} else {
    print("index does not contain a value")
}Code language: Swift (swift)
The code simply uses an optional variable to hold the index into an array of strings representing the names of tree species (Swift arrays will be covered in more detail in the chapter entitled Working with Array and Dictionary Collections in Swift). If the index optional variable has a value assigned to it, the tree name at that location in the array is printed to the console. Since the index is an optional type, the value has been unwrapped by placing an exclamation mark after the variable name:
print(treeArray[index!])Code language: Swift (swift)Had the index not been unwrapped (in other words, the exclamation mark omitted from the above line), the compiler would have issued an error similar to the following:
|
You are reading a sample chapter from an old edition of iOS App Development Essentials. Purchase the fully updated iOS 18 App Development Essentials book. The full book contains 71 chapters, over 612 pages of in-depth information, downloadable source code, and access to over 50 SwiftUI knowledge test quizzes. |
Value of optional type ‘Int?’ must be unwrapped to a value of type ‘Int’Code language: plaintext (plaintext)As an alternative to forced unwrapping, the value assigned to an optional may be allocated to a temporary variable or constant using optional binding, the syntax for which is as follows:
if let constantname = optionalName {

}

if var variablename = optionalName {

}Code language: Swift (swift)
The above constructs perform two tasks. In the first instance, the statement ascertains whether the designated optional contains a value. Second, in the event that the optional has a value, that value is assigned to the declared constant or variable and the code within the body of the statement is executed. The previous forced unwrapping example could, therefore, be modified as follows to use optional binding instead:
var index: Int?

index = 3

var treeArray = ["Oak", "Pine", "Yew", "Birch"]

if let myvalue = index {
    print(treeArray[myvalue])
} else {
    print("index does not contain a value")
}Code language: Swift (swift)
In this case the value assigned to the index variable is unwrapped and assigned to a temporary (also referred to as shadow) constant named myvalue which is then used as the index reference into the array. Note that the myvalue constant is described as temporary since it is only available within the scope of the if statement. Once the if statement completes execution, the constant will no longer exist. For this reason, there is no conflict in using the same temporary name as that assigned to the optional. The following is, for example, valid code:
.
.
if let index = index {
    print(treeArray[index])
} else {
.
.Code language: Swift (swift)
When considering the above example, the use of the temporary value begins to seem redundant. Fortunately, the Swift development team arrived at the same conclusion and introduced the following shorthand if-let syntax in Swift 5.7:
var index: Int?

index = 3

var treeArray = ["Oak", "Pine", "Yew", "Birch"]

if let index {
    print(treeArray[index])
} else {
    print("index does not contain a value")
}Code language: Swift (swift)
Using this approach it is no longer necessary to assign the optional to a temporary value.
|
You are reading a sample chapter from an old edition of iOS App Development Essentials. Purchase the fully updated iOS 18 App Development Essentials book. The full book contains 71 chapters, over 612 pages of in-depth information, downloadable source code, and access to over 50 SwiftUI knowledge test quizzes. |
Optional binding may also be used to unwrap multiple optionals and include a Boolean test condition, the syntax for which is as follows:
if let constname1 = optName1, let constname2 = optName2,
     let optName3 = …, <boolean statement=""> {

}</boolean>Code language: Swift (swift)
The shorthand if-let syntax is also available when working with multiple optionals and test conditions avoiding the need to use temporary values:
if let constname1, let constname2,
     let optName3, ... <boolean statement=""> {

}</boolean>Code language: Swift (swift)
The following code, for example, uses shorthand optional binding to unwrap two optionals within a single statement:
var pet1: String?
var pet2: String?

pet1 = "cat"
pet2 = "dog"

if let pet1, let pet2 {
    print(pet1)
    print(pet2)
} else {
    print("insufficient pets")
}Code language: Swift (swift)
The code fragment below, on the other hand, also makes use of the Boolean test clause condition:
if let pet1, let pet2, petCount > 1 {
    print(pet1)
    print(pet2)
} else {
    print("insufficient pets")
}Code language: Swift (swift)
In the above example, the optional binding will not be attempted unless the value assigned to petCount is greater than 1.
|
You are reading a sample chapter from an old edition of iOS App Development Essentials. Purchase the fully updated iOS 18 App Development Essentials book. The full book contains 71 chapters, over 612 pages of in-depth information, downloadable source code, and access to over 50 SwiftUI knowledge test quizzes. |
It is also possible to declare an optional as being implicitly unwrapped. When an optional is declared in this way, the underlying value can be accessed without having to perform forced unwrapping or optional binding. An optional is declared as being implicitly unwrapped by replacing the question mark (?) with an exclamation mark (!) in the declaration. For example:
var index: Int! // Optional is now implicitly unwrapped

index = 3

var treeArray = ["Oak", "Pine", "Yew", "Birch"]

if index != nil {
    print(treeArray[index])
} else {
    print("index does not contain a value")
}Code language: Swift (swift)
With the index optional variable now declared as being implicitly unwrapped, it is no longer necessary to unwrap the value when it is used as an index into the array in the above print call.
One final observation with regard to optionals in Swift is that only optional types are able to have no value or a value of nil assigned to them. In Swift it is not, therefore, possible to assign a nil value to a non-optional variable or constant. The following declarations, for instance, will all result in errors from the compiler since none of the variables are declared as optional:
var myInt = nil // Invalid code
var myString: String = nil // Invalid Code
let myConstant = nil // Invalid codeCode language: Swift (swift)
Type Casting and Type Checking
When writing Swift code, situations will occur where the compiler is unable to identify the specific type of a value. This is often the case when a value of ambiguous or unexpected type is returned from a method or function call. In this situation it may be necessary to let the compiler know the type of value that your code is expecting or requires using the as keyword (a concept referred to as type casting).
The following code, for example, lets the compiler know that the value returned from the object(forKey:) method needs to be treated as a String type:
|
You are reading a sample chapter from an old edition of iOS App Development Essentials. Purchase the fully updated iOS 18 App Development Essentials book. The full book contains 71 chapters, over 612 pages of in-depth information, downloadable source code, and access to over 50 SwiftUI knowledge test quizzes. |
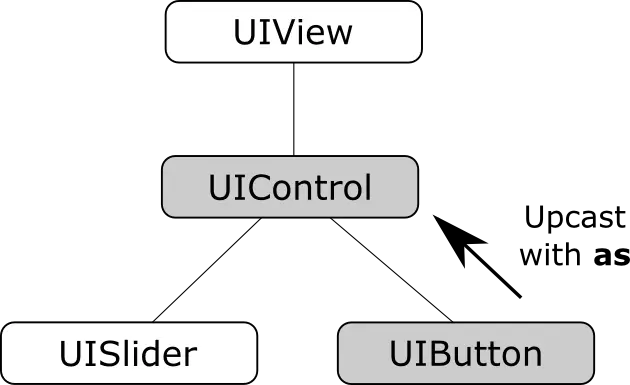
let myValue = record.object(forKey: "comment") as! StringCode language: Swift (swift)In fact, there are two types of casting which are referred to as upcasting and downcasting. Upcasting occurs when an object of a particular class is cast to one of its superclasses. Upcasting is performed using the as keyword and is also referred to as guaranteed conversion since the compiler can tell from the code that the cast will be successful. The UIButton class, for example, is a subclass of the UIControl class as shown in the fragment of the UIKit class hierarchy shown in Figure 5-1:
Since UIButton is a subclass of UIControl, the object can be safely upcast as follows:
let myButton: UIButton = UIButton()
let myControl = myButton as UIControl Code language: Swift (swift)
Downcasting, on the other hand, occurs when a conversion is made from one class to another where there is no guarantee that the cast can be made safely or that an invalid casting attempt will be caught by the compiler. When an invalid cast is made in downcasting and not identified by the compiler it will most likely lead to an error at runtime.
Downcasting usually involves converting from a class to one of its subclasses. Downcasting is performed using the as! keyword syntax and is also referred to as forced conversion. Consider, for example, the UIKit UIScrollView class which has as subclasses both the UITableView and UITextView classes as shown in Figure 5-2:

In order to convert a UIScrollView object to a UITextView class a downcast operation needs to be performed. The following code attempts to downcast a UIScrollView object to UITextView using the guaranteed conversion or upcast approach:
|
You are reading a sample chapter from an old edition of iOS App Development Essentials. Purchase the fully updated iOS 18 App Development Essentials book. The full book contains 71 chapters, over 612 pages of in-depth information, downloadable source code, and access to over 50 SwiftUI knowledge test quizzes. |
let myScrollView: UIScrollView = UIScrollView()

let myTextView = myScrollView as UITextViewCode language: Swift (swift)
The above code will result in the following error:
‘UIScrollView’ is not convertible to ‘UITextView’Code language: plaintext (plaintext)The compiler is indicating that a UIScrollView instance cannot be safely converted to a UITextView class instance. This does not necessarily mean that it is incorrect to do so, the compiler is simply stating that it cannot guarantee the safety of the conversion for you. The downcast conversion could instead be forced using the as! annotation:
let myTextView = myScrollView as! UITextViewCode language: Swift (swift)Now the code will compile without an error. As an example of the dangers of downcasting, however, the above code will crash on execution stating that UIScrollView cannot be cast to UITextView. Forced downcasting should, therefore, be used with caution.
A safer approach to downcasting is to perform an optional binding using as?. If the conversion is performed successfully, an optional value of the specified type is returned, otherwise the optional value will be nil:
if let myTextView = myScrollView as? UITextView {
    print("Type cast to UITextView succeeded")
} else {
    print("Type cast to UITextView failed")
}Code language: Swift (swift)
It is also possible to type check a value using the is keyword. The following code, for example, checks that a specific object is an instance of a class named MyClass:
|
You are reading a sample chapter from an old edition of iOS App Development Essentials. Purchase the fully updated iOS 18 App Development Essentials book. The full book contains 71 chapters, over 612 pages of in-depth information, downloadable source code, and access to over 50 SwiftUI knowledge test quizzes. |
if myobject is MyClass {
    // myobject is an instance of MyClass
}Code language: Swift (swift)
Summary
This chapter has begun the introduction to Swift by exploring data types together with an overview of how to declare constants and variables. The chapter has also introduced concepts such as type safety, type inference, and optionals, each of which is an integral part of Swift programming and designed specifically to make code writing less prone to error.