
The chapter entitled SQLite Databases in Android Studio covered the basic principles of integrating relational database storage into Android applications using the SQLite database management system. In this chapter, we will create a project using SQLite databases to store and retrieve data.
About the Database Example
The example project is a simple data entry and retrieval application that allows users to add, query, and delete database entries. The idea behind this application is a simple contact database containing customer names and phone numbers.
The name of the database file will be customerDB.db, which, in turn, will contain a single table named customers. Each record in the database table will contain a unique customer ID, a customer name, and the customer’s phone number, corresponding to column names “customername” and “customerphone”, respectively. The customer ID column will act as the primary key and automatically be assigned and incremented by the database management system.
Creating the SQLDemo Project
Start Android Studio, select the New Project option from the welcome screen and, within the resulting new project dialog, choose the Empty Views Activity template before clicking the Next button.
Enter SQLDemo into the Name field and specify com.ebookfrenzy.sqldemo as the package name. Before clicking on the Finish button, change the Minimum API level setting to API 33: Android 13 (Tiramisu) and the Language menu to Kotlin. Use the steps in An Overview of Android View Binding to enable view binding for the project.
 |
You are reading a sample chapter from an old edition of the Android Studio Essentials – Kotlin Edition book.
Purchase the fully updated Android Studio Ladybug Kotlin Edition of this publication in eBook or Print format. The full book contains 100 chapters and over 878 pages of in-depth information. |
Designing the User interface
Open the activity_main.xml file and delete the default TextView component. Add two Plain Text fields, three Buttons, and a TextView to the layout and position them as shown in Figure 38-1:
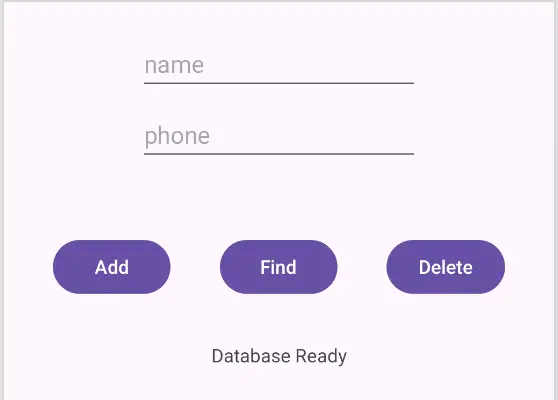
Change the hint property of the Plain Text views to “name” and “phone” respectively and remove the default “Name” text property. Modify the buttons so that they read “Add”, “Find,” and “Delete”, and the TextView text to “Database Ready,” extract all the string values to resources, and apply layout constraints either manually or using the Infer constraints button.
Change the IDs of the Plain Text views and TextView to customerName, customerPhone, and statusText, respectively. Finally, configure the buttons to call methods named addCustomer, findCustomer, and deleteCustomer.
Creating the Data Model
Once completed, the application will consist of an activity and a database handler class. The database handler will be a subclass of SQLiteOpenHelper and will provide an abstract layer between the underlying SQLite database and the activity class, with the activity calling on the database handler to interact with the database (adding, removing, and querying database entries). To implement this interaction in a structured way, a third class will need to be implemented to hold the database entry data as it is passed between the activity and the handler. This is actually a very simple class capable of holding customer ID, name, and phone values, together with getter and setter methods for accessing these values. Instances of this class can then be created within the activity and database handler and passed back and forth as needed. Essentially, this class can be thought of as representing the database model.
Navigate within the Project tool window to app -> kotlin+java and right-click on the package name. From the popup menu, choose the New -> Kotlin File/Class option and, in the Create New Class dialog, name the class Customer and change the Kind menu to Class before tapping Enter on your keyboard.
|
You are reading a sample chapter from an old edition of the Android Studio Essentials – Kotlin Edition book.
Purchase the fully updated Android Studio Ladybug Kotlin Edition of this publication in eBook or Print format. The full book contains 100 chapters and over 878 pages of in-depth information. |
Once created the Customer.kt source file will automatically load into the Android Studio editor. Once loaded, modify the code to add the appropriate constructors:
package com.ebookfrenzy.sqldemo

class Customer {

    var id: Int = 0
    var customerName: String?  = null
    var customerPhone: String? = null

    constructor(id: Int, name: String, phone: String ) {
        this.id = id
        this.customerName = name
        this.customerPhone = phone
    }
    constructor(name: String, phone: String) {
        this.customerName = name
        this.customerPhone = phone
    }
}Code language: Kotlin (kotlin)
The completed class contains data members for the internal storage of data columns from database entries.
Implementing the Data Handler
The data handler will be implemented by subclassing from the Android SQLiteOpenHelper class and, as outlined in “An Overview of Android SQLite Databases”, adding the constructor, onCreate() and onUpgrade() methods. Since the handler will be required to add, query, and delete data on behalf of the activity component, corresponding methods will also need to be added to the class.
Begin by adding a second new class to the project to act as the handler, this time named MyDBHandler. Once the new class has been created, modify it so that it reads as follows:
package com.ebookfrenzy.sqldemo

import android.database.sqlite.SQLiteDatabase
import android.database.sqlite.SQLiteOpenHelper
import android.content.Context
import android.content.ContentValues

class MyDBHandler(context: Context, name: String?,
                  factory: SQLiteDatabase.CursorFactory?, version: Int) :
    SQLiteOpenHelper(context, DATABASE_NAME, factory, DATABASE_VERSION) {

    override fun onCreate(db: SQLiteDatabase) {
    }

    override fun onUpgrade(db: SQLiteDatabase, oldVersion: Int,
                           newVersion: Int) {
    }
}
Code language: Kotlin (kotlin)
Having now pre-populated the source file with template onCreate() and onUpgrade() methods, the next task is to modify the code to declare constants for the database name, table name, table columns, and database version as follows:
|
You are reading a sample chapter from an old edition of the Android Studio Essentials – Kotlin Edition book.
Purchase the fully updated Android Studio Ladybug Kotlin Edition of this publication in eBook or Print format. The full book contains 100 chapters and over 878 pages of in-depth information. |
.
.
class MyDBHandler(context: Context?, name: String?,
                  factory: SQLiteDatabase.CursorFactory?, version: Int) :
    SQLiteOpenHelper(context, DATABASE_NAME, factory, DATABASE_VERSION) {

    override fun onCreate(db: SQLiteDatabase) {
    }

    override fun onUpgrade(db: SQLiteDatabase, oldVersion: Int,
                           newVersion: Int) {
    }

    companion object {
        private val DATABASE_VERSION = 1
        private val DATABASE_NAME = "customerDB.db"
        val TABLE_CUSTOMERS = "customers"
        val COLUMN_ID = "_id"
        val COLUMN_CUSTOMERNAME = "customername"
        val COLUMN_CUSTOMERPHONE = "customerphone"
    }
}Code language: Kotlin (kotlin)
Next, the onCreate() method needs to be implemented so that the customers table is created when the database is first initialized. This involves constructing a SQL CREATE statement containing instructions to create a new table with the appropriate columns and then passing that through to the execSQL() method of the SQLiteDatabase object passed as an argument to onCreate():
override fun onCreate(db: SQLiteDatabase) {
    val CREATE_CUSTOMERS_TABLE = ("CREATE TABLE " +
            TABLE_CUSTOMERS + "("
            + COLUMN_ID + " INTEGER PRIMARY KEY," +
            COLUMN_CUSTOMERNAME
            + " TEXT," + COLUMN_CUSTOMERPHONE + " TEXT" + ")")

    db.execSQL(CREATE_CUSTOMERS_TABLE)
}Code language: Kotlin (kotlin)
The onUpgrade() method is called when the handler is invoked with a database version number greater than the one previously used. The exact steps to be performed in this instance will be application-specific, so for this example, we will remove the old database and create a new one:
override fun onUpgrade(db: SQLiteDatabase, oldVersion: Int,
                       newVersion: Int) {
    db.execSQL("DROP TABLE IF EXISTS " + TABLE_CUSTOMERS)
    onCreate(db)
}Code language: JavaScript (javascript)
All that remains to be implemented in the MyDBHandler.kt handler class are the methods to add, query, and remove database table entries.
The Add Handler Method
The method to insert database records will be named addCustomer() and will take as an argument an instance of our Customer data model class. A ContentValues object will be created in the body of the method and primed with key-value pairs for the data columns extracted from the Customer object. Next, a reference to the database will be obtained via a call to getWritableDatabase() followed by a call to the insert() method of the returned database object. Finally, once the insertion has been performed, the database needs to be closed:
fun addCustomer(customer: Customer) {
    val values = ContentValues()

    values.put(COLUMN_CUSTOMERNAME, customer.customerName)
    values.put(COLUMN_CUSTOMERPHONE, customer.customerPhone)
    val db = this.writableDatabase
    db.insert(TABLE_CUSTOMERS, null, values)
    db.close()
}Code language: JavaScript (javascript)
The Query Handler Method
The method to query the database will be named findCustomer() and will take as an argument a String object containing the name of the customer to be located. Using this string, a SQL SELECT statement will be constructed to find all matching records in the table. For this example, only the first match will then be returned, contained within a new instance of our Customer data model class:
|
You are reading a sample chapter from an old edition of the Android Studio Essentials – Kotlin Edition book.
Purchase the fully updated Android Studio Ladybug Kotlin Edition of this publication in eBook or Print format. The full book contains 100 chapters and over 878 pages of in-depth information. |
fun findCustomer(customername: String): Customer? {
    val query =
        "SELECT * FROM $TABLE_CUSTOMERS WHERE $COLUMN_CUSTOMERNAME = \"$customername\""

    val db = this.writableDatabase
    val cursor = db.rawQuery(query, null)
    var customer: Customer? = null

    if (cursor.moveToFirst()) {
        cursor.moveToFirst()
        val id = Integer.parseInt(cursor.getString(0))
        val name = cursor.getString(1)
        val phone = cursor.getString(2)
        customer = Customer(id, name, phone)
        cursor.close()
    }
    db.close()
    return customer
}Code language: Kotlin (kotlin)
The Delete Handler Method
The deletion method will be named deleteCustomer() and will accept as an argument the entry to be deleted in the form of a Customer object. The method will use a SQL SELECT statement to search for the entry based on the customer name and, if located, delete it from the table. The success or otherwise of the deletion will be reflected in a Boolean return value:
fun deleteCustomer(customername: String): Boolean {
    var result = false
    val query =
        "SELECT * FROM $TABLE_CUSTOMERS WHERE $COLUMN_CUSTOMERNAME = \"$customername\""

    val db = this.writableDatabase
    val cursor = db.rawQuery(query, null)

    if (cursor.moveToFirst()) {
        val id = Integer.parseInt(cursor.getString(0))
        db.delete(
            TABLE_CUSTOMERS, COLUMN_ID + " = ?",
            arrayOf(id.toString()))
        cursor.close()
        result = true
    }
    db.close()
    return result
}Code language: Kotlin (kotlin)
Implementing the Activity Event Methods
The final task before testing the application is to write the onClick event handlers for the three buttons in the user interface. Load the MainActivity.kt source file into the editor and add the onClick target methods as follows:
package com.ebookfrenzy.sqldemo
.
.
import android.view.View
.
.
class MainActivity : AppCompatActivity() {

    private lateinit var binding: ActivityMainBinding
    private lateinit var dbHandler: MyDBHandler
.
.
   override fun onCreate(savedInstanceState: Bundle?) {
        super.onCreate(savedInstanceState)
        enableEdgeToEdge()
        binding = ActivityMainBinding.inflate(layoutInflater)
        setContentView(binding.root)
        ViewCompat.setOnApplyWindowInsetsListener(binding.main) { v, insets ->
            val systemBars =
                insets.getInsets(WindowInsetsCompat.Type.systemBars())
            v.setPadding(systemBars.left, systemBars.top,
                  systemBars.right, systemBars.bottom)
            insets
        }

        dbHandler = MyDBHandler(this, null, null, 1)
    }
    fun addCustomer(view: View) {
        val name = binding.customerName.text.toString()
        val phone = binding.customerPhone.text.toString()
        val customer = Customer(name, phone)

        dbHandler.addCustomer(customer)
        binding.customerName.setText("")
        binding.customerPhone.setText("")
    }

    fun findCustomer(view: View) {
        val customer =
              dbHandler.findCustomer(binding.customerName.text.toString())

        if (customer != null) {
            binding.customerPhone.setText(
                customer.customerPhone)
            binding.statusText.text = "Match Found"
        } else {
            binding.statusText.text = "No Match Found"
        }
    }

    fun deleteCustomer(view: View) {
        val result = dbHandler.deleteCustomer(
            binding.customerName.text.toString())
        if (result) {
            binding.statusText.text = "Record Deleted"
            binding.customerName.setText("")
            binding.customerPhone.setText("")
        } else
            binding.statusText.text = "No Match Found"
    }
}Code language: Kotlin (kotlin)
Testing the Application
With the coding changes completed, compile and run the application either in an AVD session or on a physical Android device. Once the application is running, enter a customer name and phone number into the user interface form and touch the Add button. Once the record has been added, the text boxes will clear. Repeat these steps to add a second customer to the database. Next, enter the name of one of the newly added customers into the customer name field and touch the Find button. The form should update with the customer ID and phone number for the selected customer. Touch the Delete button to delete the selected record. A subsequent search by customer name should indicate that the record no longer exists.
Summary
This chapter worked step by step through a practical application of SQLite-based database storage in Android applications. To develop your new database skill set further, consider extending the example to include the ability to update existing records in the database table.