
Apps developed before the introduction of SwiftUI will have been developed using UIKit and other UIKit-based frameworks included with the iOS SDK. Given the benefits of using SwiftUI for future development, it will be a common requirement to integrate the new SwiftUI app functionality with the existing project code base. Fortunately, this integration can be achieved with relative ease using the UIHostingController.
An Overview of the Hosting Controller
The hosting controller (in the form of the UIHostingController class) is a subclass of UIViewController, the sole purpose of which is to enclose a SwiftUI view so that it can be integrated into an existing UIKit-based project.
Using a hosting view controller, a SwiftUI view can be treated either as an entire scene (occupying the full screen), or as an individual component within an existing UIKit scene layout by embedding a hosting controller in a container view. A container view essentially allows a view controller to be configured as the child of another view controller.
SwiftUI views can be integrated into a UIKit project either from within the code or using an Interface Builder storyboard. The following code excerpt embeds a SwiftUI content view in a hosting view controller and then presents it to the user:
let swiftUIController =
                   UIHostingController(rootView: SwiftUIView())
present(swiftUIController, animated: true, completion: nil)Code language: Swift (swift)
The following example, on the other hand, embeds a hosted SwiftUI view directly into the layout of an existing UIViewController:
 |
You are reading a sample chapter from an old edition of iOS App Development Essentials. Purchase the fully updated iOS 18 App Development Essentials book. The full book contains 71 chapters, over 612 pages of in-depth information, downloadable source code, and access to over 50 SwiftUI knowledge test quizzes. |
let swiftUIController =
             UIHostingController(rootView: SwiftUIView())

addChild(swiftUIController)
view.addSubview(swiftUIController.view)

swiftUIController.didMove(toParent: self)Code language: Swift (swift)
In the rest of this chapter, an example project will be created that demonstrates the use of UIHostingController instances to integrate SwiftUI views into an existing UIKit-based project both programmatically and using storyboards.
A UIHostingController Example Project
Unlike previous chapters, the project created in this chapter will create a UIKit Storyboard-based project instead of a SwiftUI Multiplatform app. Launch Xcode and select the iOS tab followed by the App template as shown in Figure 54-1 below:
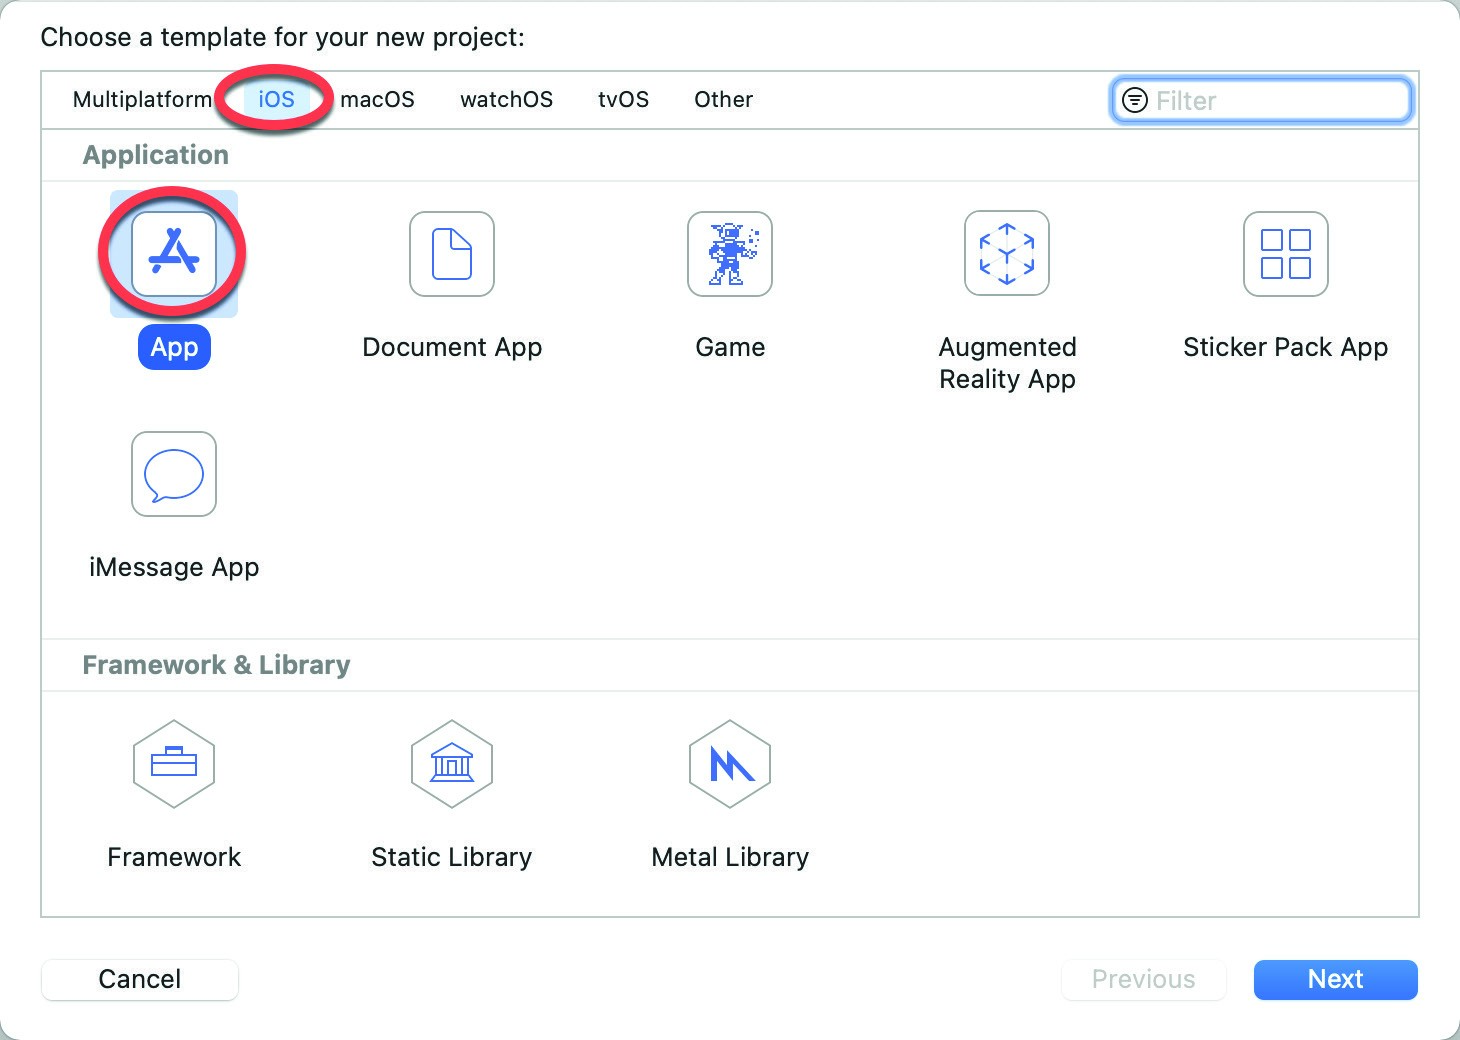
Figure 54-1
Click the Next button and, on the options screen, name the project HostingControllerDemo and change the Interface menu from SwiftUI to Storyboard. Click the Next button once again and proceed with the project creation process.
Adding the SwiftUI Content View
In the course of building this project, a SwiftUI content view will be integrated into a UIKit storyboard scene using the UIHostingController in three different ways. In preparation for this integration process, a SwiftUI View file needs to be added to the project. Add this file now by selecting the File -> New -> File… menu option and choosing the SwiftUI View template option from the resulting dialog. Proceed through the screens, keeping the default SwiftUIView file name.
|
You are reading a sample chapter from an old edition of iOS App Development Essentials. Purchase the fully updated iOS 18 App Development Essentials book. The full book contains 71 chapters, over 612 pages of in-depth information, downloadable source code, and access to over 50 SwiftUI knowledge test quizzes. |
With the SwiftUIView.swift file loaded into the editor, modify the declaration so that it reads as follows:
import SwiftUI

struct SwiftUIView: View {

    var text: String

    var body: some View {
        VStack {
            Text(text)
            HStack {
                Image(systemName: "smiley")
                Text("This is a SwiftUI View")
            }
        }
        .font(.largeTitle)
    }
}

struct SwiftUIView_Previews: PreviewProvider {
    static var previews: some View {
        SwiftUIView(text: "Sample Text")
    }
}Code language: Swift (swift)
With the SwiftUI view added, the next step is to integrate it so that it can be launched as a separate view controller from within the storyboard.
Preparing the Storyboard
Within Xcode, select the Main.storyboard file so that it loads into the Interface Builder tool. As currently configured, the storyboard consists of a single view controller scene as shown in Figure 54-2:
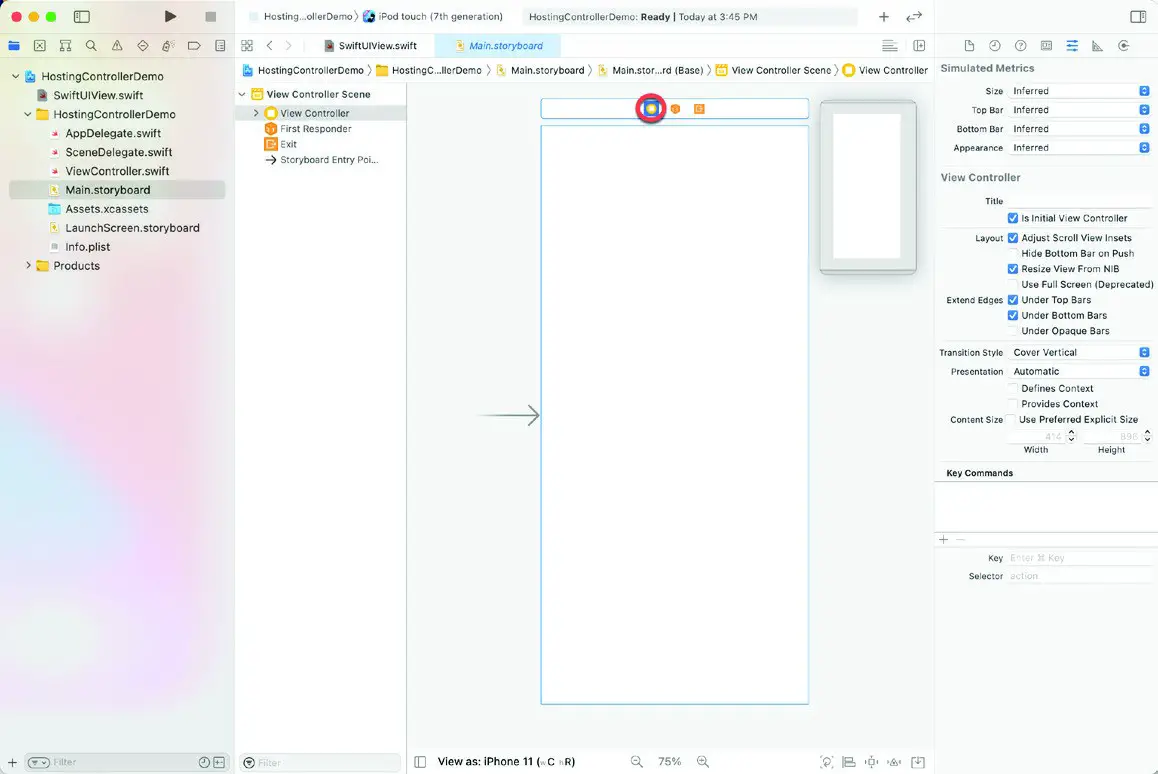
Figure 54-2
So that the user can navigate back to the current scene, the view controller needs to be embedded into a Navigation Controller. Select the current scene by clicking on the View Controller button circled in the figure above so that the scene highlights with a blue outline and select the Editor -> Embed In -> Navigation Controller menu option. At this point the storyboard canvas should resemble Figure 54-3:
|
You are reading a sample chapter from an old edition of iOS App Development Essentials. Purchase the fully updated iOS 18 App Development Essentials book. The full book contains 71 chapters, over 612 pages of in-depth information, downloadable source code, and access to over 50 SwiftUI knowledge test quizzes. |
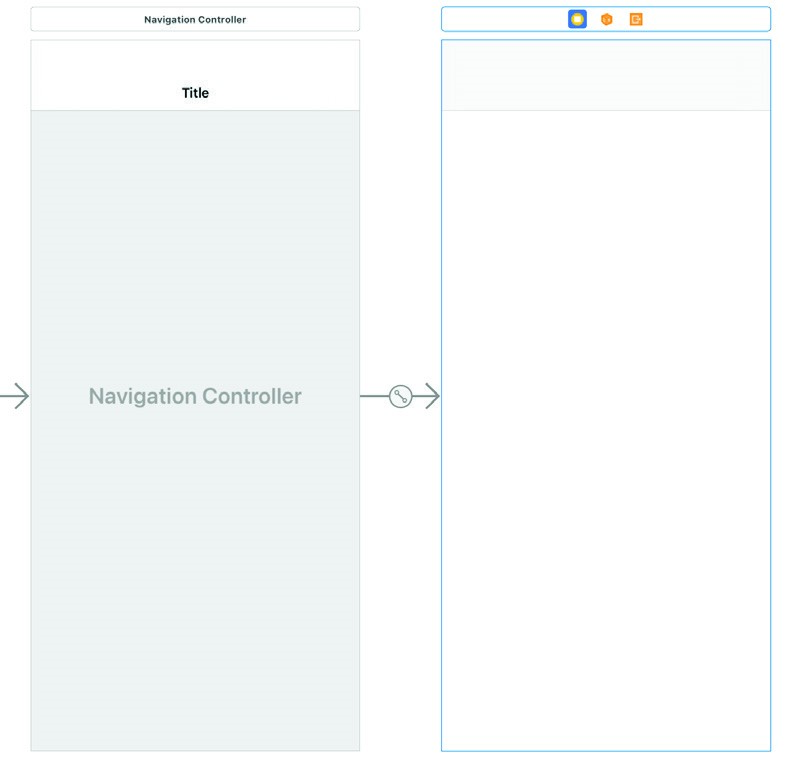
Figure 54-3
The first SwiftUI integration will require a button which, when clicked, will show a new view controller containing the SwiftUI View. Display the Library panel by clicking on the button highlighted in Figure 54-4 and locate and drag a Button view onto the view controller scene canvas:
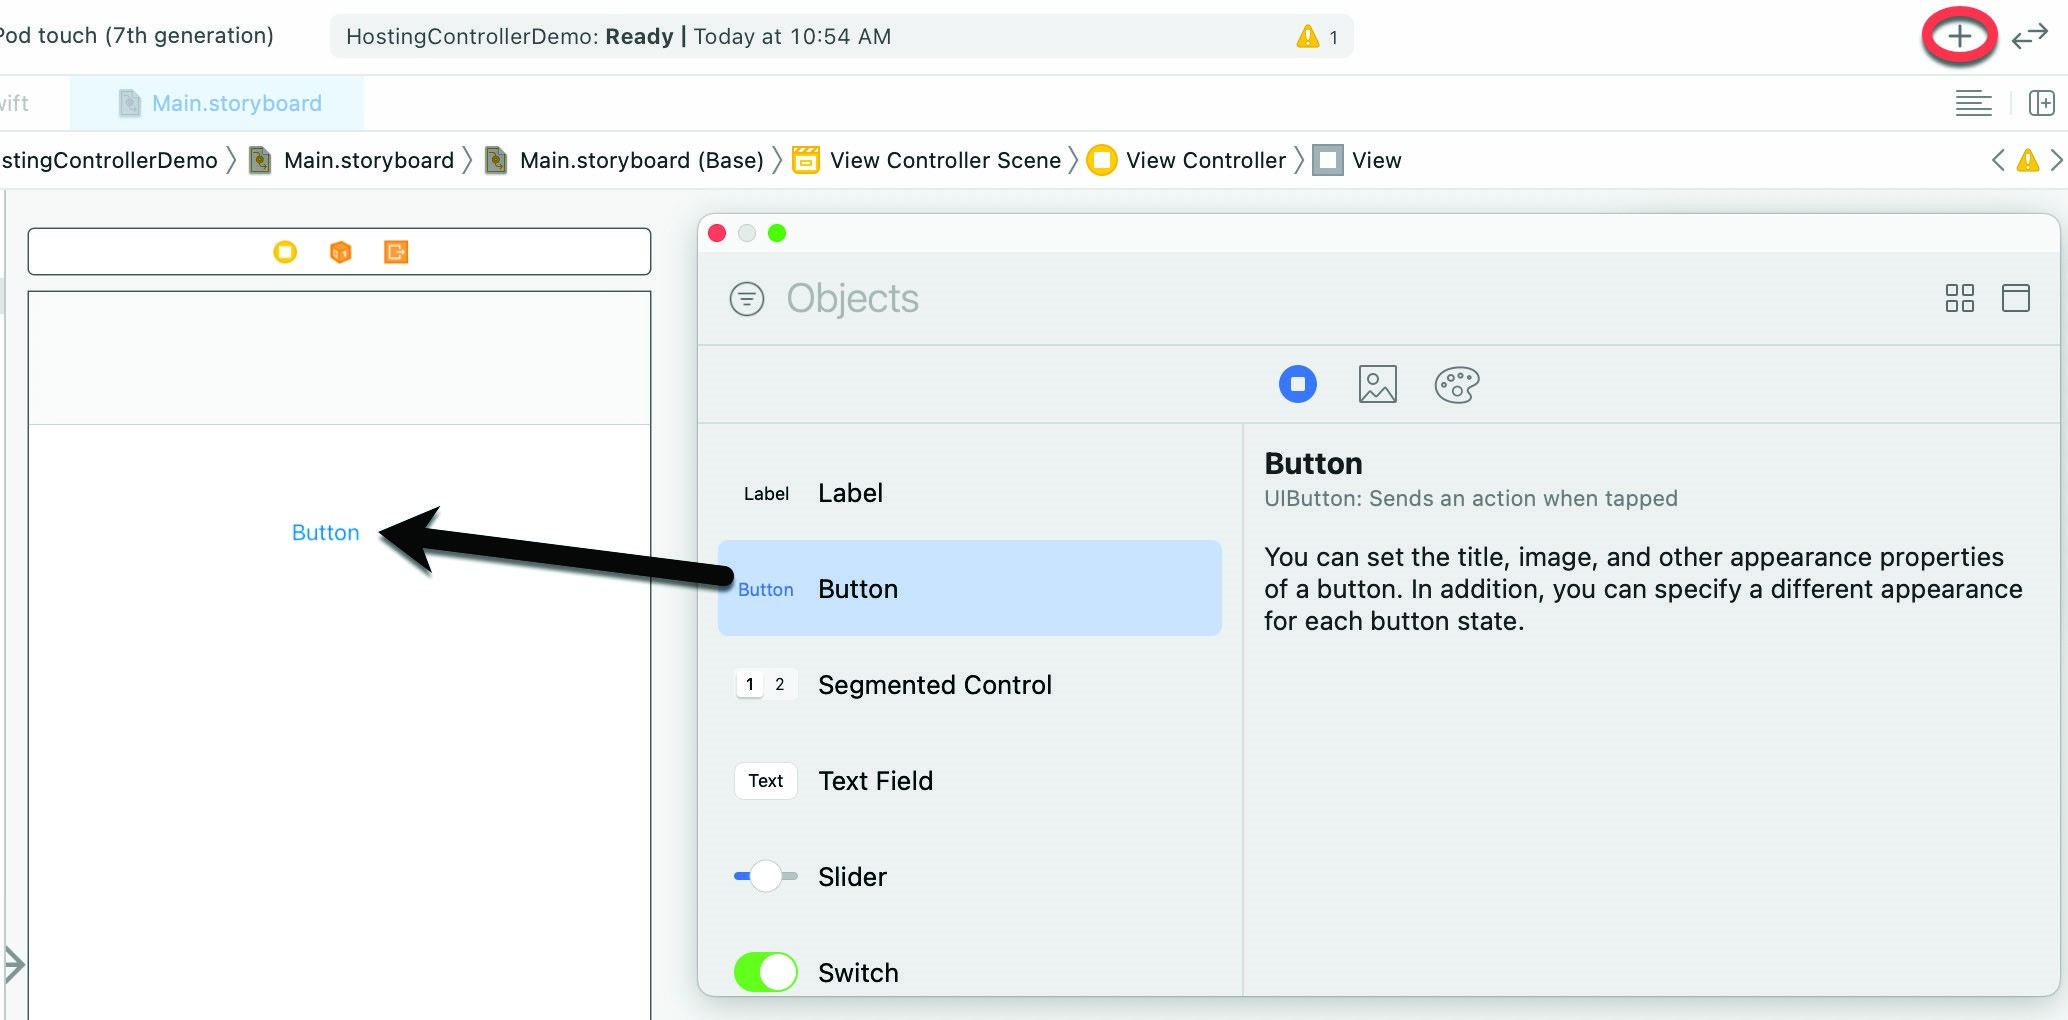
Figure 54-4
Double-click on the button to enter editing mode and change the text so that it reads “Show Second Screen”. To maintain the position of the button it will be necessary to add some layout constraints. Use the Resolve Auto Layout Issues button indicated in Figure 54-5 to display the menu and select the Reset to Suggested Constraints option to add any missing constraints to the button widget:
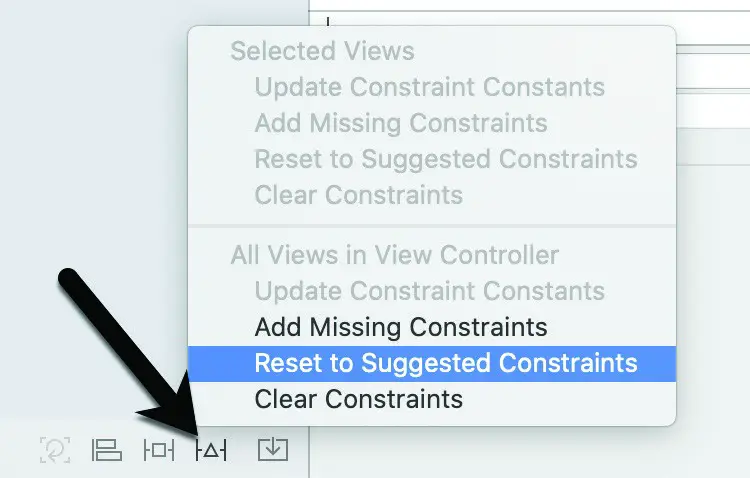
Figure 54-5
|
You are reading a sample chapter from an old edition of iOS App Development Essentials. Purchase the fully updated iOS 18 App Development Essentials book. The full book contains 71 chapters, over 612 pages of in-depth information, downloadable source code, and access to over 50 SwiftUI knowledge test quizzes. |
Adding a Hosting Controller
The storyboard is now ready to add a UIHostingController and to implement a segue on the button to display the SwiftUIView layout. Display the Library panel once again, locate the Hosting View Controller and drag and drop it onto the storyboard canvas so that it resembles Figure 54-6 below:
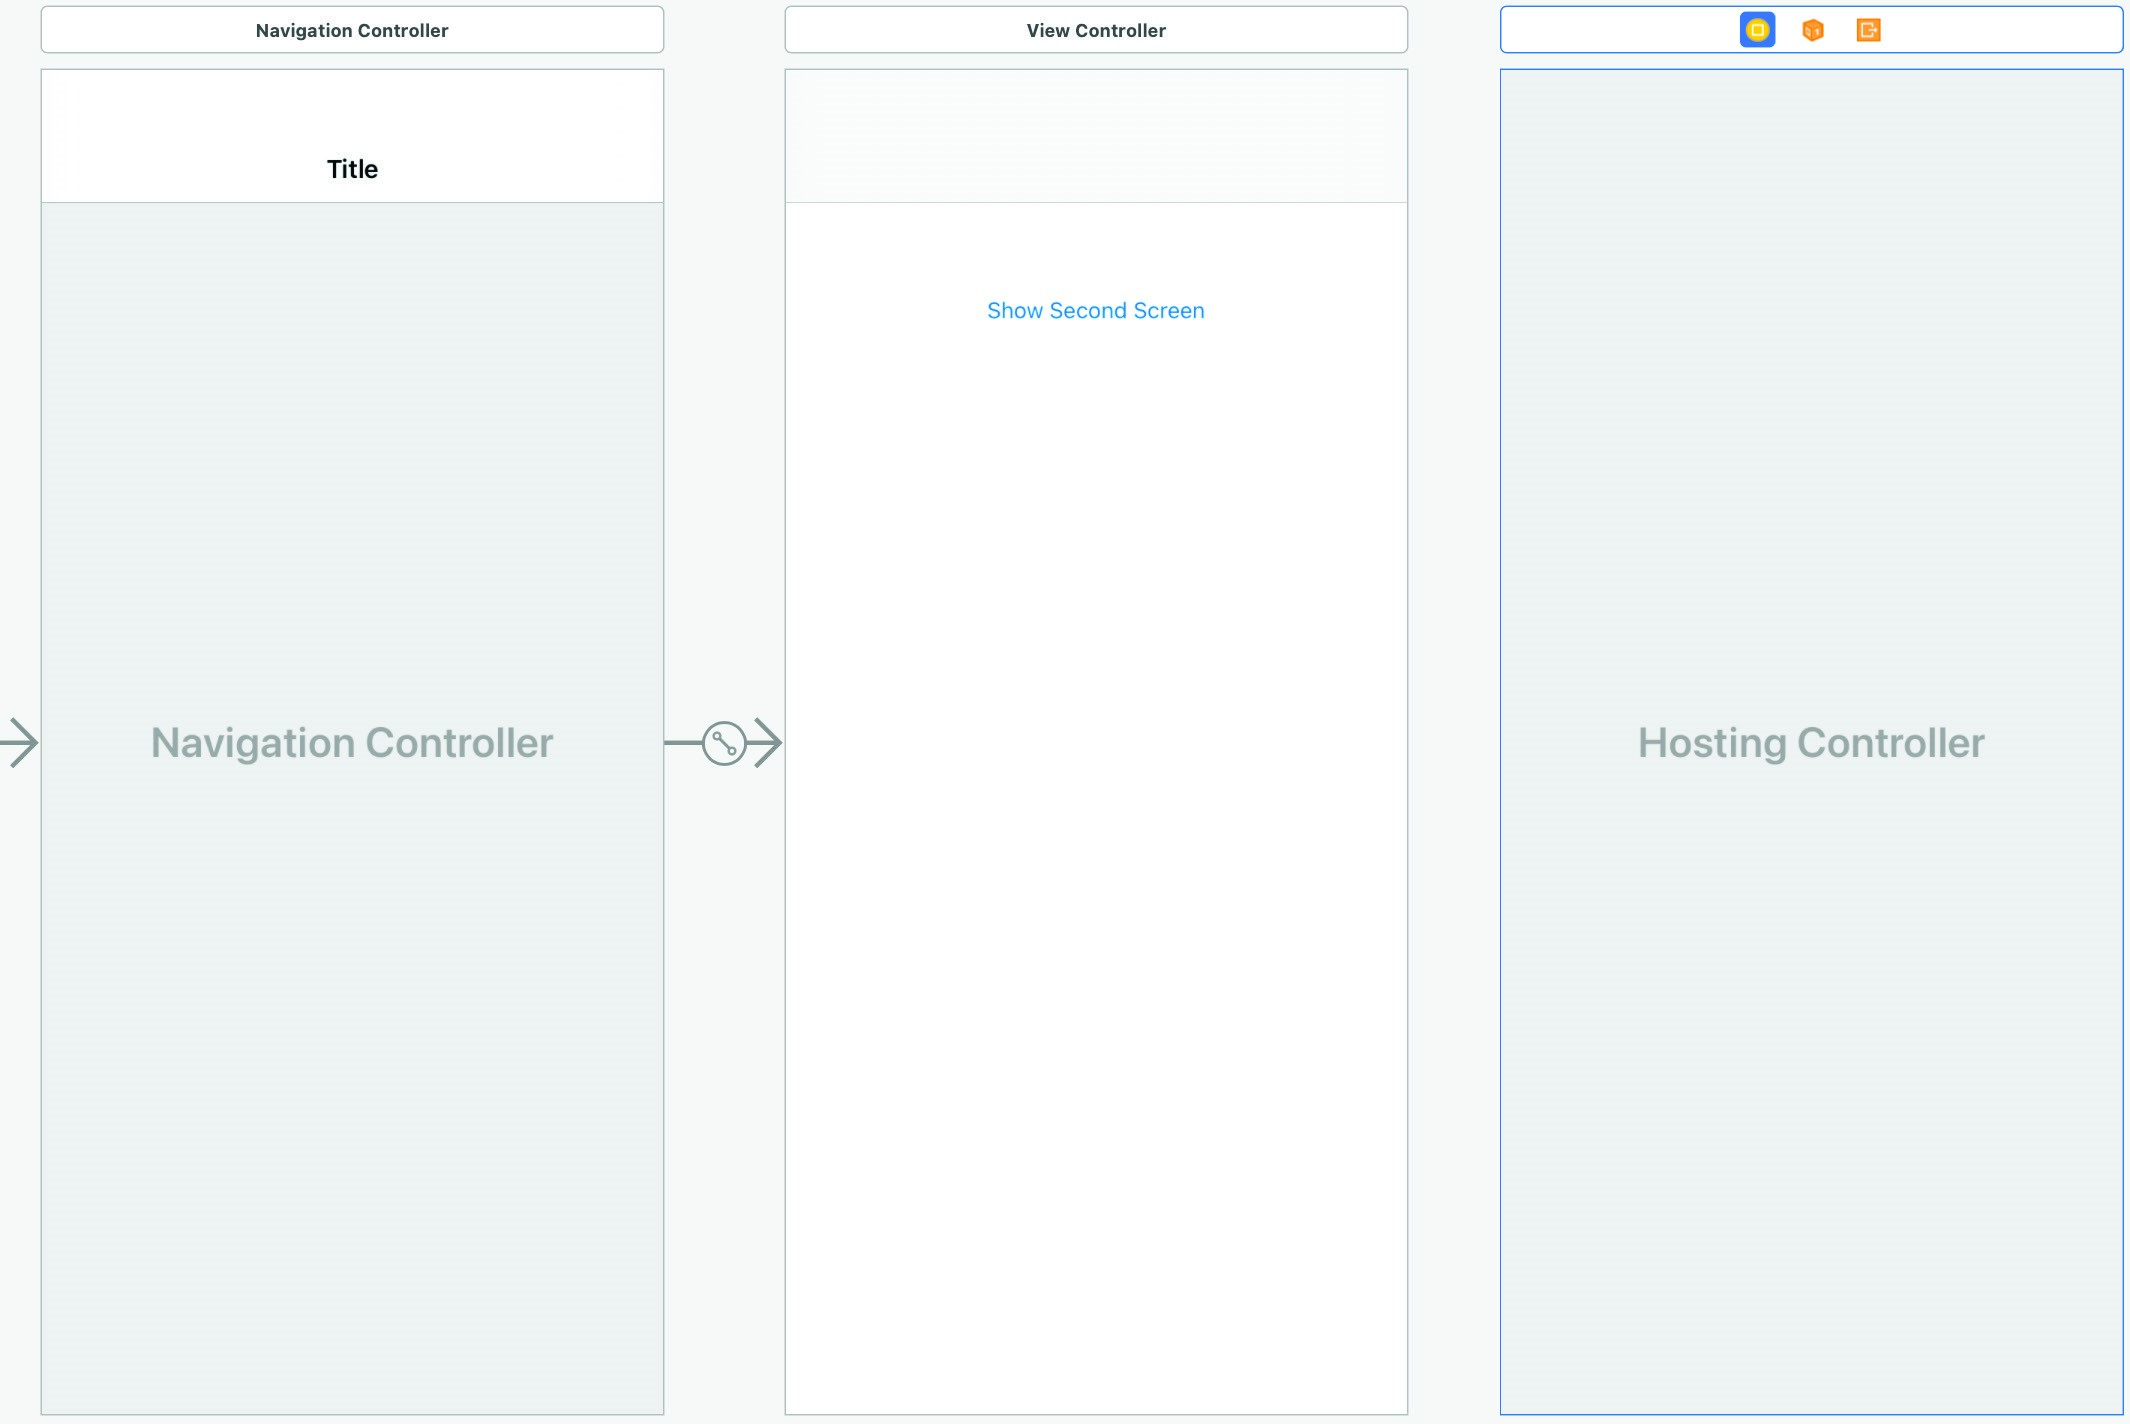
Figure 54-6
Next, add the segue by selecting the “Show Second Screen” button and Ctrl-clicking and dragging to the Hosting Controller:
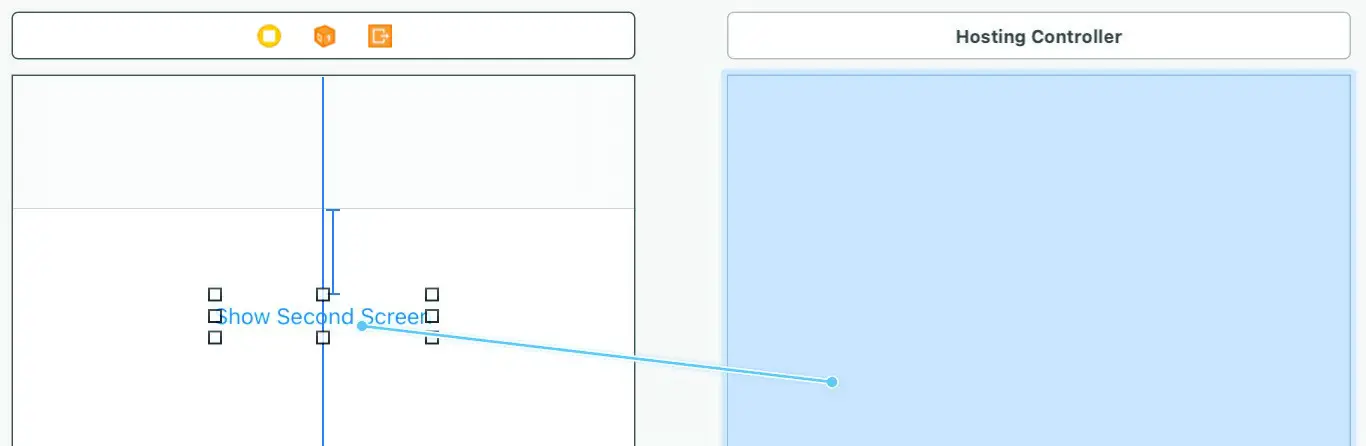
Figure 54-7
Release the line once it is within the bounds of the hosting controller and select Show from the resulting menu.
|
You are reading a sample chapter from an old edition of iOS App Development Essentials. Purchase the fully updated iOS 18 App Development Essentials book. The full book contains 71 chapters, over 612 pages of in-depth information, downloadable source code, and access to over 50 SwiftUI knowledge test quizzes. |
Compile and run the project on a simulator or connected device and verify that clicking the button navigates to the hosting controller screen and that the Navigation Controller has provided a back button to return to the initial screen. At this point the hosting view controller appears with a black background indicating that it currently has no content.
Configuring the Segue Action
The next step is to add an IBSegueAction to the segue that will load the SwiftUI view into the hosting controller when the button is clicked. Within Xcode, select the Editor -> Assistant menu option to display the Assistant Editor panel. When the Assistant Editor panel appears, make sure that it is displaying the content of the ViewController.swift file. By default, the Assistant Editor will be in Automatic mode, whereby it automatically attempts to display the correct source file based on the currently selected item in Interface Builder. If the correct file is not displayed, the toolbar along the top of the editor panel can be used to select the correct file.
If the ViewController.swift file is not loaded, begin by clicking on the Automatic entry in the editor toolbar as highlighted in Figure 54-8:

Figure 54-8
From the resulting menu (Figure 54-9), select the ViewController.swift file to load it into the editor:
|
You are reading a sample chapter from an old edition of iOS App Development Essentials. Purchase the fully updated iOS 18 App Development Essentials book. The full book contains 71 chapters, over 612 pages of in-depth information, downloadable source code, and access to over 50 SwiftUI knowledge test quizzes. |
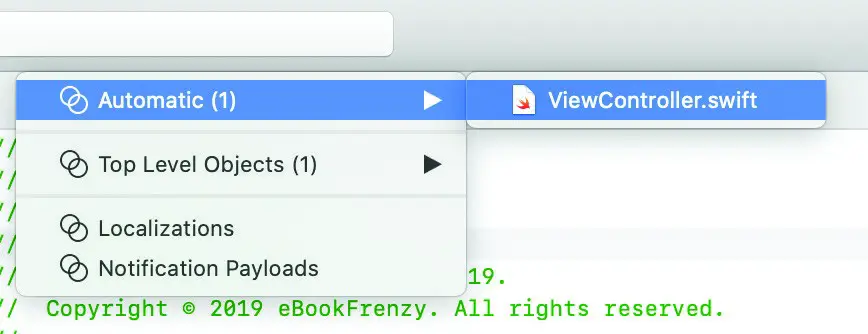
Figure 54-9
Next, Ctrl-click on the segue line between the initial view controller and the hosting controller and drag the resulting line to a position beneath the viewDidLoad() method in the Assistant panel as shown in Figure 54-10:
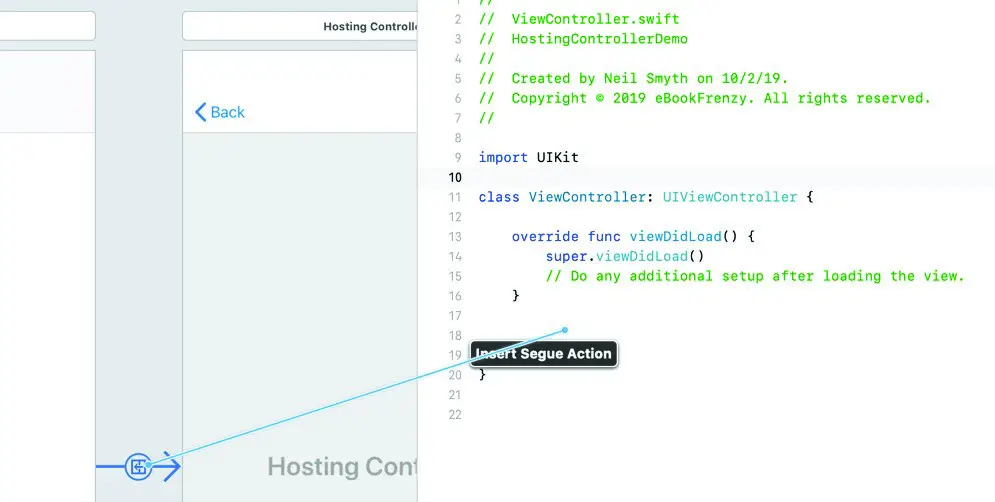
Figure 54-10
Release the line and enter showSwiftUIView into the Name field of the connection dialog before clicking the Connect button:
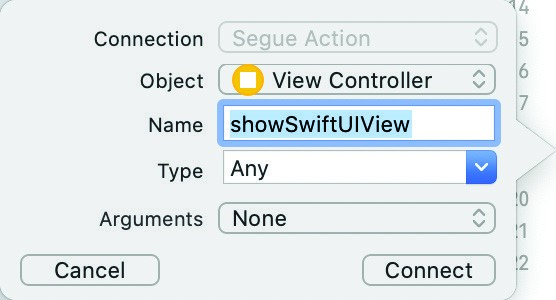
Figure 54-11
|
You are reading a sample chapter from an old edition of iOS App Development Essentials. Purchase the fully updated iOS 18 App Development Essentials book. The full book contains 71 chapters, over 612 pages of in-depth information, downloadable source code, and access to over 50 SwiftUI knowledge test quizzes. |
Within the ViewController.swift file Xcode will have added the IBSegueAction method which needs to be modified as follows to embed the SwiftUIView layout into the hosting controller (note that the SwiftUI framework also needs to be imported):
import UIKit
import SwiftUI
.
.
@IBSegueAction func showSwiftUIView(_ coder: NSCoder) -> UIViewController? {
    return UIHostingController(coder: coder,
                rootView: SwiftUIView(text: "Integration One"))
}Code language: Swift (swift)
Compile and run the app once again, this time confirming that the second screen appears as shown in Figure 54-12:

Figure 54-12
Embedding a Container View
For the second integration, a Container View will be added to an existing view controller scene and used to embed a SwiftUI view alongside UIKit components. Within the Main.storyboard file, display the Library and drag and drop a Container View onto the scene canvas of the initial view controller, then position and size the view so that it appears as shown in Figure 54-13:
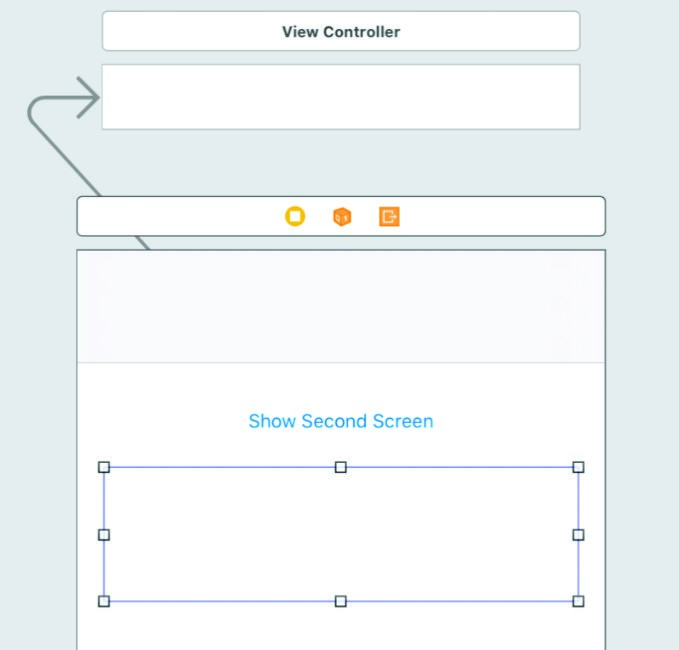
Figure 54-13
|
You are reading a sample chapter from an old edition of iOS App Development Essentials. Purchase the fully updated iOS 18 App Development Essentials book. The full book contains 71 chapters, over 612 pages of in-depth information, downloadable source code, and access to over 50 SwiftUI knowledge test quizzes. |
Before proceeding, click on the background of the view controller scene before using the Resolve Auto Layout Issues button indicated in Figure 54-5 once again and select the Reset to Suggested Constraints option to add any missing constraints to the layout.
Note that Xcode has also added an extra View Controller for the Container View (located above the initial view controller in the above figure). This will need to be replaced by a Hosting Controller so select this controller and tap the keyboard delete key to remove it from the storyboard.
Display the Library, locate the Hosting View Controller and drag and drop it so that it is positioned above the initial view controller in the storyboard canvas. Ctrl-click on the Container View in the view controller scene and drag the resulting line to the new hosting controller before releasing. From the segue menu, select the Embed option:
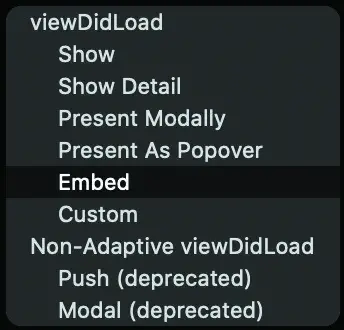
Figure 54-14
Once the Container View has been embedded in the hosting controller, the storyboard should resemble Figure 54-15:
|
You are reading a sample chapter from an old edition of iOS App Development Essentials. Purchase the fully updated iOS 18 App Development Essentials book. The full book contains 71 chapters, over 612 pages of in-depth information, downloadable source code, and access to over 50 SwiftUI knowledge test quizzes. |
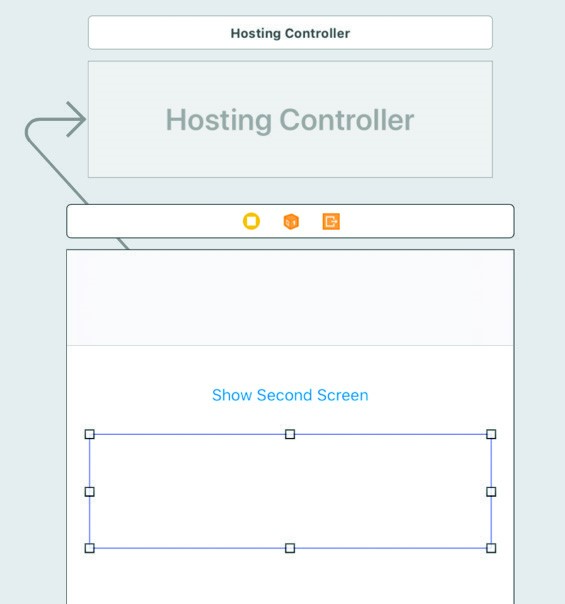
Figure 54-15
All that remains is to add an IBSegueAction to the connection between the Container View and the hosting controller. Display the Assistant Editor once again, Ctrl-click on the arrow pointing in towards the left side of the hosting controller and drag the line to a position beneath the showSwiftUIView action method. Name the action embedSwiftUIView and click on the Connect button. Once the new method has been added, modify it as follows:
@IBSegueAction func embedSwiftUIView(_ coder: NSCoder) ->
                                         UIViewController? {
    return UIHostingController(coder: coder, rootView: SwiftUIView(text: "Integration Two"))
}Code language: Swift (swift)
When the app is now run, the SwiftUI view will appear in the initial view controller within the Container View:
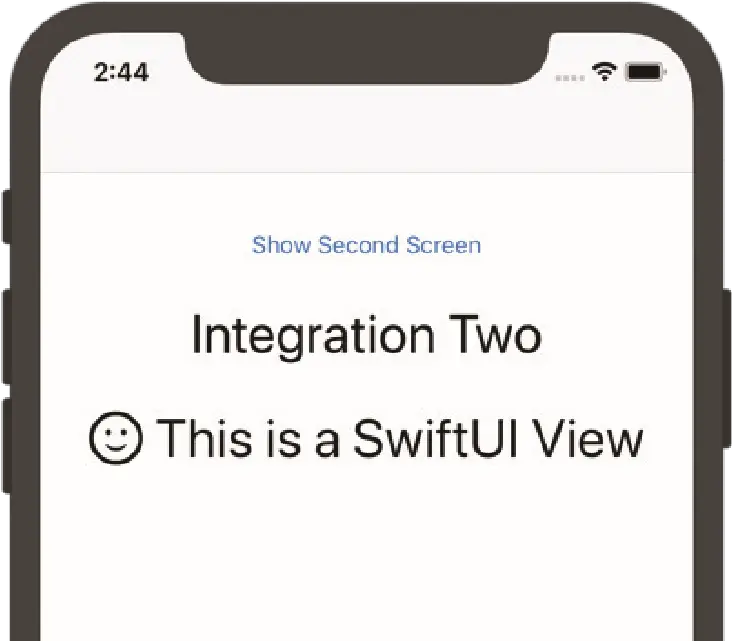
Figure 54-16
Embedding SwiftUI in Code
In this, the final integration example, the SwiftUI view will be embedded into the layout for the initial view controller programmatically. Within Xcode, edit the ViewController.swift file, locate the viewDidLoad() method and modify it as follows:
|
You are reading a sample chapter from an old edition of iOS App Development Essentials. Purchase the fully updated iOS 18 App Development Essentials book. The full book contains 71 chapters, over 612 pages of in-depth information, downloadable source code, and access to over 50 SwiftUI knowledge test quizzes. |
override func viewDidLoad() {
    super.viewDidLoad()

    let swiftUIController = UIHostingController(rootView: SwiftUIView(text: "Integration Three"))

    addChild(swiftUIController)
    swiftUIController.view.translatesAutoresizingMaskIntoConstraints
                                                      = false

    view.addSubview(swiftUIController.view)

    swiftUIController.view.centerXAnchor.constraint(
              equalTo: view.centerXAnchor).isActive = true
    swiftUIController.view.centerYAnchor.constraint(
              equalTo: view.centerYAnchor).isActive = true

    swiftUIController.didMove(toParent: self)
}Code language: Swift (swift)
The code begins by creating a UIHostingController instance containing the SwiftUIView layout before adding it as a child to the current view controller. The translates autoresizing property is set to false so that any constraints we add will not conflict with the automatic constraints usually applied when a view is added to a layout. Next, the UIView child of the UIHostingController is added as a subview of the containing view controller’s UIView. Constraints are then set on the hosting view controller to position it in the center of the screen. Finally, an event is triggered to let UIKit know that the hosting controller has been moved to the container view controller. Run the app one last time and confirm that it appears as shown in Figure 54-17:
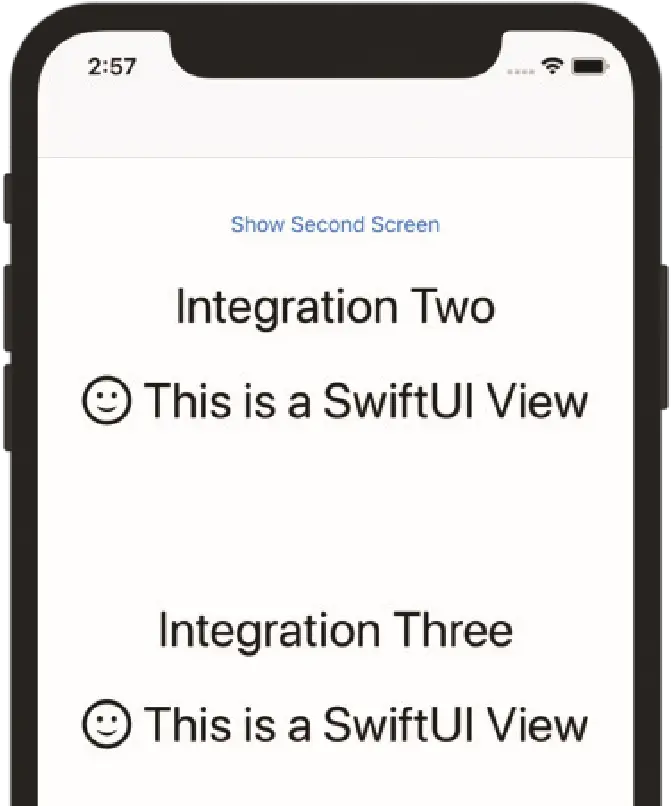
Figure 54-17
Summary
Any apps developed before the introduction of SwiftUI will have been created using UIKit. While it is certainly possible to continue using UIKit when enhancing and extending an existing app, it probably makes more sense to use SwiftUI when adding new app features (unless your app needs to run on devices that do not support iOS 13 or newer). Recognizing the need to integrate new SwiftUI-based views and functionality with existing UIKit code, Apple created the UIHostingViewController. This controller is designed to wrap SwiftUI views in a UIKit view controller that can be integrated into existing UIKit code. As demonstrated in this chapter, the hosting controller can be used to integrate SwiftUI and UIKit both within storyboards and programmatically within code. Options are available to integrate entire SwiftUI user interfaces in independent view controllers or, through the use of container views, to embed SwiftUI views alongside UIKit views within an existing layout.