Ubuntu provides two mechanisms for sharing files and folders with other systems on a network. One approach is to use technology called Samba. Samba is based on Microsoft Windows Folder Sharing and allows Linux systems to make folders accessible to Windows systems, and also to access Windows based folder shares from Linux. This approach can also be used to share folders between other Linux and UNIX based systems as long as they too have Samba support installed and configured. This is by far the most popular approach to sharing folders in heterogeneous network environments. The topic of folder sharing using Samba is covered in “Sharing Files between Ubuntu and Windows Systems with Samba”.
Another option, which is targeted specifically at sharing folders between Linux and UNIX based systems, uses technology called Network File System (NFS). NFS allows the file system on one Linux computer to be accessed over a network connection by another Linux or UNIX system. NFS was originally developed by Sun Microsystems (now part of Oracle Corporation) in the 1980s and remains the standard mechanism for sharing of remote Linux/UNIX file systems to this day.
NFS is very different to the Windows SMB resource sharing technology used by Samba. In this chapter we will be looking at network based sharing of folders between Ubuntu and other UNIX/ Linux based systems using NFS.
Ensuring NFS Services are running on Ubuntu
The first task is to verify that the NFS services are installed and running on your Ubuntu system. This can be achieved either from the command-line, or using the Cockpit interface.
Begin by installing the NFS service by running the following command from a terminal window:
 |
You are reading a sample chapter from Ubuntu 22.04 Essentials. Buy the full book now in eBook ($24.99) format. Includes 36 chapters. Learn more. |
# apt install nfs-kernel-serverCode language: plaintext (plaintext)Next, configure the service to automatically start at boot time:
# systemctl enable nfs-kernel-serverCode language: plaintext (plaintext)Once the service has been enabled, start it as follows:
# systemctl start nfs-kernel-serverCode language: plaintext (plaintext)Configuring the Ubuntu Firewall to Allow NFS Traffic
Next, the firewall needs to be configured to allow NFS traffic.
If the Uncomplicated Firewall is enabled, run the following command to add a rule to allow NFS traffic:
# ufw allow nfsCode language: plaintext (plaintext)If, on the other hand, you are using firewalld, run the following firewall-cmd commands where <zone> is replaced by the appropriate zone for your firewall and system configuration:
|
You are reading a sample chapter from Ubuntu 22.04 Essentials. Buy the full book now in eBook ($24.99) format. Includes 36 chapters. Learn more. |
# firewall-cmd --zone=<zone> --permanent --add-service=mountd
# firewall-cmd --zone=<zone> --permanent --add-service=nfs
# firewall-cmd --zone=<zone> --permanent --add-service=rpc-bind
# firewall-cmd --reloadCode language: plaintext (plaintext)
Specifying the Folders to be Shared
Now that NFS is running and the firewall has been configured, we need to specify which parts of the Ubuntu file system may be accessed by remote Linux or UNIX systems. These settings can be declared in the /etc/exports file, which will need to be modified to export the directories for remote access via NFS. The syntax for an export line in this file is as follows:
<export> <host1>(<options>) <host2>(<options>)...Code language: plaintext (plaintext)In the above line, <export> is replaced by the directory to be exported, <host1> is the name or IP address of the system to which access is being granted, and <options> represents the restrictions that are to be imposed on that access (read-only, read-write etc). Multiple host and options entries may be placed on the same line if required. For example, the following line grants read-only permission to the /datafiles directory to a host with the IP address of 192.168.2.38:
/datafiles 192.168.2.38(ro,no_subtree_check)Code language: plaintext (plaintext)The use of wildcards is permitted in order to apply an export to multiple hosts. For example, the following line permits read-write access to /home/demo to all external hosts:
/home/demo *(rw)Code language: plaintext (plaintext)A full list of options supported by the exports file may be found by reading the exports man page:
# man exportsCode language: plaintext (plaintext)For the purposes of this chapter, we will configure the /etc/exports file as follows:
|
You are reading a sample chapter from Ubuntu 22.04 Essentials. Buy the full book now in eBook ($24.99) format. Includes 36 chapters. Learn more. |
/tmp       *(rw,sync,no_subtree_check)
/vol1      192.168.2.21(ro,sync,no_subtree_check)Code language: plaintext (plaintext)
Once configured, the table of exported file systems maintained by the NFS server needs to be updated with the latest /etc/exports settings using the exportfs command as follows:
# exportfs -aCode language: plaintext (plaintext)It is also possible to view the current share settings from the command-line using the exportfs tool:
# exportfsCode language: plaintext (plaintext)The above command will generate the following output:
/tmp            <world>
/vol1           192.168.2.21Code language: plaintext (plaintext)
Accessing Shared Ubuntu Folders
The shared folders may be accessed from a client system by mounting them manually from the command-line. Before attempting to mount a remote NFS folder, the nfs-common package should first be installed on the client system:
# apt install nfs-commonCode language: plaintext (plaintext)To mount a remote folder from the command-line, open a terminal window and create a directory where you would like the remote shared folder to be mounted:
|
You are reading a sample chapter from Ubuntu 22.04 Essentials. Buy the full book now in eBook ($24.99) format. Includes 36 chapters. Learn more. |
# mkdir /home/demo/tmpCode language: plaintext (plaintext)Next, enter the command to mount the remote folder using either the IP address or hostname of the remote NFS server, for example:
# mount -t nfs 192.168.1.115:/tmp /home/demo/tmpCode language: plaintext (plaintext)The remote /tmp folder will then be mounted on the local system. Once mounted, the /home/ demo/tmp folder will contain the remote folder and all its contents.
Options may also be specified when mounting a remote NFS filesystem. The following command, for example, mounts the same folder, but configures it to be read-only:
# mount -t nfs -o ro 192.168.1.115:/tmp /home/demo/tmpCode language: plaintext (plaintext)Mounting an NFS Filesystem on System Startup
It is also possible to configure an Ubuntu system to automatically mount a remote file system each time the system starts up by editing the /etc/fstab file. When loaded into an editor, it will likely resemble the following:
UUID=84982a2e-0dc1-4612-9ffa-13baf91ec558 /     ext4    errors=remount-ro 0  1
/swapfile                        none            swap    sw              0       0Code language: plaintext (plaintext)
To mount, for example, a folder with the path /tmp which resides on a system with the IP address 192.168.1.115 in the local folder with the path /home/demo/tmp (note that this folder must already exist) add the following line to the /etc/fstab file:
|
You are reading a sample chapter from Ubuntu 22.04 Essentials. Buy the full book now in eBook ($24.99) format. Includes 36 chapters. Learn more. |
192.168.1.115:/tmp /home/demo/tmp nfs rw 0 0Code language: plaintext (plaintext)Next time the system reboots the /tmp folder located on the remote system will be mounted on the local /home/demo/tmp mount point. All the files in the remote folder can then be accessed as if they reside on the local hard disk drive.
Unmounting an NFS Mount Point
Once a remote file system is mounted using NFS it can be unmounted using the umount command with the local mount point as the command-line argument. The following command, for example, will unmount our example filesystem mount point:
# umount /home/demo/tmpCode language: plaintext (plaintext)Accessing NFS Filesystems in Cockpit
In addition to mounting a remote NFS file system on a client using the command-line, it is also possible to perform mount operations from within the Cockpit web interface. Assuming that Cockpit has been installed and configured on the client system, log into the Cockpit interface from within a web browser and select the Storage option from the left-hand navigation panel. If the Storage option is not listed, the cockpit-storaged package will need to be installed:
# apt install cockpit-storagedCode language: plaintext (plaintext)Once the Cockpit service has restarted, log back into the Cockpit interface, at which point the Storage option should now be visible.
Once selected, the main storage page will include a section listing any currently mounted NFS file systems, as illustrated in Figure 22-1:
|
You are reading a sample chapter from Ubuntu 22.04 Essentials. Buy the full book now in eBook ($24.99) format. Includes 36 chapters. Learn more. |
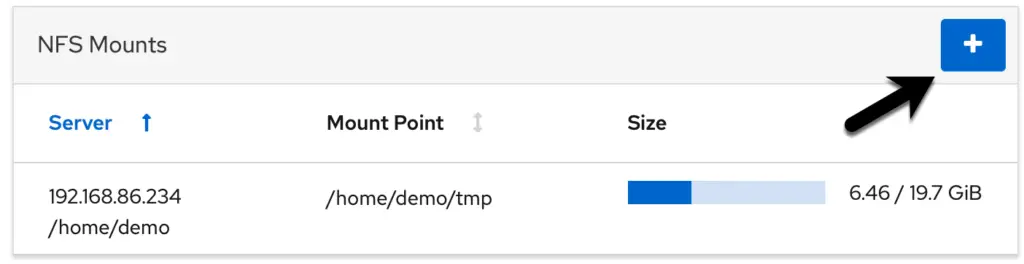
Figure 22-1
To mount a remote filesystem, click on the ‘+’ button highlighted above and enter information about the remote NFS server and file system share together with the local mount point and any necessary options into the resulting dialog before clicking on the Add button:
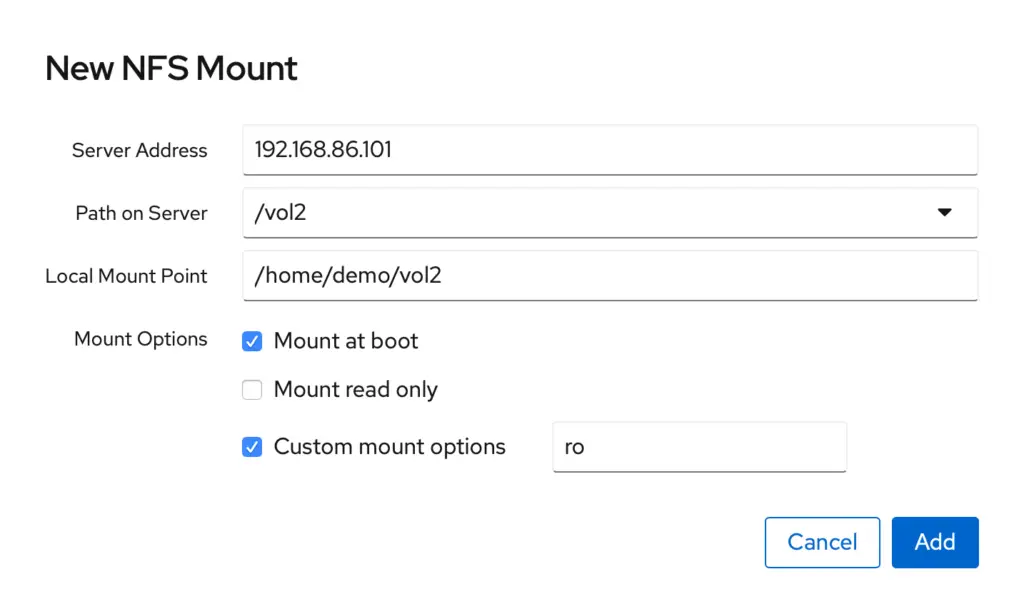
Figure 22-2
To modify, unmount or remove an NFS filesystem share, select the corresponding mount in the NFS Mounts list (Figure 22-1 above) to display the page shown in Figure 22-3 below:

Figure 22-3
|
You are reading a sample chapter from Ubuntu 22.04 Essentials. Buy the full book now in eBook ($24.99) format. Includes 36 chapters. Learn more. |
Summary
The Network File System (NFS) is a client/server-based system, originally developed by Sun Microsystems, which provides a way for Linux and Unix systems to share filesystems over a network. NFS allows a client system to access and (subject to permissions) modify files located on a remote server as though those files are stored on a local filesystem. This chapter has provided an overview of NFS and outlined the options available for configuring both client and server systems using the command-line or the Cockpit web interface.