In the previous chapter, we looked at installing Ubuntu on the same disk as Windows. This so-called “dual boot” configuration allows the user to have both operating systems installed on a single disk drive with the option to boot one or the other when the system is powered on. This chapter is intended for users who have decided they like Ubuntu enough to delete Windows entirely from the disk and use the resulting space for Linux. In the following sections, we will work through this process step by step using both the command-line tools and the gnome-disks utility.
Unmounting the Windows Partition
If the steps in the Dual Booting Ubuntu 22.04 with Windows chapter were followed to mount the Windows partition from within Ubuntu, steps should be taken to unmount the partition before continuing with this chapter. Assuming that the Windows partition was mounted as /mnt/windows, it can be unmounted as follows:
# umount /mnt/windowsCode language: plaintext (plaintext)The /etc/fstab file should also be edited to remove the /mnt/windows auto-mount if it was previously added.
Deleting the Windows Partitions from the Disk
The first step in freeing up the Windows partition for use by Ubuntu is to delete that partition. Before doing so, however, any data you need to keep must be backed up from both the Windows and partitions. Having done that, it is safe to proceed with this chapter.
To remove the Windows partitions, we first need to identify the disk on which they reside using the fdisk tool:
 |
You are reading a sample chapter from Ubuntu 22.04 Essentials. Buy the full book now in eBook ($24.99) format. Includes 36 chapters. Learn more. |
# fdisk -l
Disk /dev/nvme0n1: 64 GiB, 68719476736 bytes, 134217728 sectors
Disk model: VMware Virtual NVMe Disk
Units: sectors of 1 * 512 = 512 bytes
Sector size (logical/physical): 512 bytes / 512 bytes
I/O size (minimum/optimal): 512 bytes / 512 bytes
Disklabel type: gpt
Disk identifier: F0D04B58-29F5-4B6B-B10F-07295BEF9AAC

Device             Start       End  Sectors  Size Type
/dev/nvme0n1p1      2048    206847   204800  100M EFI System
/dev/nvme0n1p2    206848    239615    32768   16M Microsoft reserved
/dev/nvme0n1p3    239616  80184560 79944945 38.1G Microsoft basic data
/dev/nvme0n1p4 132833280 134213631  1380352  674M Windows recovery environment
/dev/nvme0n1p5  80185344 132833279 52647936 25.1G Linux filesystemCode language: plaintext (plaintext)
In the above example output, the system contains one physical disk drive referenced by device name /dev/nvme0n1. On that disk drive are six partitions accessed via the device names /dev/ nvme0n1p1 through /dev/nvme0n1p5, respectively. Based on the values in the Types column, three Windows-related partitions exist. The first is the Windows system partition, while the second, much larger, partition is the Windows boot partition containing the Windows operating system and user data, followed by the Windows recovery partition.
To remove the partitions, start the fdisk tool using the device name of the disk containing the partition (/dev/nvme0n1 in this instance) and follow the instructions to display the partition and sector information once again:
# fdisk /dev/nvme0n1

Welcome to fdisk (util-linux 2.37.2).
Changes will remain in memory only, until you decide to write them.
Be careful before using the write command.

Command (m for help): p

 Disk /dev/nvme0n1: 64 GiB, 68719476736 bytes, 134217728 sectors
Disk model: VMware Virtual NVMe Disk
Units: sectors of 1 * 512 = 512 bytes
Sector size (logical/physical): 512 bytes / 512 bytes
I/O size (minimum/optimal): 512 bytes / 512 bytes
Disklabel type: gpt
Disk identifier: F0D04B58-29F5-4B6B-B10F-07295BEF9AAC

Device             Start       End  Sectors  Size Type
/dev/nvme0n1p1      2048    206847   204800  100M EFI System
/dev/nvme0n1p2    206848    239615    32768   16M Microsoft reserved
/dev/nvme0n1p3    239616  80184560 79944945 38.1G Microsoft basic data
/dev/nvme0n1p4 132833280 134213631  1380352  674M Windows recovery environment
/dev/nvme0n1p5  80185344 132833279 52647936 25.1G Linux filesystem

Partition table entries are not in disk order.

Command (m for help):
Code language: plaintext (plaintext)
Before proceeding, note the start and end addresses of the partitions we will delete (in other words, the start of /dev/nvme0n1p2 and the sector before the start of /dev/nvme0n1p5).
At the command prompt, delete the Windows partitions (these being partitions 2, 3, and 4 on our example system):
Command (m for help): d
Partition number (1-5, default 5): 2

Partition 2 has been deleted.

Command (m for help): d
Partition number (1,3-5, default 5): 3

Partition 3 has been deleted.

Command (m for help): d
Partition number (1,4,5, default 5): 4

Partition 4 has been deleted.Code language: plaintext (plaintext)
Now that we have deleted the Windows partitions, we must create the new Ubuntu partition in the vacated disk space. The partition number must match the number of the first partition removed (in this case, 2). It will also be necessary to enter the Start and End sectors of the partition precisely as reported for the old partition (fdisk will typically offer the correct values by default, though it is wise to double-check):
|
You are reading a sample chapter from Ubuntu 22.04 Essentials. Buy the full book now in eBook ($24.99) format. Includes 36 chapters. Learn more. |
Command (m for help): n
Partition number (2-4,6-128, default 2): 2
First sector (206848-134217694, default 206848):
Last sector, +/-sectors or +/-size{K,M,G,T,P} (206848-80185343, default 80185343):

Created a new partition 2 of type 'Linux filesystem' and of size 38.1 GiB.Code language: plaintext (plaintext)
Having made these changes, the next step is to check that the settings are correct:
Command (m for help): p
Disk /dev/nvme0n1: 64 GiB, 68719476736 bytes, 134217728 sectors
Disk model: VMware Virtual NVMe Disk
Units: sectors of 1 * 512 = 512 bytes
Sector size (logical/physical): 512 bytes / 512 bytes
I/O size (minimum/optimal): 512 bytes / 512 bytes
Disklabel type: gpt
Disk identifier: F0D04B58-29F5-4B6B-B10F-07295BEF9AAC

Device            Start       End  Sectors  Size Type
/dev/nvme0n1p1     2048    206847   204800  100M EFI System
/dev/nvme0n1p2   206848  80185343 79978496 38.1G Linux filesystem
/dev/nvme0n1p5 80185344 132833279 52647936 25.1G Linux filesystemCode language: plaintext (plaintext)
To commit the changes, we now need to write the new partition information to disk and quit from the fdisk tool:
Command (m for help): w
The partition table has been altered.
Syncing disks.Code language: plaintext (plaintext)
Formatting the Unallocated Disk Partition
To make the new partition suitable for use by Ubuntu, it needs to have a file system created on it. The recommended file system type for the current release of Ubuntu is XFS which will be covered in greater detail in the chapter entitled Adding a New Disk Drive to an Ubuntu 22.04 System. Creation of the file system is performed using the mkfs.xfs command as follows (installing the xfsprogs package if necessary):
# apt install xfsprogs
# mkfs.xfs -f /dev/nvme0n1p2
meta-data=/dev/nvme0n1p2         isize=512    agcount=4, agsize=2499328 blks
         =                       sectsz=512   attr=2, projid32bit=1
         =                       crc=1        finobt=1, sparse=1, rmapbt=0
         =                       reflink=1    bigtime=0 inobtcount=0
data     =                       bsize=4096   blocks=9997312, imaxpct=25
         =                       sunit=0      swidth=0 blks
naming   =version 2              bsize=4096   ascii-ci=0, ftype=1
log      =internal log           bsize=4096   blocks=4881, version=2
         =                       sectsz=512   sunit=0 blks, lazy-count=1
realtime =none                   extsz=4096   blocks=0, rtextents=0Code language: plaintext (plaintext)
Mounting the New Partition
Next, we need to mount the new partition. In this example, we will mount it in a directory named /data. You are free, however, to mount the new partition using any valid mount point you desire or to use it as part of a logical volume (details of which are covered in the chapter entitled Adding a New Disk to an Ubuntu 22.04 Volume Group and Logical Volume). First, we need to create the directory to act as the mount point:
# mkdir /dataCode language: plaintext (plaintext)Secondly, we need to edit the mount table in /etc/fstab so that the partition is automatically mounted each time the system starts. At the bottom of the /etc/fstab file, add the following line to mount the new partition (modifying the /dev/nvme0n1p2 device to match your environment):
|
You are reading a sample chapter from Ubuntu 22.04 Essentials. Buy the full book now in eBook ($24.99) format. Includes 36 chapters. Learn more. |
/dev/nvme0n1p2 /data xfs defaults 0 0Code language: plaintext (plaintext)Finally, we can manually mount the new partition (note that this will not be necessary on subsequent reboots as the partition will automount due to the setting we added to the /etc/fstab file above):
# mount /dataCode language: plaintext (plaintext)To check the partition, run the following command to display the available space:
# df -h /data
Filesystem      Size  Used Avail Use% Mounted on
/dev/nvme0n1p2   39G  305M   38G   1% /dataCode language: plaintext (plaintext)
Editing the Boot Menu
The next step is to modify the Ubuntu boot menu. Since this was originally a dual boot system, the menu is configured to provide the option of booting either Windows or Ubuntu. Now that the Windows partition is gone, we need to remove this boot option. On Ubuntu, this can be achieved using the following steps:
# rm -r /boot/efi/EFI/Microsoft
# update-grub
Code language: plaintext (plaintext)
Since there is now only one operating system to boot, the system will automatically boot Ubuntu on the next restart without displaying the boot menu. If you need to access this boot menu, for example, to use the advanced boot options, simply press the Esc key during the initial stages of the startup process.
Using GNOME Disks Utility
The gnome-disks utility provides a user-friendly graphical alternative to reclaiming the Windows partitions from the command-line. Since the example used here will convert the Windows NTFS partitions to XFS format, the first step is to install the xfsprogs package as follows:
|
You are reading a sample chapter from Ubuntu 22.04 Essentials. Buy the full book now in eBook ($24.99) format. Includes 36 chapters. Learn more. |
# apt install xfsprogsCode language: plaintext (plaintext)Once the package has been installed, open a terminal window and launch the gnome-disks utility:
# gnome-disksCode language: plaintext (plaintext)After a short delay, the gnome-disks tool will appear as shown in Figure 5-1:
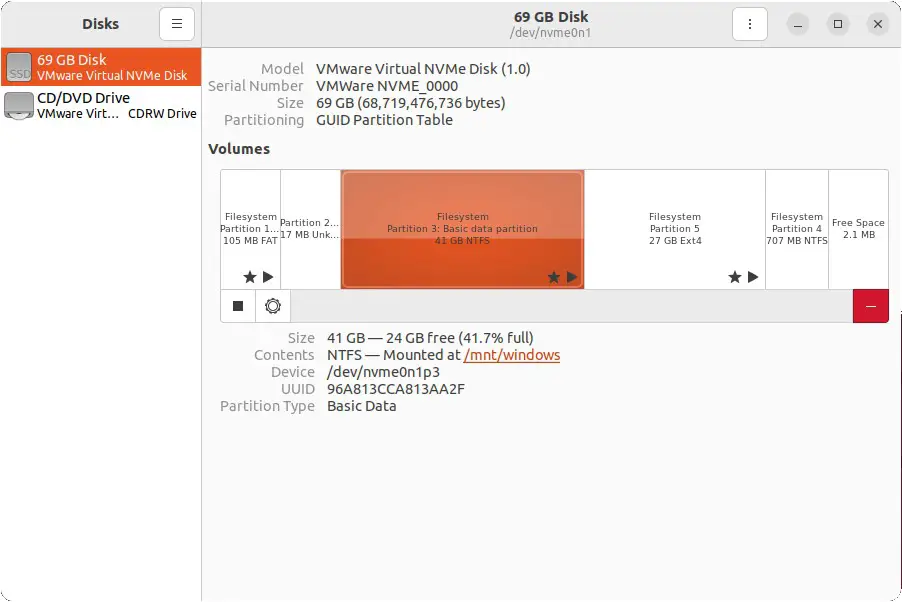
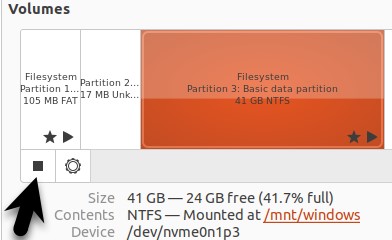
In the above example, the disk contains two Windows NTFS partitions that will need to be deleted. Any NTFS partitions with a star shown in the disk map (as is the case for the highlighted partition in the above figure) will need to be unmounted before they can be deleted. This can be achieved by selecting the partition and clicking on the unmount button as indicated in Figure 5-2 below:
With all the NTFS partitions unmounted, the next step is to delete them. Select the left-most partition in the disk map and click on the Delete button as shown in Figure 5-3:
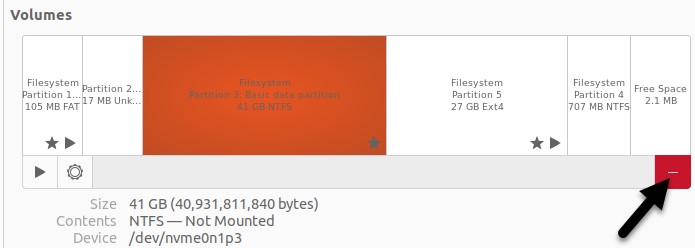
Review the information in the confirmation dialog before clicking on the Delete button to commit the change. Once the first partition has been deleted, repeat this step for any remaining NTFS partitions.
|
You are reading a sample chapter from Ubuntu 22.04 Essentials. Buy the full book now in eBook ($24.99) format. Includes 36 chapters. Learn more. |
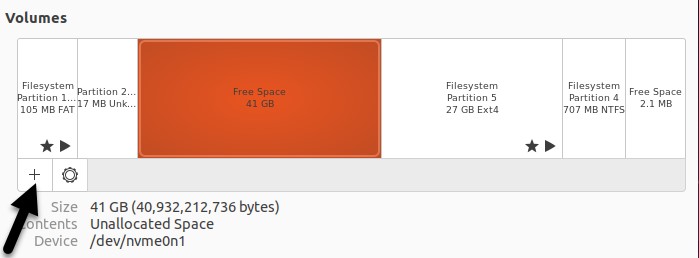
Once the NTFS partitions have been removed, the space should now be shown as being free within the disk map.
A new partition now needs to be created to make use of this free space. With the space selected, click on the new partition button (indicated by the arrow in Figure 5-4):
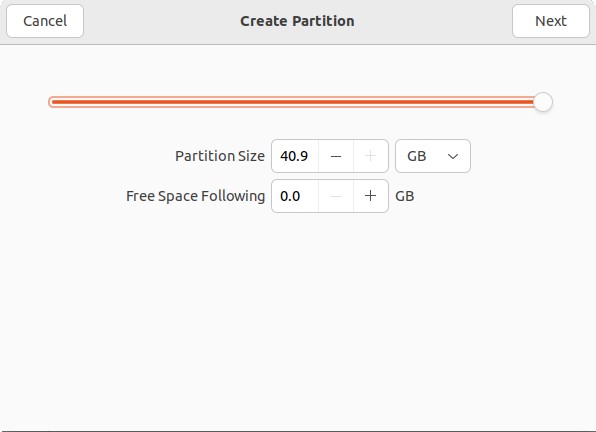
In the Create Partition dialog, choose whether the partition is to occupy all of the available space, or reduce the size if you plan to use the space for more than one partition:
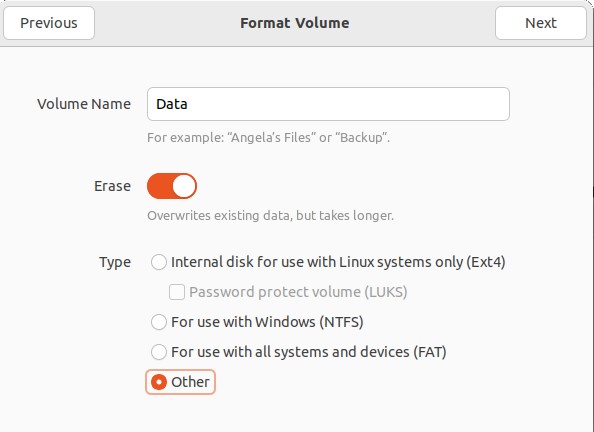
Click Next and, on the subsequent screen, enter a name for the new partition and choose whether the partition should be erased during creation. This causes the creation process to take more time but is a recommended option. Finally, choose a filesystem type for the partition. This will typically be either ext4 or XFS. Given the benefits of XFS, select Other before clicking the Next button.
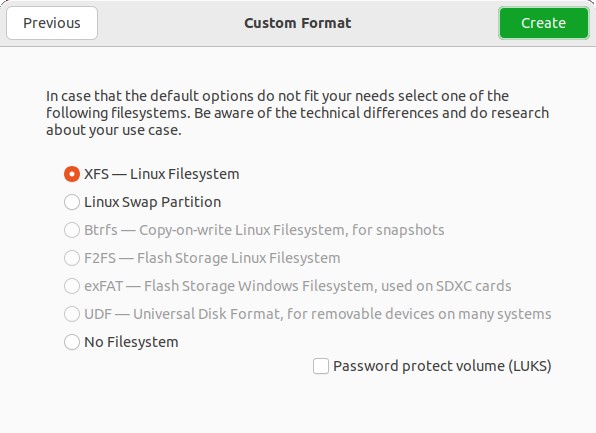
On the next screen, select the XFS option before clicking on the Create button:
|
You are reading a sample chapter from Ubuntu 22.04 Essentials. Buy the full book now in eBook ($24.99) format. Includes 36 chapters. Learn more. |
The gnome-disks utility will begin the formatting process and display the status of the process:

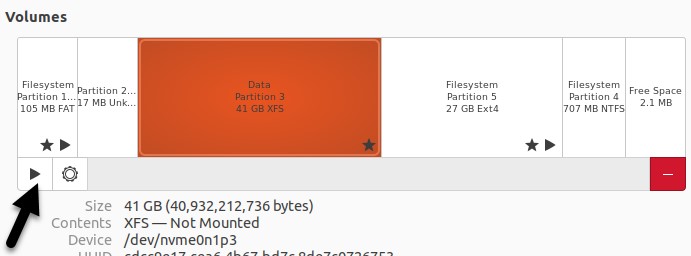
Once the partition is ready, it can be mounted either from the command line or using the gnome-disks utility. To configure a mount point, select the partition and click on the settings button as shown in Figure 5-9:
From the settings menu, select the Edit Mount Options… item to display the dialog shown in Figure 5-10.
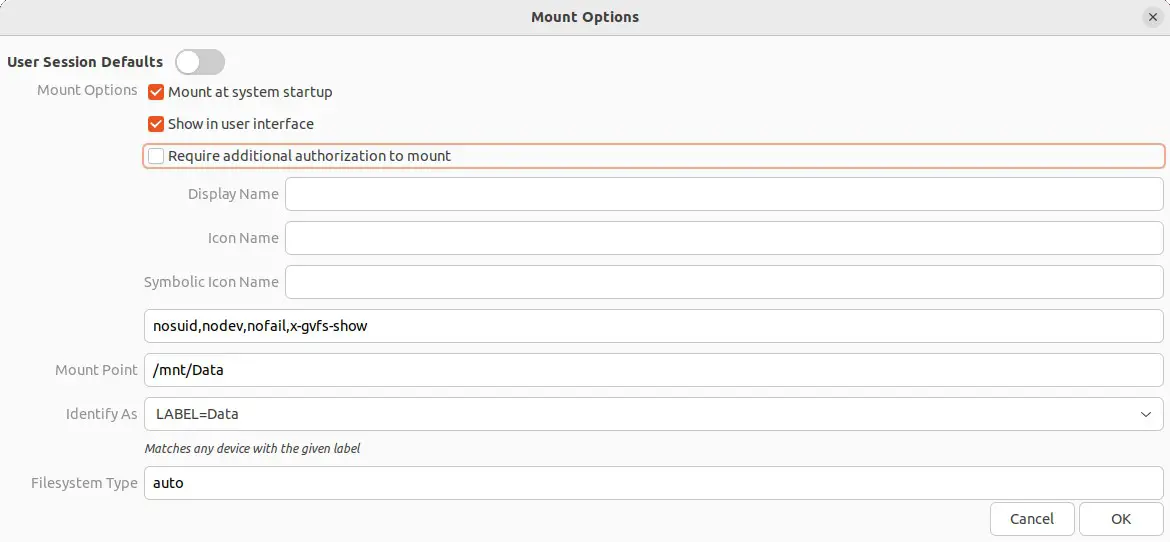
Turn off the User Session Defaults switch and configure the mount point to your requirements. In the above figure, the partition is mounted at /mnt/Data at system startup and is configured to be identified by the label “Data”.
Once the settings are complete, click on OK, then click the mount button highlighted in Figure 5-11:
|
You are reading a sample chapter from Ubuntu 22.04 Essentials. Buy the full book now in eBook ($24.99) format. Includes 36 chapters. Learn more. |

To check the partition is now mounted and ready for use, run the following command to display the available space:
$ df -h /mnt/Data
Filesystem Size Used Avail Use% Mounted on
/dev/sda1 39G 305M 38G 1% /mnt/DataCode language: plaintext (plaintext)
Finally, update the boot menu to remove the Windows option using the steps outlined earlier in this chapter.
Summary
The Windows partitions in a dual boot configuration can be removed anytime to free up space for a Ubuntu system by identifying which partitions belong to Windows and then deleting them. Once deleted, the unallocated space can be used to create a new filesystem and mounted to make it available to the Ubuntu system.