
The previous chapters introduced and demonstrated the concepts of integrating animation into Android app user interfaces using the MotionLayout container combined with the features of the Android Studio MotionLayout editor. The chapter entitled “An Introduction to MotionLayout” briefly mentioned the cycle (KeyCycle) and time cycle (KeyTimeCycle) key frames and explained how these can be used to implement animations involving large numbers of repetitive state changes.
This chapter will cover cycle key frames in more detail before demonstrating how to make use of them in an example project using Android Studio and the Cycle Editor.
An Overview of Cycle Keyframes
Clearly, position keyframes can be used to add intermediate state changes into the animation timeline. While this works well for small numbers of state changes, it would be cumbersome to implement in larger quantities. To make a button shake 50 times when tapped to indicate that an error occurred, for example, would involve the manual creation of 100 position keyframes to perform small clockwise and anti-clockwise rotations. Similarly, to implement a bouncing effect on a view as it moves across the screen would be an equally time consuming task.
For situations where state changes need to be performed repetitively, MotionLayout includes the Cycle and Time Cycle keyframes. Both perform the same tasks, with the exception that KeyCycle frames are based on frame positions within an animation path, while KeyTimeCycles are time-based in cycles per second (Hz).
Using these KeyCycle frames, the animation timeline is essentially divided up into subsections (referred to as cycles), each containing one or more waves that define how a property of a view is to be modified throughout the timeline. To create a KeyCycle cycle, the following information is required:
- target view – The id of the view on which the changes are to be made.
- frame position – The position in the timeline at which the cycle is to start.
- wave period – The number of waves to be included in the cycle.
- attribute – The property of the view that is to be modified by the waves.
- wave offset – Offsets the cycle by the specified amount from the keyframe baseline.
- wave shape – The shape of the wave (sin, cos, sawtooth, square, triangle, bounce or reverse sawtooth) Consider the following cycle key frame set:
<KeyFrameSet>
   <KeyCycle
       motion:framePosition="0"
       motion:motionTarget="@+id/button"
       motion:wavePeriod="1"
       motion:waveOffset="0dp"
       motion:waveShape="sin"
       android:translationY="50dp"/>

   <KeyCycle
       motion:framePosition="25"
       motion:motionTarget="@+id/button"
       motion:wavePeriod="1"
       motion:waveOffset="0dp"
       motion:waveShape="sin"
       android:translationY="50dp"/>

   <KeyCycle
       motion:framePosition="50"
       motion:motionTarget="@+id/button"
       motion:wavePeriod="1"
       motion:waveOffset="0dp"
       motion:waveShape="sin"
       android:translationY="50dp"/>

   <KeyCycle
       motion:framePosition="75"
       motion:motionTarget="@+id/button"
       motion:wavePeriod="1"
       motion:waveOffset="0dp"
       motion:waveShape="sin"
       android:translationY="50dp"/>

   <KeyCycle
       motion:framePosition="100"
       motion:motionTarget="@+id/button"
       motion:wavePeriod="1"
       motion:waveOffset="0dp"
       motion:waveShape="sin"
       android:translationY="50dp"/>
</KeyFrameSet>Code language: HTML, XML (xml)
The above key frame set divides the timeline into four equal cycles. Each cycle is configured to contain a sin wave shape which adjusts the translationY property of a button 50dp. When executed, this animation will cause the button to oscillate vertically multiple times within the specified range. This key frame set can be visualized as shown in Figure 45-1 where the four dots representing the key frame positions:
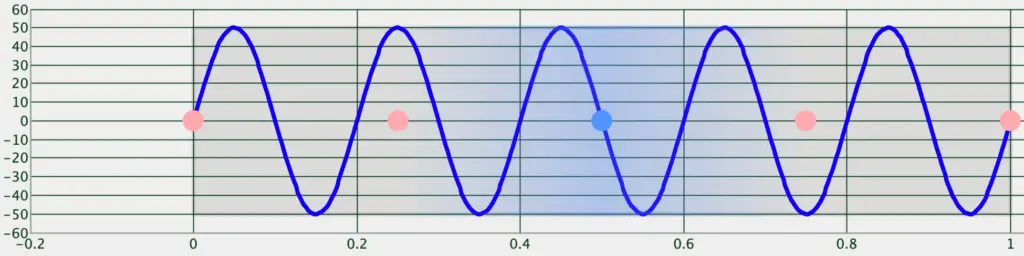
Figure 45-1
As currently implemented, each cycle contains a single wave. Suppose that instead of these evenly distributed waves, we need four waves within the last cycle. This can easily be achieved by increasing the wavePeriod property for the last KeyCycle element as follows:
.
.
    <KeyCycle
       motion:framePosition="75"
       motion:motionTarget="@+id/button"
       motion:wavePeriod="4"
       motion:waveOffset="0dp"
       motion:waveShape="sin"
       android:translationY="50dp"/>
.
.Code language: HTML, XML (xml)
After making this change, the frame set can be rendered in wave form as follows:
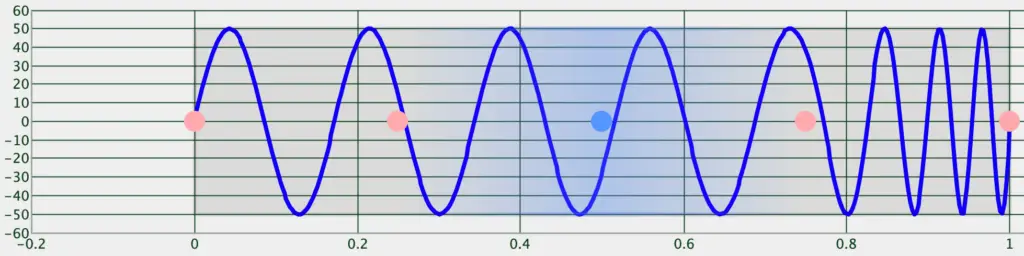
Figure 45-2
So far the examples in this chapter have been using sin waves. In fact, a number of different wave shapes are available when working with cycle key frames in MotionLayout. Figure 45-3, for example, illustrates the effect of changing the waveShape property for all the cycle key frames to the sawtooth wave shape:
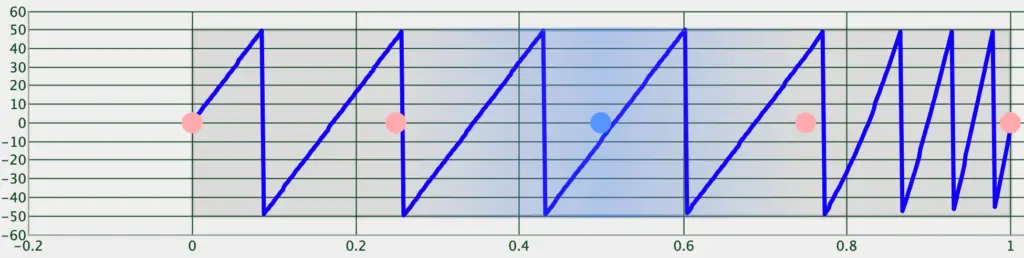
Figure 45-3
In addition to sin and sawtooth, MotionLayout also supports triangle, square, bounce and reverseSawtooth wave shapes.
In the above examples, each cycle moves the button within the same range along the Y-axis. Suppose, however, that we need the second cycle to move the button a greater distance along the positive Y-axis. This involves making an adjustment to the waveOffset property of the second cycle as follows:
<KeyCycle
        motion:framePosition="25"
        motion:target="@+id/button"
        motion:wavePeriod="1"
        motion:waveOffset="100dp"
        motion:waveShape="sin"
        android:translationY="50dp"/>Code language: HTML, XML (xml)
By making this change, we end up with a timeline that resembles Figure 45-4:

Figure 45-4
The movement of the button during the second cycle will now range between approximately 0 and 150dp on the Y-axis. If we still need the lower end of the range to match the other waves we can, of course, add 100dp to the translationY value:
<KeyCycle
        motion:framePosition="25"
        motion:target="@+id/button"
        motion:wavePeriod="1"
        motion:waveOffset="100dp"
        motion:waveShape="sin"
        android:translationY="150dp"/>Code language: HTML, XML (xml)
This change now gives us the following wave form:
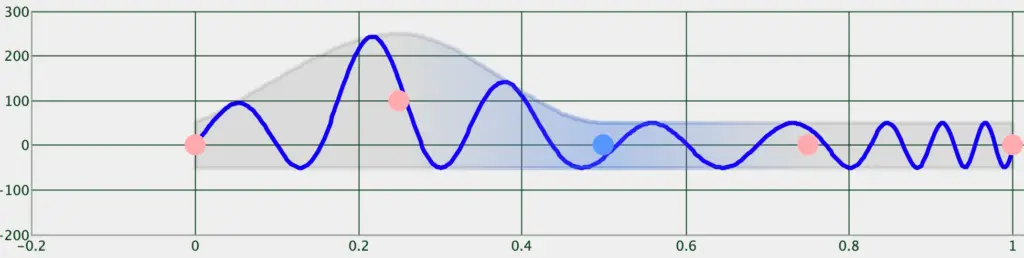
Figure 45-5
Using the Cycle Editor
Although not particularly complicated, it can take some time to get the exact cycle configuration you need by directly editing XML KeyCycle entries in the MotionScene file. In recognition of this fact, the Android engineers at Google have developed the Cycle Editor. This is a separate Java-based utility that is not yet part of Android Studio. The Cycle Editor allows you to visually design and test cycle key frame sets.
The Cycle Editor tool is provided in the form of a Java archive (jar) file which will require that the Java runtime be installed on your development system. Steps to install Java will vary depending on your operating system.
Once you have Java installed, the CycleEditor.jar file can be downloaded from the following URL:
Once downloaded, open a command-prompt or terminal window, change directory to the location of the jar file and run the following command:
java -jar CycleEditor.jarCode language: plaintext (plaintext)Once the tool has loaded the screen shown in Figure 45-6 will appear:
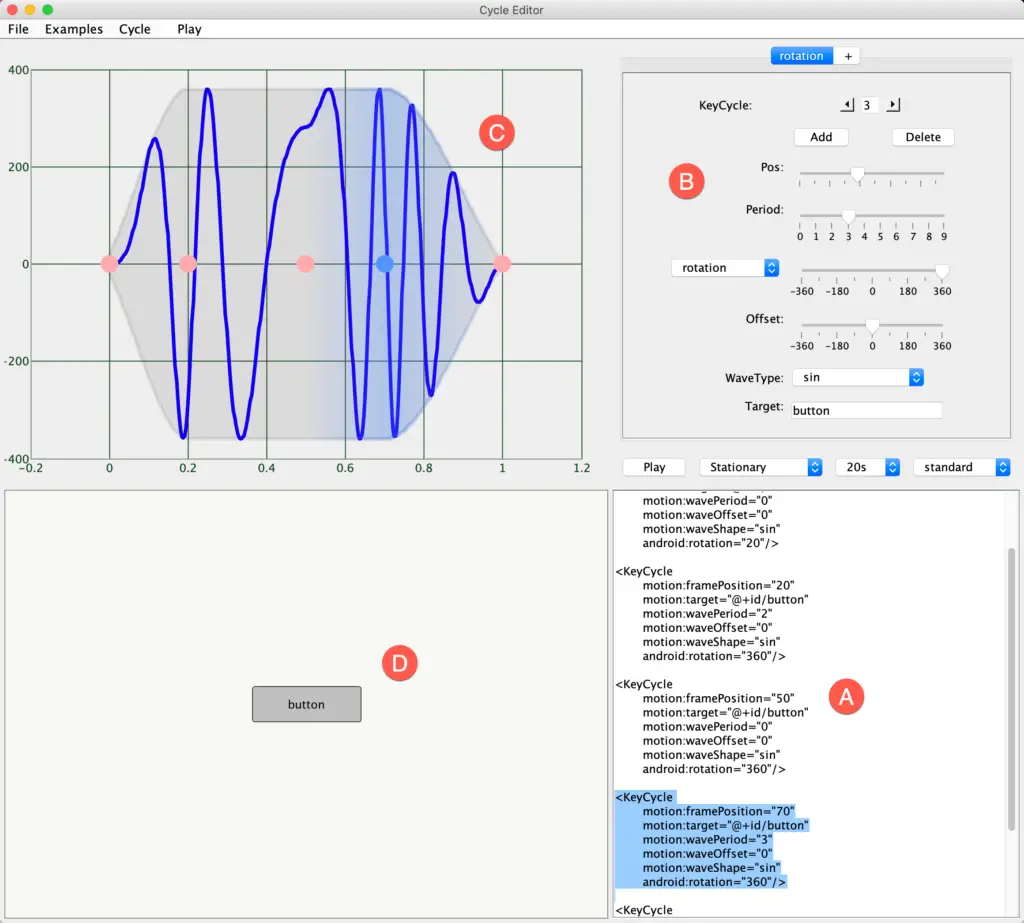
Figure 45-6
The panel marked A in the above figure displays the XML for the keyframe set and can be edited either directly or using the controls in panel B. Panel C displays the rendering of the cycles in wave form. Unfortunately, this is not redrawn in real-time as changes are made. Instead, it must be refreshed by selecting the File -> Parse XML menu option. The panel marked D will show a live rendering of the cycle animations when the play button in panel B is clicked. The Examples menu provides access to a collection of example key frame sets which can be used both for learning purposes and as the basis for your own animations.
To demonstrate the use of both the Cycle Keyframe and the Cycle Editor, the remainder of this chapter will create a sample project which implements a KeyCycle-based animation effect.
Creating the KeyCycleDemo Project
Select the Start a new Android Studio project quick start option from the welcome screen and, within the resulting new project dialog, choose the Empty Activity template before clicking on the Next button.
Enter KeyCycleDemo into the Name field and specify com.ebookfrenzy.keycycledemo as the package name. Before clicking on the Finish button, change the Minimum API level setting to API 26: Android 8.0 (Oreo) and the Language menu to Java.
MotionLayout requires version 2.0.0 or later of the androidx.constraintlayout library. To check that the project is using this library, edit the Gradle Scripts -> build.gradle (Module: app) file and locate the ConstraintLayout dependency entry:
dependencies {
.
.
    implementation 'androidx.constraintlayout:constraintlayout:2.0.0-beta6'
}Code language: Gradle (gradle)
If the file does not reference at least version 2.0.0 of the library, edit the file so that it reads as above before clicking on the Sync Now link at the top of the editor window. Having modified the reference, select File -> Project Structure… followed by the Suggestions option to check if a more recent library update version than the one shown above is available. If a newer version is listed, click on the corresponding Update button followed by Apply to update the Gradle file.
With the layout editor in Design mode and the activity_main.xml file open, right-click on the ConstraintLayout entry and select the Convert to MotionLayout menu option:
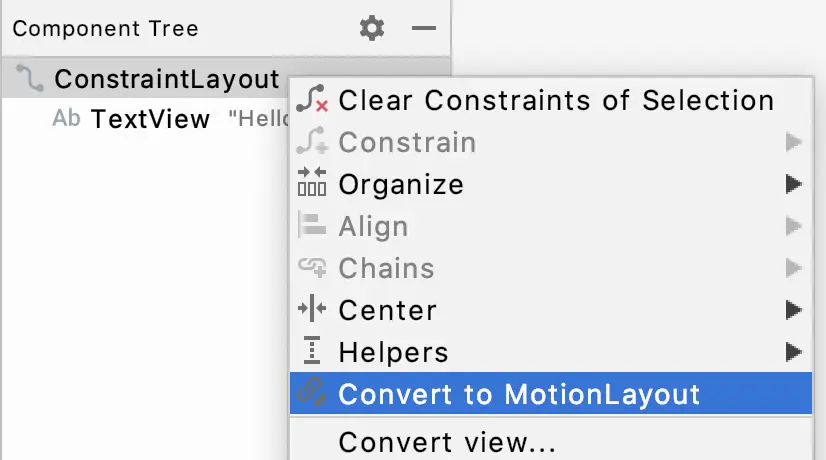
Figure 45-7
After making the selection, click on the Convert button in the confirmation dialog.
Configuring the Start and End Constraints
The objective of this tutorial is to animate the movement of a button from one side of the device screen to the other including KeyCycle effects that cause the view to also move up and down along the Y-axis. The first step is to configure the start and end constraints.
With the activity_main.xml file loaded into the MotionLayout editor, select and delete the default TextView widget. Make sure the Motion Layout box (marked E in Figure 45-9 below) is selected before dragging and dropping a Button view from the palette so that it is centered vertically and positioned along the left-hand edge of the layout canvas:
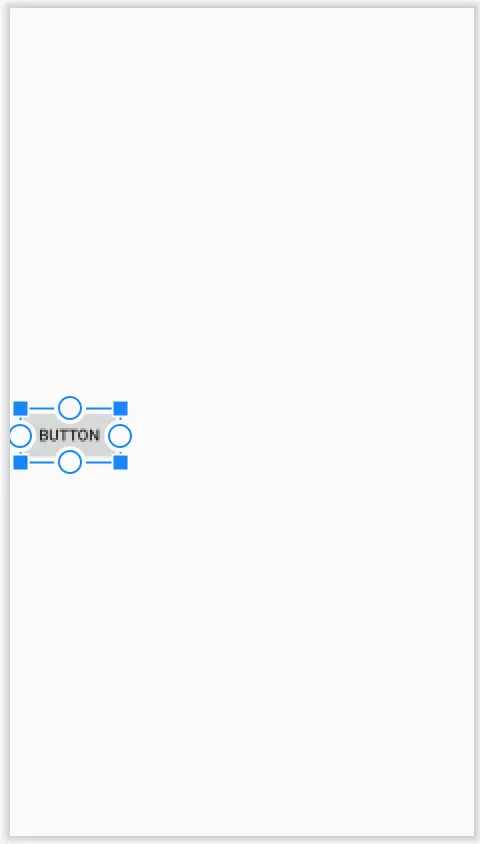
Figure 45-8
To configure the constraints for the start point, select the start constraint set entry in the editor window (marked A in Figure 45-9):
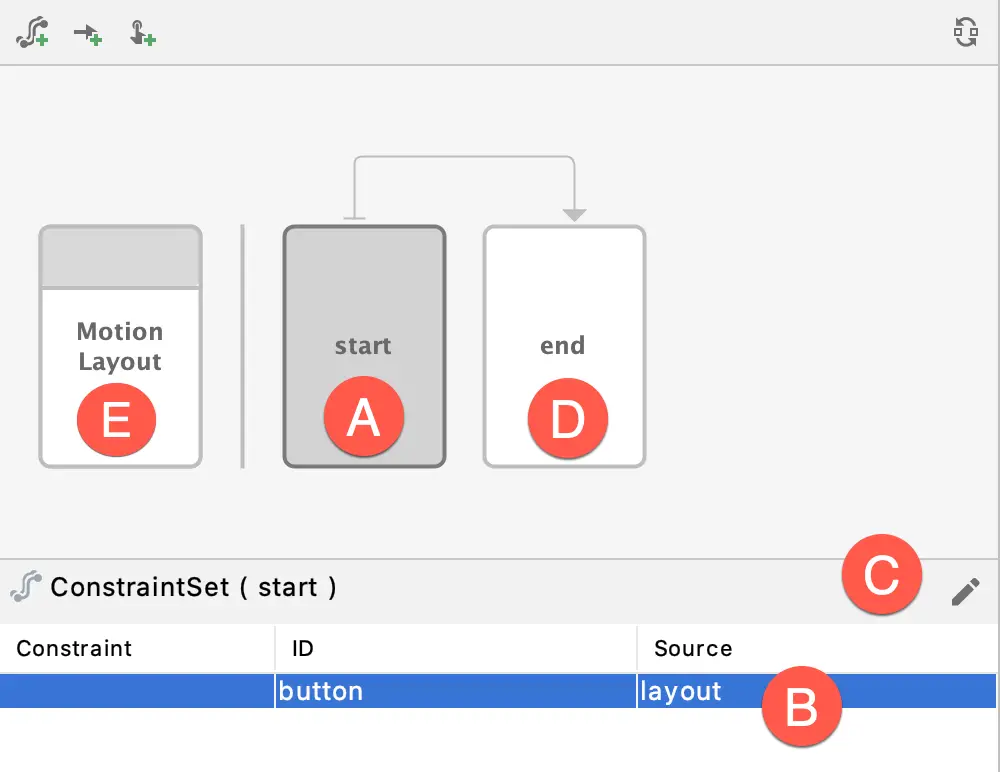
Figure 45-9
Next, select the button entry within the ConstraintSet list (B). With the button entry still selected, click on the edit button (C) and select Create Constraint from the menu.
With the button still selected, use the Attributes tool window to set constraints on the top, left and bottom sides of the view as follows:
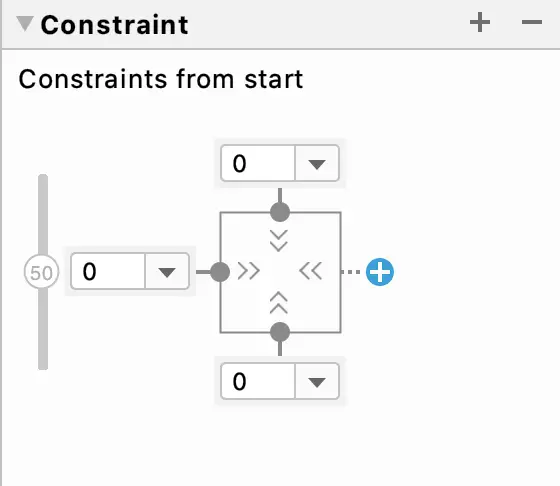
Figure 45-10
Select the end constraint set entry (marked D in Figure 45-9 above) and repeat the steps to create a new constraint, this time with constraints on the top, bottom and right-hand edges of the button:
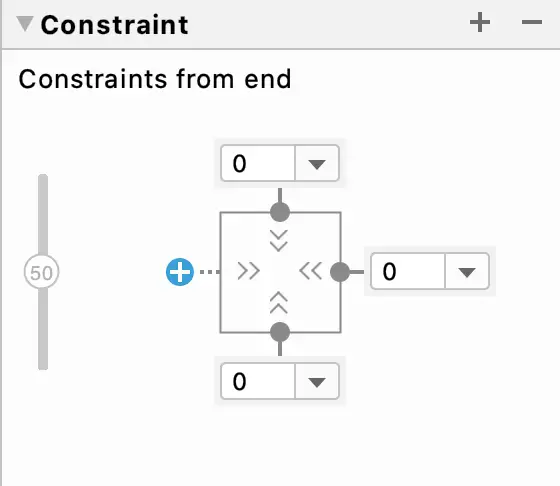
Figure 45-11
Creating the Cycles
The next step is to use the Cycle Editor to generate the cycle key frames for the animation. With the Cycle Editor running, refer to the control panel shown in Figure 45-12 below:
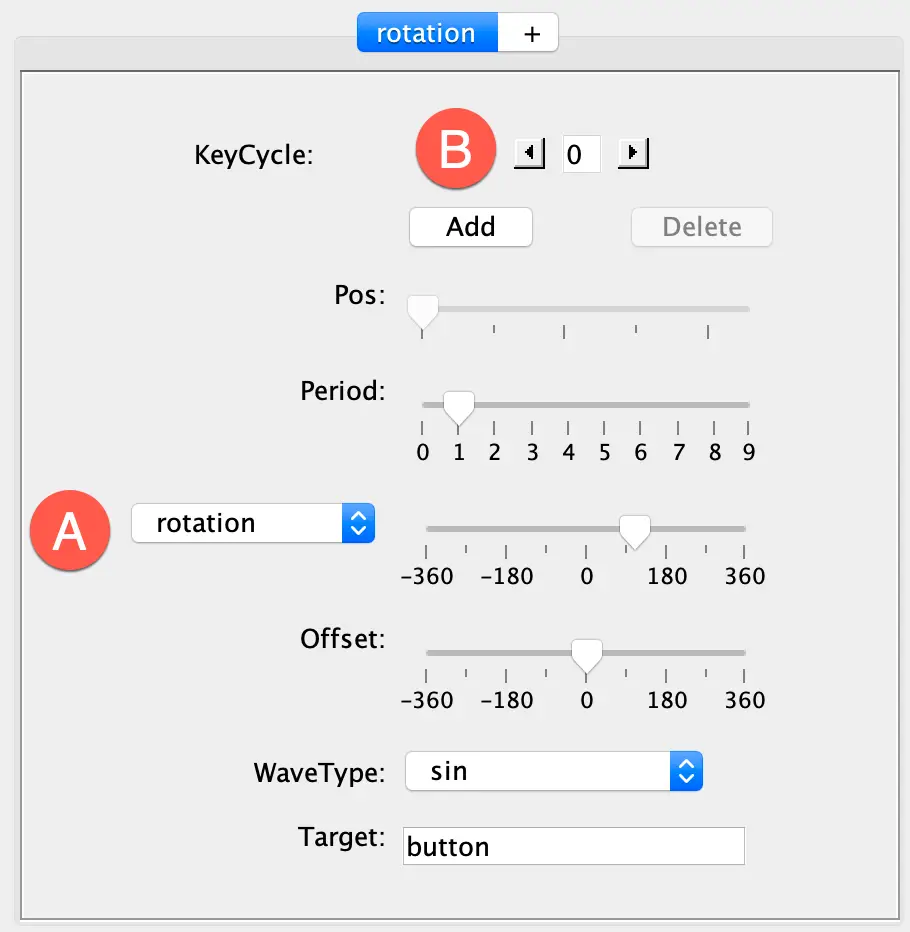
Figure 45-12
Using the menu marked A, change the property to be modified from rotation to translationY.
Next, use the KeyCycle control (B) to select cycle 0 so that changes made elsewhere in the panel will be applied to the first cycle. Move the Period slider to 1 and the translationY slider to 60 as shown in Figure 45-13 (refer to the XML panel to see the precise setting for the translationY value as you move the slider):
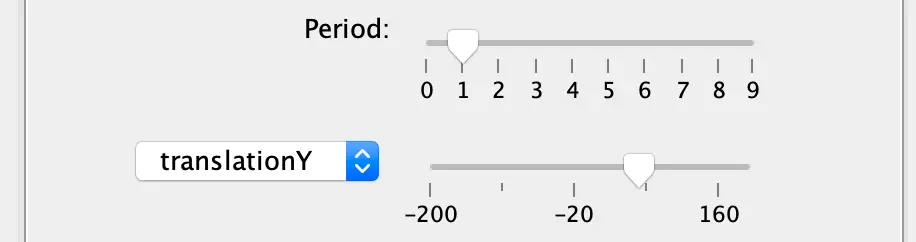
Figure 45-13
To see the changes so far in the graph, select the File -> Parse XML menu option. Using the values listed in Table 45-1, configure the settings for KeyFrames 1 through 4 (keeping in mind that you have already configured the settings in the KeyCycle 0 column):
| KeyCycle 0 | KeyCycle 1 | KeyCycle 2 | KeyCycle 3 | KeyCycle 4 | |
| Position | 0 | 25 | 50 | 75 | 100 |
| Period | 1 | 2 | 3 | 2 | 1 |
| translationY | 60 | 60 | 150 | 60 | 60 |
Table 45-1
On completion of these changes, the key frame set XML should read as follows:
<KeyFrameSet>
   <KeyCycle
       motion:framePosition="0"
       motion:motionTarget="@+id/button"
       motion:wavePeriod="1"
       motion:waveOffset="0dp"
       motion:waveShape="sin"
       android:translationY="60dp"/>

   <KeyCycle
       motion:framePosition="25"
       motion:motionTarget="@+id/button"
       motion:wavePeriod="2"
       motion:waveOffset="0dp"
       motion:waveShape="sin"
       android:translationY="60dp"/>

   <KeyCycle
       motion:framePosition="50"
       motion:motionTarget="@+id/button"
       motion:wavePeriod="3"
       motion:waveOffset="0dp"
       motion:waveShape="sin"
       android:translationY="150dp"/>

   <KeyCycle
       motion:framePosition="75"
       motion:motionTarget="@+id/button"
       motion:wavePeriod="2"
       motion:waveOffset="0dp"
       motion:waveShape="sin"
       android:translationY="60dp"/>

   <KeyCycle
       motion:framePosition="100"
       motion:motionTarget="@+id/button"
       motion:wavePeriod="1"
       motion:waveOffset="0dp"
       motion:waveShape="sin"
       android:translationY="60dp"/>
</KeyFrameSet>Code language: HTML, XML (xml)
To view the graph with the new cycles, select the File -> Parse XML menu option to refresh the wave pattern which should now appear as illustrated in Figure 45-14:
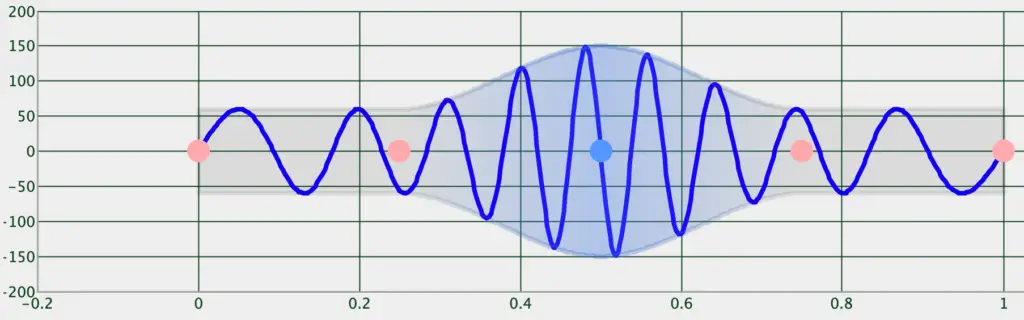
Figure 45-14
Previewing the Animation
The cycle-based animation may now be previewed from within the Cycle Editor tool. Start the animation running by clicking on the play button (marked A in Figure 45-15). To combine the cycles with horizontal movement, change the second menu (B) from Stationary to West to East. Also, take some time to experiment with the time and linearity settings (C and D).
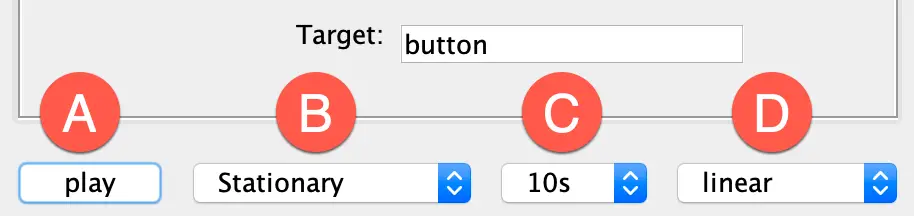
Figure 45-15
Adding the KeyFrameSet to the MotionScene
Within the Cycle Editor, highlight and copy the KeyCycle elements from the XML panel and paste them into the Transition section of the res -> xml -> activity_main_scene.xml file within Android Studio so that they are placed between the existing KeyFrameSet markers. Note also the increased duration setting and the addition of an OnClick handler to initiate the animation:
<Transition
    motion:constraintSetEnd="@+id/end"
    motion:constraintSetStart="@id/start"
    motion:duration="7000">
    <KeyFrameSet>
       <KeyCycle
           motion:framePosition="0"
           motion:motionTarget="@+id/button"
           motion:wavePeriod="1"
           motion:waveOffset="0dp"
           motion:waveShape="sin"
           android:translationY="60dp"/>

           <KeyCycle
               motion:framePosition="25"
.
.
   </KeyFrameSet>

   <OnClick motion:targetId="@id/button"
            motion:clickAction="toggle" />
.
.Code language: HTML, XML (xml)
Before proceeding check that each target property is correctly declared. At the time of writing, the Cycle Editor was using the outdated motion:target tag. For example:
motion:target="@+id/buttonCode language: HTML, XML (xml)This will need to be changed for each of the five KeyCycle entires to read as follows:
motion:motionTarget="@+id/buttonCode language: HTML, XML (xml)Once these changes have been made, compile and run the app on a device or emulator and click on the button to start and view the animation.
Note that the KeyCycle wave formation can also be viewed within the Android Studio MotionLayout editor as shown in Figure 45-16 below:
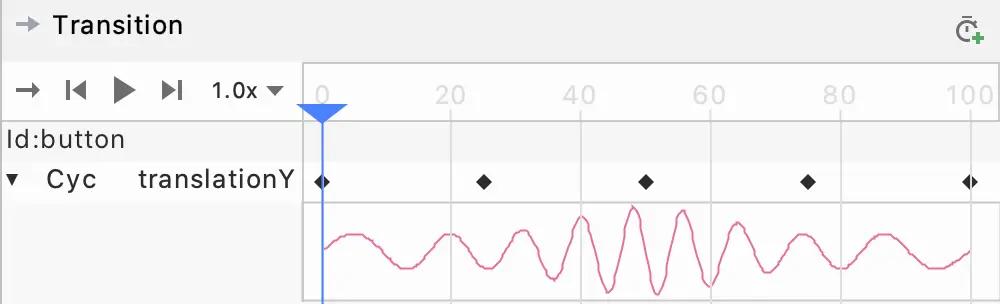
Figure 45-16
KeyCycle frame sets are not limited to one per animation. For example, add the following KeyFrameSet to the Transition section of the activity_main_scene.xml file to add some rotation effects to the button as it moves:
<KeyFrameSet>
    <KeyCycle
        motion:framePosition="0"
        motion:motionTarget="@+id/button"
        motion:wavePeriod="1"
        motion:waveOffset="0"
        motion:waveShape="sin"
        android:rotation="45"/>

    <KeyCycle
        motion:framePosition="25"
        motion:motionTarget="@+id/button"
        motion:wavePeriod="2"
        motion:waveOffset="0"
        motion:waveShape="sin"
        android:rotation="80"/>

    <KeyCycle
        motion:framePosition="50"
        motion:motionTarget="@+id/button"
        motion:wavePeriod="3"
        motion:waveOffset="0"
        motion:waveShape="sin"
        android:rotation="45"/>

    <KeyCycle
        motion:framePosition="75"
        motion:motionTarget="@+id/button"
        motion:wavePeriod="2"
        motion:waveOffset="0"
        motion:waveShape="sin"
        android:rotation="80"/>

    <KeyCycle
        motion:framePosition="100"
        motion:motionTarget="@+id/button"
        motion:wavePeriod="1"
        motion:waveOffset="0"
        motion:waveShape="sin"
        android:rotation="45"/>
</KeyFrameSet>Code language: HTML, XML (xml)
Summary
Cycle key frames provide a useful way to build frame animations that involve potentially large numbers of state changes that match wave patterns. As outlined in this chapter, the process of generating these cycle key frames can be eased significantly by making use of the Cycle Editor application.